ANSIBLE基础
ansible -自动化安装程序
1.简介
1.介绍
1.ansible是新出现的自动化运维工具,基于Python开发,集合了众多运维工具(puppet、cfengine、chef、func、fabric)的优点。
2.实现了批量系统配置、批量程序部署、批量运行命令等功能。
2.特点
1.没有客户端,通过ssh跟其他人进行连接。
2.面对高并发,如何去对应众多客户主机(当管理的机器特别多,发出的信号容易拥塞,延迟丢包的时候)可以加上消息队列0mq。
3.可以通过定义主机群、主机组更好更方便的管理计算机集群。
4.可以通过各种模块实现一些较简单的功能。
5.通过playbooks实现一些复杂的功能。
2.install部署
1.dns解析
(1)环境:
ansible服务器:192.168.0.155
ansible客户机:192.168.0.104
192.168.0.105
(2)ansible服务器:
域名解析 vim /etc/hosts
192.168.0.115 ansible
192.168.0.104 host1
192.168.0.105 host2
ansible客户机(IP、YUM源、关闭防火墙和selinux)
无需配置
2.安装ansible
ansible服务器:yum -y install ansible
检测部署是否完成:
rpm -qa 列出所有文件
rpm -qc ansible 查看配置文件
3.ssh-key(可选)
1.免密码ssh-key的方式
ssh-keygen
ssh-copy-id IP地址 推送公钥
2.如果没有提前做免密
(1)ansible host2 -m ping   输入yes确认连接,会显示红色不可达,失败了
(2)ansible host2 -m ping -u root -k -o
	-u 增加用户名选项
	-k 增加密码选项
(3)去掉是否连接(yes/no)的询问:
==vim /etc/ssh/ssh_config==
StrictHostKeyChecking no           #进行修改
systemctl restart sshd
ansible host2 -m ping -u root -k -o    成功不提示是否连接
4.ansible基础
(1)定义主机清单
vim /etc/ansible/hosts
host1
host2
(2)连通性测试
ansible host1 -m ping -o 测试host1连通性,显示绿字成功,红字失败
-m 指定模块。什么功能
ping 只是其中一个模块
-o 简洁输出
(3)know_hosts
使用OpenSSH时,ssh会把访问过的每个计算机公钥都记录在~/.ssh/know_hosts
(4)ping和ssh
ping ICMP:网际消息管理协议(网络层)
ssh 应用层安全登录协议
ansible的ping,是探测ssh程序是否连接,不是icmp协议。
5.Inventory-主机清单
(1)增加主机组
vim /etc/ansible/hosts
[webserver]
host1
host2
ansible webserver -m ping -o
关于返回信息与文件中的IP地址顺序不同,是因为网络延迟及主机处理的速度不同导致的。
(2)增加用户名、密码、端口
vim /etc/ansible/hosts
[webserver]
host[1:2] ansible_ssh_user='root' ansible_ssh_pass='123' ansible_ssh_port='22'
(3)组和变量
vim /etc/ansible/hosts
[webserver]
host[1:2]
[webserver:vars]                     #var 变量
ansible_ssh_user='root'
ansible_ssh_pass='1'
(4)子分组
vim /etc/ansible/hosts
[apache]
host1
[nginx]
host2
[webserver:children]
apache
nginx
6.Ad-Hoc-点对点模式
简介:临时的,在ansible中是指需要快速执行的单条命令,并且不需要保存的命令。对于复杂的命令则为 playbook。
(1)shell模块
1.帮助
ansible-doc shell
2.查询主机名
ansible webserver -m shell -a 'hostname' -o -f 2
-f 2 指定线程数
-f FORKS
–forks=FORKS (Ansible一次命令执行并发的线程数)
NUM被指定为一个整数,默认是5
specify number of parallel processes to use (default=5)
3.部署apache
ansible host2 -m shell -a 'yum -y install httpd' -o
4.查询系统负载
ansible host1 -m shell -a 'uptime' -o
(2)复制模块
1.帮助
ansible-doc copy
2.复制
ansible webserver -m copy -a 'src=/etc/hosts dest=/tmp/2.txt owner=root group=bin mode=777'
src(source)资源
dest(destination)目的地
mode 模式,权限
若出现黄色字,为警告,可能权限不同
3.如果文件有多份,可以进行备份
ansible webserver -m copy -a 'src=/etc/hosts dest=/tmp/2.txt owner=root group=bin mode=777 backup=yes'
(3)用户模块
1.帮助
ansible-doc user
2.创建用户
ansible webserver -m user -a 'name=shichen state=present'
state=present 创建
3.修改密码时
1.生成加密密码
echo '512050951' | openssl passwd -1 -stdin
生成加密密码值:
$1 $XVzsJMDr$5wI4oUaQ.emxap6s.N272.
2.修改密码
ansible webserver -m user -a 'name=shichen password="$1 $XVzsJMDr$5wI4oUaQ.emxap6s.N272."'
4.修改shell
ansible webserver -m user -a 'name=shichen shell=/sbin/nologin append=yes'
append 追加
5.删除用户
ansible webserver -m user -a 'name=shichen state=absent'
state=absent 删除
(4)软件包管理
1.帮助
ansible-doc yum
2.升级所有包
ansible host1 -m yum -a 'name="*" state=latest'
3.安装apache
ansible host2 -m yum -a 'name="httpd" state=latest'
ansible host2 -m yum -a 'name="httpd" state=present'
(5)服务模块
1.帮助
ansible-doc service
2.启动
ansible host2 -m service -a 'name=httpd state=started'
3.开机启动
ansible host2 -m service -a 'name=httpd state=started enabled=yes'
5.停止
ansible host2 -m service -a 'name=httpd state=stopped'
6.重启
ansible host2 -m service -a 'name=httpd state=restarted'
7.开机禁止启动
ansible host2 -m service -a 'name=httpd state=started enabled=no'
(6)文件模块
1.帮助
ansible-doc file
2.创建文件
ansible host1 -m file -a 'path=/tmp/1.txt mode=777 state=touch'
3.创建目录
ansible host1 -m file -a 'path=/tmp/2.txt mode=777 state=directory'
(7)收集模块
1.帮助
ansible-doc setup
2.查询所有信息
ansible host1 -m setup
3.查询IP
ansible host1 -m setup -a 'filter=ansible_all_ipv4_addresses'
7.YAML-YAML Ain’t Markup Language-非标记语言
(1)语法
1.列表
fruits:
- Apple
- Orange
- Strawberry
- Mango
2.字典
martin:
name: Martin D'vloper
job: Developer
skill: Elite
通过YAML编写一个简单的剧本,完成web的部署,配置,启动的全过程。
1.准备工作
(1)
ansible all -m yum -a 'name=httpd state=removed' -o
(2) 准备配置文件:
1.yum -y install httpd
2.mkdir apache
3.cd apache
4.cp -rf /etc/httpd/conf/httpd.conf .
5.vim httpd.conf 将端口改为8080,用作推送
2.编写剧本
vim apache.yaml
- hosts: host2
  tasks:
  - name: install apache packages
    yum: name=httpd state=present
  - name: copy apache.conf
    copy: src=./httpd.conf dest=/etc/httpd/conf/httpd.conf
  - name: ensure apache is running
    service: name=httpd state=started enabled=yes
3.测试:
ansible-playbook apache.yaml --syntax-check 检查语法
ansible-playbook apache.yaml --list-tasks 列出任务
ansible-playbook apache.yaml --list-hosts 列出主机
4.执行:
ansible-playbook apache.yaml
5.handlers:
1.如果配置文件发生变化。
Listen 9000
2.再次执行,命令执行成功,但是配置未生效,所以要增加处理程序,设置触发器。
3.修改配置文件
vim apache.yaml
  - name: copy apache conf
    copy: src=./httpd.conf dest=/etc/httpd/conf/httpd.conf
    notify: restart apache service
  handlers:
  - name: restart apache service
    service: name=httpd state=restarted
再次执行,配置生效,触发成功
8.Role-角色扮演
1.简介:roles在ansible中是playbooks的目录组织结构。将代码或文件进行模块化,成为roles的文件目录组织结构。
(1)特点:易读,代码可重用,层次清晰。
(2)目标:通过role远程部署nginx并部署。
2.目录结构
1.剧本目录
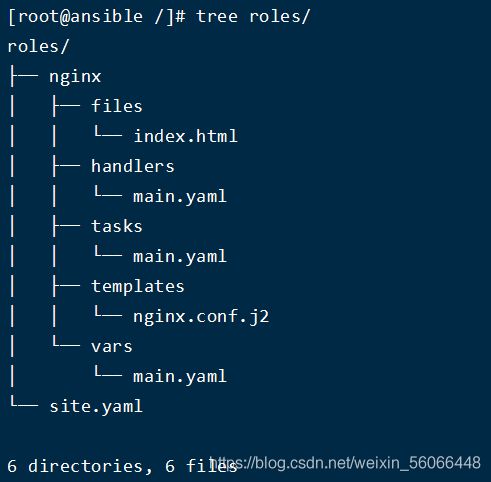
nginx 角色名、files普通文件、handlers 触发器程序、tasks 主任务、templates 金甲模式(有变量的文件,系统自带变量和自定义变量)、vars 自定义变量
2.准备目录结构
1.自建
(1)mkdir roles/nginx/{files,handlers,tasks,templates,vars} -p
(2)touch roles/site.yaml roles/nginx/{handlers,tasks,vars}/main.yaml
(3)echo 1234 > /roles/nginx/files/index.html
2.命令
ansible-galaxy init nginx
3.准备程序
yum -y install nginx && cp /etc/nginx/nginx.conf roles/nginx/templates.nginx.conf.j2
4.编写任务
vim roles/nginx/tasks/main.yaml
---
- name: install epel-release packages
  yum: name=epel-release state=latest
- name: install nginx package
  yum: name=nginx state=latest
- name: copy index.html
  copy: src=index.html dest=/usr/share/nginx/html/index.html
- name: copy nginx.conf template
  template: src=nginx.conf.j2 dest=/etc/nginx/nginx.conf
  notify: restart nginx
- name: make sure nginx service running
  service: name=nginx state=started enabled=yes
5.修改配置文件
vim roles/nginx/templates/nginx.conf.j2
worker_process {{ ansible_processer_cores }};  #调用内部已知变量
worker_connections {{ worker_connections }};  #自定义变量
6.编写变量
vim roles/nginx/vars/main.yaml
worker_connections: 10240
7.编写处理程序
vim roles/nginx/handlers/main.yaml
---
- name: restart nginx
  service: name=nginx state=restarted
8.编写剧本
vim roles/site.yaml
- hosts: host1
  roles:
  - nginx    #文件夹的名称
9.实施
cd roles
ansible-playbook site.yaml --syntax-check  #测试语法
ansible-playbook site.yaml  #实施剧本
10.验证
验证host1,网页输入IP后显示1234,成功