knife4j:快速入门
大纲
- 一、依赖
- 二、配置类
- 三、控制层编写
- 四、页面显示
- 五、Swagger常用注解
- 六、文档显示的权限控制
-
- 6.1 方法一:@Value
- 6.2 方法二:@Profile
- 6.3 方法三:使用knife4j的增强功能
- 6.4 方法四:输入用户名以及密码
技术版本
springboot:2.5.6
Knife4j :2.0.9 Knife4j增强功能自版本2.0.7开始
一、依赖
在本次项目中,pom.xml使用的依赖如下所示:
    <properties>
        <java.version>1.8java.version>
        <knife4j.version>2.0.9knife4j.version>
    properties>

   <dependencies>

        <dependency>
            <groupId>com.github.xiaoymingroupId>
            <artifactId>knife4j-spring-boot-starterartifactId>
            <version>${knife4j.version}version>
        dependency>
        <dependency>
            <groupId>org.springframework.bootgroupId>
            <artifactId>spring-boot-starter-webartifactId>
        dependency>
        <dependency>
            <groupId>org.springframework.bootgroupId>
            <artifactId>spring-boot-starter-testartifactId>
            <scope>testscope>
        dependency>
    dependencies>
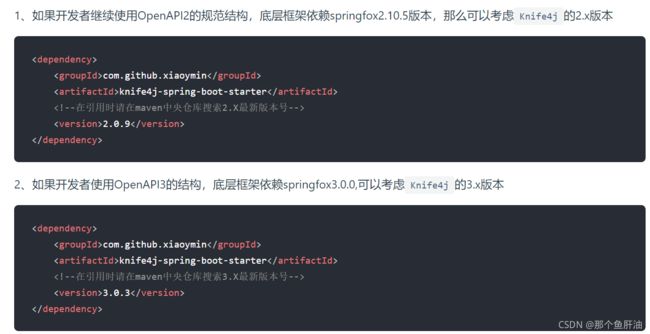
版本依赖的选取可以参考Knife4j官方文档中对于版本的选取,如下图所示:
二、配置类
如果要增加分组,多配置几个@Bean的内容:修改分组名以及扫描包的地址。
/**
 * @author hanyulin
 * @apiNote 轻量级的Swagger生成Api文档
 * @date 2021/10/28 11:15
 */
@Configuration
@EnableSwagger2WebMvc //该注解是Springfox-swagger框架提供的使用Swagger注解,该注解必须加
@EnableKnife4j   //该注解是knife4j提供的增强注解,Ui提供了例如动态参数、参数过滤、接口排序等增强功能,如果你想使用这些增强功能就必须加该注解,否则可以不用加
public class SwaggerConfig {


    /**
     *  api的主页显示信息
     */
    private static ApiInfo apiInfo;

    static {
        apiInfo = new ApiInfoBuilder()
                .title("企业用户API接口")
                .description("API接口文档")
                .termsOfServiceUrl("http://www.hyl.com")
                .contact(new Contact("helen", "http://www.helen.com", "[email protected]"))
                .version("1.0")
                .build();
    }

    @Bean
    public Docket api() {
        return new Docket(DocumentationType.SWAGGER_2)
                // 配置分组名
                .groupName("api")
                .apiInfo(apiInfo)
                .select()
                // 设置扫描包的地址 : com.hanliy.controller
                .apis(RequestHandlerSelectors.basePackage("com.hanliy.controller"))
                // 设置路径筛选 只扫描com.hanliy.controller/test/下面的包
                // .paths(PathSelectors.ant("/test/**"))
                // com.hanliy.controller下的任何接口信息
                 .paths(PathSelectors.any())
                .build();
    }

    // 如果要新增一个分组:api2
    @Bean
    public Docket api() {
        return new Docket(DocumentationType.SWAGGER_2)
                // 配置分组名
                .groupName("api2")
                .apiInfo(apiInfo)
                .select()
                // 设置扫描包的地址 : com.hanliy.controller2
                .apis(RequestHandlerSelectors.basePackage("com.hanliy.controller2"))
                .paths(PathSelectors.any())
                .build();
    }

}
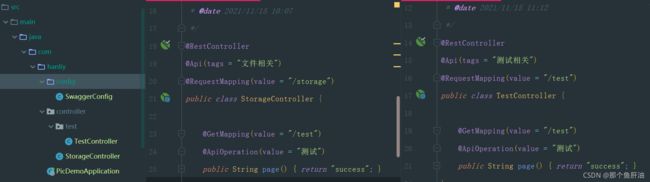
三、控制层编写
简单的代码编写如下:
@RestController
@Api(tags = "测试相关")
@RequestMapping(value = "/test")
public class TestController {

    @GetMapping(value = "/test")
    @ApiOperation(value = "测试")
    public String page() {
        return "success";
    }
}
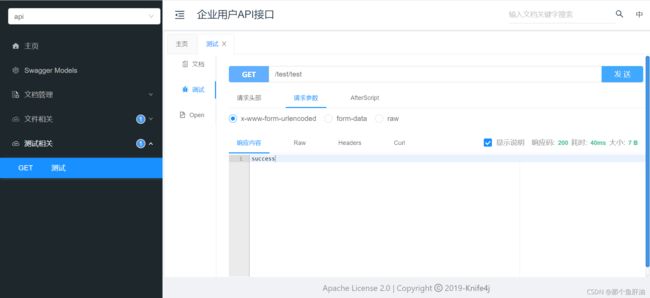
四、页面显示
在浏览器中,输入http://localhost/doc.html。
- 在Swagger配置类中的静态代码块:配置分组之间的共同的显示信息。在页面的显示信息如下:
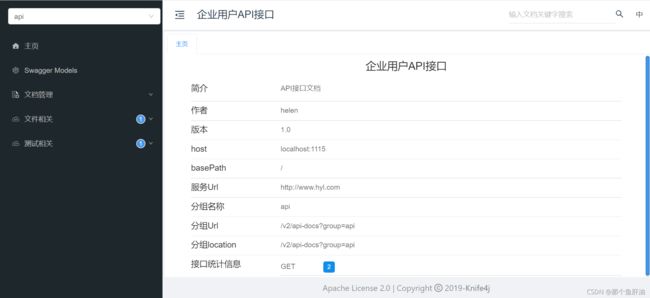
- 控制层显示的页面效果如下:
五、Swagger常用注解
Swagger所有注解并非必须,若不加就只显示类目/方法名/参数名没有注释而已。
@Api:注解在控制层上,value为@RequestMapping路径
@Api(tags = "轮播图相关")
@ApiOperation:注解在方法上,value为简要描述(该参数没什么意义,不需要配置),notes为全面描述;hidden=true时,将不显示该方法,默认为false。
@ApiOperation(value = "分页")
@ApiImplicitParams:用在请求的方法上,包含一组参数说明。
@ApiImplicitParam:用在 @ApiImplicitParams 注解中,指定一个请求参数的配置信息 ,name对应参数名,value为注释,defaultValue设置默认值,allowableValues设置范围值,required设置参数是否必须,默认为false(此处只是限制了文档而已,空指针肯定要额外判断的)
@ApiImplicitParams({
     @ApiImplicitParam(name = Constant.PAGE, value = "页码", required = false, dataType = "Integer", paramType = "query"),
     @ApiImplicitParam(name = Constant.LIMIT, value = "条数", required = false, dataType = "Integer", paramType = "query"),
     @ApiImplicitParam(name = "showStatus", value = "0显示 1隐藏", required = false, dataType = "Integer", paramType = "query"),
     @ApiImplicitParam(name = "teamName", value = "团队名称", required = false, dataType = "String", paramType = "query")
})
@ApiIgnore:注解类、参数、方法,注解后将不在Swagger UI中显示
public String page(@ApiIgnore @RequestParam Map<String, Object> params) {
          // 省略
    }
@ApiModel:注解在Model上
@ApiModelProperty:注解Model下的属性,当前端传过来的是一个对象时swagger中该对象的属性注解就是ApiModelProperty中的value
@ApiModel(value = "轮播图DTO")
@Data
public class BannerDTO {
    /**
     * 主键
     */
    @ApiModelProperty(value = "主键")
    private Long id;
}
具体的使用如下:
@RestController
@RequestMapping(value = "/banner")
@Api(tags = "轮播图相关")
public class BannerController {

    @GetMapping(value = "/page")
    @ApiOperation(value = "分页")
    @ApiImplicitParams({
            @ApiImplicitParam(name = Constant.PAGE, value = "页码", required = false, dataType = "Integer", paramType = "query"),
            @ApiImplicitParam(name = Constant.LIMIT, value = "条数", required = false, dataType = "Integer", paramType = "query"),
            @ApiImplicitParam(name = "showStatus", value = "0显示 1隐藏", required = false, dataType = "Integer", paramType = "query"),
            @ApiImplicitParam(name = "teamName", value = "团队名称", required = false, dataType = "String", paramType = "query")
    })
    public String page(@ApiIgnore @RequestParam Map<String, Object> params) {
          return "success";
    }
六、文档显示的权限控制
6.1 方法一:@Value
在dev环境下开启在线文档。修改配置类:
@Configuration
@EnableSwagger2WebMvc
@EnableKnife4j
public class SwaggerConfig {
    /**
     * swagger激活环境
     */
    @Value(value = "${swagger.enable}")
    public boolean enable;

    @Bean
    public Docket api() {
    			// 相同代码 在末尾加上 .enable(enable)
                .build()
                .enable(enable);
    }
application-dev.yml文件。
swagger:
  enable: true
只有在激活dev环境时,才能够扫描到 enable 的值,在线文档.enable(enable)才能够生效。
6.2 方法二:@Profile
@Profile:加载指定配置文件时才起作用。只有当Profile指定的配置被激活的时候,才会将Profile中所对应的Bean注册到Spring容器中。
开发环境develop : dev
测试环境test : test
生产环境prod : prod
@Configuration
@EnableSwagger2WebMvc
@EnableKnife4j
@Profile("dev","test")
public class SwaggerConfig {
	//  省略
}
只有项目加载dev、test 的时候以上代码才会起作用
@profile里的值对应的是主配置文件application.yml中spring.profiles.active的值。
spring:
  profiles:
    active: @profiles.active@
通过在pom.xml中配置多个profile实现。
说明:
yml 文件引入pom.xml的值使用@标签名@;
properties 文件引入pom.xml的值使用${标签名}
    <profiles>
        <profile>
            <id>devid>
            <properties>
                <profiles.active>devprofiles.active>
            properties>
            <activation>
                <activeByDefault>trueactiveByDefault>
            activation>
        profile>
        <profile>
            <id>prodid>
            <properties>
                <profiles.active>prodprofiles.active>
            properties>
        profile>
        <profile>
            <id>testid>
            <properties>
                <profiles.active>testprofiles.active>
            properties>
        profile>
使项目能够打包为jar包:
    <packaging>jarpackaging>


    <build>
        <resources>
            <resource>
                <directory>src/main/resources/directory>
                <filtering>truefiltering>
                <excludes>
                    <exclude>application-*.ymlexclude>
                excludes>
            resource>
            <resource>
                <directory>src/main/resources/${profiles.active}directory>
            resource>
            <resource>
                <directory>src/main/resourcesdirectory>
                <includes>
                    <include>application-${profiles.active}.ymlinclude>
                includes>
            resource>
        resources>
        <plugins>
            <plugin>
                <groupId>org.apache.maven.pluginsgroupId>
                <artifactId>maven-compiler-pluginartifactId>
                <version>3.1version>
                <configuration>
                    <encoding>UTF-8encoding>
                    <target>1.8target>
                    <source>1.8source>
                configuration>
            plugin>

            <plugin>
                <groupId>org.springframework.bootgroupId>
                <artifactId>spring-boot-maven-pluginartifactId>
            plugin>
        plugins>
    build>
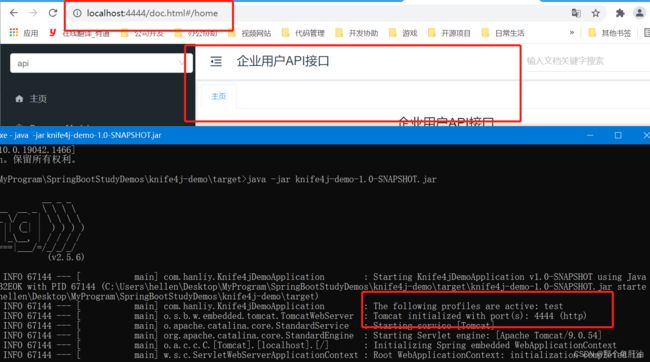
打包不同环境的jar包:以打包测试环境为例子。
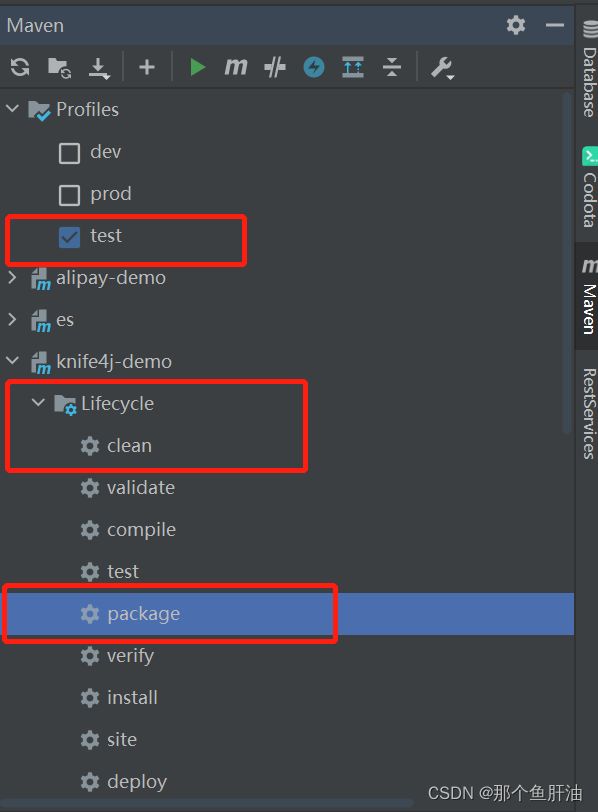
运行test环境的jar:
6.3 方法三:使用knife4j的增强功能
增强功能通过配置yml配置文件开启增强,自版本2.0.7开始
使用SpringBoot框架,只需在application.properties或者application.yml配置文件中配置
knife4j:
  # 开启增强配置
  enable: true
 # 开启生产环境屏蔽
  production: true
注意 在配置类上要增加@EnableKnife4j注解:
@EnableKnife4j   //该注解是knife4j提供的增强注解,Ui提供了例如动态参数、参数过滤、接口排序等增强功能,如果你想使用这些增强功能就必须加该注解,否则可以不用加
public class SwaggerConfig {
6.4 方法四:输入用户名以及密码
只有知道用户名和密码的人才能访问此文档。效果如下:
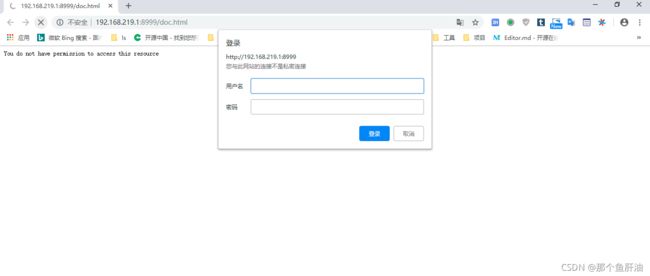
在相应的application.yml中配置如下:
knife4j:
  # 开启增强配置
  enable: true
 # 开启Swagger的Basic认证功能,默认是false
  basic:
      enable: true
      # Basic认证用户名
      username: test
      # Basic认证密码
      password: 123
如果用户开启了basic认证功能,但是并未配置用户名及密码,Knife4j提供了默认的用户名和密码: admin/123321