TRT3-trt-basic - 5 插件的编写
生成onnx:
还是一模一样的genonnx.py
class Model(nn.Module):
    def __init__(self):
        super().__init__()

        self.conv = nn.Conv2d(1, 1, 3, padding=1)
        self.myselu = MYSELU(3)
        self.conv.weight.data.fill_(1)
        self.conv.bias.data.fill_(0)

    def forward(self, x):
        x = self.conv(x)
        x = self.myselu(x)
        return x
但是不一样的是这里的激活算子改为了MYSELU
class MYSELUImpl(torch.autograd.Function):

    # reference: https://pytorch.org/docs/1.10/onnx.html#torch-autograd-functions
    @staticmethod
    def symbolic(g, x, p):
        print("==================================call symbolic")
        return g.op("MYSELU", x, p,
            g.op("Constant", value_t=torch.tensor([3, 2, 1], dtype=torch.float32)),
            attr1_s="这是字符串属性",
            attr2_i=[1, 2, 3],
            attr3_f=222
        )

    @staticmethod
    def forward(ctx, x, p):
        return x * 1 / (1 + torch.exp(-x))


class MYSELU(nn.Module):
    def __init__(self, n):
        super().__init__()
        self.param = nn.parameter.Parameter(torch.arange(n).float())

    def forward(self, x):
        return MYSELUImpl.apply(x, self.param)
其中这个MYSELUImpl就是咱们插件真正实现的一个类
class MYSELUImpl(torch.autograd.Function):

    # reference: https://pytorch.org/docs/1.10/onnx.html#torch-autograd-functions
    @staticmethod
    def symbolic(g, x, p):
        print("==================================call symbolic")
        return g.op("MYSELU", x, p,
            g.op("Constant", value_t=torch.tensor([3, 2, 1], dtype=torch.float32)),
            attr1_s="这是字符串属性",
            attr2_i=[1, 2, 3],
            attr3_f=222
        )

    @staticmethod
    def forward(ctx, x, p):
        return x * 1 / (1 + torch.exp(-x))
所有的插件都要继承于torch.autograd.Function
其中MYSELUImpl.apply调用的就是forward
    @staticmethod
    def forward(ctx, x, p):
        return x * 1 / (1 + torch.exp(-x))
ctx是上下文,x就是数据 , p就是parameter。
但forward不会实际上生成节点,真正在onnx中生成节点的是
 @staticmethod
    def symbolic(g, x, p):
        print("==================================call symbolic")
        return g.op("MYSELU", x, p,
            g.op("Constant", value_t=torch.tensor([3, 2, 1], dtype=torch.float32)),
            attr1_s="这是字符串属性",
            attr2_i=[1, 2, 3],
            attr3_f=222
        )
g就是graph , x , p 就是参数了
我们将这个模型导出:
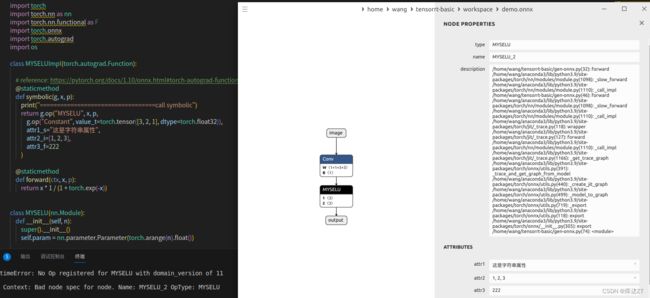
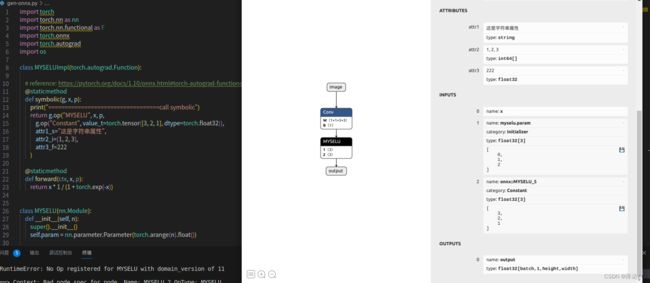
能看到,relu已经变成MYSELU了
g.op的第一个参数就是type
之后是我们的三个attribute,分别是字符串类型,整数类型,float32类型
input分为三项,第一项为x,第二项是parameter 第三项是一个常量项,这个常量项的值也会作为一个输入输入进来
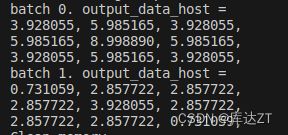
g.op("Constant", value_t=torch.tensor([3, 2, 1], dtype=torch.float32)),之后我们make run一下,发现和torch推理的结果一模一样:
新增插件算子:
但是我们看CPP文件,还是从demo.onnx中读出来的,那么MYSELU是怎么被识别出来的呢?
我们在前几节讲过,要想修改onnx里的部分内容,要去builtin那个cpp文件下修改,那么自然,新增算子也要去这个下面新增:
DEFINE_BUILTIN_OP_IMPORTER(MYSELU)
{
    printf("\033[31m=======================call MYSELU==============\033[0m\n");
    OnnxAttrs attrs(node, ctx);
    const std::string pluginName{node.op_type()};
    const std::string pluginVersion{attrs.get("plugin_version", "1")};
    const std::string pluginNamespace{attrs.get("plugin_namespace", "")};
    //做一个不同版本的隔离,但这里只有一个版本,所以写一个version =  1 , namespace赋空白就好了
    LOG_INFO("Searching for plugin: " << pluginName << ", plugin_version: " << pluginVersion << ", plugin_namespace: " << pluginNamespace);
    nvinfer1::IPluginCreator* creator = importPluginCreator(pluginName, pluginVersion, pluginNamespace);
    //导入信息,创建creator(创建器)
    ASSERT(creator && "Plugin not found, are the plugin name, version, and namespace correct?", ErrorCode::kUNSUPPORTED_NODE);
    //如果没拿到创建器就输出报错
    const nvinfer1::PluginFieldCollection* fieldNames = creator->getFieldNames();//获取创建器名称,看看什么从onnx中需要读取,比如attribute那些东西
    // Field data needs to be type erased, we use fieldData for temporary allocations.
    string_map> fieldData{};
    std::vector fields = loadFields(fieldData, attrs, fieldNames, ctx);//读取filedname对应的属性,形成一个数组

    const auto plugin = createPlugin(getNodeName(node), creator, fields);//丢给 createPlugin去创建一个plugin,三项分别是name , creator , 还有field属性
    ASSERT(plugin && "Could not create plugin", ErrorCode::kUNSUPPORTED_NODE);//如果没有成功创建plugin

    std::vector pluginInputs{};//定义了一个空的std::vector类型的变量pluginInputs,用于存储输入张量。
    for (auto& input : inputs)
    {
        pluginInputs.emplace_back(&convertToTensor(input, ctx));
    }
    //通过循环迭代inputs中的每个元素,将经过convertToTensor(input, ctx)处理后得到的张量指针添加到pluginInputs中。
    LOG_INFO("Successfully created plugin: " << pluginName);
    auto* layer = ctx->network()->addPluginV2(pluginInputs.data(), pluginInputs.size(), *plugin);//通过调用ctx->network()->addPluginV2()方法,
                                                                                                                                                                                                    //将pluginInputs中的输入张量作为参数传递给plugin插件,
                                                                                                                                                                                                    //并创建一个插件层,并将该层(layer)返回给变量layer。
    ctx->registerLayer(layer, getNodeName(node));//tx->registerLayer(layer, getNodeName(node))用于将该层注册到计算图(graph)中,并为该层提供一个节点名称。
    RETURN_ALL_OUTPUTS(layer);//成功返回layer
}
也正是由于这个定义,才能正确执行。
推理过程:
MySELUPlugin::MySELUPlugin(const std::string name, const void* data, size_t length)
    : mLayerName(name)
{
    // Deserialize in the same order as serialization
    const char* d = static_cast(data);
    const char* a = d;
//使用指针转换将data参数转换为const char*类型,并将其赋值给const char* d和const char* a两个指针。
    int nstr = readFromBuffer(d);//读buffer得到字符串
    mattr1 = std::string(d, d + nstr);

    d += nstr;
    mattr3 = readFromBuffer(d);
    assert(d == (a + length));//得到数组

    printf("==================== 推理阶段,attr1 = %s, attr3 = %f\n", mattr1.c_str(), mattr3);
}
//在代码中,使用readFromBuffer模板函数从数据缓冲区中读取数据。首先,调用readFromBuffer(d)读取一个整数值,并将结果存储在变量nstr中。此整数值表示后续字符串的长度。

//然后,通过使用std::string对象的构造函数,将当前位置的d指针和长度nstr作为参数创建一个子字符串,将结果存储在变量mattr1中。这样就得到了反序列化后的字符串数据。

//之后,将d指针增加nstr的值,以便指向下一个要解析的数据部分。而后,通过调用readFromBuffer(d)读取一个浮点数,并将结果存储在mattr3变量中。
// 行性能测试
int MySELUPlugin::enqueue(const nvinfer1::PluginTensorDesc* inputDesc, const nvinfer1::PluginTensorDesc* outputDesc,
const void* const* inputs, void* const* outputs, void* workspace, cudaStream_t stream) noexcept
{
void* output = outputs[0];
size_t volume = 1;
for (int i = 0; i < inputDesc->dims.nbDims; i++){
volume *= inputDesc->dims.d[i];//遍历inputDesc->dims结构体中的维度值,获得输入的总数
}
mInputVolume = volume;
myselu_inference(
static_cast(inputs[0]),
static_cast(output),
mInputVolume,
stream
);
return 0;
} kernel:
static __device__ float sigmoid(float x){
    return 1 / (1 + expf(-x));
}

static __global__ void myselu_kernel(const float* x, float* output, int n){

    int position = threadIdx.x + blockDim.x * blockIdx.x;
    if(position >= n) return;

    output[position] = x[position] * sigmoid(x[position]);
}

void myselu_inference(const float* x, float* output, int n, cudaStream_t stream){

    const int nthreads = 512;
    int block_size = n < nthreads ? n : nthreads;
    int grid_size = (n + block_size - 1) / block_size;
    myselu_kernel<<>>(x, output, n);
}
这只是一个很简易的plugin的模板,具体的详细的以后还会更新


