使用numpy创建三层神经网络
numpy网络编程
本文参考于:书本《Make Your Own Neural Network》 中文《Python神经网络编程》
书中源代码
本文代码托管github
通过此次实践对于神经网络的认识更加深刻,通过数学推导到代码实践让自己有了比较大的收获
一、数学推导
构造三层神经网络
1.前向传播
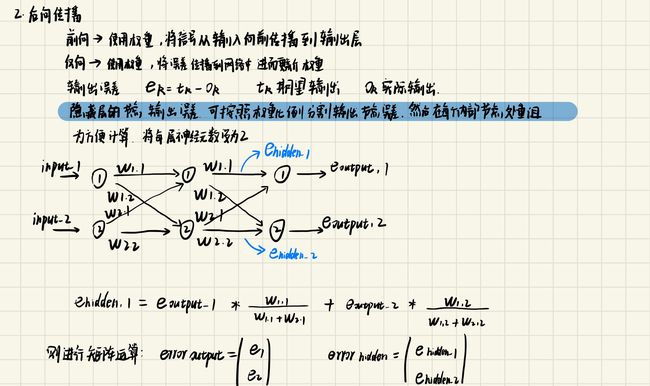
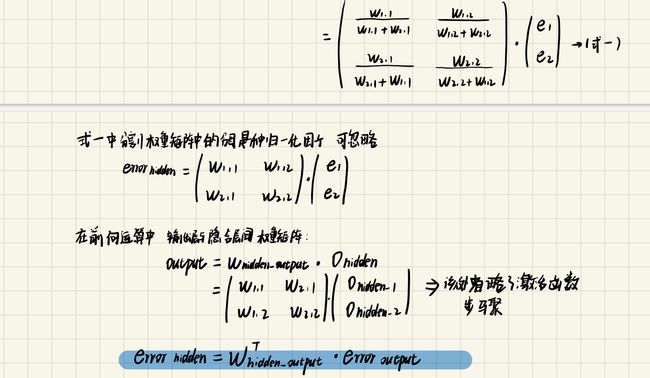
2.反向传播
3.更新权重
二、代码实现
1.网络实现以及训练过程(Network.py)
该部分对上述数学推导过程进行代码实现,构建一个三层的神经网络,其中隐含层的节点self.hnodes可以自己进行设置,因为网络主要使用的MNIST手写数字数据集,输入为(28,28)的灰度图片,但是要对其进行展平,变为784个输入数据;输出为10个节点,因为预测结果有0到9 十种可能
网络实现:
"""
    创建三层神经网络模型
    用于训练  MNIST 数据集
    书中的源码:https://github.com/makeyourownneuralnetwork/makeyourownneuralnetwork/blob/master/part2_neural_network_mnist_data.ipynb
"""
import numpy
# Sigmod() 函数定义在scipy包里面,其输入可以直接 为矩阵
import scipy.special
# 绘图
import matplotlib.pyplot as plt

class neuralNetwork:
    def __init__(self,inputnodes,hiddennodes,outputnodes,learningrate):
        self.inodes = inputnodes
        self.hnodes = hiddennodes
        self.onodes = outputnodes

        # learning rate
        self.lr = learningrate

        # 隐藏层与输入层之间wih  以及 隐藏层与输出层之间 的初始权重矩阵
        self.wih = numpy.random.normal(0.0,pow(self.inodes,-0.5),(self.hnodes,self.inodes))
        self.who = numpy.random.normal(0.0,pow(self.hnodes,-0.5),(self.onodes,self.hnodes))

        # 激活函数
        self.activation_function = lambda x: scipy.special.expit(x)

    # train the neural network
    def train(self,inputs_list,targets_list):
        # 将输入转为2d 矩阵
        inputs = numpy.array(inputs_list,ndmin=2).T
        targets = numpy.array(targets_list,ndmin=2).T

        # 计算隐藏层的信号加权和
        hidden_inputs = numpy.dot(self.wih,inputs)
        # 对加权和的值 使用激活函数
        hidden_outputs = self.activation_function(hidden_inputs)

        # 计算输出层的信号加权和
        final_inputs = numpy.dot(self.who,hidden_outputs)
        # 对加权和的值 使用激活函数
        final_outputs = self.activation_function(final_inputs)

        # output layer error is the  (target - actual)
        output_errors = targets - final_outputs
        # 隐藏层的误差 是对输出层误差按照权重进行分割重组得到的
        hidden_errors = numpy.dot(self.who.T,output_errors)

        # 更新隐含层与输出层之间的权重
        self.who += self.lr * numpy.dot((output_errors * final_outputs * (1.0 - final_outputs)),
                                        numpy.transpose(hidden_outputs))
        # 更新隐含层与输入层之间的权重
        self.wih += self.lr * numpy.dot((hidden_errors * hidden_outputs * (1.0 - hidden_outputs)),
                                       numpy.transpose(inputs))

        return final_outputs

    # 测试网络
    def query(self,inputs_list):
        # 将输入转化为2D 矩阵
        inputs = numpy.array(inputs_list,ndmin=2).T

        # 将输入信号的加权和 输入之隐藏层
        hidden_inputs = numpy.dot(self.wih,inputs)
        # 是 加权使用 激活函数
        hidden_outputs = self.activation_function(hidden_inputs)

        # 对隐藏层的输出信号进行加权和
        final_inputs = numpy.dot(self.who,hidden_outputs)
        # 对加权和的信号  使用激活函数
        final_outputs = self.activation_function(final_inputs)

        return final_outputs
主程序
if __name__ == '__main__':
    # 输入为 28*28 = 784 单通道
    input_nodes = 784
    hidden_nodes = 200
    # 输出为 0-9 10 个预测数字
    output_nodes = 10

    #  学习率
    learning_rate = 0.1

    # 创建网络实例
    n = neuralNetwork(input_nodes,hidden_nodes,output_nodes,learning_rate)

    # 加载 MNIST 训练的数据集
    training_data_file = open("/home/zxz/Proj/deeplearning/Create_neural_network/Mnist_dateset/mnist_train.csv",'r')
    # 在csv 类型文本中 mnist 数据集 每一行 代表一张单通道图片 其中的内容为 图片像素矩阵的各个像素值,并且存入列表
    training_data_list = training_data_file.readlines()
    training_data_file.close()

    # 加载mnist 测试数据集
    test_data_file = open("/home/zxz/Proj/deeplearning/Create_neural_network/Mnist_dateset/mnist_test.csv",'r')
    test_data_list = test_data_file.readlines()
    test_data_file.close()


    # 训练神经网络
    print("Training ...................................")
    epochs = 5
    for epoch in range(epochs):
        scorecard = []  # 用于存储每一轮的训练正确与否的结果
        # 遍历训练数据(列表)并对其进行 数据处理  --- 对数据仅仅训练了一轮
        for recode in training_data_list:
            # 每一行数据 之间的像素值 以 “,“ 分割开来
            # 以 “,” 将每一行的 像素矩阵的值进行分割,并且将值存入列表
            all_values = recode.split(',')
            # 正确的标签是 数组中的第一个元素
            correct_label = int(all_values[0])
            # 对数据进行归一化以及偏移0.01 防止0输入导致权值无法更新
            inputs = (numpy.asfarray(all_values[1:]) / 255.0 * 0.99) + 0.01
            # 创建期望输出值 (所有的都为0.01 只有期望的标签对应的值 为 0.99)
            targets = numpy.zeros(output_nodes) + 0.01
            # 列表的第一个元素all_values[0]为 每一个图片的 标签
            targets[int(all_values[0])] = 0.99
            # 使用训练函数进行训练
            outputs = n.train(inputs, targets)
            # 得到输出结果中得分最好的索引
            result = numpy.argmax(outputs)
            if(result == correct_label):
                scorecard.append(1)
            else:
                scorecard.append(0)
        # 计算本轮训练中的正确率
        scorecard_array = numpy.asarray(scorecard)
        print(r"Epoch {}  Training performance = {}".format((epoch+1),scorecard_array.sum() / scorecard_array.size))


    print("Testing ................................")
    # 测试神经网络
    scorecard = []   # 用于存储每一轮的预测正确与否的结果
    for recode in test_data_list:
        all_values = recode.split(",")
        # 正确的标签是 数组中的第一个元素
        correct_label = int(all_values[0])
        inputs = (numpy.asfarray(all_values[1:]) / 255.0 * 0.99) + 0.01
        # 测试网络
        outputs = n.query(inputs)
        # 得到输出结果中 得分最高的索引位置
        label = numpy.argmax(outputs)
        if(label == correct_label):
            scorecard.append(1)
        else:
            scorecard.append(0)

    # 计算 该论测试中的 正确率
    scorecard_array = numpy.asarray(scorecard)
    print("Testing performance = ",scorecard_array.sum() / scorecard_array.size)


"""
# 可视化数据集中的图片
    all_v = test_data_list[0].split(",")
    image_array = ((np.asfarray(all_values[1:])/255.0 * 0.99) + 0.01).reshape(28,28)
    plt.imshow(image_array,cmap='Greys',interpolation='None')
    plt.show()
"""
运行结果 测试的正确率可以达到97%左右
2.构建自己的手写数字数据集
将自己手写的数字,进行数据处理变为合适网络的输入
"""
    将自己手写的数字(PNG存储在my_image中)进行处理并且进行数据存储(存储到training_data_list中)
        1.书中的源码:https://github.com/makeyourownneuralnetwork/makeyourownneuralnetwork/blob/master/part3_load_own_images.ipynb
        2.将自己创建的数字图片存储在 my_image,每张图片对应的label为图片的上层文件夹,图片格式为xxx.PNG
        文件结构;
         my_image
            ├── 0
                └── 0.png
            ├── 1
                └── 1.png
            ├── 2
                └── 2.png
            ├── 3
                └── 3.png
            ├── 4
                └── 4.png
            ├── 5
                └── 5.png
            ├── 6
                └── 6.png
            ├── 7
                └── 7.png
            ├── 8
                └── 8.png
            └── 9
                └── 9.png
"""

import numpy
import matplotlib.pyplot as plt
import PIL
import os
import torchvision


def my_image(file_path):
    # 将图片放缩至 (28,28)
    ReSize = torchvision.transforms.Resize((28, 28))
    # 用于存储数据的列表
    training_data_list = []
    # 将路径下的文件转化 列表 --- 图片的标签列表
    num_class = [cla for cla in os.listdir(file_path)]
    for cla in num_class:
        # 每一个标签文件夹
        cla_path = os.path.join(file_path,cla)
        # 每一个标签文件夹下的图片列表
        images = os.listdir(cla_path)
        for image in images:
            # 每一张图片的路径
            image_path = os.path.join(cla_path,image)

            # 开始对数据进行处理
            # 将图片转为灰度图片
            image_array = PIL.Image.open(image_path).convert('L')
            # 将图片的大小缩放到 (28,28)
            image_array_crop = ReSize(image_array)
            # 将 PIL.Image.Image 数据类型变为 ndarry 二维数组类型 ---- 并将其展平为一维数组(784)列 ---网络中输入数据的固定格式
            image_data = numpy.asfarray(image_array_crop).reshape(784)
            # 像素值0表示黑色  255表示白色 但是 MNIST 中相反因此需要用 255-image_data
            image_data = 255 - image_data
            # 数据归一化并且进行偏移0.01,防止0输入造成梯度消失
            image_data = (image_data/255.0 * 0.99) + 0.01
            record = numpy.append(float(cla),image_data)
            train_data_list.append(record)

    return training_data_list


# 与 Network.py中的 train_data_list 效果一致
training_data_list = my_image("/home/zxz/Proj/deeplearning/Create_neural_network/my_image")
print(training_data_list[0])

"""
# 可视化图片
    plt.imshow(image_data.reshape(28,28), cmap='Greys', interpolation='None')
    plt.show()
"""


