hibernate入门,springboot整合hibernate
Mybatis和Hibernate是我们常用的两大ORM框架,这篇文章主要介绍hibernate的使用,如何通过springboot整合hibernate,实现简单的crud功能。
添加依赖
首先,需要创建一个springboot项目,这里就取名为hibernate。项目创建完成后,修改pom.xml,添加项目必要的的依赖
    4.0.0


        org.springframework.boot
        spring-boot-starter-parent
        2.3.4.RELEASE


    com.example
    hibernate
    0.0.1-SNAPSHOT


        1.8
        8.0.28
        1.1.21
        1.18.22


            org.springframework.boot
            spring-boot-starter-web


            org.springframework.boot
            spring-boot-starter-test
            test


            org.projectlombok
            lombok
            ${lombok.version}


            mysql
            mysql-connector-java
            ${mysql.version}


            com.alibaba
            druid
            ${druid.version}


            org.springframework.boot
            spring-boot-starter-data-jpa


            org.hibernate
            hibernate-core


                org.springframework.boot
                spring-boot-maven-plugin
配置文件
然后修改配置文件application.yml
server:
  port: 8080
  servlet:
    context-path: /

spring:
  # 数据源
  datasource:
    username: root
    password: root
    url: jdbc:mysql://localhost:3306/hibernate
    driver-class-name: com.mysql.cj.jdbc.Driver
    type: com.alibaba.druid.pool.DruidDataSource
  # 只返回不为null的数据
  jackson:
    default-property-inclusion: non_null

  jpa:
    database: MYSQL
    show-sql: true
    hibernate:
      ddl-auto: update
    properties:
      hibernate:
        dialect: org.hibernate.dialect.MySQL8Dialect
    database-platform: org.hibernate.dialect.MySQL8Dialect

logging:
  level:
    springfox: error
    com.example.hibernate: debug
完成以上工作,就可以开始使用hibernate了。
实体类
首先创建一个实体类User:在项目根目录下创建entity包,在entity包下创建一个类User
package com.example.hibernate.entity;

import lombok.Data;

import javax.persistence.*;
import java.io.Serializable;

/**
 * @author heyunlin
 * @version 1.0
 */
@Data
@Entity
@Table(name = "user")
public class User implements Serializable {
    private static final long serialVersionUID = 18L;

    @Id
    @GeneratedValue(strategy = GenerationType.AUTO)
    private Integer id;

    /**
     * 用户名
     */
    @Column(name = "username")
    private String username;

    /**
     * 密码
     */
    @Column(name = "password")
    private String password;
}
其中@Entity表示这是一个JPA实体类,@Table(name = "user")指定实体类对应数据库表名为user,@Id表示数据库的标识字段,也就是主键,@Column指定对应数据库字段。
持久层
接下来,创建持久层对象
在项目根目录下创建dao包,在entity包下创建一个UserDao接口,然后继承JpaRepository接口,该接口有两个参数化类型,第一个表示实体类的类型,第二个表示主键的类型,也就是@Id注解标注的字段的类型,这里是Integer。
package com.example.hibernate.dao;

import com.example.hibernate.entity.User;
import org.springframework.data.jpa.repository.JpaRepository;
import org.springframework.stereotype.Repository;

/**
 * @author heyunlin
 * @version 1.0
 */
@Repository
public interface UserDao extends JpaRepository {

}
然后在启动类上面使用@EnableJpaRepositories注解
package com.example.hibernate;

import org.slf4j.Logger;
import org.slf4j.LoggerFactory;
import org.springframework.boot.SpringApplication;
import org.springframework.boot.autoconfigure.SpringBootApplication;
import org.springframework.data.jpa.repository.config.EnableJpaRepositories;

/**
 * @author heyunlin
 * @version 1.0
 */
@SpringBootApplication
@EnableJpaRepositories
public class HibernateApplication {
    private static final Logger logger = LoggerFactory.getLogger(HibernateApplication.class);

    public static void main(String[] args) {
        if (logger.isDebugEnabled()) {
            logger.debug("启动hibernate...");
        }

        SpringApplication.run(HibernateApplication.class, args);
    }

}
业务层
接下来创建业务层,在项目根目录下创建service包,在service包下创建一个UserService接口
package com.example.hibernate.service;

import com.example.hibernate.entity.User;

import java.util.List;

/**
 * @author heyunlin
 * @version 1.0
 */
public interface UserService {

    /**
     * 查询全部用户
     * @return List
     */
    List selectAll();
}
service包下面创建impl包,在impl包下创建UserService的实现类,调用持久层userDao的方法
package com.example.hibernate.service.impl;

import com.example.hibernate.dao.UserDao;
import com.example.hibernate.entity.User;
import com.example.hibernate.service.UserService;
import org.springframework.beans.factory.annotation.Autowired;
import org.springframework.stereotype.Service;

import java.util.List;

/**
 * @author heyunlin
 * @version 1.0
 */
@Service
public class UserServiceImpl implements UserService {
    private final UserDao userDao;

    @Autowired
    public UserServiceImpl(UserDao userDao) {
        this.userDao = userDao;
    }

    @Override
    public List selectAll() {
        return userDao.findAll();
    }

}
功能测试
完成以上任务之后,启动项目
可以看到,hibernate在启动过程中自动根据User实体类帮我们创建了user表。
接着我们往表里插一条数据用来测试
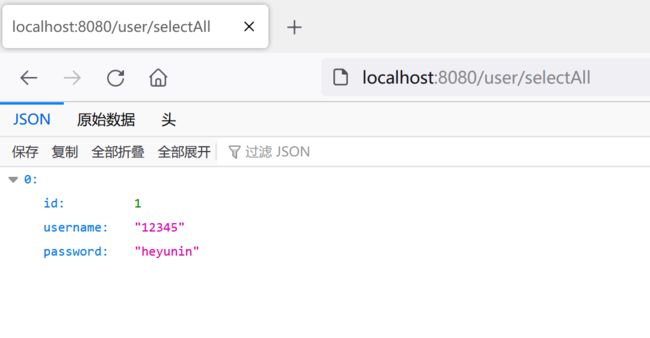
INSERT INTO user(id, username, password) VALUES (1, 'heyunin', '12345');然后访问http://localhost:8080/user/selectAll获取全部用户
添加、修改和删除的方法就不测试了,按照同样的步骤在service层和controller层创建对应的方法就可以了。
好了,文章就分享到这里了,看完如果觉得对你有所帮助,不要忘了点赞+收藏哦~

