python调用halcon程序/.hdev文件/直接调用halcon引擎
一、前言
python有两种调用halcon的方法
1、安装halcon的python库,pip install mvtec-halcon==20111
然后python代码中主要调用方式为:通过ha来调用halcon中的各种算子,本人不是很喜欢这种方式,后面主要介绍第2种方法。
import halcon as ha

if __name__ == '__main__':
    img = ha.read_image('pcb')

    region = ha.threshold(img, 0, 122)
    num_regions = ha.count_obj(ha.connection(region))

    print(f'Number of Regions: {num_regions}')
2、python是可以直接调用halcon的.hdev程序的。
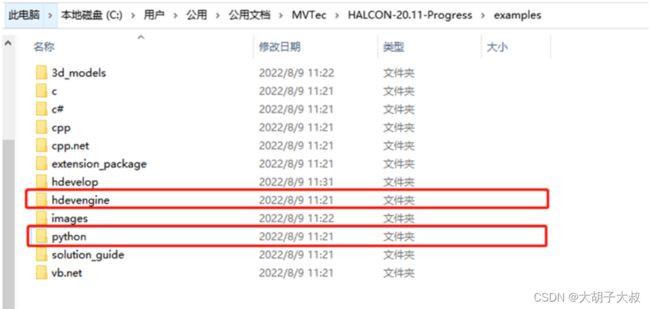
开始的时候从网上找了很多代码,不过都写的很复杂,而且加入了很多python的库,各种python的库的安装也比较头痛,后来发现halcon提供了参考代码,在下图的位置
本人也写了一个简单的例子供大家参考,简单说一下步骤
步骤1:安装halcon的库,主要用于向halcon程序输入参数用,通过pip安装即可:pip install mvtec-halcon==20111
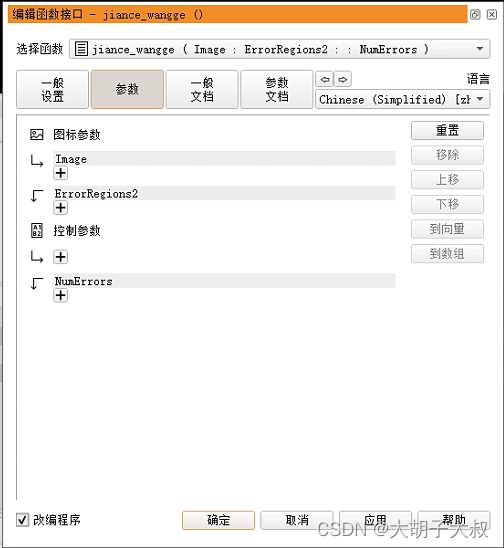
步骤2:写halcon程序,需要将halcon的程序封装到一个方法里面,方便调用,和C#引擎直接halcon程序的方法类似。
步骤3:写python代码,输入和接收halcon的参数
halcon程序,halcon程序的名称为:test_halcon.hdev,后面的python程序会用到
dev_update_window ('off')
*合格
*read_image (Image, 'D:/2022/1218test/数据/测试/1218侧面1007895p0')
*不合格
*read_image (Image, 'D:/2022/1218test/数据/测试/1218侧面100789p1')
*read_image (Image, 'D:/2022/1218test/数据/测试/1218侧面100789p2')
read_image (Image, 'D:/2022/1218test/数据/测试/1218侧面1007859p3')

dev_close_window ()

get_image_size (Image, Width, Height)
dev_open_window_fit_image (Image, 0, 0, Width/2, Height/2, WindowHandle)
set_display_font (WindowHandle, 18, 'mono', 'true', 'false')
dev_set_draw ('margin')
dev_set_line_width (1)
dev_display(Image)

*合格位置
jiance_wangge (Image, ErrorRegions2, NumErrors)

if (NumErrors > 0)
    disp_message (WindowHandle, 'Mesh not OK', 'window', 24, 12, 'red', 'true')
else
    disp_message (WindowHandle, 'Mesh OK', 'window', 24, 12, 'black', 'true')
endif
jiance_wangge封装的算子
jiance_wangge代码
gen_rectangle1 (ROI_0, 476.5, 624.5, 596.5, 1048.5)
*gen_rectangle1 (ROI_0, 696.5, 636.5, 844.5, 1044.5)

reduce_domain (Image, ROI_0, ImageReduced)
*read_image (Image, 'plastic_mesh/plastic_mesh_')
mean_image (ImageReduced, ImageMean, 49, 49)
*dyn_threshold (ImageReduced, ImageMean, RegionDynThresh, 15, 'dark')
dyn_threshold (ImageReduced, ImageMean, RegionDynThresh, 15, 'light')
connection (RegionDynThresh, ConnectedRegions)
select_shape (ConnectedRegions, ErrorRegions2, 'area', 'and', 200, 99999)
count_obj (ErrorRegions2, NumErrors)
dev_display (Image)
dev_set_color ('red')


return ()
python调用halcon程序代码
import os
import halcon as ha
import halcon_IO as hal_IO
# from matplotlib import pyplot as plt
if __name__ == "__main__":
    #hdev_example_dir = hal_IO.setup_hdev_engine()
    #program = ha.HDevProgram(
    #    os.path.join(hdev_example_dir, 'hdevelop', 'wangge_halcon.hdev')
    #)
    program = ha.HDevProgram('test_halcon.hdev')
    proc = ha.HDevProcedure.load_local(program, 'jiance_wangge')
    proc_call = ha.HDevProcedureCall(proc)
    #acq_handle = hal_IO.init_acq_handle(program)
    for _ in range(3):
        #acq_img = ha.grab_image(acq_handle)
        acq_img=ha.read_image('D:/2022/1218test/数据/测试/1218侧面100789p3')
        width, height = ha.get_image_size_s(acq_img)
        window = hal_IO.open_window(width/2, height/2, row=100, col=100)
        ha.disp_obj(acq_img, window)
        #传入图像参数Image
        proc_call.set_input_iconic_param_by_name('Image', acq_img)
        proc_call.execute()
        #将halcon的输出参数传回来
        fin_region = proc_call.get_output_iconic_param_by_name('ErrorRegions2')
        fin_area = proc_call.get_output_control_param_by_name('NumErrors')
        hal_IO.display_fin(window, fin_region, fin_area)
        input('Press Enter to continue...')
        zoom_window = hal_IO.zoom_in_on_fin(acq_img, fin_region)
        input('Press Enter to continue...')
上面的程序段用到了halcon_IO,主要是用于打开显示窗口,用于显示图像和region等数据
import os
import halcon as ha

def open_window(width, height, row, col):
    """打开窗口"""
    if os.name == 'nt':
        ha.set_system('use_window_thread', 'true')

    return ha.open_window(
        row=row,
        column=col,
        width=width,
        height=height,
        father_window=0,
        mode='visible',
        machine=''
    )


def setup_hdev_engine():
    """获取引擎"""
    example_dir = ha.get_system_s('example_dir')
    hdev_example_dir = os.path.join(example_dir, 'hdevengine')

    engine = ha.HDevEngine()
    engine.set_procedure_path(os.path.join(hdev_example_dir, 'procedures'))

    return hdev_example_dir


def init_acq_handle(program):
    """采集图像"""
    proc = ha.HDevProcedure.load_local(program, 'init_acquisition')
    proc_call = ha.HDevProcedureCall(proc)
    proc_call.execute()
    return proc_call.get_output_control_param_by_name('AcqHandle')


def display_fin(window, fin_region, fin_area):
    """显示信息"""
    ha.set_color(window, 'red')
    ha.set_draw(window, 'margin')
    ha.disp_obj(fin_region, window)

    ha.set_color(window, 'red')
    ha.set_tposition(window, 20, 20)
    ha.write_string(window, f'缺陷数量: {fin_area[0]}')


def zoom_in_on_fin(img, fin_region):
    """显示放大的region在新的窗口"""
    zoom_scale = 2
    margin = 5

    _, center_row, center_col = ha.area_center_s(fin_region)
    row1, col1, row2, col2 = ha.smallest_rectangle1_s(fin_region)

    region_height = row2 - row1
    region_width = col2 - col1

    zoom_window = open_window(
        width=(region_width + (2 * margin)) * zoom_scale,
        height=(region_height + (2 * margin)) * zoom_scale,
        row=100 + (center_row / 2),
        col=100 + ((center_col / 2) + 30)
    )
    ha.set_part(
        zoom_window,
        row1 - margin,
        col1 - margin,
        row2 - margin,
        col2 - margin
    )
    ha.disp_obj(img, zoom_window)
    ha.set_color(zoom_window, 'red')
    ha.disp_obj(fin_region, zoom_window)

    return zoom_window
更新记录:2023年5月9日更新,上传代码
声明:不想自己动手的朋友可以点击下面的链接下载,一共放了三个链接,全部下载下来以后放到一个文件夹中即可运行。每个链接1积分。
halcon的接口用于python的调用程序(一)
https://download.csdn.net/download/sunnyrainflower/87766081
halcon的接口用于python的调用程序(二)
https://download.csdn.net/download/sunnyrainflower/87766083
halcon的接口用于python的调用程序(三)
https://download.csdn.net/download/sunnyrainflower/87766086
更新记录:2023年6月30日更新,增加环境说明
注意:pip 安装命令“pip install mvtec-halcon==20111”里面的版本号要和自己电脑上的halcon版本号一致,还要注意自己的halcon是否可用,license自己到官网下载。
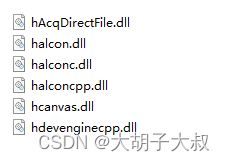
如果写好的python程序想要移植到别的电脑上用,除了需要license以外,还需将下面的dll文件放置到这个路径里面“C:\Windows\System32”


