Python SMTP发送邮件
如何使用Python发送QQ邮件?如何发送带附件的邮件?这篇文章将详细说明
目录
一、发送邮件
二、发送HTML格式的邮件
三、在HTML中添加图片
四、发送带附件的邮件
五、最终整合版
六、配置指引
一、发送邮件
import smtplib
from email.mime.text import MIMEText
from email.mime.multipart import MIMEMultipart

# 邮件服务器配置
smtp_server = 'smtp.qq.com'
smtp_port = 587  # QQ邮箱的端口号为587

# 发送方邮箱账号和密码
sender_email = '[email protected]'
sender_password = 'your_sender_email_password'

# 接收方邮箱地址
receiver_email = '[email protected]'

# 创建邮件内容
subject = 'Python SMTP 邮件测试'
body = '这是一封使用Python发送的测试邮件。'
message = MIMEMultipart()
message['From'] = sender_email
message['To'] = receiver_email
message['Subject'] = subject

# 添加邮件正文
# MIMEText有三个参数第一个为文本内容,第二个 plain 设置文本格式,第三个 utf-8 设置编码可不填
message.attach(MIMEText(body, 'plain'))

# 发送邮件
try:
    smtp = smtplib.SMTP(smtp_server, smtp_port)
    smtp.starttls()  # 开启TLS加密连接
    smtp.login(sender_email, sender_password)
    smtp.sendmail(sender_email, receiver_email, message.as_string())
    print("邮件发送成功!")
except smtplib.SMTPException as e:
    print("邮件发送失败:", e)
finally:
    smtp.quit()
二、发送HTML格式的邮件
import smtplib
from email.mime.text import MIMEText
from email.mime.multipart import MIMEMultipart
# 邮件服务器配置
smtp_server = 'smtp.qq.com'
smtp_port = 587 # QQ邮箱的端口号为587
# 发送方邮箱账号和密码
sender_email = '[email protected]'
sender_password = 'your_sender_email_password'
# 接收方邮箱地址
receiver_email = '[email protected]'
# 创建邮件内容
subject = 'Python SMTP 邮件测试'
body = body = """Python 邮件发送测试...
"""
message = MIMEMultipart()
message['From'] = sender_email
message['To'] = receiver_email
message['Subject'] = subject
# 添加邮件正文
# MIMEText有三个参数第一个为文本内容,第二个 html设置文本格式,第三个 utf-8 设置编码可不填
message.attach(MIMEText(body, 'html'))
# 发送邮件
try:
smtp = smtplib.SMTP(smtp_server, smtp_port)
smtp.starttls() # 开启TLS加密连接
smtp.login(sender_email, sender_password)
smtp.sendmail(sender_email, receiver_email, message.as_string())
print("邮件发送成功!")
except smtplib.SMTPException as e:
print("邮件发送失败:", e)
finally:
smtp.quit()
三、在HTML中添加图片
import smtplib
from email.mime.text import MIMEText
from email.mime.multipart import MIMEMultipart
from email.mime.image import MIMEImage
# 邮件服务器配置
smtp_server = 'smtp.qq.com'
smtp_port = 587 # QQ邮箱的端口号为587
# 发送方邮箱账号和密码
sender_email = '[email protected]'
sender_password = 'your_sender_email_password'
# 接收方邮箱地址
receiver_email = '[email protected]'
# 创建邮件内容
subject = 'Python SMTP 邮件测试'
body = """Python 邮件发送测试...
图片演示:

"""
message = MIMEMultipart()
message['From'] = sender_email
message['To'] = receiver_email
message['Subject'] = subject
# 添加邮件正文
message.attach(MIMEText(body, 'html'))
# 指定图片为当前目录
fp = open('E:\demo\head_image.png', 'rb')
msgImage = MIMEImage(fp.read())
fp.close()
# 定义图片 ID,在 HTML 文本中引用
msgImage.add_header('Content-ID', '')
message.attach(msgImage)
# 发送邮件
try:
smtp = smtplib.SMTP(smtp_server, smtp_port)
smtp.starttls() # 开启TLS加密连接
smtp.login(sender_email, sender_password)
smtp.sendmail(sender_email, receiver_email, message.as_string())
print("邮件发送成功!")
except smtplib.SMTPException as e:
print("邮件发送失败:", e)
finally:
smtp.quit() 四、发送带附件的邮件
import smtplib
from email.mime.text import MIMEText
from email.mime.multipart import MIMEMultipart
from email.mime.application import MIMEApplication
from email.mime.image import MIMEImage
# 邮件服务器配置
smtp_server = 'smtp.qq.com'
smtp_port = 587 # QQ邮箱的端口号为587
# 发送方邮箱账号和密码
sender_email = '[email protected]'
sender_password = 'your_sender_email_password'
# 接收方邮箱地址
receiver_email = '[email protected]'
# 创建邮件内容
subject = 'Python SMTP 邮件测试'
body = """Python 邮件发送测试...
"""
message = MIMEMultipart()
message['From'] = sender_email
message['To'] = receiver_email
message['Subject'] = subject
# 添加邮件正文
message.attach(MIMEText(body, 'html'))
# 添加附件
import os
file_path = 'E:\\demo\\《Python+Cookbook》.pdf'
file_name = os.path.basename(file_path) # 只获取文件名
with open(file_path, 'rb') as file:
part = MIMEApplication(file.read(), Name=file_name) # Name参数指定了附件的文件名
part['Content-Disposition'] = f'attachment; filename="{file_path}"'
message.attach(part)
# 发送邮件
try:
smtp = smtplib.SMTP(smtp_server, smtp_port)
smtp.starttls() # 开启TLS加密连接
smtp.login(sender_email, sender_password)
smtp.sendmail(sender_email, receiver_email, message.as_string())
print("邮件发送成功!")
except smtplib.SMTPException as e:
print("邮件发送失败:", e)
finally:
smtp.quit()五、最终整合版
import smtplib
from email.mime.text import MIMEText
from email.mime.multipart import MIMEMultipart
from email.mime.application import MIMEApplication
from email.mime.image import MIMEImage
# 邮件服务器配置
smtp_server = 'smtp.qq.com'
smtp_port = 587 # QQ邮箱的端口号为587
# 发送方邮箱账号和密码
sender_email = '[email protected]'
sender_password = 'your_sender_email_password'
# 接收方邮箱地址
receiver_email = '[email protected]'
# 创建邮件内容
subject = 'Python SMTP 邮件测试'
body = """Python 邮件发送测试...
图片演示:

"""
message = MIMEMultipart()
message['From'] = sender_email
message['To'] = receiver_email
message['Subject'] = subject
# 添加邮件正文
message.attach(MIMEText(body, 'html'))
# 指定图片为当前目录
fp = open('E:\demo\head_image.png', 'rb')
msgImage = MIMEImage(fp.read())
fp.close()
# 定义图片 ID,在 HTML 文本中引用
msgImage.add_header('Content-ID', '')
message.attach(msgImage)
# 添加附件
file_path = 'E:\\demo\\《Python+Cookbook》.pdf'
file_name = os.path.basename(file_path) # 只获取文件名
with open(file_path, 'rb') as file:
part = MIMEApplication(file.read(), Name=file_name)
part['Content-Disposition'] = f'attachment; filename="{file_path}"'
message.attach(part)
# 发送邮件
try:
smtp = smtplib.SMTP(smtp_server, smtp_port)
smtp.starttls() # 开启TLS加密连接
smtp.login(sender_email, sender_password)
smtp.sendmail(sender_email, receiver_email, message.as_string())
print("邮件发送成功!")
except smtplib.SMTPException as e:
print("邮件发送失败:", e)
finally:
smtp.quit() 六、配置指引
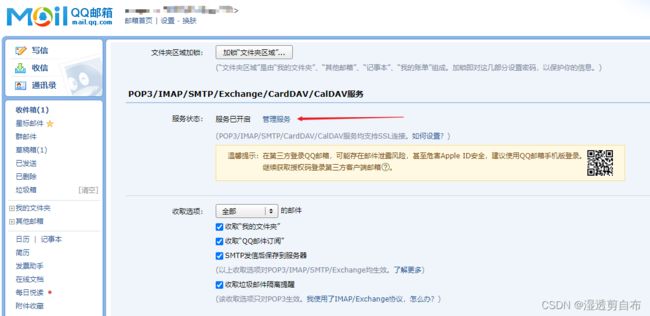
您需要将 [email protected] 和 your_sender_email_password 替换为实际的发件人邮箱账号和密码,将 [email protected] 替换为收件人的 QQ 邮箱地址。同时,确保开启了发件人邮箱的 SMTP 服务。
其中your_sender_email_password 的密码应当在QQ邮箱的设置--帐户中找到POP3/IMAP/SMTP/Exchange/CardDAV/CalDAV服务,点击管理服务,在跳转的新页面中点击生成授权码,这将作为你的密码使用


