撸一个基于VUE的WEB管理后台(一)
最近需要一个BS架构的管理后台,对工作过程中产生的调研资料进行登记、查询和导出。我们的调研资料都是人工收集,每年的产生量大概也就是万级,用户人数也不过百,从需求上来看并没有什么架构压力,正好适合我这样的WEB新手来练练手。特此记录下个人的整个开发过程。
初步设计方案
- 使用MySQL来存储结构化数据,调研资料通过WEB上传直接存放在服务器。
- 前后端分离
- 后端api server使用Spring全家桶,SpringBoot + Spring Data JPA
- 前端frontend基于花裤衩的vue-admin-template(https://github.com/PanJiaChen/vue-element-admin)来改造。
- 前端开发使用VSCode,装好Beautify插件和Vetur或者Vue2Snippets。
- 后端使用IDEA9,选择它是因为界面有些类似熟悉的VisualStudio,并支持直接创建Springboot工程。
- 方案大致如此,选型也没有什么特殊,原则上优先使用现成封装好的东西。
先阅读一下教程,大致对各类系统有所了解
Vue https://cn.vuejs.org/v2/guide/
Element-UI https://element.eleme.cn/#/zh-CN/component/quickstart
vue-admin-template https://github.com/PanJiaChen/vue-element-admin
Springboot https://spring.io/guides
Spring Data JPA https://docs.spring.io/spring-data/jpa/docs/current/reference/html/#preface
当然,各类博客也能找到很多参考资料,不再列举
先看前端,vue-admin-template这个模板自带mock,可以脱离服务端自己运行。
按照教程一步步安装好环境后,在项目目录下运行
npm run dev
一个登录页面就会出现在浏览器中。
前端项目的基本配置
因为开发部署环境不同,要先看一下整个项目结构,掌握一些有关路径相关的配置信息:
作为一个vue项目,首先要研究的当然是vue的配置信息 vue.config.js
vue.config.js
'use strict'
const path = require('path')
const defaultSettings = require('./src/settings.js')

function resolve(dir) {
  return path.join(__dirname, dir)
}

const name = defaultSettings.title || 'vue Element Admin' // page title
const port = 9527 // dev port

// All configuration item explanations can be find in https://cli.vuejs.org/config/
module.exports = {
  /**
   * You will need to set publicPath if you plan to deploy your site under a sub path,
   * for example GitHub Pages. If you plan to deploy your site to https://foo.github.io/bar/,
   * then publicPath should be set to "/bar/".
   * In most cases please use '/' !!!
   * Detail: https://cli.vuejs.org/config/#publicpath
   */
  publicPath: '/',
  outputDir: 'dist',
  assetsDir: 'static',
  lintOnSave: process.env.NODE_ENV === 'development',
  productionSourceMap: false,
  devServer: {
    port: port,
    open: true,
    overlay: {
      warnings: false,
      errors: true
    },
    proxy: {
      // change xxx-api/login => mock/login
      // detail: https://cli.vuejs.org/config/#devserver-proxy
      [process.env.VUE_APP_BASE_API]: {
        target: `http://localhost:${port}/mock`,
        changeOrigin: true,
        pathRewrite: {
          ['^' + process.env.VUE_APP_BASE_API]: ''
        }
      }
    },
    after: require('./mock/mock-server.js')
  },
  configureWebpack: {
    // provide the app's title in webpack's name field, so that
    // it can be accessed in index.html to inject the correct title.
    name: name,
    resolve: {
      alias: {
        '@': resolve('src')
      }
    }
  },
  chainWebpack(config) {
    config.plugins.delete('preload') // TODO: need test
    config.plugins.delete('prefetch') // TODO: need test

    // set svg-sprite-loader
    config.module
      .rule('svg')
      .exclude.add(resolve('src/icons'))
      .end()
    config.module
      .rule('icons')
      .test(/\.svg$/)
      .include.add(resolve('src/icons'))
      .end()
      .use('svg-sprite-loader')
      .loader('svg-sprite-loader')
      .options({
        symbolId: 'icon-[name]'
      })
      .end()

    // set preserveWhitespace
    config.module
      .rule('vue')
      .use('vue-loader')
      .loader('vue-loader')
      .tap(options => {
        options.compilerOptions.preserveWhitespace = true
        return options
      })
      .end()

    config
    // https://webpack.js.org/configuration/devtool/#development
      .when(process.env.NODE_ENV === 'development',
        config => config.devtool('cheap-source-map')
      )

    config
      .when(process.env.NODE_ENV !== 'development',
        config => {
          config
            .plugin('ScriptExtHtmlWebpackPlugin')
            .after('html')
            .use('script-ext-html-webpack-plugin', [{
            // `runtime` must same as runtimeChunk name. default is `runtime`
              inline: /runtime\..*\.js$/
            }])
            .end()
          config
            .optimization.splitChunks({
              chunks: 'all',
              cacheGroups: {
                libs: {
                  name: 'chunk-libs',
                  test: /[\\/]node_modules[\\/]/,
                  priority: 10,
                  chunks: 'initial' // only package third parties that are initially dependent
                },
                elementUI: {
                  name: 'chunk-elementUI', // split elementUI into a single package
                  priority: 20, // the weight needs to be larger than libs and app or it will be packaged into libs or app
                  test: /[\\/]node_modules[\\/]_?element-ui(.*)/ // in order to adapt to cnpm
                },
                commons: {
                  name: 'chunk-commons',
                  test: resolve('src/components'), // can customize your rules
                  minChunks: 3, //  minimum common number
                  priority: 5,
                  reuseExistingChunk: true
                }
              }
            })
          config.optimization.runtimeChunk('single')
        }
      )
  }
}
配置有点儿长 ,好在源码里的注释比较清晰,相关配置项的含义和使用方法可以参考这里:https://cli.vuejs.org/config/#global-cli-config,我主要关注的是
- devServer.proxy和devServer.after,我把这一块注释了,因为前后端都是我开发,不打算使用mock,前端直接连后台
- publicPath,这个参数详细解释一下就是,我们这个后台其实是分两部分,一部分是前端静态资源文件,比如index.html和app.js等,还一部分是java编写的api server,前端静态资源我们打算部署在nginx代理之后,用户访问的时候需要使用http://www.test-url.com/report这样的URL而不是直接http://www.test-url.com,因此publicPath这里要配置成URL子路径的名称 /report
- lintOnSave,不太喜欢这个,因为每次都要检查语法格式,显示一堆警告信息,我嫌烦给关掉了
- name,改成自己的标题,当然也可以在src/setting.js里修改
- port,前端项目在本地调试时,vue-cli会自动起一个http server,方便开发者对网站的静态资源文件进行浏览测试,这个是port用来配置http server服务端口的。我留着没改。但如果本地有多个前端项目在同时进行开发测试,这里就要设置成不同端口了。
接下来看配置文件 .env.development
.env.development
# just a flag
ENV = 'development'

# base api
VUE_APP_BASE_API = '/dev-api'

# vue-cli uses the VUE_CLI_BABEL_TRANSPILE_MODULES environment variable,
# to control whether the babel-plugin-dynamic-import-node plugin is enabled.
# It only does one thing by converting all import() to require().
# This configuration can significantly increase the speed of hot updates,
# when you have a large number of pages.
# Detail:  https://github.com/vuejs/vue-cli/blob/dev/packages/@vue/babel-preset-app/index.js

VUE_CLI_BABEL_TRANSPILE_MODULES = true
- 这是一个用于开发过程的配置文件,主要配置项就是VUE_APP_BASE_API了。花裤衩把所有的XHR请求使用axio封装起来了,并以这个VUE_APP_BASE_API作为baseURL。我开发的时候,api server就运行在本地,所以要将其修改为本地api server的地址
VUE_APP_BASE_API = 'http://localhost:10200/'
用户登录界面
好了,这时在vue-admin-template目录下运行
npm run dev
 DONE  Compiled successfully in 22288ms                                                                         21:40:24
  App running at:
 - Local:   http://localhost:9527/report/
 - Network: http://172.29.95.1:9527/report/
  Note that the development build is not optimized.
  To create a production build, run npm run build.
然后我们用浏览器访问 http://localhost:9527/report/,就可以得到如下的登录界面了

尝试点击登录按钮会发现报错,打开浏览器的调试窗口,观察到login时页面尝试向http://localhost:10200/user/login发起了请求,我们的api server还没有运行呢,当然会报错。
但这并不妨碍我们研究一下vue-admin-template是如何处理用户登陆的。
用户识别机制
我们都知道,http是一个无状态的协议,浏览器每次向服务端的请求,哪怕是同一台电脑,同一个用户连续发起的,对服务端来说都会被认为是完全独立且不相干的请求。那如果服务端要能安全的识别发起请求的用户身份,则必须要在请求中包含一些服务端能够识别的用户的特有信息,具体识别用户身份的实现方式需要前端和服务端共同约定,且随技术方案不同而不同。
一般而言,用户识别机制都是在用户登录后,服务端返回一个用户识别ID(或者叫Token等等),浏览器记住这个ID,浏览器随后对这个网站发起请求时,可以:
- 约定好名称,把这个ID写入到http header的cookie字段中,比如我们常见的JSESSIONID
- 把这个ID以参数的形式加入到URL中,比如http://www.test.com/dosomething?token=xxxx
- 把这个ID以各种形式,比如json字段,加入到http正文之中
- ……
明白了其中原理,无论机制如何变化,原理都是一样的。回到前端项目源码,我们找到 view/login/index.vue,看看具体实现:
handleLogin() {
  this.$refs.loginForm.validate(valid => {
    if (valid) {
      this.loading = true
      this.$store.dispatch('user/login', this.loginForm)
        .then(() => {
          this.$router.push({ path: this.redirect || '/' })
          this.loading = false
        })
        .catch(() => {
          this.loading = false
        })
    } else {
      console.log('error submit!!')
      return false
    }
  })
}
这里用了store组件,估计是用store来存储服务端返回的用户ID,继续跟进 store/modules/user.js
import { login, logout, getInfo } from '@/api/user'
const actions = {
  // user login
  login({ commit }, userInfo) {
    const { username, password } = userInfo
    return new Promise((resolve, reject) => {
      login({ username: username.trim(), password: password }).then(response => {
        const { data } = response
        commit('SET_TOKEN', data.token)
        setToken(data.token)
        resolve()
      }).catch(error => {
        reject(error)
      })
    })
  },
这里可以看出,api/user中的login实现了用户登录请求,该请求成功后,将返回数据里的token字段存储到store中,我们的目的是研究该项目用户认证的实现机制,所以我们继续跟进 api/user,查看login的实现
import request from '@/utils/request'
export function login(data) {
  return request({
    url: '/user/login',
    method: 'post',
    data
  })
}
……真是一环套一环,通过其他部分的代码不难发现,这个utils/request 组件应该是对前端所有XHR请求进行了二次封装,因此,用户认证机制很可能就是在这里实现的,我们再跟进 utils/request,request组件的这块代码比较长,我们分段来看
import axios from 'axios'
import { MessageBox, Message } from 'element-ui'
import store from '@/store'
import { getToken } from '@/utils/auth'

// create an axios instance
const service = axios.create({
  baseURL: process.env.VUE_APP_BASE_API, // url = base url + request url
  withCredentials: true, // send cookies when cross-domain requests
  timeout: 5000 // request timeout
})
这里可以看到初始化并使用了axio,axio的官方文档在这里 https://cn.vuejs.org/v2/cookbook/using-axios-to-consume-apis.html
没有深入了解,但也能知道axios也是对前端XHR请求的一类封装,并提供了拦截器之类比较便利的功能吧。果然process.env.VUE_APP_BASE_API就是我们之前在.env.development中配置的XHR请求路径。我这里配置的是 http://localhost:10200,继续看代码
// request interceptor
service.interceptors.request.use(
  config => {
    // do something before request is sent
    if (store.getters.token) {
      // let each request carry token --['X-Token'] as a custom key.
      // please modify it according to the actual situation.
      config.headers['X-Token'] = getToken()
    }
    return config
  },
  error => {
    // do something with request error
    console.log(error) // for debug
    return Promise.reject(error)
  }
)
这部分对使用request组件发起的XHR请求进行拦截处理,如果token(也就是用户登录后服务端返回的ID)存在,就在请求的http header中加入一个名称为X-Token的header,其内容就是token。这正是前面提到过的用户识别机制之一——将用户登录时服务端返回的ID封装到后续请求的header之中。
最后再看一下request组件对请求相应的拦截处理
service.interceptors.response.use(
  /**
   * If you want to get information such as headers or status
   * Please return  response => response
  */

  /**
   * Determine the request status by custom code
   * Here is just an example
   * You can also judge the status by HTTP Status Code.
   */
  response => {
    const res = response.data

    // if the custom code is not 20000, it is judged as an error.
    if (res.code !== 20000) {
      Message({
        message: res.message || 'error',
        type: 'error',
        duration: 5 * 1000
      })

      // 50008: Illegal token; 50012: Other clients logged in; 50014: Token expired;
      if (res.code === 50008 || res.code === 50012 || res.code === 50014) {
        // to re-login
        MessageBox.confirm('You have been logged out, you can cancel to stay on this page, or log in again', 'Confirm logout', {
          confirmButtonText: 'Re-Login',
          cancelButtonText: 'Cancel',
          type: 'warning'
        }).then(() => {
          store.dispatch('user/resetToken').then(() => {
            location.reload()
          })
        })
      }
      return Promise.reject(res.message || 'error')
    } else {
      return res
    }
  },
代码中response.data对应着请求的响应数据,我们可以依据拦截器的处理流程看出,request组件对服务端的响应结果是有统一格式要求的。类似这样:
{
 code: [20000|50008|50012|50014|others...],
 message: 'some message text',
 ...
}
其中code解释服务端针对该请求的处理结果,message可以用来传递错误信息,比如服务端认为请求中的token不合法等等。这样便要求我们在实现api server的时候,每一个api的响应格式最好都要遵循这个规则来实现。这样做有几个好处:
- 前端的所有XHR请求就都可以通过request组件来实现
- 便于前端集中处理服务端返回的通用错误信息
拦截器处理完各类错误信息后,将response.data传递给request组件的用户做最后处理。
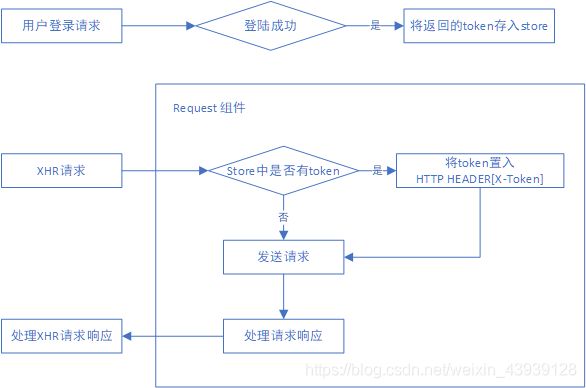
最后,我们再回顾一下这个前端项目中有关用户认证的处理流程

logout流程就比较简单了,直接reset本地store中的token即可。当然,如果api server也设计了用户注销的api,那我们在reset本地token的同时再使用request组件按照api设计,发起一次请求即可。
