【Spring -02学习】
Spring 笔记记录
-
- 1. spring整合mybatis 注解开发
- 2. spring整合junit
- 3. IOC底层核心原理
-
- 3.1 层次结构
- 3.2 组件扫描器
- 3.3 自定义导入器
- 3.4 自定义注册器
- 3.5 bean初始化过程解析
- 4.AOP配置
-
- 4.1 AOP核心概念
- 4.2 AOP入门案例
-
- 4.2.1 XML方式
- 4.2.2 注解方式
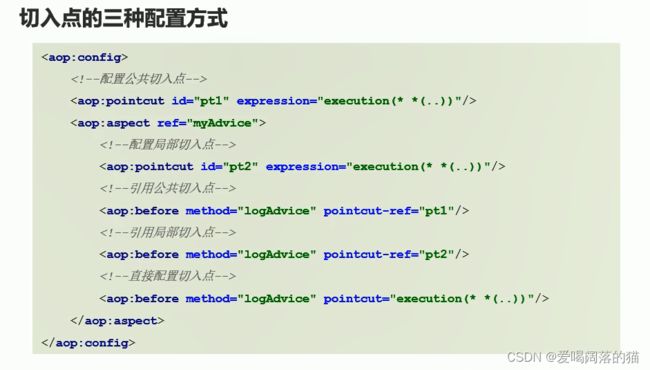
- 4. 3 切入点的三种形式
- 4.4 五种通知类型
- 4.5 通知顺序
- 4.6 通知获取参数数据
- 4.7 利用AOP测接口执行时间
- 5. 静态代理 装饰着模式
- 6. 动态代理
- 7. cglib--动态代理
- 8. AOP织入时机
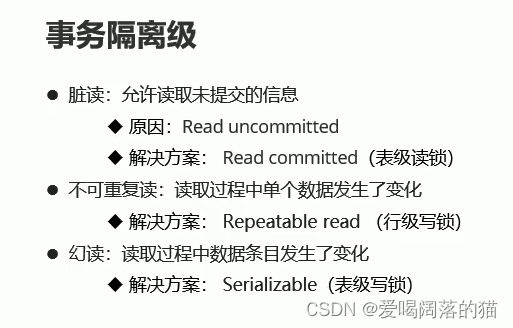
- 9 Spring对事物的管理
-
- 9.1 Spring事务核心对象
- 9.2 PlatformTransactionManager
- 9.3 TranasactionDefinition
- 9.4 TranasactionStatus
- 9.5 事务控制方式
-
- 1. 编程式
- 2.声明式xml
- 3.声明式 注解
- 4. 事务传播行为
1. spring整合mybatis 注解开发

1.引入依赖
 <dependencies>
        <dependency>
            <groupId>org.springframework</groupId>
            <artifactId>spring-context</artifactId>
            <version>5.1.9.RELEASE</version>
        </dependency>
        <dependency>
            <groupId>org.springframework</groupId>
            <artifactId>spring-jdbc</artifactId>
            <version>5.1.9.RELEASE</version>
        </dependency>
        <dependency>
            <groupId>com.alibaba</groupId>
            <artifactId>druid</artifactId>
            <version>1.2.8</version>
        </dependency>
        <dependency>
            <groupId>mysql</groupId>
            <artifactId>mysql-connector-java</artifactId>
            <version>5.1.49</version>
        </dependency>
        <dependency>
            <groupId>org.mybatis</groupId>
            <artifactId>mybatis</artifactId>
            <version>3.5.9</version>
        </dependency>
        <dependency>
            <groupId>org.mybatis</groupId>
            <artifactId>mybatis-spring</artifactId>
            <version>2.0.7</version>
        </dependency>
    </dependencies>
    2.resources下编写properties文件,用于连接数据库
    jdbc.driver=com.mysql.jdbc.Driver
jdbc.url=jdbc:mysql://localhost:3306/spring_db?useSSL=false
jdbc.username=root
jdbc.password=root
3.使用注解@PropertySource引入数据库配置文件,使用注解@Bean创建DruidDataSource
@PropertySource("classpath:jdbc.properties")
public class JDBCConfig {
    @Value("${jdbc.driver}")
    private String Driver;
    @Value("${jdbc.url}")
    private String url;
    @Value("${jdbc.username}")
    private String username;
    @Value("${jdbc.password}")
    private String password;
    @Bean("dataSource")
    public DruidDataSource getDataSource(){
        DruidDataSource ds=new DruidDataSource();
        ds.setDriverClassName(Driver);
        ds.setUrl(url);
        ds.setUsername(username);
        ds.setPassword(password);
        return  ds;
    }
}
4.使用注解@Bean创建SqlSessionFactoryBean 和MapperScannerConfigurer ,分别用来配置数据源和扫描实体类bean以及mapper映射文件
public class MyBatisConfig {
    @Bean
    public SqlSessionFactoryBean getSqlSessionFactoryBean(@Autowired DataSource dataSource){
        SqlSessionFactoryBean sessionFactoryBean=new SqlSessionFactoryBean();
        sessionFactoryBean.setTypeAliasesPackage("com.zfz.bean");
        sessionFactoryBean.setDataSource(dataSource);
        return sessionFactoryBean;
    }
    @Bean
    public MapperScannerConfigurer getMapperScannerConfigurer(){
        MapperScannerConfigurer msc=new MapperScannerConfigurer();
        msc.setBasePackage("com.zfz.mapper");
        return msc;
    }
}
5.使用以下注解引入上述两个配置,并指明spring扫描基础包
@Configuration
@ComponentScan("com.zfz")
@Import({JDBCConfig.class,MyBatisConfig.class})
public class SpringConfig {
}
6.写dao层接口
public interface AccountMapper {
    @Insert("    insert into account(name, money)\n" +
            "        values (#{name}, #{money})")
    void save(Account account);
    @Delete("  delete\n" +
            "        from account\n" +
            "        where id = #{id}")
    void delete(Integer id);
    @Update(" update account\n" +
            "        set name=#{name},\n" +
            "            money=#{money}\n" +
            "        where id = #{id}")
    void update(Account account);
    @Select("      select *\n" +
            "        from account")
    List<Account> findAll();
    @Select("    select *\n" +
            "        from account\n" +
            "        where id = #{id}")
    Account findById(Integer id);
}
7.service层接口
public interface AccountService {
    void save(Account account);
    void delete(Integer id);
    void update(Account account);
    List<Account> findAll();
    Account findById(Integer id);
}
8.service实现及注入dao

@Service("accountService")
public class AccountServiceImpl implements AccountService {
    @Autowired
    private AccountMapper accountDao;

    @Override
    public void save(Account account) {
        accountDao.save(account);
    }

    @Override
    public void delete(Integer id) {
        accountDao.delete(id);
    }

    @Override
    public void update(Account account) {
        accountDao.update(account);
    }

    @Override
    public List<Account> findAll() {
        return accountDao.findAll();
    }

    @Override
    public Account findById(Integer id) {
        return accountDao.findById(id);
    }
}
9.测试
public class AccountApp {
    public static void main(String[] args) {
        ApplicationContext ctx=new AnnotationConfigApplicationContext(SpringConfig.class);
        AccountService accountService = (AccountService) ctx.getBean("accountService");
        List<Account> all = accountService.findAll();
        for (Account account : all) {
            System.out.println(account);
        }
        DruidDataSource dataSource = (DruidDataSource) ctx.getBean("dataSource");

        System.out.println(dataSource);
    }
}
输出成功:
![]()
2. spring整合junit
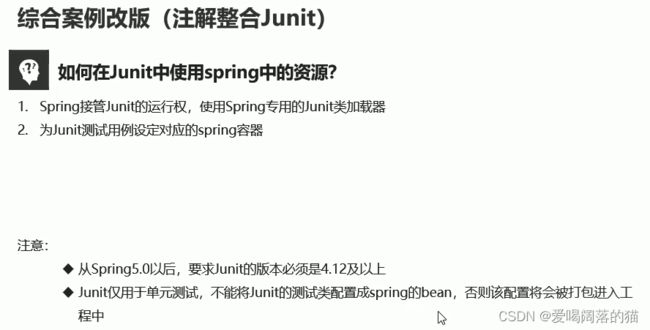

使用注解开发
@RunWith(SpringRunner.class)
@ContextConfiguration(classes = {SpringConfig.class})
public class AccountServiceTest {
    @Autowired
    private AccountService accountService;
    @Test
    public void findById(){
        Account byId = accountService.findById(1);
        Assert.assertEquals("Mike",byId.getName());
    }
}
3. IOC底层核心原理
3.1 层次结构

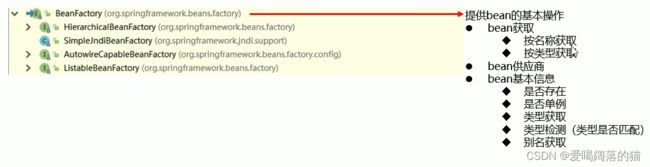
在这里插入图片描述


3.2 组件扫描器
在测试中排除非自己写的bean,只需要能够加载启动自己方法的bean,其他的排除;比如我只测试dao层或者service层接口,但是我不需要让他们整个都跑,只需要排除即可

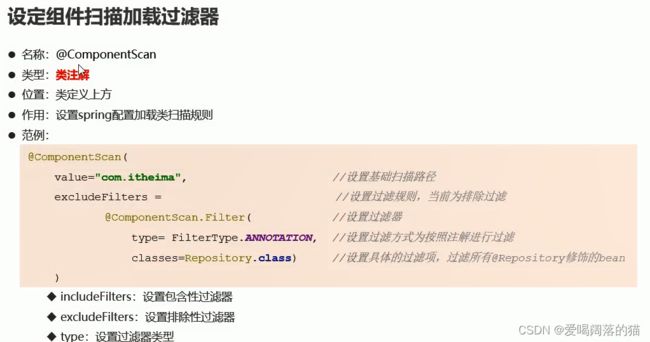
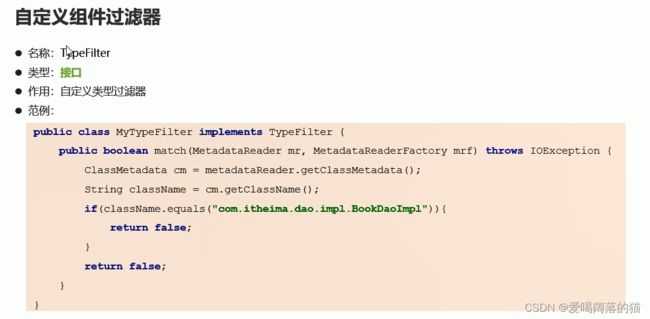
3.3 自定义导入器
应用场景:当bean很多很多时,需要自己写导入器加载bean


自定义导入器


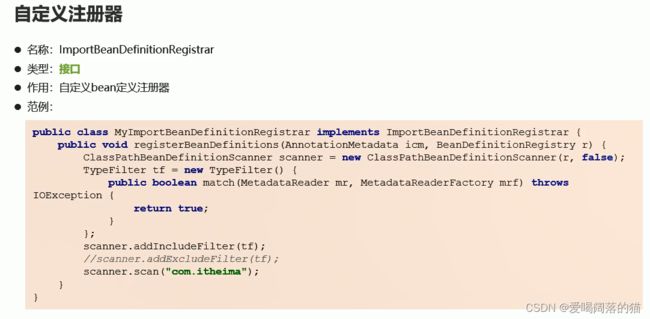
3.4 自定义注册器
为了明白ComponentScan注解的作用
3.5 bean初始化过程解析
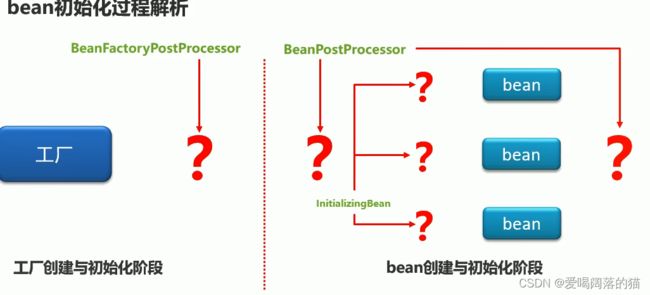

问题又来了:其中一个bean加载需要干很多事情,这个时候FcatoryBean来了


4.AOP配置


4.1 AOP核心概念
- 不论是接口中的方法还是实现的方法都叫连接点
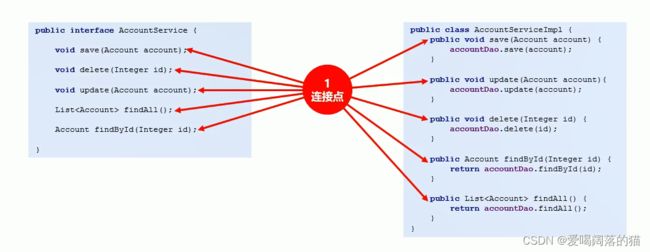
- 能被抽走共性功能的方法叫切入点

- 通知 指的是被抽走共性功能以后剩下的代码

- 切面指的就是 共性代码从哪里被抽走的 与非共性代码(通知)之间的关系

- 被简化出来的运行对象叫 目标对象,这个目标对象需要被抽走的共性代码才能运行

- 原始的共性代码放回到目标功能中的过程叫做织入

- 目标对象类变成的心得类的过程–>叫做代理

- 现在得到的类现在的类根据之前目标对象的类创建出来的东西都有,但是还可以无中生有,引入新的东西,这个代理类可以凭空出现,这个动作叫引入


开发中需要做的是绿色的东西:


4.2 AOP入门案例
4.2.1 XML方式


1.导入依赖
<dependency>
            <groupId>org.aspectj</groupId>
            <artifactId>aspectjweaver</artifactId>
            <version>1.9.6</version>
        </dependency>
2.把共性功能抽离出来,写到一个类中
这里是接口实现的一句话抽取
    @Override
    public void save() {
//        System.out.println("共性功能");
        System.out.println("userService running");
    }
3. 写抽取的代码,制作通知类,在类中定义一个方法用于完成共性功能
public class AopAdvice {
    public  void function(){
        System.out.println("共性功能");
    }
}
4.这时候spring还不知道这之间的关系,现在做配置,将上面抽离出的共性功能类配置成一个bean,然后开启aop的命名空间支持,然后配置AOP
<?xml version="1.0" encoding="UTF-8"?>
<beans xmlns="http://www.springframework.org/schema/beans"
xmlns:xsi="http://www.w3.org/2001/XMLSchema-instance"
xmlns:context="http://www.springframework.org/schema/context"
xmlns:aop="http://www.springframework.org/schema/aop"
xsi:schemaLocation="http://www.springframework.org/schema/beans
https://www.springframework.org/schema/beans/spring-beans.xsd
http://www.springframework.org/schema/context
https://www.springframework.org/schema/context/spring-context.xsd
http://www.springframework.org/schema/aop
https://www.springframework.org/schema/aop/spring-aop.xsd">
<!--开启命名空间-->
<bean id="userService" class="com.zfz.service.impl.UserServiceImpl">
</bean>
<!--    配置通知bean-->
<bean id="myAdvice" class="com.zfz.aop.AopAdvice"></bean>
<!--配置aop-->
    <aop:config>
<!--        配置切入点-->
        <aop:pointcut id="pt" expression="execution(* *..*(..))"/>
<!--        配置切面(切入点与通知的关系)-->
        <aop:aspect ref="myAdvice">
            <aop:before method="function" pointcut-ref="pt"></aop:before>
        </aop:aspect>
    </aop:config>
</beans>
4.2.2 注解方式

1.@EnableAspectJAutoProxy 开启注解配置
@Configuration
@ComponentScan("com.zfz")
@EnableAspectJAutoProxy
public class SpringConfig {
}
2.切面类配置
@Component
@Aspect
public class AopAdvice {
    @Pointcut("execution(* *(..))")
    public void pt(){
    }
    @Before("pt()")
    public  void before(){
        System.out.println("共性功能");
    }
}
4. 3 切入点的三种形式

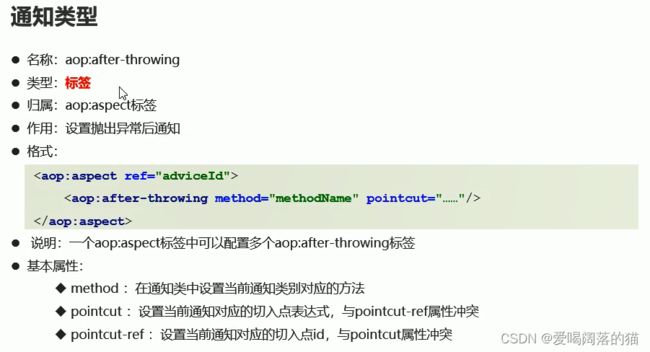
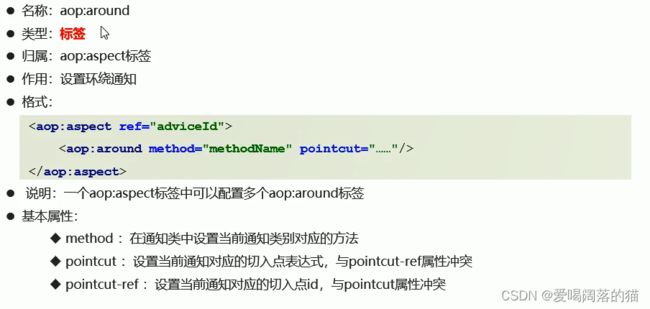
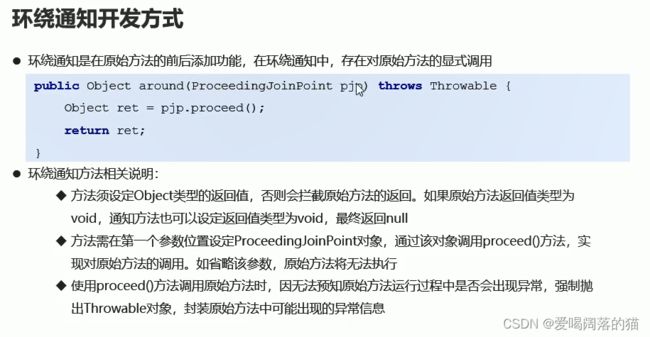
4.4 五种通知类型


4.5 通知顺序
不论是前置还是后置,配置顺序就是它的基本顺序

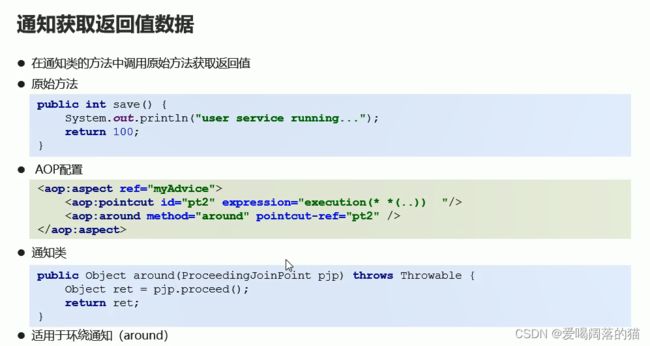
4.6 通知获取参数数据
方式一:
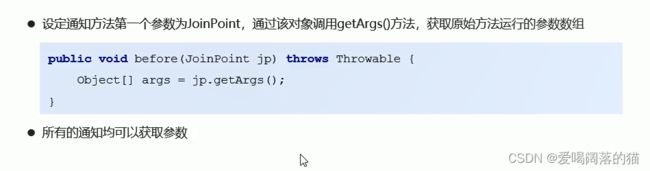
方式二:


只有这两种一定有返回值:


4.7 利用AOP测接口执行时间

5. 静态代理 装饰着模式
@Component("userService")
public class UserServiceImpl implements UserService {

    @Override
    public void save() {
//        System.out.println("共性功能");
        System.out.println("水泥墙");
    }
}
public class decorator implements UserService{
    private UserService userService;

    public decorator(UserService userService){
        this.userService=userService;
    }
    @Override
    public void save() {
        userService.save();
        System.out.println("刮大白");
    }
}

6. 动态代理


public class UserServiceProxy {
    public  static UserService getServiceProxy( UserService userService){
        UserService service = (UserService) Proxy.newProxyInstance(userService.getClass().getClassLoader(),
                new Class[]{UserService.class}, new InvocationHandler() {
                    @Override
                    public Object invoke(Object proxy, Method method, Object[] args) throws Throwable {
                        Object invoke = method.invoke(userService, args);
                        System.out.println("刮大白22");
                        System.out.println("贴壁纸22");
                        return invoke;
                    }
                });
        return service;
    }
}
public class App {
    public static void main(String[] args) {
        UserService userService=new UserServiceImpl();
        UserService userService1=UserServiceProxy.getServiceProxy(userService);
        userService1.save();
    }
}
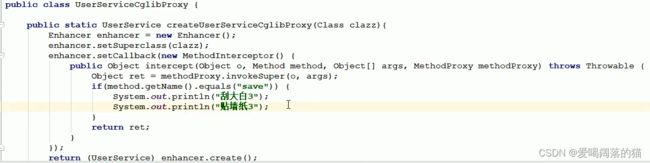
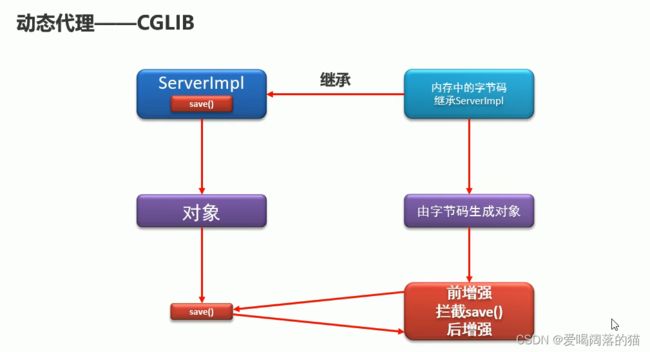
7. cglib–动态代理
动态字节码文件


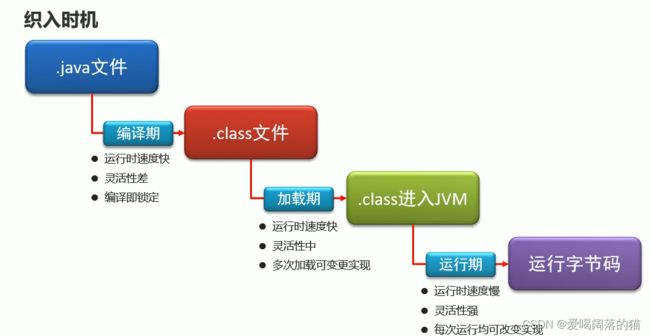
8. AOP织入时机
9 Spring对事物的管理

9.1 Spring事务核心对象


9.2 PlatformTransactionManager

9.3 TranasactionDefinition

9.4 TranasactionStatus

9.5 事务控制方式
实现案例:

业务层实现:主要是转钱的接口实现,要么都成功要么都失败
1. 编程式
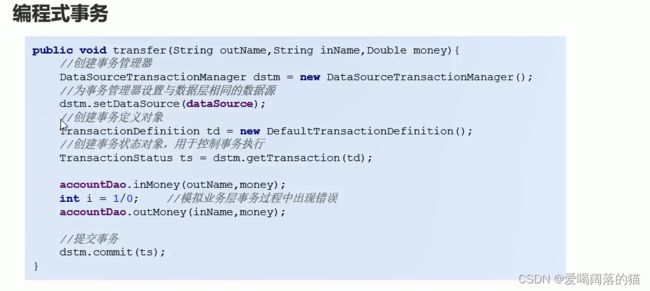
   public void transfer(String outName, String inName, Double money) {
        PlatformTransactionManager ptm = new DataSourceTransactionManager(dataSource);
        TransactionDefinition td = new DefaultTransactionDefinition();
        TransactionStatus ts = ptm.getTransaction(td);
        accountMapper.inMoney(outName, money);
        int i = 1 / 0;
        accountMapper.outMoney(inName, money);
        //提交事务
        ptm.commit(ts);
    }
2.声明式xml


通知类:


3.声明式 注解

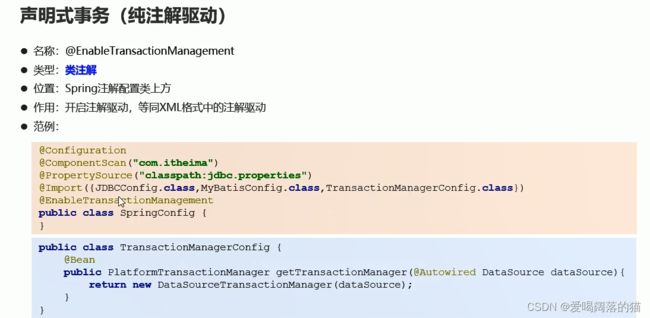
@Configuration
@ComponentScan("com.zfz")
@EnableAspectJAutoProxy
@Import({JDBCConfig.class,MybatisConfig.class})
@EnableTransactionManagement
public class SpringConfig {
}
@PropertySource("classpath:jdbc.properties")
public class JDBCConfig {
    @Value("${jdbc.driver}")
    private String Driver;
    @Value("${jdbc.url}")
    private String url;
    @Value("${jdbc.username}")
    private String username;
    @Value("${jdbc.password}")
    private String password;
    @Bean("dataSource")
    public DruidDataSource getDataSource(){
        DruidDataSource ds=new DruidDataSource();
        ds.setDriverClassName(Driver);
        ds.setUrl(url);
        ds.setUsername(username);
        ds.setPassword(password);
        return  ds;
    }
    @Bean
    public PlatformTransactionManager platformTransactionManager(DataSource dataSource){
        return new DataSourceTransactionManager(dataSource);
    }
}
@Transactional(propagation = Propagation.SUPPORTS,readOnly = false,isolation = Isolation.DEFAULT)
public interface AccountService {
    @Transactional
    void transfer(String outName,String inName,Double money);
}
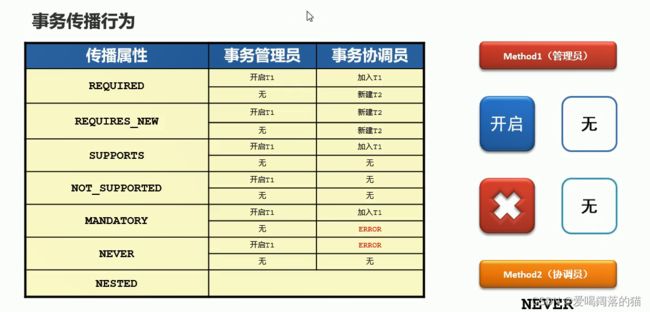
4. 事务传播行为
Required:有事务就加入,没有事务自己新建一个

Requires_new 有没有事务我都新建

Supports:有事务就加入 没有就没有
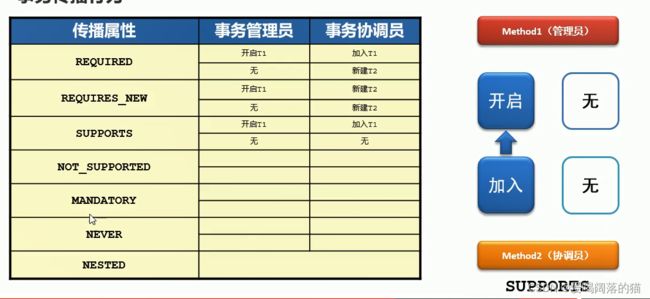
Not_Supported 有没有事务都不管你 属于不支持状态

Mandatory:有事务就加入,没有事务 就报错 ;这个必须有事务才行

never:要求不带事务,如果有事务就报错,没事务刚好