RocketMQ 5.0 快速入门
RocketMQ 5.0
Apache RocketMQ 自诞生以来,因其架构简单、业务功能丰富、具备极强可扩展性等特点被众多企业开发者以及云厂商广泛采用。历经十余年的大规模场景打磨,RocketMQ 已经成为业内共识的金融级可靠业务消息首选方案,被广泛应用于互联网、大数据、移动互联网、物联网等领域的业务场景。
1、下载与安装RocketMQ 5.0
为了接近生产环境的开发,我们都是选择直接在Linux服务器上安装。
下载地址:https://rocketmq.apache.org/zh/download

注意:安装包分为二进制包和源码包,二进制包是已经编译好的可以直接运行,而源码包则需要编译后才能运行。
编译命令示例
$ unzip rocketmq-all-5.1.3-source-release.zip
$ cd rocketmq-all-5.1.3-source-release/
$ mvn -Prelease-all -DskipTests -Dspotbugs.skip=true clean install -U
$ cd distribution/target/rocketmq-5.1.3/rocketmq-5.1.3
我们直接下载最新的二进制包就好了。
安装步骤如下
1、启动NameServer注册中心(存储 Broker 元信息)
# 解压
$ unzip rocketmq-all-5.1.3-bin-release.zip
解压后我们需要改一下启动脚本(如果服务器资源足够多可以忽略这一步)。
runserver.sh需要修改JVM内存的配置,此脚本默认从JVM申请的内存有4G(我们只是用来测试与学习服务器资源配置根本没有这么高),如下
# 以下为 runserver.sh 截取片段
# 无论走 if 还是 else -Xms和-Xmx的配置都是4g
# 所以我们要重新赋值这个 JAVA_OPT 变量
choose_gc_options()
{
    # Example of JAVA_MAJOR_VERSION value : '1', '9', '10', '11', ...
    # '1' means releases befor Java 9
    JAVA_MAJOR_VERSION=$("$JAVA" -version 2>&1 | awk -F '"' '/version/ {print $2}' | awk -F '.' '{print $1}')
    if [ -z "$JAVA_MAJOR_VERSION" ] || [ "$JAVA_MAJOR_VERSION" -lt "9" ] ; then
      JAVA_OPT="${JAVA_OPT} -server -Xms4g -Xmx4g -Xmn2g -XX:MetaspaceSize=128m -XX:MaxMetaspaceSize=320m"
      JAVA_OPT="${JAVA_OPT} -XX:+UseConcMarkSweepGC -XX:+UseCMSCompactAtFullCollection -XX:CMSInitiatingOccupancyFraction=70 -XX:+CMSParallelRemarkEnabled -XX:SoftRefLRUPolicyMSPerMB=0 -XX:+CMSClassUnloadingEnabled -XX:SurvivorRatio=8 -XX:-UseParNewGC"
      JAVA_OPT="${JAVA_OPT} -verbose:gc -Xloggc:${GC_LOG_DIR}/rmq_srv_gc_%p_%t.log -XX:+PrintGCDetails -XX:+PrintGCDateStamps"
      JAVA_OPT="${JAVA_OPT} -XX:+UseGCLogFileRotation -XX:NumberOfGCLogFiles=5 -XX:GCLogFileSize=30m"
    else
      JAVA_OPT="${JAVA_OPT} -server -Xms4g -Xmx4g -XX:MetaspaceSize=128m -XX:MaxMetaspaceSize=320m"
      JAVA_OPT="${JAVA_OPT} -XX:+UseG1GC -XX:G1HeapRegionSize=16m -XX:G1ReservePercent=25 -XX:InitiatingHeapOccupancyPercent=30 -XX:SoftRefLRUPolicyMSPerMB=0"
      JAVA_OPT="${JAVA_OPT} -Xlog:gc*:file=${GC_LOG_DIR}/rmq_srv_gc_%p_%t.log:time,tags:filecount=5,filesize=30M"
    fi
}
重新定制内存(重新赋值JAVA_OPT变量)直接加在条件判断代码块后面即可。
# 重新定制内存
JAVA_OPT="${JAVA_OPT} -server -Xms512m -Xmx512m -XX:MetaspaceSize=128m -XX:MaxMetaspaceSize=320m"
# JAVA_OPT="${JAVA_OPT} -XX:+UseG1GC -XX:G1HeapRegionSize=16m -XX:G1ReservePercent=25 -XX:InitiatingHeapOccupancyPercent=30 -XX:SoftRefLRUPolicyMSPerMB=0"
# JAVA_OPT="${JAVA_OPT} -Xlog:gc*:file=${GC_LOG_DIR}/rmq_srv_gc_%p_%t.log:time,tags:filecount=5,filesize=30M"
runbroker.sh也是需要修改JVM内存的配置,如下代码默认分配的是8g。
# 修改前
# JAVA_OPT="${JAVA_OPT} -server -Xms8g -Xmx8g"
# 修改后
JAVA_OPT="${JAVA_OPT} -server -Xms512m -Xmx512m"
修改完后,我们就可以启动 RocketMQ 的 NameServer 了
# 启动 namesrv
$ nohup sh bin/mqnamesrv &

# 验证 namesrv 是否启动成功
$ tail -f -n 500 nohup.out
...
The Name Server boot success. serializeType=JSON, address 0.0.0.0:9876

# 或者是
$ tail -f ~/logs/rocketmqlogs/namesrv.log
2023-07-18 23:17:49 INFO NSScanScheduledThread - start scanNotActiveBroker
...
2、启动 Broker 消息存储中心和 Proxy 代理
修改/conf/broker.conf配置文件,这里主要是为了测试方便我们放开自动创建Topic的配置,加入以下配置
# 开启自动创建 Topic
autoCreateTopicEnable=true
Proxy组件是 RocketMQ 5.0 版本官方推荐的部署组件,详细说明可查看官方文档
https://rocketmq.apache.org/zh/docs/deploymentOperations/01deploy/
NameServer 成功启动后,我们启动 Broker 和 Proxy 。
# 启动 Broker+Proxy
$ nohup sh bin/mqbroker -n localhost:9876 --enable-proxy &

# 指定配置文件启动(broker默认使用的端口是10911,我们也可以在配置文件修改端口)
$ nohup sh bin/mqbroker -n localhost:9876 -c conf/broker.conf --enable-proxy &

# 注意 --enable-proxy 开启代理后可能会报错
# java.io.IOException: Failed to bind to address 0.0.0.0:8080
# 当端口被占用时 broker/proxy 将无法启动
# 解决方案 https://blog.csdn.net/zooah212/article/details/127994243

# 验证是否启动成功
$ tail -f -n 500 nohup.out
The broker[suzhou-ydshp, 192.168.5.135:10911] boot success. serializeType=JSON and name server is localhost:9876
2、测试消息收发
创建消息发送的目标 Topic,RocketMQ 5.0 版本需要提前创建,例如:
# 可以通过 mqadmin 命令创建
# 注意 TestTopic 是topic名称
$ sh bin/mqadmin updatetopic -n localhost:9876 -t TestTopic -c DefaultCluster

create topic to 192.168.5.135:10911 success.
TopicConfig [topicName=TestTopic, readQueueNums=8, writeQueueNums=8, perm=RW-, topicFilterType=SINGLE_TAG, topicSysFlag=0, order=false, attributes={}]
1、在IDEA中创建一个Java工程,并引入以下依赖
<dependency>
    <groupId>org.springframework.bootgroupId>
    <artifactId>spring-boot-starter-testartifactId>
    <scope>testscope>
dependency>


<dependency>
    <groupId>org.apache.rocketmqgroupId>
    <artifactId>rocketmq-client-javaartifactId>
    <version>5.0.5version>
dependency>
2、创建发送消息的程序并运行
@SpringBootTest
public class DemoApplicationTest {
    private static final Logger logger = LoggerFactory.getLogger(DemoApplicationTest.class);

    @Test
    public void test() throws ClientException {
        // 接入点地址,需要设置成 Proxy 的地址和端口列表,一般是xxx:8081;xxx:8081
        String endpoint = "192.168.5.135:8081";
        // 消息发送的目标Topic名称,需要提前创建。
        String topic = "TestTopic";
        ClientServiceProvider provider = ClientServiceProvider.loadService();
        ClientConfigurationBuilder builder = ClientConfiguration.newBuilder().setEndpoints(endpoint);
        ClientConfiguration configuration = builder.build();

        // 初始化Producer时需要设置通信配置以及预绑定的Topic
        Producer producer = provider.newProducerBuilder()
                .setTopics(topic)
                .setClientConfiguration(configuration)
                .build();

        // 普通消息发送
        Message message = provider.newMessageBuilder()
                .setTopic(topic)
                // 设置消息索引键,可根据关键字精确查找某条消息
                .setKeys("messageKey")
                // 设置消息Tag,用于消费端根据指定Tag过滤消息
                .setTag("messageTag")
                // 消息内容实体(byte[])
                .setBody("hello rocketMQ".getBytes())
                .build();
        try {
            // 发送消息,需要关注发送结果,并捕获失败等异常。
            SendReceipt sendReceipt = producer.send(message);
            logger.info("send message successfully, messageId={}", sendReceipt.getMessageId());
        } catch (ClientException e) {
            logger.error("failed to send message", e);
        }
        // 关闭
        producer.close();
    }
}
3、创建订阅消息程序并运行。
Apache RocketMQ 支持SimpleConsumer和PushConsumer两种消费者类型,可以选择任意一种方式订阅消息。这里主要介绍PushConsumer。
@Test
public void pushConsumerTest() throws Exception {
    ClientServiceProvider provider = ClientServiceProvider.loadService();
    // 接入点地址,需要设置成Proxy的地址和端口列表,一般是xxx:8081;xxx:8081
    String endpoint = "192.168.5.135:8081";
    ClientConfiguration clientConfiguration = ClientConfiguration.newBuilder()
            .setEndpoints(endpoint)
            .build();
    // 订阅消息的过滤规则,表示订阅所有Tag的消息
    String tag = "*";
    FilterExpression filterExpression = new FilterExpression(tag, FilterExpressionType.TAG);
    // 为消费者指定所属的消费者分组,Group需要提前创建
    String consumerGroup = "TestGroup";

    // 指定需要订阅哪个目标Topic,Topic需要提前创建
    String topic = "TestTopic";
    // 初始化 PushConsumer,需要绑定消费者分组ConsumerGroup、通信参数以及订阅关系
    PushConsumer pushConsumer = provider.newPushConsumerBuilder()
            .setClientConfiguration(clientConfiguration)
            // 设置消费者分组
            .setConsumerGroup(consumerGroup)
            // 设置预绑定的订阅关系
            .setSubscriptionExpressions(Collections.singletonMap(topic, filterExpression))
            // 设置消费监听器
            .setMessageListener(messageView -> {
                // 处理消息并返回消费结果
                logger.info("consume message successfully, messageId={}", messageView.getMessageId());
                // 消息内容处理
                ByteBuffer body = messageView.getBody();
                String message = StandardCharsets.UTF_8.decode(body).toString();
                body.flip();
                logger.info("message body={}", message);
                return ConsumeResult.SUCCESS;
            }).build();
    Thread.sleep(Long.MAX_VALUE);
    // 如果不需要再使用 PushConsumer,可关闭该实例。
    pushConsumer.close();
}
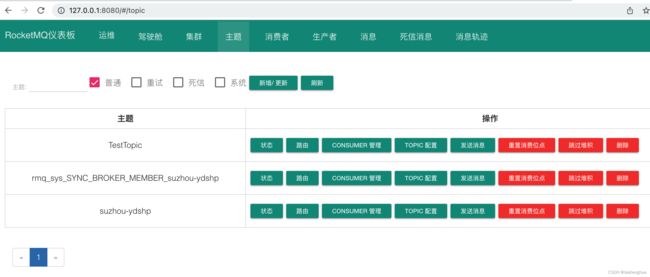
3、新版rocketmq-dashboard搭建
rocketmq-dashboard是由 rocketmq-console 升级而来,整体UI风格更加简洁,新增了很多新功能。支持多种部署方式如 docker 镜像部署,源码手动编译与部署等。
搭建过程可参考如下文章
文章地址:https://blog.csdn.net/m0_46357847/article/details/130476251
官方文档(使用说明):https://rocketmq.apache.org/zh/docs/deploymentOperations/04Dashboard
4、其他原生API的使用
RocketMQ的原生API在GitHub上都能找到使用案例,这里主要是列举了常用的API。
GitHub地址:
https://github.com/apache/rocketmq/tree/develop/example/src/main/java/org/apache/rocketmq/example
4.1、异步消息发送
RocketMQ 5.0提供了新的API来支持发送异步消息,例如
@Test
public void AsyncProducerTest() throws ClientException, InterruptedException {
String endpoint = "192.168.5.135:8081"; // Proxy的地址和端口
ClientConfigurationBuilder builder = ClientConfiguration.newBuilder()
.setEndpoints(endpoint);
ClientConfiguration configuration = builder.build();
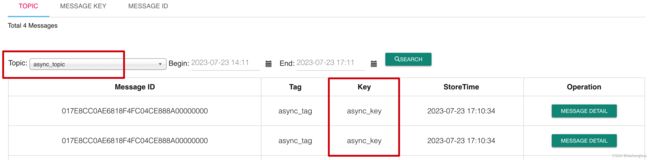
String topic = "async_topic";
ClientServiceProvider provider = ClientServiceProvider.loadService();
Producer producer = provider.newProducerBuilder()
.setTopics(topic)
.setClientConfiguration(configuration)
.build();
// 设置消息
Message message = provider.newMessageBuilder()
.setTopic(topic)
.setKeys("async_key")
.setTag("async_tag")
.setBody("hello rocketMQ this is a async message".getBytes())
.build();
// 异步消息发送
CompletableFuture<SendReceipt> completableFuture = producer.sendAsync(message); // 返回一个task编排工具
// 回调处理
completableFuture.whenComplete((sendReceipt, exception) -> {
if (null != exception) {
exception.printStackTrace();
} else {
logger.info("send message successfully, messageId={}", sendReceipt.getMessageId());
try {
producer.close();
} catch (IOException e) {
e.printStackTrace();
}
}
});
Thread.sleep(Long.MAX_VALUE);
}
同步接收消息,前面我们已经介绍过了PushConsumer的使用,这里使用SimpleConsumer来同步消费消息,例如
// 使用SimpleConsumer消费消息
@Test
public void AsyncConsumerTest() throws Exception {
    String endpoint = "192.168.5.135:8081";
    ClientConfiguration clientConfiguration = ClientConfiguration.newBuilder()
            .setEndpoints(endpoint)
            .build();

    String consumerGroup = "test_group";
    FilterExpression filterExpression = new FilterExpression("*", FilterExpressionType.TAG);
    String topic = "async_topic";

    ClientServiceProvider provider = ClientServiceProvider.loadService();
    SimpleConsumer simpleConsumer = provider.newSimpleConsumerBuilder()
            .setClientConfiguration(clientConfiguration)
            .setConsumerGroup(consumerGroup)
            .setSubscriptionExpressions(Collections.singletonMap(topic, filterExpression))
            .setAwaitDuration(Duration.ofSeconds(30))
            .build();
    List<MessageView> messageViewList = null;
    try {
        messageViewList = simpleConsumer.receive(10, Duration.ofSeconds(30));
        messageViewList.forEach(messageView -> {
            // 消息内容处理
            ByteBuffer body = messageView.getBody();
            String message = StandardCharsets.UTF_8.decode(body).toString();
            body.flip();
            logger.info("message body={}", message);

            //消费处理完成后,需要主动调用ACK提交消费结果
            try {
                simpleConsumer.ack(messageView);
            } catch (ClientException e) {
                e.printStackTrace();
            }
        });
    } catch (ClientException e) {
        // 如果遇到系统流控等原因造成拉取失败,需要重新发起获取消息请求
        e.printStackTrace();
    }
    // Thread.sleep(Long.MAX_VALUE);
    // simpleConsumer.close();
}
先执行异步消息发送代码,在执行消费消息代码,我们再来看消息的收发情况。
4.2、异步消费消息
新版本的RocketMQ也支持异步消费消息,例如:
@Test
public void AsyncConsumerTest() throws Exception {
    String endpoint = "192.168.5.135:8081";
    ClientConfiguration clientConfiguration = ClientConfiguration.newBuilder()
            .setEndpoints(endpoint)
            .build();

    String consumerGroup = "test_group";
    FilterExpression filterExpression = new FilterExpression("*", FilterExpressionType.TAG);
    String topic = "async_topic";

    ClientServiceProvider provider = ClientServiceProvider.loadService();
    SimpleConsumer simpleConsumer = provider.newSimpleConsumerBuilder()
            .setClientConfiguration(clientConfiguration)
            .setConsumerGroup(consumerGroup)
            .setSubscriptionExpressions(Collections.singletonMap(topic, filterExpression))
            .setAwaitDuration(Duration.ofSeconds(30))
            .build();
    List<MessageView> messageViewList = null;
    // 同步消费
    // messageViewList = simpleConsumer.receive(10, Duration.ofSeconds(30));
    // 异步消费
    CompletableFuture<List<MessageView>> completableFutureList = simpleConsumer.receiveAsync(10, Duration.ofSeconds(30));
    messageViewList = completableFutureList.get();
    if (CollectionUtils.isEmpty(messageViewList)) {
        return;
    }
    messageViewList.forEach(messageView -> {
        // 消息内容处理
        ByteBuffer body = messageView.getBody();
        String message = StandardCharsets.UTF_8.decode(body).toString();
        body.flip();
        logger.info("message body={}", message);

        //消费处理完成后,需要主动调用ACK提交消费结果
        try {
            simpleConsumer.ack(messageView);
        } catch (ClientException e) {
            e.printStackTrace();
        }
    });
    Thread.sleep(Long.MAX_VALUE);
    // simpleConsumer.close();
}
4.3、事务消息发送
由官方文档得知事务消息为 Apache RocketMQ 中的高级特性消息,分布式系统调用的特点为一个核心业务逻辑的执行,同时需要调用多个下游业务进行处理。因此,需要保证核心业务和多个下游业务的执行结果完全一致。
以电商交易场景为例:
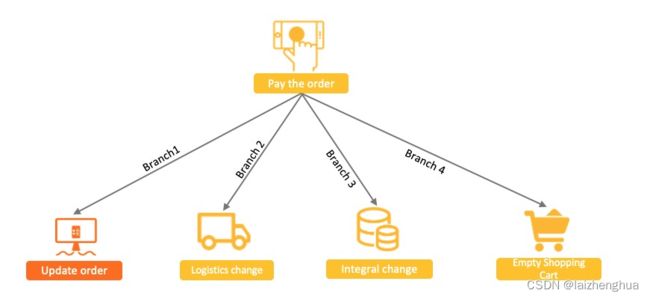
支付订单这一核心操作会涉及到
- 主分支订单系统状态更新(由未支付变更为支付成功)
- 下游物流发货(新增待发货物流记录,创建订单物流记录)
- 积分变更(变更用户积分,更新用户积分表)
- 购物车状态清空(清空购物车,更新用户购物车记录)
- 等多个子系统的变更
需要做事务控制,已经很明显了。而在这之前一直使用XA分布式事务方案,XA分布式事务方案将四个调用分支封装成包含四个独立事务分支的大事务。基于XA分布式事务的方案可以满足业务处理结果的正确性,但最大的缺点是多分支环境下资源锁定范围大,并发度低,随着下游分支的增加,系统性能会越来越差。
因此新版本 Apache RocketMQ 解决了一系列分布式性能问题、多个下游分支一致性等问题,推出了分布式事务消息功能,与本地事务(数据库事务)进行绑定,使其拥有提交、回滚和统一协调的能力,并且具备高性能、可扩展、业务开发简单的优势。
更多介绍请参考官方文档(事务消息处理流程、事务消息生命周期等):
https://rocketmq.apache.org/zh/docs/featureBehavior/04transactionmessage
事务消息使用示例:
1、新增一个支持事务消息的topic官方文档也明确指出 NORMAL 类型Topic不支持TRANSACTION类型消息,生产消息会报错。
# 注意 transaction_topic 是topic名称
$ ./bin/mqadmin updatetopic -n localhost:9876 -t transaction_topic -c DefaultCluster -a +message.type=TRANSACTION

create topic to 192.168.5.135:10911 success.
TopicConfig [topicName=transaction_topic, readQueueNums=8, writeQueueNums=8, perm=RW-, topicFilterType=SINGLE_TAG, topicSysFlag=0, order=false, attributes={+message.type=TRANSACTION}]
2、发送事务消息
@Test
public void transactionProviderTest() throws Exception {
    String endpoint = "192.168.5.135:8081"; // Proxy的地址和端口
    ClientConfiguration configuration = ClientConfiguration.newBuilder()
            .setEndpoints(endpoint).build();

    String topic = "transaction_topic";
    // 构造事务生产者:事务消息需要生产者构建一个事务检查器,用于检查确认异常事务的中间状态
    ClientServiceProvider provider = ClientServiceProvider.loadService();
    Producer producer = provider.newProducerBuilder()
            .setTopics(topic)
            .setClientConfiguration(configuration)
            // 设置事务检查器(不知道啥时候触发的。。。遇到了在研究一下吧)
            .setTransactionChecker(messageView -> {
                // 事务检查器一般是根据业务的ID去检查本地事务是否正确提交还是回滚,此处以订单ID属性为例
                // 在订单表找到了这个订单,说明本地事务插入订单的操作已经正确提交;如果订单表没有订单,说明本地事务已经回滚
                String orderId = messageView.getProperties().get("orderId");
                if (!StringUtils.hasText(orderId)) {
                    // 没有业务ID直接回滚
                    return TransactionResolution.ROLLBACK;
                }
                // 检查本地事务是否提交
                String order = getOrderById(orderId);
                logger.info("check transaction start order={} [orderId={}]", order, orderId);
                if (!StringUtils.hasText(order)) {
                    // 本地事务没有正常提交直接回滚
                    return TransactionResolution.ROLLBACK;
                }
                // 通过业务ID查询到了对应的记录说明本地事务已经正常提交了
                // 消息事务也正常提交
                return TransactionResolution.COMMIT;
            }).build();

    // 开启事务分支
    Transaction transaction;
    try {
        transaction = producer.beginTransaction();
    } catch (ClientException e) {
        e.printStackTrace();
        // 事务分支开启失败则直接退出
        return;
    }

    // 构建事务消息
    Message message = provider.newMessageBuilder()
            .setTopic(topic)
            .setKeys("transaction_key")
            .setTag("transaction_tag")
            .addProperty("orderId", UUID.randomUUID().toString()) // 一般事务消息都会设置一个本地事务关联的唯一ID,用来做本地事务回查的校验
            .setBody("hello rocketMQ this is a transaction message".getBytes(StandardCharsets.UTF_8))
            .build();

    // 发送事务消息
    SendReceipt sendReceipt;
    try {
        sendReceipt = producer.send(message, transaction);
    } catch (ClientException e) {
        e.printStackTrace();
        // 事务消息发送失败,事务可以直接退出并回滚
        return;
    }
    /**
     * 执行本地事务,并确定本地事务结果
     * 1. 如果本地事务提交成功,则提交消息事务
     * 2. 如果本地事务提交失败,则回滚消息事务
     * 3. 如果本地事务未知异常,则不处理,等待事务消息回查
     */
    boolean localTransactionOk = doLocalTransaction();
    if (localTransactionOk) {
        try {
            transaction.commit();
        } catch (ClientException e) {
            // 业务可以自身对实时性的要求选择是否重试,如果放弃重试,可以依赖事务消息回查机制进行事务状态的提交
            e.printStackTrace();
        }
    } else {
        try {
            transaction.rollback();
        } catch (ClientException e) {
            // 建议记录异常信息,回滚异常时可以无需重试,依赖事务消息回查机制进行事务状态的提交
            e.printStackTrace();
        }
    }
    Thread.sleep(Long.MAX_VALUE);
}

// 模拟订单查询服务用来确认订单事务是否提交成功
private static String getOrderById(String orderId) {
    return "order";
}

// 模拟本地事务执行结果
private static boolean doLocalTransaction() {
    return true;
}