【Selenium+Pytest+allure报告生成自动化测试框架】附带项目源码和项目部署文档
目录
前言
【文章末尾给大家留下了大量的福利】
测试框架简介
首先管理时间
添加配置文件
conf.py
config.ini
读取配置文件
记录操作日志
简单理解POM模型
简单学习元素定位
管理页面元素
封装Selenium基类
创建页面对象
简单了解Pytest
pytest.ini
编写测试用例
conftest.py
执行用例
发送邮件
pytest使用allure测试报告
allure安装
allure初体验
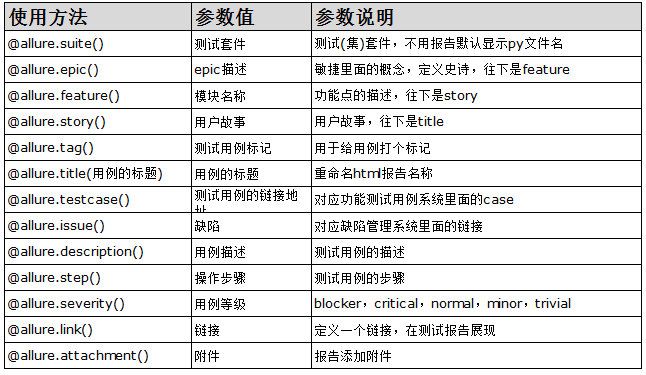
allure装饰器介绍
报告的生成和展示
allure发生错误截图
开源地址
前言
selenium自动化+ pytest测试框架+allure报告
本章你需要
-
一定的python基础——至少明白类与对象,封装继承
-
一定的selenium基础——本篇不讲selenium,不会的可以自己去看selenium中文翻译网
-
文章末尾给大家留下了大量的福利】

测试框架简介
-
测试框架有什么优点呢:
- 代码复用率高,如果不使用框架的话,代码会很冗余
- 可以组装日志、报告、邮件等一些高级功能
-
- 提高元素等数据的可维护性,元素发生变化时,只需要更新一下配置文件
- 使用更灵活的PageObject设计模式
-
测试框架的整体目录
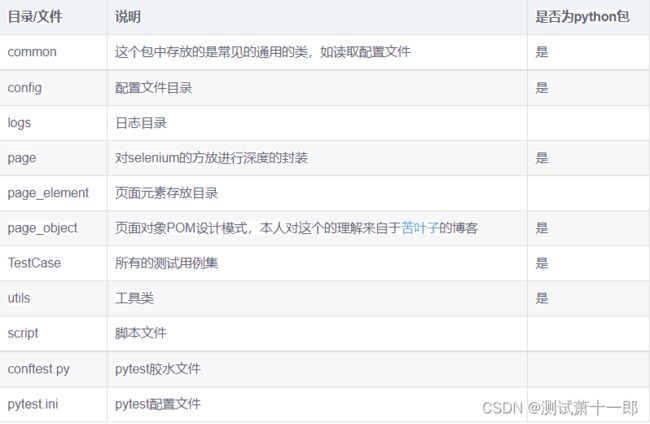
这样一个简单的框架结构就清晰了。
知道了以上这些我们就开始吧!
我们在项目中先按照上面的框架指引,建好每一项目录。
注意:python包为是的,都需要添加一个__init__.py文件以标识此目录为一个python包。
首先管理时间
首先呢,因为我们很多的模块会用到时间戳,或者日期等等字符串,所以我们先单独把时间封装成一个模块。
然后让其他模块来调用即可。在utils目录新建times.py模块
#!/usr/bin/env python3
# -*- coding:utf-8 -*-
import time
import datetime
from functools import wraps


def timestamp():
    """时间戳"""
    return time.time()


def dt_strftime(fmt="%Y%m"):
    """
    datetime格式化时间
    :param fmt "%Y%m%d %H%M%S
    """
    return datetime.datetime.now().strftime(fmt)


def sleep(seconds=1.0):
    """
    睡眠时间
    """
    time.sleep(seconds)


def running_time(func):
    """函数运行时间"""

    @wraps(func)
    def wrapper(*args, **kwargs):
        start = timestamp()
        res = func(*args, **kwargs)
        print("校验元素done!用时%.3f秒!" % (timestamp() - start))
        return res

    return wrapper


if __name__ == '__main__':
    print(dt_strftime("%Y%m%d%H%M%S"))
添加配置文件
配置文件总是项目中必不可少的部分!
将固定不变的信息集中在固定的文件中
conf.py
项目中都应该有一个文件对整体的目录进行管理,我也在这个python项目中设置了此文件。
在项目config目录创建conf.py文件,所有的目录配置信息写在这个文件里面。
#!/usr/bin/env python3
# -*- coding:utf-8 -*-
import os
from selenium.webdriver.common.by import By
from utils.times import dt_strftime


class ConfigManager(object):
    # 项目目录
    BASE_DIR = os.path.dirname(os.path.dirname(os.path.abspath(__file__)))

    # 页面元素目录
    ELEMENT_PATH = os.path.join(BASE_DIR, 'page_element')

    # 报告文件
    REPORT_FILE = os.path.join(BASE_DIR, 'report.html')

    # 元素定位的类型
    LOCATE_MODE = {
        'css': By.CSS_SELECTOR,
        'xpath': By.XPATH,
        'name': By.NAME,
        'id': By.ID,
        'class': By.CLASS_NAME
    }

    # 邮件信息
    EMAIL_INFO = {
        'username': '[email protected]',  # 切换成你自己的地址
        'password': 'QQ邮箱授权码',
        'smtp_host': 'smtp.qq.com',
        'smtp_port': 465
    }

    # 收件人
    ADDRESSEE = [
        '[email protected]',
    ]

    @property
    def log_file(self):
        """日志目录"""
        log_dir = os.path.join(self.BASE_DIR, 'logs')
        if not os.path.exists(log_dir):
            os.makedirs(log_dir)
        return os.path.join(log_dir, '{}.log'.format(dt_strftime()))

    @property
    def ini_file(self):
        """配置文件"""
        ini_file = os.path.join(self.BASE_DIR, 'config', 'config.ini')
        if not os.path.exists(ini_file):
            raise FileNotFoundError("配置文件%s不存在!" % ini_file)
        return ini_file


cm = ConfigManager()
if __name__ == '__main__':
    print(cm.BASE_DIR)
这个conf文件我模仿了Django的settings.py文件的设置风格,但是又有些许差异。
在这个文件中我们可以设置自己的各个目录,也可以查看自己当前的目录。
遵循了约定:不变的常量名全部大写,函数名小写。看起来整体美观。
config.ini
在项目config目录新建一个config.ini文件,里面暂时先放入我们的需要测试的URL
[HOST]
HOST = https://www.baidu.com
读取配置文件
配置文件创建好了,接下来我们需要读取这个配置文件以使用里面的信息。
我们在common目录中新建一个readconfig.py文件
#!/usr/bin/env python3
# -*- coding:utf-8 -*-
import configparser
from config.conf import cm

HOST = 'HOST'


class ReadConfig(object):
    """配置文件"""

    def __init__(self):
        self.config = configparser.RawConfigParser()  # 当有%的符号时请使用Raw读取
        self.config.read(cm.ini_file, encoding='utf-8')

    def _get(self, section, option):
        """获取"""
        return self.config.get(section, option)

    def _set(self, section, option, value):
        """更新"""
        self.config.set(section, option, value)
        with open(cm.ini_file, 'w') as f:
            self.config.write(f)

    @property
    def url(self):
        return self._get(HOST, HOST)


ini = ReadConfig()

if __name__ == '__main__':
    print(ini.url)
可以看到我们用python内置的configparser模块对config.ini文件进行了读取。
对于url值的提取,我使用了高阶语法@property属性值,写法更简单。
记录操作日志
日志,大家应该都很熟悉这个名词,就是记录代码中的动作。
在utils目录中新建logger.py文件。
这个文件就是我们用来在自动化测试过程中记录一些操作步骤的。
#!/usr/bin/env python3
# -*- coding:utf-8 -*-
import logging
from config.conf import cm


class Log:
    def __init__(self):
        self.logger = logging.getLogger()
        if not self.logger.handlers:
            self.logger.setLevel(logging.DEBUG)

            # 创建一个handle写入文件
            fh = logging.FileHandler(cm.log_file, encoding='utf-8')
            fh.setLevel(logging.INFO)

            # 创建一个handle输出到控制台
            ch = logging.StreamHandler()
            ch.setLevel(logging.INFO)

            # 定义输出的格式
            formatter = logging.Formatter(self.fmt)
            fh.setFormatter(formatter)
            ch.setFormatter(formatter)

            # 添加到handle
            self.logger.addHandler(fh)
            self.logger.addHandler(ch)

    @property
    def fmt(self):
        return '%(levelname)s\t%(asctime)s\t[%(filename)s:%(lineno)d]\t%(message)s'


log = Log().logger

if __name__ == '__main__':
    log.info('hello world')
在终端中运行该文件,就看到命令行打印出了:
INFO 2020-12-01 16:00:05,467 [logger.py:38] hello world
然后在项目logs目录下生成了当月的日志文件。
简单理解POM模型
由于下面要讲元素相关的,所以首先理解一下POM模型
Page Object模式具有以下几个优点。
该观点来自 《Selenium自动化测试——基于Python语言》
- 抽象出对象可以最大程度地降低开发人员修改页面代码对测试的影响, 所以, 你仅需要对页
面对象进行调整, 而对测试没有影响; - 可以在多个测试用例中复用一部分测试代码;
- 测试代码变得更易读、 灵活、 可维护
Page Object模式图
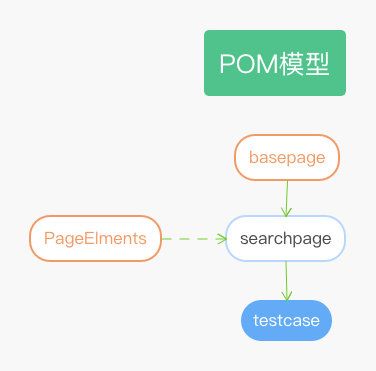
- basepage ——selenium的基类,对selenium的方法进行封装
- pageelements——页面元素,把页面元素单独提取出来,放入一个文件中
- searchpage ——页面对象类,把selenium方法和页面元素进行整合
- testcase ——使用pytest对整合的searchpage进行测试用例编写
通过上图我们可以看出,通过POM模型思想,我们把:
- selenium方法
- 页面元素
- 页面对象
- 测试用例
以上四种代码主体进行了拆分,虽然在用例很少的情况下做会增加代码,但是当用例多的时候意义很大,代码量会在用例增加的时候显著减少。我们维护代码变得更加直观明显,代码可读性也变得比工厂模式强很多,代码复用率也极大的得到了提高。
简单学习元素定位
在日常的工作中,我见过很多在浏览器中直接在浏览器中右键Copy Xpath复制元素的同学。这样获得的元素表达式放在 webdriver 中去运行往往是不够稳定的,像前端的一些微小改动,都会引起元素无法定位的NoSuchElementException报错。
所以在实际工作和学习中我们应该加强自己的元素定位能力,尽可能的采用xpath和CSS selector 这种相对稳定的定位语法。由于CSS selector的语法生硬难懂,对新手很不友好,而且相比xpath缺少一些定位语法。所以我们选择xpath进行我们的元素定位语法。
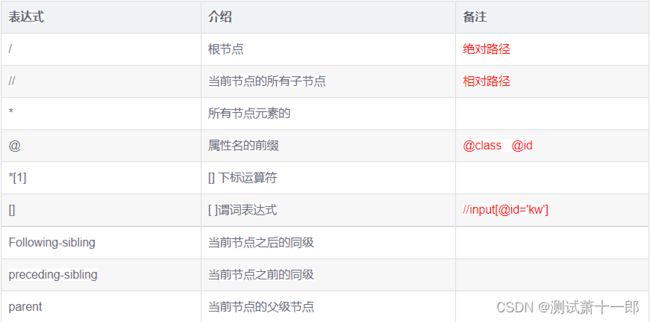
xpath#
语法规则
定位工具
- chropath
- 优点:这是一个Chrome浏览器的测试定位插件,类似于firepath,本人试用了一下整体感觉非常好。对小白的友好度很好。
- 缺点:安装这个插件需要FQ。
- Katalon录制工具
- 录制出来的脚本里面也会有定位元素的信息
- 自己写——本人推荐这种
-
- 优点:本人推荐的方式,因为当熟练到一定程度的时候,写出来的会更直观简洁,并且在运行自动化测试中出现问题时,能快速定位。
- 缺点:需要一定
xpath和CSS selector语法积累,不太容易上手。
管理页面元素
本教程选择的测试地址是百度首页,所以对应的元素也是百度首页的。
项目框架设计中有一个目录page_element就是专门来存放定位元素的文件的。
通过对各种配置文件的对比,我在这里选择的是YAML文件格式。其易读,交互性好。
我们在page_element中新建一个search.yaml文件。
搜索框: "id==kw"
候选: "css==.bdsug-overflow"
搜索候选: "css==#form div li"
搜索按钮: "id==su"
元素定位文件创建好了,下来我们需要读取这个文件。
在common目录中创建readelement.py文件。
#!/usr/bin/env python3
# -*- coding:utf-8 -*-
import os
import yaml
from config.conf import cm


class Element(object):
    """获取元素"""

    def __init__(self, name):
        self.file_name = '%s.yaml' % name
        self.element_path = os.path.join(cm.ELEMENT_PATH, self.file_name)
        if not os.path.exists(self.element_path):
            raise FileNotFoundError("%s 文件不存在!" % self.element_path)
        with open(self.element_path, encoding='utf-8') as f:
            self.data = yaml.safe_load(f)

    def __getitem__(self, item):
        """获取属性"""
        data = self.data.get(item)
        if data:
            name, value = data.split('==')
            return name, value
        raise ArithmeticError("{}中不存在关键字:{}".format(self.file_name, item))


if __name__ == '__main__':
    search = Element('search')
    print(search['搜索框'])
通过特殊方法__getitem__实现调用任意属性,读取yaml中的值。
这样我们就实现了定位元素的存储和调用。
但是还有一个问题,我们怎么样才能确保我们写的每一项元素不出错,人为的错误是不可避免的,但是我们可以通过代码来运行对文件的审查。当前也不能所有问题都能发现。
所以我们编写一个文件,在script脚本文件目录中创建inspect.py文件,对所有的元素yaml文件进行审查。
#!/usr/bin/env python3
# -*- coding:utf-8 -*-
import os
import yaml
from config.conf import cm
from utils.times import running_time


@running_time
def inspect_element():
    """检查所有的元素是否正确
    只能做一个简单的检查
    """
    for files in os.listdir(cm.ELEMENT_PATH):
        _path = os.path.join(cm.ELEMENT_PATH, files)
        with open(_path, encoding='utf-8') as f:
            data = yaml.safe_load(f)
        for k in data.values():
            try:
                pattern, value = k.split('==')
            except ValueError:
                raise Exception("元素表达式中没有`==`")
            if pattern not in cm.LOCATE_MODE:
                raise Exception('%s中元素【%s】没有指定类型' % (_path, k))
            elif pattern == 'xpath':
                assert '//' in value,\
                    '%s中元素【%s】xpath类型与值不配' % (_path, k)
            elif pattern == 'css':
                assert '//' not in value, \
                    '%s中元素【%s]css类型与值不配' % (_path, k)
            else:
                assert value, '%s中元素【%s】类型与值不匹配' % (_path, k)


if __name__ == '__main__':
    inspect_element()
执行该文件:
校验元素done!用时0.002秒!
可以看到,很短的时间内,我们就对所填写的YAML文件进行了审查。
现在我们基本所需要的组件已经大致完成了。
接下来我们将进行最重要的一环,封装selenium。
封装Selenium基类
在工厂模式种我们是这样写的:
#!/usr/bin/env python3
# -*- coding:utf-8 -*-
import time
from selenium import webdriver


driver = webdriver.Chrome()
driver.get('https://www.baidu.com')
driver.find_element_by_xpath("//input[@id='kw']").send_keys('selenium')
driver.find_element_by_xpath("//input[@id='su']").click()
time.sleep(5)
driver.quit()
很直白,简单,又明了。
创建driver对象,打开百度网页,搜索selenium,点击搜索,然后停留5秒,查看结果,最后关闭浏览器。
那我们为什么要封装selenium的方法呢。首先我们上述这种较为原始的方法,基本不适用于平时做UI自动化测试的,因为在UI界面实际运行情况远远比较复杂,可能因为网络原因,或者控件原因,我们元素还没有显示出来,就进行点击或者输入。所以我们需要封装selenium方法,通过内置的显式等待或一定的条件语句,才能构建一个稳定的方法。而且把selenium方法封装起来,有利于平时的代码维护。
我们在page目录创建webpage.py文件。
#!/usr/bin/env python3
# -*- coding:utf-8 -*-
"""
selenium基类
本文件存放了selenium基类的封装方法
"""
from selenium.webdriver.support import expected_conditions as EC
from selenium.webdriver.support.ui import WebDriverWait
from selenium.common.exceptions import TimeoutException

from config.conf import cm
from utils.times import sleep
from utils.logger import log


class WebPage(object):
    """selenium基类"""

    def __init__(self, driver):
        # self.driver = webdriver.Chrome()
        self.driver = driver
        self.timeout = 20
        self.wait = WebDriverWait(self.driver, self.timeout)

    def get_url(self, url):
        """打开网址并验证"""
        self.driver.maximize_window()
        self.driver.set_page_load_timeout(60)
        try:
            self.driver.get(url)
            self.driver.implicitly_wait(10)
            log.info("打开网页:%s" % url)
        except TimeoutException:
            raise TimeoutException("打开%s超时请检查网络或网址服务器" % url)

    @staticmethod
    def element_locator(func, locator):
        """元素定位器"""
        name, value = locator
        return func(cm.LOCATE_MODE[name], value)

    def find_element(self, locator):
        """寻找单个元素"""
        return WebPage.element_locator(lambda *args: self.wait.until(
            EC.presence_of_element_located(args)), locator)

    def find_elements(self, locator):
        """查找多个相同的元素"""
        return WebPage.element_locator(lambda *args: self.wait.until(
            EC.presence_of_all_elements_located(args)), locator)

    def elements_num(self, locator):
        """获取相同元素的个数"""
        number = len(self.find_elements(locator))
        log.info("相同元素:{}".format((locator, number)))
        return number

    def input_text(self, locator, txt):
        """输入(输入前先清空)"""
        sleep(0.5)
        ele = self.find_element(locator)
        ele.clear()
        ele.send_keys(txt)
        log.info("输入文本:{}".format(txt))

    def is_click(self, locator):
        """点击"""
        self.find_element(locator).click()
        sleep()
        log.info("点击元素:{}".format(locator))

    def element_text(self, locator):
        """获取当前的text"""
        _text = self.find_element(locator).text
        log.info("获取文本:{}".format(_text))
        return _text

    @property
    def get_source(self):
        """获取页面源代码"""
        return self.driver.page_source

    def refresh(self):
        """刷新页面F5"""
        self.driver.refresh()
        self.driver.implicitly_wait(30)
在文件中我们对主要用了显式等待对selenium的click,send_keys等方法,做了二次封装。提高了运行的成功率。
好了我们完成了POM模型的一半左右的内容。接下来我们们进入页面对象。
创建页面对象
在page_object目录下创建一个searchpage.py文件。
#!/usr/bin/env python3
# -*- coding:utf-8 -*-
from page.webpage import WebPage, sleep
from common.readelement import Element

search = Element('search')


class SearchPage(WebPage):
    """搜索类"""

    def input_search(self, content):
        """输入搜索"""
        self.input_text(search['搜索框'], txt=content)
        sleep()

    @property
    def imagine(self):
        """搜索联想"""
        return [x.text for x in self.find_elements(search['候选'])]

    def click_search(self):
        """点击搜索"""
        self.is_click(search['搜索按钮'])
在该文件中我们对,输入搜索关键词,点击搜索,搜索联想,进行了封装。
并配置了注释。
在平时中我们应该养成写注释的习惯,因为过一段时间后,没有注释,代码读起来很费劲。
好了我们的页面对象此时业已完成了。下面我们开始编写测试用例。在开始测试用了之前我们先熟悉一下pytest测试框架。
简单了解Pytest
打开pytest框架的官网。pytest: helps you write better programs — pytest documentation
# content of test_sample.py
def inc(x):
    return x + 1


def test_answer():
    assert inc(3) == 5
pytest.ini
pytest项目中的配置文件,可以对pytest执行过程中操作做全局控制。
在项目根目录新建pytest.ini文件。
[pytest]
addopts = --html=report.html --self-contained-html
addopts 指定执行时的其他参数说明:
--html=report/report.html --self-contained-html生成pytest-html带样式的报告-s输出我们用例中的调式信息
-
-q安静的进行测试-v可以输出用例更加详细的执行信息,比如用例所在的文件及用例名称等
编写测试用例
我们将使用pytest编写测试用例。
在TestCase目录中创建test_search.py文件。
#!/usr/bin/env python3
# -*- coding:utf-8 -*-
import re
import pytest
from utils.logger import log
from common.readconfig import ini
from page_object.searchpage import SearchPage


class TestSearch:
    @pytest.fixture(scope='function', autouse=True)
    def open_baidu(self, drivers):
        """打开百度"""
        search = SearchPage(drivers)
        search.get_url(ini.url)

    def test_001(self, drivers):
        """搜索"""
        search = SearchPage(drivers)
        search.input_search("selenium")
        search.click_search()
        result = re.search(r'selenium', search.get_source)
        log.info(result)
        assert result

    def test_002(self, drivers):
        """测试搜索候选"""
        search = SearchPage(drivers)
        search.input_search("selenium")
        log.info(list(search.imagine))
        assert all(["selenium" in i for i in search.imagine])


if __name__ == '__main__':
    pytest.main(['TestCase/test_search.py'])
我们测试用了就编写好了。
-
pytest.fixture 这个实现了和unittest的setup,teardown一样的前置启动,后置清理的装饰器。
-
第一个测试用例:
-
- 我们实现了在百度selenium关键字,并点击搜索按钮,并在搜索结果中,用正则查找结果页源代码,返回数量大于10我们就认为通过。
-
第二个测试用例:
- 我们实现了,搜索selenium,然后断言搜索候选中的所有结果有没有selenium关键字。
最后我们的在下面写一个执行启动的语句。
这时候我们应该进入执行了,但是还有一个问题,我们还没有把driver传递。
conftest.py
我们在项目根目录下新建一个conftest.py文件。
#!/usr/bin/env python3
# -*- coding:utf-8 -*-
import pytest
from py.xml import html
from selenium import webdriver


driver = None


@pytest.fixture(scope='session', autouse=True)
def drivers(request):
    global driver
    if driver is None:
        driver = webdriver.Chrome()
        driver.maximize_window()

    def fn():
        driver.quit()

    request.addfinalizer(fn)
    return driver


@pytest.hookimpl(hookwrapper=True)
def pytest_runtest_makereport(item):
    """
    当测试失败的时候,自动截图,展示到html报告中
    :param item:
    """
    pytest_html = item.config.pluginmanager.getplugin('html')
    outcome = yield
    report = outcome.get_result()
    report.description = str(item.function.__doc__)
    extra = getattr(report, 'extra', [])

    if report.when == 'call' or report.when == "setup":
        xfail = hasattr(report, 'wasxfail')
        if (report.skipped and xfail) or (report.failed and not xfail):
            file_name = report.nodeid.replace("::", "_") + ".png"
            screen_img = _capture_screenshot()
            if file_name:
                html = ' \
                       'onclick="window.open(this.src)" align="right"/>' % screen_img
                extra.append(pytest_html.extras.html(html))
        report.extra = extra


def pytest_html_results_table_header(cells):
    cells.insert(1, html.th('用例名称'))
    cells.insert(2, html.th('Test_nodeid'))
    cells.pop(2)


def pytest_html_results_table_row(report, cells):
    cells.insert(1, html.td(report.description))
    cells.insert(2, html.td(report.nodeid))
    cells.pop(2)


def pytest_html_results_table_html(report, data):
    if report.passed:
        del data[:]
        data.append(html.div('通过的用例未捕获日志输出.', class_='empty log'))


def _capture_screenshot():
    '''
    截图保存为base64
    :return:
    '''
    return driver.get_screenshot_as_base64()
\
'onclick="window.open(this.src)" align="right"/>' % screen_img
extra.append(pytest_html.extras.html(html))
report.extra = extra
def pytest_html_results_table_header(cells):
cells.insert(1, html.th('用例名称'))
cells.insert(2, html.th('Test_nodeid'))
cells.pop(2)
def pytest_html_results_table_row(report, cells):
cells.insert(1, html.td(report.description))
cells.insert(2, html.td(report.nodeid))
cells.pop(2)
def pytest_html_results_table_html(report, data):
if report.passed:
del data[:]
data.append(html.div('通过的用例未捕获日志输出.', class_='empty log'))
def _capture_screenshot():
'''
截图保存为base64
:return:
'''
return driver.get_screenshot_as_base64()
conftest.py测试框架pytest的胶水文件,里面用到了fixture的方法,封装并传递出了driver。
执行用例
以上我们已经编写完成了整个框架和测试用例。
我们进入到当前项目的主目录执行命令:
pytest
命令行输出:
Test session starts (platform: win32, Python 3.7.7, pytest 5.3.2, pytest-sugar 0.9.2)
cachedir: .pytest_cache
metadata: {'Python': '3.7.7', 'Platform': 'Windows-10-10.0.18362-SP0', 'Packages': {'pytest': '5.3.2', 'py': '1.8.0', 'pluggy': '0.13.1'}, 'Plugins': {'forked': '1.1.3', 'html': '2.0.1', 'metadata': '1.8.0', 'ordering': '0.6', 'rerunfailures': '8.0', 'sugar': '0.9.2', 'xdist': '1.31.0'}, 'JAVA_HOME': 'D:\\Program Files\\Java\\jdk1.8.0_131'}
rootdir: C:\Users\hoou\PycharmProjects\web-demotest, inifile: pytest.ini
plugins: forked-1.1.3, html-2.0.1, metadata-1.8.0, ordering-0.6, rerunfailures-8.0, sugar-0.9.2, xdist-1.31.0
collecting ...
DevTools listening on ws://127.0.0.1:10351/devtools/browser/78bef34d-b94c-4087-b724-34fb6b2ef6d1
TestCase\test_search.py::TestSearch.test_001 ✓ 50% █████
TestCase\test_search.py::TestSearch.test_002 ✓ 100% ██████████
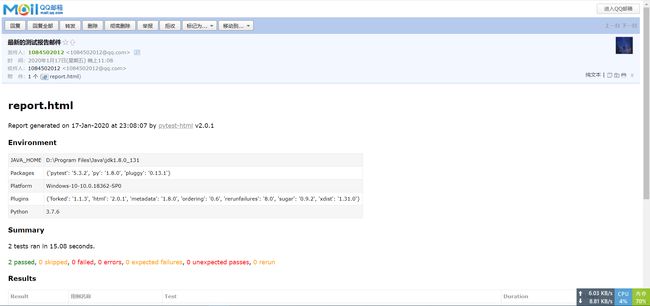
------------------------------- generated html file: file://C:\Users\hoou\PycharmProjects\web-demotest\report\report.html --------------------------------
Results (12.90s):
2 passed
可以看到两条用例已经执行成功了。
项目的report目录中生成了一个report.html文件。
这就是生成的测试报告文件。
发送邮件
当项目执行完成之后,需要发送到自己或者其他人邮箱里查看结果。
我们编写发送邮件的模块。
在utils目录中新建send_mail.py文件
#!/usr/bin/env python3
# -*- coding:utf-8 -*-
import zmail
from config.conf import cm


def send_report():
    """发送报告"""
    with open(cm.REPORT_FILE, encoding='utf-8') as f:
        content_html = f.read()
    try:
        mail = {
            'from': '[email protected]',
            'subject': '最新的测试报告邮件',
            'content_html': content_html,
            'attachments': [cm.REPORT_FILE, ]
        }
        server = zmail.server(*cm.EMAIL_INFO.values())
        server.send_mail(cm.ADDRESSEE, mail)
        print("测试邮件发送成功!")
    except Exception as e:
        print("Error: 无法发送邮件,{}!", format(e))


if __name__ == "__main__":
    '''请先在config/conf.py文件设置QQ邮箱的账号和密码'''
    send_report()
执行该文件:
测试邮件发送成功!
可以看到测试报告邮件已经发送成功了。打开邮箱。

成功收到了邮件。
这个demo项目就算是整体完工了;是不是很有心得,在发送邮件的那一刻很有成就感。
最后,想必你已经对pytest+selenium框架有了一个整体的认知了,在自动化测试的道路上又上了一层台阶。
pytest使用allure测试报告
- 选用的项目为
Selenium自动化测试Pytest框架实战,在这个项目的基础上说allure报告。
allure安装
- 首先安装python的allure-pytest包
pip install allure-pytest
- 然后安装allure的command命令行程序
MacOS直接使用homebrew工具执行 brew install allure 即可安装,不用配置下载包和配置环境
在GitHub下载安装程序https://github.com/allure-framework/allure2/releases
但是由于GitHub访问太慢,我已经下载好并放在了群文件里面
下载完成后解压放到一个文件夹。我的路径是D:\Program Files\allure-2.13.3
然后配置环境变量: 在系统变量path中添加D:\Program Files\allure-2.13.3\bin,然后确定保存。
打开cmd,输入allure,如果结果显示如下则表示成功了:
C:\Users\hoou>allure
Usage: allure [options] [command] [command options]
  Options:
    --help
      Print commandline help.
    -q, --quiet
      Switch on the quiet mode.
      Default: false
    -v, --verbose
      Switch on the verbose mode.
      Default: false
    --version
      Print commandline version.
      Default: false
  Commands:
    generate      Generate the report
      Usage: generate [options] The directories with allure results
        Options:
          -c, --clean
            Clean Allure report directory before generating a new one.
            Default: false
          --config
            Allure commandline config path. If specified overrides values from
            --profile and --configDirectory.
          --configDirectory
            Allure commandline configurations directory. By default uses
            ALLURE_HOME directory.
          --profile
            Allure commandline configuration profile.
          -o, --report-dir, --output
            The directory to generate Allure report into.
            Default: allure-report

    serve      Serve the report
      Usage: serve [options] The directories with allure results
        Options:
          --config
            Allure commandline config path. If specified overrides values from
            --profile and --configDirectory.
          --configDirectory
            Allure commandline configurations directory. By default uses
            ALLURE_HOME directory.
          -h, --host
            This host will be used to start web server for the report.
          -p, --port
            This port will be used to start web server for the report.
            Default: 0
          --profile
            Allure commandline configuration profile.

    open      Open generated report
      Usage: open [options] The report directory
        Options:
          -h, --host
            This host will be used to start web server for the report.
          -p, --port
            This port will be used to start web server for the report.
            Default: 0

    plugin      Generate the report
      Usage: plugin [options]
        Options:
          --config
            Allure commandline config path. If specified overrides values from
            --profile and --configDirectory.
          --configDirectory
            Allure commandline configurations directory. By default uses
            ALLURE_HOME directory.
          --profile
            Allure commandline configuration profile.
allure初体验
改造一下之前的测试用例代码
#!/usr/bin/env python3
# -*- coding:utf-8 -*-
import re
import pytest
import allure
from utils.logger import log
from common.readconfig import ini
from page_object.searchpage import SearchPage


@allure.feature("测试百度模块")
class TestSearch:
    @pytest.fixture(scope='function', autouse=True)
    def open_baidu(self, drivers):
        """打开百度"""
        search = SearchPage(drivers)
        search.get_url(ini.url)

    @allure.story("搜索selenium结果用例")
    def test_001(self, drivers):
        """搜索"""
        search = SearchPage(drivers)
        search.input_search("selenium")
        search.click_search()
        result = re.search(r'selenium', search.get_source)
        log.info(result)
        assert result

    @allure.story("测试搜索候选用例")
    def test_002(self, drivers):
        """测试搜索候选"""
        search = SearchPage(drivers)
        search.input_search("selenium")
        log.info(list(search.imagine))
        assert all(["selenium" in i for i in search.imagine])

if __name__ == '__main__':
    pytest.main(['TestCase/test_search.py', '--alluredir', './allure'])
    os.system('allure serve allure')
然后运行一下:
注意:如果你使用的是pycharm编辑器,请跳过该运行方式,直接使用.bat或.sh的方式运行
***
------------------------------- generated html file: file://C:\Users\hoou\PycharmProjects\web-demotest\report.html --------------------------------
Results (12.97s):
2 passed
Generating report to temp directory...
Report successfully generated to C:\Users\hoou\AppData\Local\Temp\112346119265936111\allure-report
Starting web server...
2020-06-18 22:52:44.500:INFO::main: Logging initialized @1958ms to org.eclipse.jetty.util.log.StdErrLog
Server started at to exit
命令行会出现如上提示,接着浏览器会自动打开:
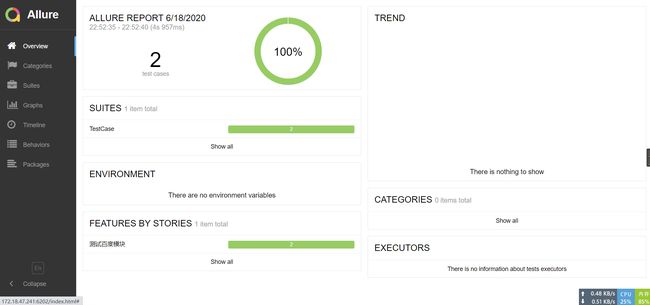
点击左下角En即可选择切换为中文。

是不是很清爽很友好,比pytest-html更舒服。
allure装饰器介绍
报告的生成和展示
刚才的两个命令:
- 生成allure原始报告到report/allure目录下,生成的全部为json或txt文件。
pytest TestCase/test_search.py --alluredir ./allure
- 在一个临时文件中生成报告并启动浏览器打开
allure serve allure
但是在关闭浏览器之后这个报告就再也打不开了。不建议使用这种。
所以我们必须使用其他的命令,让allure可以指定生成的报告目录。
我们在项目的根目录中创建run_case.py文件,内容如下:
#!/usr/bin/env python3
# -*- coding:utf-8 -*-
import sys
import subprocess

WIN = sys.platform.startswith('win')


def main():
   """主函数"""
   steps = [
       "venv\\Script\\activate" if WIN else "source venv/bin/activate",
       "pytest --alluredir allure-results --clean-alluredir",
       "allure generate allure-results -c -o allure-report",
       "allure open allure-report"
   ]
   for step in steps:
       subprocess.run("call " + step if WIN else step, shell=True)


if __name__ == "__main__":
   main()
命令释义:
1、使用pytest生成原始报告,里面大多数是一些原始的json数据,加入--clean-alluredir参数清除allure-results历史数据。
pytest --alluredir allure-results --clean-alluredir
- --clean-alluredir 清除allure-results历史数据
2、使用generate命令导出HTML报告到新的目录
allure generate allure-results -o allure-report
3、使用open命令在浏览器中打开HTML报告
allure open allure-report
好了我们运行一下该文件。
Results (12.85s):
2 passed
Report successfully generated to c:\Users\hoou\PycharmProjects\web-demotest\allure-report
Starting web server...
2020-06-18 23:30:24.122:INFO::main: Logging initialized @260ms to org.eclipse.jetty.util.log.StdErrLog
Server started at 172.18 .47.241:7932/>. Press to exit

可以看到运行成功了。
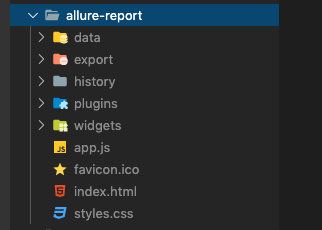
在项目中的allure-report文件夹也生成了相应的报告。
allure发生错误截图
上面的用例全是运行成功的,没有错误和失败的,那么发生了错误怎么样在allure报告中生成错误截图呢,我们一起来看看。
首先我们先在config/conf.py文件中添加一个截图目录和截图文件的配置。
+++

class ConfigManager(object):

		...

    @property
    def screen_path(self):
        """截图目录"""
        screenshot_dir = os.path.join(self.BASE_DIR, 'screen_capture')
        if not os.path.exists(screenshot_dir):
            os.makedirs(screenshot_dir)
        now_time = dt_strftime("%Y%m%d%H%M%S")
        screen_file = os.path.join(screenshot_dir, "{}.png".format(now_time))
        return now_time, screen_file

  	...
+++
然后我们修改项目目录中的conftest.py:
#!/usr/bin/env python3
# -*- coding:utf-8 -*-
import base64
import pytest
import allure
from py.xml import html
from selenium import webdriver

from config.conf import cm
from common.readconfig import ini
from utils.times import timestamp
from utils.send_mail import send_report

driver = None


@pytest.fixture(scope='session', autouse=True)
def drivers(request):
    global driver
    if driver is None:
        driver = webdriver.Chrome()
        driver.maximize_window()

    def fn():
        driver.quit()

    request.addfinalizer(fn)
    return driver


@pytest.hookimpl(hookwrapper=True)
def pytest_runtest_makereport(item):
    """
    当测试失败的时候,自动截图,展示到html报告中
    :param item:
    """
    pytest_html = item.config.pluginmanager.getplugin('html')
    outcome = yield
    report = outcome.get_result()
    report.description = str(item.function.__doc__)
    extra = getattr(report, 'extra', [])

    if report.when == 'call' or report.when == "setup":
        xfail = hasattr(report, 'wasxfail')
        if (report.skipped and xfail) or (report.failed and not xfail):
            screen_img = _capture_screenshot()
            if screen_img:
                html = ' \
                       'onclick="window.open(this.src)" align="right"/>' % screen_img
                extra.append(pytest_html.extras.html(html))
        report.extra = extra


def pytest_html_results_table_header(cells):
    cells.insert(1, html.th('用例名称'))
    cells.insert(2, html.th('Test_nodeid'))
    cells.pop(2)


def pytest_html_results_table_row(report, cells):
    cells.insert(1, html.td(report.description))
    cells.insert(2, html.td(report.nodeid))
    cells.pop(2)


def pytest_html_results_table_html(report, data):
    if report.passed:
        del data[:]
        data.append(html.div('通过的用例未捕获日志输出.', class_='empty log'))


def pytest_html_report_title(report):
    report.title = "pytest示例项目测试报告"


def pytest_configure(config):
    config._metadata.clear()
    config._metadata['测试项目'] = "测试百度官网搜索"
    config._metadata['测试地址'] = ini.url


def pytest_html_results_summary(prefix, summary, postfix):
    # prefix.clear() # 清空summary中的内容
    prefix.extend([html.p("所属部门: XX公司测试部")])
    prefix.extend([html.p("测试执行人: 随风挥手")])


def pytest_terminal_summary(terminalreporter, exitstatus, config):
    """收集测试结果"""
    result = {
        "total": terminalreporter._numcollected,
        'passed': len(terminalreporter.stats.get('passed', [])),
        'failed': len(terminalreporter.stats.get('failed', [])),
        'error': len(terminalreporter.stats.get('error', [])),
        'skipped': len(terminalreporter.stats.get('skipped', [])),
        # terminalreporter._sessionstarttime 会话开始时间
        'total times': timestamp() - terminalreporter._sessionstarttime
    }
    print(result)
    if result['failed'] or result['error']:
        send_report()


def _capture_screenshot():
    """截图保存为base64"""
    now_time, screen_file = cm.screen_path
    driver.save_screenshot(screen_file)
    allure.attach.file(screen_file,
                       "失败截图{}".format(now_time),
                       allure.attachment_type.PNG)
    with open(screen_file, 'rb') as f:
        imagebase64 = base64.b64encode(f.read())
    return imagebase64.decode()
来看看我们修改了什么:
- 我们修改了_capture_screenshot函数
在里面我们使用了webdriver截图生成文件,并使用allure.attach.file方法将文件添加到了allure测试报告中。
并且我们还返回了图片的base64编码,这样可以让pytest-html的错误截图和allure都能生效。
运行一次得到两份报告,一份是简单的一份是好看内容丰富的。
现在我们在测试用例中构建一个预期的错误测试一个我们的这个代码。
修改test_002测试用例
assert not all(["selenium" in i for i in search.imagine])
运行一下:

可以看到allure报告中已经有了这个错误的信息。
再来看看pytest-html中生成的报告:

可以看到两份生成的报告都附带了错误的截图,真是鱼和熊掌可以兼得呢。
好了,到这里可以说allure的报告就先到这里了,以后发现allure其他的精彩之处我再来分享。
开源地址
为了方便学习交流,本次的示例项目已经保存在网盘了,直接点击下方小卡片免费获取。