SpringBoot快速创建web项目
创建
使用Spring initializr创建一个新的web工程
Spring initializr是Spring官方提供的初始化SpringBoot项目的工具,主要作用在于springboot中选择我们所需要的依赖包
如图:

选择相应的依赖包,因为我们进行web开发,选择如图

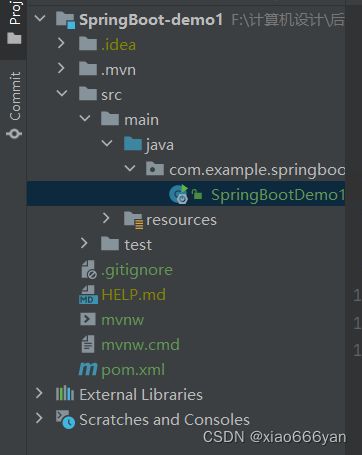
创建后的目录结构:
pom.xml如下:
<?xml version="1.0" encoding="UTF-8"?>
<project xmlns="http://maven.apache.org/POM/4.0.0" xmlns:xsi="http://www.w3.org/2001/XMLSchema-instance"
         xsi:schemaLocation="http://maven.apache.org/POM/4.0.0 https://maven.apache.org/xsd/maven-4.0.0.xsd">
    <modelVersion>4.0.0</modelVersion>
    <parent>
        <groupId>org.springframework.boot</groupId>
        <artifactId>spring-boot-starter-parent</artifactId>
        <version>2.7.9</version>
        <relativePath/> <!-- lookup parent from repository -->
    </parent>
    <groupId>com.example</groupId>
    <artifactId>SpringBoot-demo1</artifactId>
    <version>0.0.1-SNAPSHOT</version>
    <name>SpringBoot-demo1</name>
    <description>SpringBoot-demo1</description>
    <properties>
        <java.version>1.8</java.version>
    </properties>
    <dependencies>
        <dependency>
            <groupId>org.springframework.boot</groupId>
            <artifactId>spring-boot-starter-web</artifactId>
        </dependency>

        <dependency>
            <groupId>org.springframework.boot</groupId>
            <artifactId>spring-boot-starter-test</artifactId>
            <scope>test</scope>
            <exclusions>
                <exclusion>
                    <groupId>org.junit.vintage</groupId>
                    <artifactId>junit-vintage-engine</artifactId>
                </exclusion>
            </exclusions>
        </dependency>
    </dependencies>

    <build>
        <plugins>
            <plugin>
                <groupId>org.springframework.boot</groupId>
                <artifactId>spring-boot-maven-plugin</artifactId>
            </plugin>
        </plugins>
    </build>

</project>
说明:
spring-boot-starter-parent是一个特殊的starter,它提供相关的Maven默认依赖,使用后,常用的包依赖可以省去version标签
创建控制层controller

点击启动类右键运行

SpringBoot工程热部署
在修改代码后不重启就能生效修改的代码,在 pom.xml 中添加如下配置就可以,实现这样的功能,我们称之为热部署
<!--热部署配置-->
<dependency>
<groupId>org.springframework.boot</groupId>
<artifactId>spring-boot-devtools</artifactId>
</dependency>
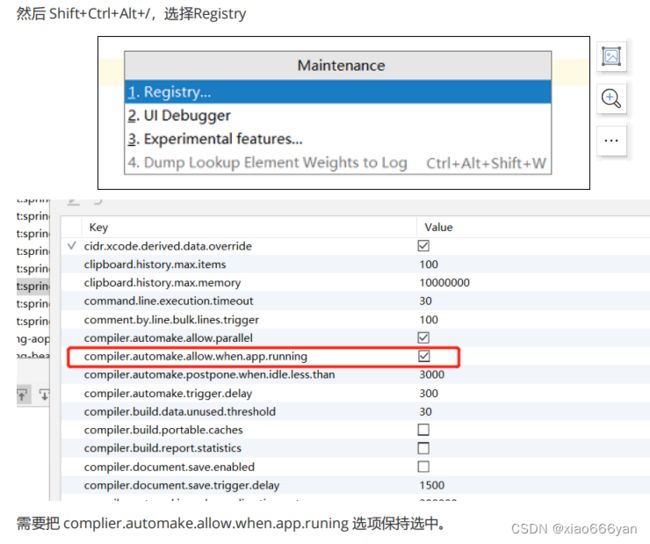
失败原因:
这种情况,并不是热部署配置问题,其根本原因是因为Intellij IEDA默认情况下不会自动编译,需要
对IDEA进行自动编译的设置,如下:
右键file->settings

然后Shift+Ctrl+Alt+/,选择Registry
然后在配置文件中加入如下代码:(此处为application.yml)
spring:
	devtools:
		restart:
			enabled: true #设置开启热部署
			additional-paths: src/main/java #重启目录
			exclude: WEB-INF/**
配置文件
SpringBoot是基于约定的,所以很多配置都有默认值,但如果想使用自己的配置替换默认配置的话,就可以使用application.properties(键对值类型文件)或application.yml(application.yaml)进行配置。
注意:
application.yml语法:
语法:
key:
key1: value1
key2: value2
或者:
key: {key1: value1,key2: value2}
在yml语法中,相同缩进代表同一个级别
application.properties语法:
语法:
key:
- value1(注意:value1与之间的 - 之间存在一个空格)
- value2
或者:
key: [value1,value2]
SpringBoot配置信息的查询
SpringBoot的配置文件,主要的目的就是对配置信息进行修改的,在配置时的key我们可以查阅SpringBoot的官方文档
文档URL:https://docs.spring.io/spring-boot/docs/2.0.1.RELEASE/reference/htmlsingle/#commonapplication-properties
常用的配置如下:

以上配置在application.properties或者application.yml
中实现:
例如:
application.properties文件:
server.port=8888
servlet.servlet.context-path=/demo
application.yml文件:
server:
	port:8888
	servlet:
		context-path:/demo
配置文件与配置类的属性映射方式
使用注解@ConfigurationProperties映射
通过@Value注解将配置文件中的值映射到一个Spring管理的Bean字段上:
例如:
application.properties配置如下(语法与上述配置文件相同):
person.name=zhangsan
person.age=18
实体Bean代码如下:
第一步:在pom.xml中加入以下依赖:
<dependency>
            <groupId>org.springframework.boot</groupId>
            <artifactId>spring-boot-configuration-processor</artifactId>
            <optional>true</optional>
</dependency>
创建controller包,在包下创建TestController.java类:
代码如下:
package com.example.springbootdemo1.controller;

import org.springframework.boot.context.properties.ConfigurationProperties;
import org.springframework.context.annotation.Conditional;
import org.springframework.stereotype.Controller;
import org.springframework.web.bind.annotation.RequestMapping;
import org.springframework.web.bind.annotation.ResponseBody;

@Controller
@ConfigurationProperties(prefix = "person")
public class TestController {
    private String name;
    private String age;

    @RequestMapping("/quick")
    @ResponseBody
    public String quick() {
        return "SpringBoot 访问成功! name="+name+",age="+age;
    }

    public void setAge(String age) {
        this.age = age;
    }

    public void setName(String name) {
        this.name = name;
    }
}
右键启动类,启动成功,在浏览器地址栏输入以下内容回车:
localhost:8888/quick
结果:

使用注解@Value映射
使用@value注解将配置文件中的值映射到一个Spring管理的Bean的字段上
application.properties配置如下(语法与上述配置文件相同):
person.name=zhangsan
person.age=18
实体Bean代码如下:
package com.example.springbootdemo1.controller;

import org.springframework.beans.factory.annotation.Value;
import org.springframework.boot.context.properties.ConfigurationProperties;
import org.springframework.context.annotation.Conditional;
import org.springframework.stereotype.Controller;
import org.springframework.web.bind.annotation.RequestMapping;
import org.springframework.web.bind.annotation.ResponseBody;

@Controller
public class TestController {
    @Value("${person.name}")
    private String name;
    @Value("${person.age}")
    private String age;

    @RequestMapping("/quick")
    @ResponseBody
    public String quick() {
        return "SpringBoot 访问成功! name="+name+",age="+age;
    }
}
结果:

使用自定义配置文件:
可以使用@PropertySource注解
@PropertySource(value = {"classpath:jdbc.properties"}, encoding = "UTF-8")
注意:使用@ConfigurationProperties(prefix = “person”)方式可以进行配置文件与实体字段的自动映射,但需要字段必须提供set方法才行,而使用@Value注解修饰的字段不需要提供set方法