微服务探索之路06篇k8s配置文件Yaml部署Redis使用Helm部署MongoDB和kafka
1 安装Redis
1.1创建配置文件redis.conf
切换到自己的目录下如本文是放在/home/ubuntu下
cd /home/ubuntuvim redis.conf
bind 0.0.0.0
protected-mode yes
port 6379
requirepass qwe123456
tcp-backlog 511
timeout 0
tcp-keepalive 300
daemonize no
pidfile /var/run/redis_6379.pid
loglevel notice
logfile "/tmp/redis.log"
databases 16
always-show-logo no
stop-writes-on-bgsave-error yes
rdbcompression yes
rdbchecksum yes
dbfilename dump.rdb
dir /data
1.2创建deployment配置文件
vim redis.yaml
apiVersion: apps/v1
kind: Deployment
metadata:
  labels:
    app: redis-single-node
  name: redis-single-node
spec:
  progressDeadlineSeconds: 600    #部署进度截止时间
  replicas: 1  #副本数
  revisionHistoryLimit: 10   #修订历史记录限制数
  selector:
    matchLabels:
      app: redis-single-node #选择器,用于选择匹配的Pod
  strategy:
    rollingUpdate:
      maxSurge: 1
      maxUnavailable: 0
    type: RollingUpdate
  template:
    metadata:
      creationTimestamp: null
      labels:
        app: redis-single-node
    spec:
      containers:
      - command:
        - sh
        - -c
        - redis-server "/mnt/redis.conf"
        env:
        - name: TZ
          value: Asia/Shanghai
        - name: LANG
          value: C.UTF-8
        image: redis:5.0.4-alpine #Redis镜像版本
        imagePullPolicy: IfNotPresent
        lifecycle: {}
        livenessProbe:
          failureThreshold: 2    #失败的最大次数2次
          initialDelaySeconds: 10  #启动容器后10秒开始检测
          periodSeconds: 10  #每过10s检测一次
          successThreshold: 1  #只要成功了1次,就表示成功了。
          tcpSocket:
            port: 6379
          timeoutSeconds: 2
        name: redis-single-node
        ports:
        - containerPort: 6379
          name: web
          protocol: TCP
        readinessProbe:
          failureThreshold: 2
          initialDelaySeconds: 10
          periodSeconds: 10
          successThreshold: 1
          tcpSocket:
            port: 6379
          timeoutSeconds: 2
        resources:   #资源限制
          limits:    #最多可使用的资源
            cpu: 100m #CPU的计量单位叫毫核(m)。一个节点的CPU核心数量乘以1000,得到的就是节点总的CPU总数量。如,一个节点有两个核,那么该节点的CPU总量为2000m
            memory: 339Mi
          requests:  #代表容器启动请求的资源限制,分配的资源必须要达到此要求
            cpu: 10m
            memory: 10Mi
        securityContext: #上下文参数
          privileged: false  #特权,最高权限
          runAsNonRoot: false #禁止以root用户启动容器 true为禁止
        terminationMessagePath: /dev/termination-log #表示容器的异常终止消息的路径,默认在 /dev/termination-log 下。当容器退出时,可以通过容器的状态看到退出信息。
        terminationMessagePolicy: File   #默认情况容器退出时,退出信息会从文件中读取。 可以修改为 FallbackToLogsOnError 从日志中读取
        volumeMounts:
        - mountPath: /usr/share/zoneinfo/Asia/Shanghai
          name: tz-config
        - mountPath: /etc/localtime
          name: tz-config
        - mountPath: /etc/timezone
          name: timezone
        - mountPath: /mnt
          name: redis-conf
          readOnly: true
      dnsPolicy: ClusterFirst
      restartPolicy: Always
      schedulerName: default-scheduler
      securityContext: {}
      terminationGracePeriodSeconds: 30 #在规定的terminationGracePeriodSeconds优雅时间内完成Pod优雅终止动作。默认是30秒
      tolerations:  #零容忍设置
      - effect: NoExecute #即使在节点上存在污点,也不会将Pod从该节点上删除
        key: node.kubernetes.io/unreachable
        operator: Exists
        tolerationSeconds: 30
      - effect: NoExecute
        key: node.kubernetes.io/not-ready
        operator: Exists
        tolerationSeconds: 30
      volumes:
      - hostPath:
          path: /usr/share/zoneinfo/Asia/Shanghai
          type: ""
        name: tz-config
      - hostPath:
          path: /etc/timezone
          type: ""
        name: timezone
      - configMap:
          defaultMode: 420
          name: redis-conf
        name: redis-conf
- 1.创建k8sConfig Maps配置文件
kubectl create cm redis-conf --from-file=redis.conf - 2.部署redis Deployments
kubectl create -f redis.yaml - 3.将资源公开一个新的服务service`kubectl expose deploy redis-single-node --port 6379
- 4.对外开放6379端口找到service编辑type为NodePort,设置nodePort: 6379

- 到此安装完成之后就可以使用可视化工具(如AnotherRedisDesktopManager)或者代码进行测试连接。
2 安装MongoDB
这里使用Helm安装所以需要先安装一下Helm,如果已经安装跳过2.1这个小步骤
2.1 安装Helm
- 下载安装包https://github.com/helm/helm/releases,打开地址后选择适合自己的版本一般选择最新版本。本文使用的是ubuntu服务器下载命令如下
wget https://get.helm.sh/helm-v3.12.1-linux-amd64.tar.gz,如果遇到卡主那就是需要 - 下载完后解压
tar -zxvf helm-v3.12.1-linux-amd64.tar.gz - 移动到安装目标
mv linux-amd64/helm /usr/local/bin/helm - 初始化仓库
helm repo add bitnami https://charts.bitnami.com/bitnami,这边如果要添加找其他仓库地址可以去Artifact Hub搜索相对于的仓库地址。
2.2开始MongoDB安装
- 创建pv
vim mongodb-pv.yaml
apiVersion: v1
kind: PersistentVolume
metadata:
  name: mongodb-pv
spec:
  capacity:
    storage: 5Gi
  accessModes:
    - ReadWriteOnce
  hostPath:
    path: /bitnami/mongodb/data
以上内容中/bitnami/mongodb/data是主机真实路径,小提示如果没有权限需要赋权限给uid为1001
- 创建pvc
vim mongodb-pvc.yaml
apiVersion: v1
kind: PersistentVolumeClaim
metadata:
  name: mongodb-pvc
spec:
  accessModes:
    - ReadWriteOnce
  resources:
    requests:
      storage: 5Gi
  volumeName: mongodb-pv
- 创建配置文件
vim mongodb-values.yaml
persistence:
  enabled: true
  existingClaim: "mongodb-pvc"
securityContext:
    privileged: true
    runAsUser: 1001
    runAsGroup: 1001
    fsGroup: 1001
auth:
  rootPassword: "自定义密码"
创建完以上三个文件之后按顺序执行如下:
①kubectl apply -f mongodb-pv.yaml
②kubectl apply -f mongodb-pvc.yaml
③helm install my-mongodb bitnami/mongodb -f mongodb-values.yaml --set volumePermissions.enabled=true
提示–set volumePermissions.enabled=true第③必须加这个不然pod创建的时候没有权限创建文件夹及文件会报错mkdir: cannot create directory ‘/bitnami/mongodb/data’: Permission denied
安装成功之后如果想让外网访问跟上面redis一样service编辑type为NodePort,设置nodePort: 27017,端口号自定义只要防火墙对外开放就行
卸载使用helm uninstall my-mongodb
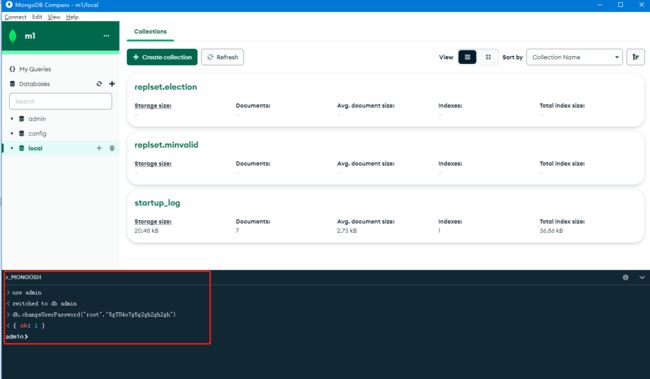
先切换至admin库use admin再执行修改 db.changeUserPassword("用户名","密码")
3 安装kafka
前置条件参考第2步安装MongoDB中的创建pv跟pvc命名为kafka-pv和kafka-pvc
3.1 Helm部署kafka
- 创建配置文件kafka-values.yaml内容如下
replicaCount: 1       # kafka 副本数
#global:
#  storageClass: nfs-client  # kafka 和 zookeeper 使用的存储

heapOpts: "-Xmx1024m -Xms1024m"  # kafka 启动的 jvm 参数

persistence:   # kafka 每个副本的存储空间
  enabled: true
  existingClaim: "kafka-pvc"

resources:
  limits:
    cpu: 1000m
    memory: 2Gi
  requests:
    cpu: 100m
    memory: 100Mi

zookeeper:
  replicaCount: 1  # zookeeper 的副本数
  persistence:
    enabled: true
    existingClaim: "kafka-pvc"
  resources:
    limits:
      cpu: 2000m
      memory: 2Gi

externalAccess:
  enabled: true    # 开启外部访问
  autoDiscovery:
    enabled: true
  service:
    type: NodePort  # 开启 nodeport
    ports:
      external: 9094
    nodePorts:      # nodeport 对应的端口,多少个 kafka 副本对应多少个端口
      - 30001
#      - 30002
#      - 30003
执行部署helm install my-kafka bitnami/kafka -f kafka-values.yaml --set volumePermissions.enabled=true --set rbac.create=true
3.1 安装简洁版的管理界面kafka-console-ui
- 创建kafka-console-ui-deploy.yaml
apiVersion: apps/v1
kind: Deployment
metadata:
  name: kafka-console-ui
  namespace: default
spec:
  replicas: 1
  selector:
    matchLabels:
      app: kafka-console-ui
  template:
    metadata:
      labels:
        app: kafka-console-ui
    spec:
      containers:
      - name: kafka-console-ui
        resources:
          limits:
            cpu: 1000m
            memory: 1Gi
          requests:
            cpu: 10m
            memory: 10Mi
        image: wdkang/kafka-console-ui:latest
        volumeMounts:
        - mountPath: /etc/localtime
          readOnly: true
          name: time-data
      volumes:
      - name: time-data
        hostPath:
          path: /usr/share/zoneinfo/Asia/Shanghai
- 创建kafka-console-ui-service.yaml
kind: Service
apiVersion: v1
metadata:
  labels:
    app: kafka-console-ui
  name: kafka-console-ui
  namespace: default
spec:
  ports:
    - port: 7766
      targetPort: 7766
      nodePort: 30088
  selector:
    app: kafka-console-ui
  type: NodePort
- 执行部署命令
①kubectl apply -f kafka-console-ui-service.yaml
②kubectl apply -f kafka-console-ui-deploy.yaml


