Ansible自动化运维学习——综合练习
目录
(一)练习一
1.新建一个role——app
2.创建文件
3.删除之前安装的httpd服务和apache用户
4.准备tasks任务
(1)创建组group.yml
(2)创建用户user.yml
(3)安装程序yum.yml
(4)修改模板httpd.conf.j2
(5)编写templ.yml
(6)编写start.yml
(7)编写copyfile.yml
(8)定义顺序main.yml
5.准备变量文件vars
(1)编写变量脚本——main.yml
6.准备触发器handlers
(1)编写脚本main.yml
7.编写playbook脚本调度任务
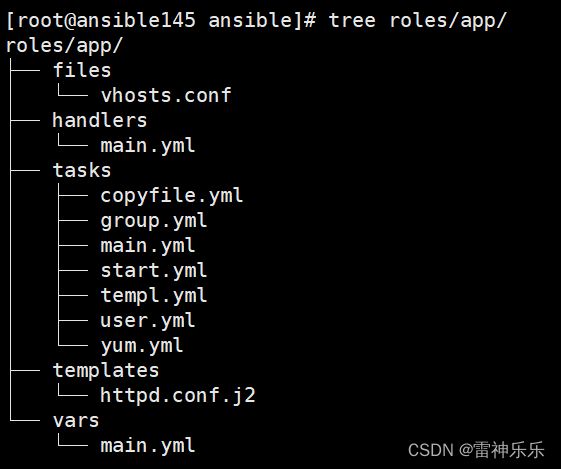
8.角色app目录结构
9.执行脚本
10.检查结果
(二)练习二——使用运算符//,设置缓存大小
1.准备工作
2.修改node141机器的内存
(1)node141现在的内存
(2)修改node141的内存
(3)修改node141后内存
(4)查看node142的内存
3.编辑配置文件
4.准备tasks任务
(1)编写yum.yml
(2)编写start.yml
(3)编写templ.yml
(4)编写main.yml
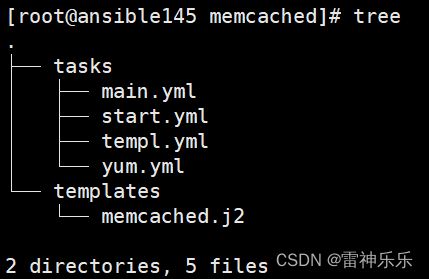
5.角色memcached目录结构
6.编写playbook脚本
7.检查并执行playbook脚本
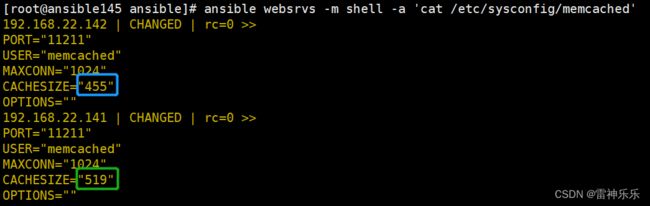
8.脚本执行结果
(三)推荐资料
(一)练习一
1.新建一个role——app
[root@ansible145 ansible]# cd roles/

[root@ansible145 roles]# rm -rf app/

[root@ansible145 roles]# mkdir app

[root@ansible145 roles]# cd app/
2.创建文件
[root@ansible145 app]# mkdir tasks templates vars handlers files

[root@ansible145 app]# tree
.
├── files
├── handlers
├── tasks
├── templates
└── vars

5 directories, 0 files
3.删除之前安装的httpd服务和apache用户
ansible all -m shell -a 'rm -rf /data/*'

ansible all -m shell -a 'userdel -r apache'

ansible all -m shell -a 'yum -y remove httpd'

ansible all -m shell -a 'rpm -q httpd'
4.准备tasks任务
(1)创建组group.yml
- name: create group
  group: name=app system=yes gid=123
(2)创建用户user.yml
- name: create user
  user: name=app system=yes shell=/sbin/nologin uid=123
(3)安装程序yum.yml
- name: install package
  yum: name=httpd
(4)修改模板httpd.conf.j2
[root@ansible145 tasks]# cp /etc/httpd/conf/httpd.conf ../templates/httpd.conf.j2

[root@ansible145 tasks]# vim ../templates/httpd.conf.j2

41 #Listen 12.34.56.78:80
42 Listen {{ ansible_processor_vcpus*10 }}
43 #
44 # Dynamic Shared Object (DSO) Support

64 #
65 User {{ username }}
66 Group {{ groupname }}
67
68 # 'Main' server configuration
(5)编写templ.yml
- name: copy conf
  template: src=httpd.conf.j2 dest=/etc/httpd/conf/httpd.conf
  notify: restart service
(6)编写start.yml
- name: start service
  service: name=httpd state=started enabled=yes
(7)编写copyfile.yml
- name: copy conf
  copy: src=vhosts.conf dest=/etc/httpd/conf.d/ owner=app
(8)定义顺序main.yml
- include: group.yml
- include: user.yml
- include: yum.yml
- include: templ.yml
- include: copyfile.yml
- include: start.yml
5.准备变量文件vars
(1)编写变量脚本——main.yml
[root@ansible145 vars]# vim main.yml

username: app
groupname: app
6.准备触发器handlers
(1)编写脚本main.yml
[root@ansible145 app]# vim handlers/main.yml

- name: restart service
  service: name=httpd state=restarted
7.编写playbook脚本调度任务
[root@ansible145 ansible]# vim app_role.yml

- hosts: websrvs
  remote_user: root
  roles:
    - app
8.角色app目录结构
9.执行脚本
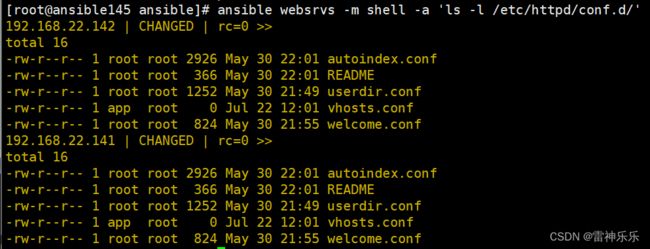
[root@ansible145 ansible]# ansible-playbook app_role.yml10.检查结果
[root@node141 ~]# ss -ntl
users:(("httpd",pid=10792,fd=4),("httpd",pid=10791,fd=4),("httpd",pid=10790,fd=4),("httpd",pid=10789,fd=4),("httpd",pid=10788,fd=4),("httpd",pid=10787,fd=4))

[root@node141 ~]# getent passwd app
app:x:123:100::/home/app:/sbin/nologin

[root@node141 ~]# getent group app
app:x:123:

[root@node141 ~]# ps aux | grep app
app       10788  0.0  0.1 221948  2968 ?        S    12:01   0:00 /usr/sbin/httpd -DFOREGROUND
app       10789  0.0  0.1 221948  2968 ?        S    12:01   0:00 /usr/sbin/httpd -DFOREGROUND
app       10790  0.0  0.1 221948  2968 ?        S    12:01   0:00 /usr/sbin/httpd -DFOREGROUND
app       10791  0.0  0.1 221948  2968 ?        S    12:01   0:00 /usr/sbin/httpd -DFOREGROUND
app       10792  0.0  0.1 221948  2968 ?        S    12:01   0:00 /usr/sbin/httpd -DFOREGROUND
root      10850  0.0  0.0 112660   964 pts/1    S+   12:08   0:00 grep --color=auto app
(二)练习二——使用运算符//,设置缓存大小
要求每台被控机memcached的缓存空间为物理内存的1/4
1.准备工作
[root@ansible145 roles]# cd memcached/

[root@ansible145 memcached]# mkdir tasks templates

[root@ansible145 memcached]# yum install -y memcached

[root@ansible145 memcached]# cat /etc/sysconfig/memcached
PORT="11211"
USER="memcached"
MAXCONN="1024"
CACHESIZE="64"
OPTIONS=""
2.修改node141机器的内存
(1)node141现在的内存

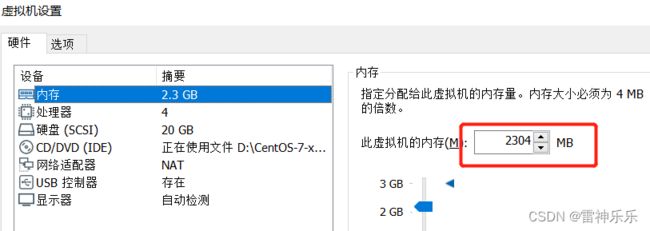
(2)修改node141的内存
(3)修改node141后内存

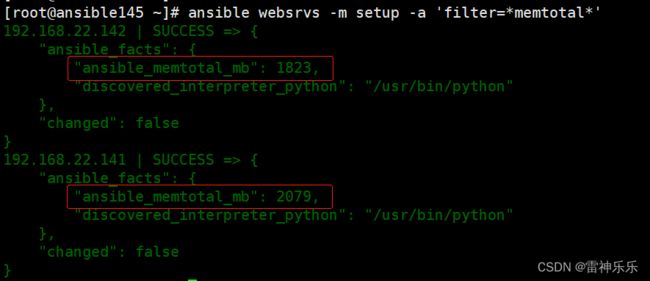
(4)查看node142的内存

3.编辑配置文件
[root@ansible145 memcached]# cp /etc/sysconfig/memcached templates/memcached.j2

[root@ansible145 memcached]# vim templates/memcached.j2

PORT="11211"
USER="memcached"
MAXCONN="1024"
CACHESIZE="{{ ansible_memtotal_mb//4 }}"
OPTIONS=""
4.准备tasks任务
(1)编写yum.yml
- name: install package
  yum: name=memcached
(2)编写start.yml
- name: start service
  service: name=memcached state=started enabled=yes
(3)编写templ.yml
- name: copy conf
  template: src=memcached.j2 dest=/etc/sysconfig/memcached
(4)编写main.yml
- include: yum.yml
- include: templ.yml
- include: start.yml
5.角色memcached目录结构
6.编写playbook脚本
[root@ansible145 ansible]# vim memcached_role.yml

- hosts: websrvs
  remote_user: root
  roles:
   - memcached
7.检查并执行playbook脚本
[root@ansible145 ansible]# ansible-playbook -C memcached_role.yml

[root@ansible145 ansible]# ansible-playbook memcached_role.yml
8.脚本执行结果

(三)推荐资料
http://galaxy.ansible.com
https://galaxy.ansible.com/explore#/
http://github.com/
http://ansible.com.cn/
https://github.com/ansible/ansible
https://github.com/ansible/ansible-examples