Linux&Windows系统双系统
一.在windows环境下安装Ubuntu18.04操作系统
Ubuntu入门指南:https://wiki.ubuntu.org.cn/Ubuntu%E6%A1%8C%E9%9D%A2%E5%85%A5%E9%97%A8%E6%8C%87%E5%8D%97
点击:(亲测有效)
操作指南
二.修改输入法
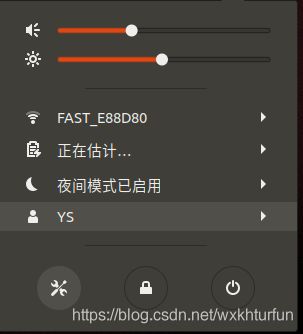
1.击右上角下三角符号:

2.点击设置:
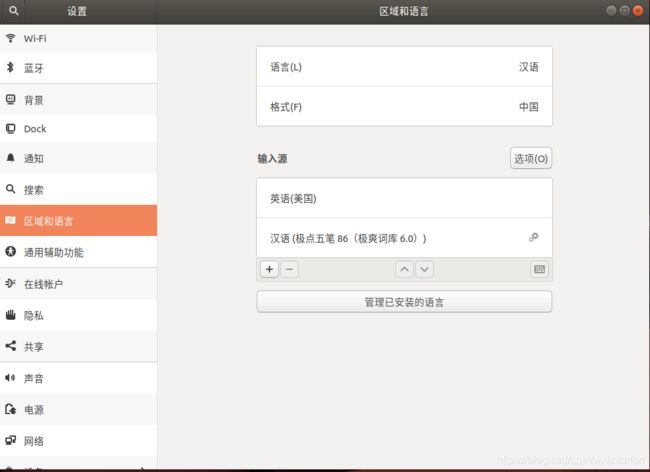
3.选择区域语言(OK):
二.更改文件权限:
相信你已经在安装ubuntu系统时设定了密码,如此可进入Root模式以修改文件权限。
- Ctrl+ALT+T:(同时按下)进入terminal
- 输入su,并输入密码(注意:密码是不可见的,所以别认为是自己敲不上)

如此可以输入如 chmod a+w [文件路径]如:
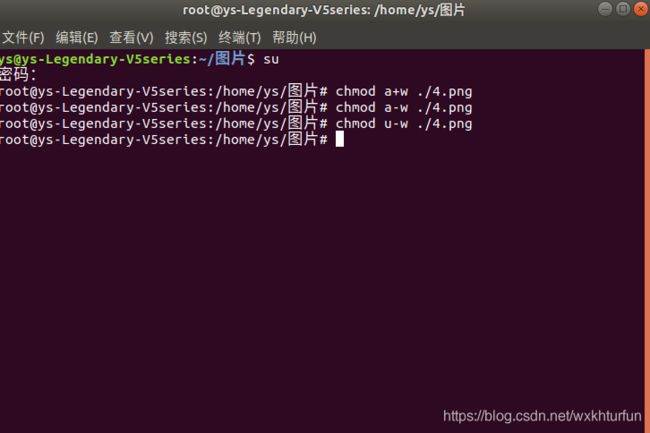
上图是在图片文件夹下右击打开terminal,a代表all表示对所有用户操作,+表示增加权限,w表示写权限。当然也可以使用:
sudo chmod a+w  [文件名]
提示:将东西复制到终端是:Shift+Ctrl+V
- 补充:上述只是开一个头,对桌面的其他操作可见链接
三.删除杂音
输入错误时,确实会有电脑发声,可以以此来关闭。
打开文件>其他位置>计算机>etc>inputrc
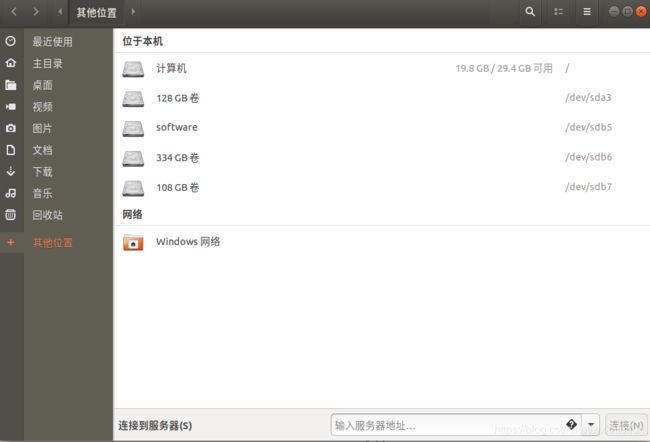
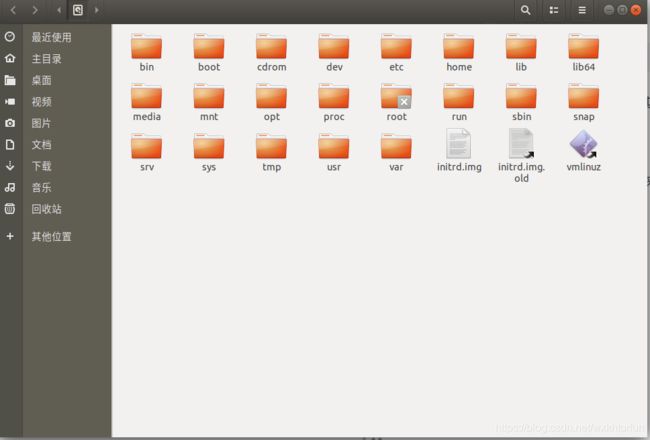
 先修改inputrc的权限,增加"w"权限,然后将第21行的注释删除。
其中几行如下:
# do not bell on tab-completion
set bell-style none
# set bell-style visible
四.显示网速、cpu占用率、温度等的显示
启动terminal,输入:
sudo add-apt-repository ppa:fossfreedom/indicator-sysmonitor
sudo apt-get update
sudo apt-get install indicator-sysmonitor
接着输入
indicator-sysmonitor &
这时先别关闭终端,而是点击右上角显示的网速符号>Preferences>勾选Run on startup>Advance
可在Advance里选择其他显示,这时关闭终端,不会显示符号;但是下次开机时就自动显示,不需要终端输入。
有时候ppa需要漫长的等待,最后还不一定出来,直接git也行
github地址:https://github.com/fossfreedom/indicator-sysmonitor
sudo apt-get install python3-psutil curl git gir1.2-appindicator3-0.1
git clone https://github.com/fossfreedom/indicator-sysmonitor.git
cd indicator-sysmonitor
sudo make install
nohup indicator-sysmonitor &
五.音乐软件
Linux操作系统下的音乐软件,我们在windows下使用的同一软件着实不多。以Linux for QQ 为例,垃圾的界面,每次登录都需要扫码。这里的音乐软件我推荐网易云音乐。在ubuntu下它依然有着熟悉而又良好的界面。
网易云音乐:点击右上角的“下载全部客户端”,选择linux,下载后安装即可。
最后你会发现点击下载的.deb文件并点击install后,安装的具体位置在"/opt",关于文件目录分析可见链接
六.关于在Linux操作Windows文件的问题
当然可以在下图中对相应的硬盘选择卸载、挂载,以进行操作。
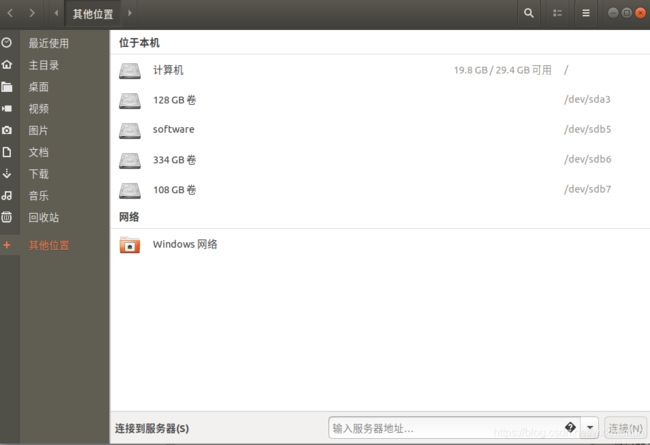
这里给出一个使用的方法。用微软的Onedrive。
参考:https://gitee.com/PeripateticWind/onedrive?_from=gitee_search
windows下自己使用Onedrive,这里给出Linux下的使用方法。
sudo apt-get install libcurl4-openssl-dev
sudo apt-get  install libsqlite3-dev
sudo snap install --classic dmd && sudo snap install --classic dub
sudo apt-get install git
sudo apt-get install make
git clone https://github.com/skilion/onedrive.git
sudo apt-get install onedrive
cd onedrive
make
sudo make install
onedrive
上述git一行的链接也可改为https://gitee.com/PeripateticWind/onedrive?_from=gitee_search
每敲完一行,回车就行了。
最终终端会出现一个链接,将该链接复制到浏览器上,并登录,会弹出一个空白网页,该空白网页的链接回来复制到终端上,并等待同步,同步完毕后接着再输入:
systemctl --user enable onedrive
systemctl --user start onedrive
此时“主目录”下的“Onedrive”已实现同步,你对该目录下的文件操作即同步到windos下的Onedrive。
七.开机自启
	本人需要开机自动一个python脚本,里面需要import cv2,
本人曾尝试什么rc-local.service,rc.local,或gnome-session-propertiesXXXXXXXXXXXXX
之类的方法,脚本是调用了没错,但是显示"cannot connect to X server",许多说可以
注释掉“imshow”的那行代码,但是这不符合本人所需。于是乎找到了另一个方法,见下文
cd 到下述路径,并touch test.desktop
/home/<用户名>/.config/autostart
下添加后缀为.desktop的文件,别忘了加上u+x权限
然后在里写入如下
[Desktop Entry]
Name=test
Comment=Python Program
Exec=python3 /home/ys/OneDrive/code/Linux/python/video.py
Icon=/home/ys/Pictures/1.jpg
Terminal=false
MultipleArgs=false
Type=Application
Categories=Application;Development;
StartupNotify=true
其中我建立的是test.desktop,所以名字为test, Icon就是这个test.desktop的力标,Exec后加入你要自启的python脚本即可。然后重启试试(也可以不重启,保存后双击test.desktop)
不喜欢cd?:打开文件管理器>打开home,此时可能看不到.config文件,这时***你按下Ctrl+h即可发现隐藏的文件夹,就此可以找到autostart文件夹。
温馨提示:在python脚本中最好引入cv2包的绝对路径,因为opencv这个包它要系统调用,否则可以试试,不出来的!!!***
#coding=utf-8
#!/usr/bin/python3
import sys
#下面这这个路径(本人的cv2包所在),你要是不引入的话,是不imshow的
sys.path.append("/home/ys/.local/lib/python3.6/site-packages")
import cv2

import time

if __name__ == '__main__':

    cv2.namedWindow("camera",1)
    video = cv2.VideoCapture(0)
    #num=0
    while True:
        success,img = video.read()
        cv2.imshow("camera",img)

    #按键处理,注意,焦点应当在摄像头窗口,不是在终端命令行窗口
        key = cv2.waitKey(10)

        if key == 27:
        #esc键退出
            print("esc break...")
            break
        '''if key == ord(' '):
             #保存一张图像
            num = num+1
            filename = "frames_%s.jpg" % num
            cv2.imwrite(filename,img)'''
    video.release()
    cv2.destroyWindow("camera")
八.WPS
推荐使用wps for linux作为ubuntu下的文本软件
https://www.wps.cn/product/wpslinux
九.安装.exe文件
在终端输入如下:
通常是 sudo apt install wine
然后输入:
winetricks
会弹出一个弹窗,选择install an applaction会发现有许多应用可以选择,例如你会发现“qq”,即安装qq(下面依然以安装QQ为例,安装其他的类似)
这里我们不用这种方法,我们用另一种方法:
星外之神
即:git clone https://gitee.com/wszqkzqk/deepin-wine-for-ubuntu.git
然后在git得到的文件夹下输入:
sudo apt -f install
sudo sh install.sh
接着在链接中选择一个.deb后缀的,其他的应该也行,无所谓了,
下载后,sudo dpkg -i deepin.com.qq.im_9.1.8deepin0_i386.deb
即安装完成,此时可以正常打开,但是不出意外的话会出现乱码,解决乱码可以参考链接简单地讲就是在home目录下,把window系统中的C:\WINDOWS\Fonts文件夹直接copy到 deepin-wine-for-ubuntu/drive_c/windows 目录中并覆盖其Fonts目录即可。
十.android for linux
对于不想采用九中所述的方法来安装.exe,如果有对应的.apk文件,则可以用xDroid来进行安装:https://www.linzhuotech.com/
这个软件真的很好用,而不需要虚拟机。界面如下,直接占地即可下载。良心推荐。
十一.github.com连不上
可先sudo gedit /etc/hosts
然后删除有关github的所有内容,一定要先删除!!!!并保存!!!,接着在终端输入:
ping github.com此时会得到一个ip地址,例如:52.74.223.119
同理,再ping github.global.ssl.fastly.net会得到另一个ip地址,例如:69.63.187.12
此时,再sudo gedit /etc/hosts,然后加入
52.74.223.119 github.com git
69.63.187.12 github.global.ssl.fastly.net
保存后,应该可以打开github.com了,
十二.录屏
sudo apt install kazam
安装后打开kazam,然后点击file->preference->Screencast–>Record with->H264(MP4),这样就是录屏了,否则好像是默认只录音?当然回到开头,勾选Sound from speakers,就可以录扬声器的音了,Sound from microphone是麦克风的,当然还可以截屏。至于视频播放软件,推荐mpv
sudo apt install mpv
mpv快捷键:https://blog.csdn.net/qq_32719871/article/details/80475737
关于mpv,详见链接:https://github.com/mpv-player/mpv/blob/master/DOCS/man/options.rst
十三.创建快捷方式
比如我在一个硬盘里创建了一个文件夹叫WindowsLinux,想用来当作双系统中两个系统的中介,这样为了方便的话需要在Ubuntu系统的桌面上创建这个文件夹的快捷方式,则可以
sudo ln -s /media/ys/WindowsLinux /home/username/Desktop
前面是文件夹的路径,后面是桌面的路径
当然重启后,会发现挂载的盘已经不见了,会有error,所以有时需要永久挂载硬盘,具体操作见链接
十四.fsearch
类似windows下的everything,其github为:https://github.com/cboxdoerfer/fsearch,具体来讲,其安装过程可以按照github里提到的ppa方式,当然也可直接安装,如下:
先安装前凑:
sudo apt install git build-essential automake autoconf libtool pkg-config intltool autoconf-archive libpcre3-dev libglib2.0-dev libgtk-3-dev libxml2-utils
然后正式下载安装:
sudo apt-get update
git clone https://github.com/cboxdoerfer/fsearch.git
#(可以改为 git clone https://gitee.com/uniquezxdrt/fsearch)
cd fsearch
./autogen.sh
./configure
make && sudo make install
感觉git clone比较慢,可以到gitee 上下载:https://gitee.com/uniquezxdrt/fsearch,安装完成后,选择Edit->Preference->Database->Add直接选择此电脑的username即可,还可以选择Search下的正则表达式
十五.vscode
从ubuntu自带的应用商店下载安装的vscode截止目前2020-11不能输入中文
下载:链接
c/c++安装与配置:链接
vscode 面板整体放大与缩小快捷键:"Ctrl +"是放大、“Ctrl -”是缩小
vscode运行shell脚本:
首先在扩展里下载如下:shellcheck、shell-format、Code Runner等插件。然后新建test.sh文件,输入如:
#!/bin/bash
a=12
b=5
if [ $a -ge $b ]
then
    echo "yes"
else
    echo "no"
fi
然后右击test.sh,选择run code,即可。如果不想这么麻烦,可以设置一下run code的快捷键:file->preference->Keyboard Shortcuts然后搜索run code ,接着可以更改其快捷键,我改的是ctrl+r,这个随意改,不重复即可
十六.批量删除文件夹
安装一些软件后,发现不好用,所以想删除,但是没找到删除路径.使用fsearch(见十四),后输入该文件的相关內容,出现许多东西,于是Ctrl+A选中后,导出路径,复制到delete.txt中,在与delete.txt同一文件下的delete.sh中输入:
#!/usr/bin/env bash
while read myline
do
 echo "LINE:"$myline
 sudo rm -rf $myline
done < delete.txt
即将其全部删除
十七.Mac主题
其实ubuntu风格还好,只是没有那么地炫酷,我的本意是想体验体验Mac界面,但是安装之后,确实挺耗电、占内存的,没有必需,建议不必如此折腾。
先参考一下这个链接:https://zhuanlan.zhihu.com/p/71588449
其中的Mac主题可以在此处下载:https://gitee.com/wxkhturf/gnome-osc-themes
十八.其他
linux下的类似windos里的everthing软件:fsearch,catfish等
直接如下:
sudo apt-get install catfish
慎用sudo apt-get autoremove <包名>(血的教训)
-
打开触控板:
sudo modprobe -r psmouse+sudo modprobe psmouse proto=imps -
注销:
sudo pkill Xorg -
有用的其他链接:https://www.jb51.net/article/187736.htm
-
firefox& //放在后台运行,解放终端(即使已经运行了,也可以用CTRL+Z,bg扔到后台)
nohup firefox //即使关闭终端还继续运行 -
分析开机时耗时`systemd-analyze blame
-
/temp目录下的文件 在电脑重启后会清空
-
ubuntu20.04LTS的时区设置为Shanghai时,应用商店显示不全,当改为NewYork时,重启电脑,显示完整,没找到因为,先记录一下
`
十九.Vscode 插件
- 推荐一个摸鱼插件:
z-reader可以在线阅读也可以本地阅读小说,但是截止2020-12-6,ubuntu20.04上打不开本地。但是windows10上效果非常好! - 由于ubuntu上打不开,所以安装了另一个:
epub reader这个可以阅读本地的,ubuntu上效果不错 - 还有一些可以追番的插件,请自行搜索
亲测有效的链接:
- 安装pip:
https://www.cnblogs.com/technologylife/p/5870576.html - 安装java jdk:
https://yq.aliyun.com/articles/704959?spm=a2c4e.11155472.0.0.3dbe7a6dpwO7OW - 清理垃圾:
https://blog.csdn.net/yj1499945/article/details/90676428?depth_1-utm_source=distribute.pc_relevant.none-task&utm_source=distribute.pc_relevant.none-task - 彻底卸载软件:
https://blog.csdn.net/get_set/article/details/51276609?depth_1-utm_source=distribute.pc_relevant.none-task&utm_source=distribute.pc_relevant.none-task - 时间同步:https://linux.cn/article-11220-1-rel.html
- firefox不能看bilibili
- 玩红警:https://cloud.189.cn/t/jmM7ri3YRn2m(下载后,直接./install.sh)
详见:https://blog.csdn.net/zhqh100/article/details/107669549
8.apt 镜像:https://mirrors.tuna.tsinghua.edu.cn/help/ubuntu/
9.install wubi:https://blog.csdn.net/muyangjun/article/details/88957067
10.下载工具:https://github.com/agalwood/Motrix/releases/tag/v1.5.15
11.vim教程:https://vimjc.com/
安装vim-genome时,发现没有这个选项,百度了一下,发现有人说:“本来gnome库现在就没什么用了,gnome现在使用的都是gtk库了。 ”所以我就安装vim-gtk3了
12.在Ubuntu单系统下安装windows系统:https://blog.csdn.net/qq_41789091/article/details/108726870
20.后记
2021年3月18日晚,本人在Ubuntu20.04LTS上安装了zsh,之后想到大部分内容还是基于bash写的,怕出问题,所以打算卸掉zsh ==>sudo apt remove zsh
之后,不知道发生了什么,再打terminal打不开,并无法关机,于是强制关机后重启仍无效。想到一年来曾重装8次Ubuntu(相来也是攒了不少经验)心有余悸,本人决定最后一试,然后插上了U盘(带有Ubuntu20.04LTS),重启,进入recovery mode,尝试修复。于是乎:
 可能本人太菜了,Ubuntu这种东西不是给我玩的,2021年3月19日,本人安装了kali2021.1(终),由于系统相仿,本文仍将持续更新,之后顺序从21开始 。
21.下载工具
目前推荐Motrix:https://motrix.app/
22. vivado 操作
安装驱动(如果是虚拟机,请在虚拟机里设置兼容USB3.0)
cd /tools/Xilinx/Vivado/2020.1/data/xicom/cable_drivers/lin64/install_script/install_drivers
sudo ./install_drivers
启动vivado:
source /tools/Xilinx/Vivado/2020.1/settings64.sh
vivado&
23. Vitis
vitis包含的交叉编译工具
source /tools/Xilinx/Vivado/2020.1/settings64.sh
arm-linux-gnueabihf-gcc -v
适合 zynqMP 的交叉编译器:
source /tools/Xilinx/Vivado/2020.1/settings64.sh
aarch64-linux-gnu-gcc -v