- Java基础9(throws和throw、异常细节)
孤影恋长风
java开发语言
throws和throw可能出现错误的代码写在try中e接受可能出现的异常,为了通用性一般不要写精确的异常,写最大的Exceptionthor抛出一个具体的异常,throw跟在函数之后,标志有异常抛出publicvoidtext(){如果这个函数将有异常处理,有两种策略,1.立即用try处理2.不处理,抛给调用此函数对象异常处理的原则,谁调用谁处理以后调用别人的函数,除了关注函数的参数,返回值,还
- Java设计模式之解释器模式
飞翔中文网
java设计模式
概念解释器模式是一种行为型设计模式,用于定义一种语言的语法规则,并提供解释器来解释该语言中的表达式。作用其核心作用是将复杂的语法分解为简单的语法单元,通过递归组合的方式构建抽象语法树(AST),最终由解释器逐层解释执行。场景1.需要解释特定领域的语言:如数学公式、正则表达式、SQL查询等。2.语法相对简单且稳定:若语法频繁变化或过于复杂,建议使用解析器生成工具(如ANTLR)。3.需要灵活扩展语法
- springCloud集成tdengine(原生和mapper方式) 其一
张小娟
springcloudtdenginemybatis
第一种mapper方式,原生方式在主页看第二章一、添加pom文件com.zaxxerHikariCPcom.taosdata.jdbctaos-jdbcdriver3.5.3二、在nacos中配置好数据库连接spring:datasource:url:jdbc:TAOS://localhost:6030/testusername:rootpassword:yourPassWorddriver-cl
- 深入理解 Java 内存模型(JMM):原理、可见性与并发控制
全栈探索者chen
javajava开发语言缓存程序人生数据库JMM内存
深入理解Java内存模型(JMM):原理、可见性与并发控制1.引言在多线程编程中,内存可见性、指令重排序和线程同步是开发者必须理解的核心概念。Java内存模型(JMM,JavaMemoryModel)定义了一组规则,确保Java程序在并发环境下的线程安全性和一致性。本文将深入剖析JMM的原理,并通过代码示例展示如何正确控制并发。2.什么是Java内存模型(JMM)?Java内存模型(JMM)是Ja
- Java 并发编程实战:深入理解线程池的核心原理与最佳实践
全栈探索者chen
javajava服务器开发语言性能优化缓存node.js数据库
Java并发编程实战:深入理解线程池的核心原理与最佳实践1.为什么需要线程池?在Java并发编程中,直接创建和管理线程的成本较高,频繁创建线程会带来性能开销和资源浪费。线程池(ThreadPool)的作用:降低线程创建和销毁的开销,提高系统响应速度。提高系统吞吐量,充分利用CPU资源。避免资源耗尽,限制最大线程数,防止OOM(内存溢出)。支持任务排队,确保任务按照一定规则执行。2.线程池的核心组成
- Visual Studio Code官网下载地址及使用技巧(含常用的拓展插件推荐)
ITCTCSDN
vscodeide编辑器
VisualStudioCode(简称“VSCode”)是Microsoft于2015年4月发布的可运行于MacOS、Windows和Linux之上的跨平台源代码编辑器,它具有对JavaScript,TypeScript和Node.js的内置支持,并具有丰富的其他语言(例如C++,C#,Java,Python,PHP,Go)和运行时(例如.NET和Unity)扩展的生态系统。VisualStudi
- springCloud集成tdengine(原生和mapper方式) 其二 原生篇
张小娟
springcloudtdenginespring
mapper篇请看另一篇文章一、引入pom文件com.taosdata.jdbctaos-jdbcdriver3.5.3二、在nacos中填写数据库各种value值tdengine:datasource:location:yourLocationusername:rootpassword:yourPassword三、编写TDengineUtil文件下方util文件里面,包含创建database的方
- Java 24 正式发布:AI 开发与后量子安全引领企业级编程革命
程序猿小白菜
后端java生态圈java人工智能安全
摘要2025年3月18日,Oracle正式发布Java24(OracleJDK24),这是Java诞生30周年之际的重要版本更新。新版本聚焦AI开发支持、后量子安全加密、性能优化和开发效率提升,提供20余项新特性及数千项改进,为企业级应用开发注入全新动力。一、语言特性:代码简洁性与模式匹配增强Java24在语法层面进一步简化代码逻辑,提升开发效率:JEP488:原始类型模式匹配(第二次预览)支持在
- 什么是Spring Boot?它在Java后端开发中的作用是什么?
破碎的天堂鸟
学习教程javaspringboot数据库
什么是SpringBoot?SpringBoot是由Pivotal团队开发的一个基于Spring框架的快速开发框架,旨在简化Spring应用的初始搭建和开发流程。其核心理念是“约定优于配置”(ConventionoverConfiguration),通过默认配置和自动化机制,使开发者能够快速构建独立的、生产级别的应用程序。以下是其核心定义与特点:基于Spring的扩展与优化SpringBoot并非
- 庖丁解java(一篇文章学java)
庖丁解java
java开发语言springboot后端
(大家不用收藏这篇文章,因为这篇文章会经常更新,也就是删除后重发)一篇文章学java,这是我滴一个执念...当然,真一篇文章就写完java基础,java架构,java业务实现,java业务扩展,根本不可能.所以,这篇文章,就是一个索引,索什么呢?请看下文...关于决定开始写博文的介绍(一切故事的起点源于这一次反省)中小技术公司的软扩展(微服务扩展是否有必要?)-CSDN博客SpringCloud(
- ts之变量声明以及语法细节,ts小白初学ing
菥菥爱嘻嘻
小白学习tstypescript前端
TypeScript用js编写的项目虽然开发很快,但是维护是成本很高,而且js不报错啊啊啊啊啊!!!以js为基础进行扩展的给变量赋予了类型语法、实战(ts+vue3)TypeScript是JavaScript的一个超集,支持ECMAScript6标准(ES6教程)。TypeScript由微软开发的自由和开源的编程语言,在JavaScript的基础上增加了静态类型检查的超集。TypeScript设计
- Node.js 如何发布一个 NPM 包——详细教程
还是鼠鼠
node.jsnpm前端node.jsvscode
在本文中,我将带大家一步步学习如何创建并发布一个NPM包,帮助开发者理解整个流程,并能顺利将自己的JavaScript库发布到NPM上供他人使用。1.安装Node.js和npm在开始之前,请确保你的电脑上已经安装了Node.js和npm(Node.js自带npm)。你可以在终端(Windows用户请使用cmd或PowerShell)输入以下命令检查是否已安装:node-vnpm-v如果出现版本号,
- 深入探讨Spring MVC:原理、架构与实践
luckilyil
开发框架springmvc架构
SpringMVC原理与架构解析1.SpringMVC概述SpringMVC是Spring框架中的一个模块,专注于实现Web应用的MVC设计模式。它通过将应用逻辑分为模型(Model)、视图(View)和控制器(Controller),使得开发人员能够清晰地组织代码,提高开发效率和可维护性。2.SpringMVC的核心组件SpringMVC的核心组件包括:DispatcherServlet:作为前
- 同时使用接口文档swagger和knife4j
黑taoA
java开发语言
项目场景:springboot项目中同时使用接口文档swagger和knife4j问题描述在实体类中设置了字段必填的属性,在访问接口文档时出现异常实体类关键代码片段/***部门表sys_dept*/publicclassSysDeptextendsBaseEntity{privatestaticfinallongserialVersionUID=1L;/**部门ID*/privateLongdep
- SpringCloud框架下的注册中心比较:Eureka与Consul的实战解析
耶耶Norsea
网络杂烩springcloud
摘要在探讨SpringCloud框架中的两种注册中心之前,有必要回顾单体架构与分布式架构的特点。单体架构将所有业务功能集成在一个项目中,优点是架构简单、部署成本低,但耦合度高。分布式架构则根据业务功能对系统进行拆分,每个模块作为独立服务开发,降低了服务间的耦合,便于升级和扩展,然而其复杂性增加,运维、监控和部署难度也随之提高。关键词SpringCloud,注册中心,单体架构,分布式架构,服务拆分一
- 程序员晋升架构师实战指南
甘苦人生
职业规划职场和发展
以下是为程序员量身定制的晋升架构师实战指南,结合行业案例与可落地路径,助你完成技术跃迁:一、晋升路径拆解(从Code到Architecture)程序员→高级工程师核心任务:独立完成模块开发(需求分析+方案设计+编码实现)技术重点:掌握1-2门核心语言(如Java/Go)、熟悉主流框架(SpringCloud/Dubbo)案例:主导用户中心模块开发,通过缓存优化将接口响应时间从800ms降至150m
- Linux 启动Jar脚本&&设置开机自启【超级详细】
黑taoA
linuxjarpython
Linux启动Jar脚本&&设置开机自启【超级详细】概要服务器开机自启服务重启脚本概要最近在Linux服务器中部署了一个项目(单机版),每次更新服务的时候需要用到好几个命令,停止服务,再重启,并且服务器突然重启后,还需要人工重启服务,非常繁琐,下面展示了两个脚本的写法。。服务器开机自启检查系统是否安装jdk;java-version查看jdk安装位置whereisjava编写脚本restart_y
- Spring Cloud Config 快速介绍与实例
oscar999
SpringBoot实战开发大全SpringBootCloudConfig
SpringCloudConfig是什么?SpringCloudConfig是一个用于分布式系统的配置管理工具,提供集中化的外部配置支持。它适用于微服务架构,能够将各个服务的配置集中存储在服务端(如Git仓库),客户端按需动态获取配置,解决了配置分散、环境切换复杂等问题。SpringCloudConfig核心概念ConfigServer:配置中心服务端,统一管理配置,支持Git、本地文件等存储方式
- 包管理工具
她的双马尾
JSjavascript包管理工具npmyarnpnpm
JavaScript包管理工具对比:npm、yarn和pnpm1.npm1.1历史与背景npm(NodePackageManager)是Node.js的默认包管理工具,首次发布于2010年。它是JavaScript生态系统中最早的包管理工具,主要用于管理和共享JavaScript模块。目前,npm拥有全球最大的JavaScript包注册中心(npmregistry),包含数百万个开源包。1.2核心
- Spring Boot拦截器(Interceptor)与过滤器(Filter)深度解析:区别、实现与实战指南
QQ828929QQ
springboot后端java
SpringBoot拦截器(Interceptor)与过滤器(Filter)深度解析:区别、实现与实战指南一、核心概念对比1.本质区别维度过滤器(Filter)拦截器(Interceptor)规范层级Servlet规范(J2EE标准)SpringMVC框架机制作用范围所有请求(包括静态资源)只处理Controller请求依赖关系不依赖Spring容器完全集成SpringIOC容器执行顺序最先执行(
- PV操作(Java代码)进程同步实战指南
Cloud_.
java开发语言操作系统并发
引言在Java并发编程中,资源同步如同精密仪器的齿轮咬合,任何偏差都可能导致系统崩溃。本文将以Java视角解析经典PV操作原理,通过真实可运行的代码示例,带你掌握线程同步的底层实现逻辑。一、Java信号量实现机制1.1Semaphore类解析importjava.util.concurrent.Semaphore;//创建包含5个许可的信号量(相当于计数信号量)Semaphoresemaphore
- Spring Boot 整合 RabbitMQ:注解声明队列与交换机详解
Cloud_.
java-rabbitmqspringbootrabbitmqMQ消息队列
RabbitMQ作为一款高性能的消息中间件,在分布式系统中广泛应用。SpringBoot通过spring-boot-starter-amqp提供了对RabbitMQ的无缝集成,开发者可以借助注解快速声明队列、交换机及绑定规则,极大简化了配置流程。本文将通过代码示例和原理分析,详细介绍如何用注解实现RabbitMQ的集成,并深入解析交换机的作用与类型。一、环境准备1.添加依赖在pom.xml中引入S
- 191113面试题总结
快乐男孩小东
1.Maven中A依赖BB依赖C那么A可以使用C中的类吗?*按照依赖关系,可推C继承A,则C可以使用A中修饰符为public,protected的类2.SpringBoot中有一个类标记了@Controller注解,通过自动扫描把这个类的对象加入IOC,那么这个类应该放那?*在@SpringBootApplication所在包或者下面的子包,才能被自动扫描到#3.通过Maven下载jar包,下载失
- 开发语言漫谈-groovy
大道不孤,众行致远
技术杂谈开发语言
groovy是一门脚本语言,在前期的脚本语言中简单介绍了下。现在再深入介绍下,因为它是本平台上选用的脚本语言。所谓脚本语言就是不用编译,直接执行。这种特色非常适合做嵌入编程,即编即用。我们知道平台后台的业务开发语言是Java,开发人员都熟悉Java。那么使用groovy就是自然而然的事情,因为groovy最大特点就是和Java兼容。然后做了最有意义的改造:1、可以解释执行;2、增加动态类型。发明人
- java:实现设置窗体背景颜色为淡蓝色(附带源码)
Katie。
Java实战项目java信息可视化开发语言
一、项目简介在桌面应用开发中,窗体背景颜色作为界面设计的重要组成部分,不仅影响整体美观,还能传递特定的情感和品牌信息。本项目旨在使用JavaSwing简单实现将窗体背景颜色设置为淡蓝色效果。该示例展示了如何创建一个基本的JFrame,并通过调用其内容面板的setBackground()方法,设置背景颜色为淡蓝色(RGB值173,216,230)。通过本项目,初学者可以了解Swing基本组件的使用方
- 前端实例:轮播图效果
2301_81535770
前端
利用HTML、CSS和JavaScript实现轮播图效果。一、轮播图原理:通过给窗口设置position属性和overflow属性,使得超出窗口范围的部分被隐藏,表面可见范围只包含窗口,但实际上其内部空间很大;调整胶卷相对于窗口的位置,使得整个胶卷向左移动;调用JS中的定时器,实现轮播效果。流程图如下:二、实现自动切换效果1、HTML搭建基础框架分为图片展示窗口和上下页切换按键两部分>2、CSS设
- Orange 单体架构 - 快速启动
mmd0308
Orange开源项目架构开源
1后端服务1.1基础设施组件说明版本MySQLMySQL数据库服务5.7/8+JavaJava17redis-stackRedis向量数据库最新版本Node安装Node22.11.0+1.2orange-dependencies-parent项目Maven依赖版本管理1.2.1项目克隆GitHubgitclonehttps://github.com/hengzq/orange-dependenci
- SpringbootActuator未授权访问漏洞
web_15534274656
面试学习路线阿里巴巴java
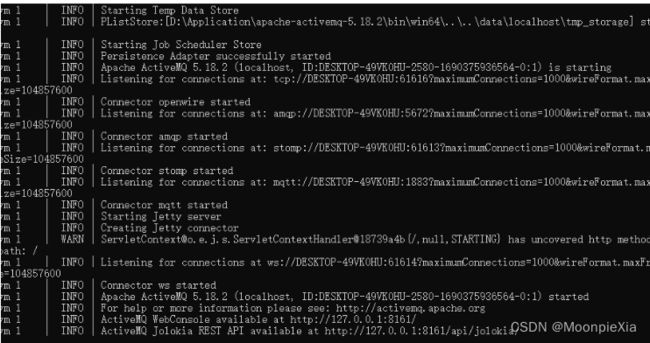
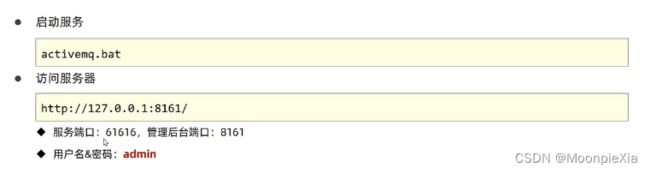
漏洞介绍Actuator是SpringBoot提供的用来对应用系统进行自省和监控的功能模块,借助于Actuator开发者可以很方便地对应用系统某些监控指标进行查看、统计等。然而,其默认配置会出现接口未授权访问,导致部分接口会泄露网站数据库连接信息等配置信息,使用Jolokia库特性甚至可以远程执行任意代码,获取服务器权限。1、漏洞危害1、信息泄露:未授权的访问者可以通过Actuator端点获取敏感
- 过滤器Filter
" 微笑
spring
过滤器Filter1.快速入门什么是Filter?Filter表示过滤器,是JavaWeb三大组件(Servlet、Filter、Listener)之一。过滤器可以把对资源的请求拦截下来,从而实现一些特殊的功能使用了过滤器之后,要想访问web服务器上的资源,必须先经过滤器,过滤器处理完毕之后,才可以访问对应的资源。过滤器一般完成一些通用的操作,比如:登录校验、统一编码处理、敏感字符处理等。下面我们
- k8s运维 设置Pod实现JVM内存根据容器内存动态调整
风行無痕
K8Skubernetesjvm容器
一、实现方式推荐方案:利用JVM容器感知特性,按比例动态分配。适用场景:动态根据Pod内存限制自动分配堆内存,无需硬编码参数Java要求:Java8u191+或Java11+Java8u191+或Java11+支持通过-XX:InitialRAMPercentage替代-Xms,根据容器内存限制自动计算堆内存。在容器环境变量中配置-XX:MaxRAMPercentage=75.0,使JVM根据容
- 用MiddleGenIDE工具生成hibernate的POJO(根据数据表生成POJO类)
AdyZhang
POJOeclipseHibernateMiddleGenIDE
推荐:MiddlegenIDE插件, 是一个Eclipse 插件. 用它可以直接连接到数据库, 根据表按照一定的HIBERNATE规则作出BEAN和对应的XML ,用完后你可以手动删除它加载的JAR包和XML文件! 今天开始试着使用
- .9.png
Cb123456
android
“点九”是andriod平台的应用软件开发里的一种特殊的图片形式,文件扩展名为:.9.png
智能手机中有自动横屏的功能,同一幅界面会在随着手机(或平板电脑)中的方向传感器的参数不同而改变显示的方向,在界面改变方向后,界面上的图形会因为长宽的变化而产生拉伸,造成图形的失真变形。
我们都知道android平台有多种不同的分辨率,很多控件的切图文件在被放大拉伸后,边
- 算法的效率
天子之骄
算法效率复杂度最坏情况运行时间大O阶平均情况运行时间
算法的效率
效率是速度和空间消耗的度量。集中考虑程序的速度,也称运行时间或执行时间,用复杂度的阶(O)这一标准来衡量。空间的消耗或需求也可以用大O表示,而且它总是小于或等于时间需求。
以下是我的学习笔记:
1.求值与霍纳法则,即为秦九韶公式。
2.测定运行时间的最可靠方法是计数对运行时间有贡献的基本操作的执行次数。运行时间与这个计数成正比。
- java数据结构
何必如此
java数据结构
Java 数据结构
Java工具包提供了强大的数据结构。在Java中的数据结构主要包括以下几种接口和类:
枚举(Enumeration)
位集合(BitSet)
向量(Vector)
栈(Stack)
字典(Dictionary)
哈希表(Hashtable)
属性(Properties)
以上这些类是传统遗留的,在Java2中引入了一种新的框架-集合框架(Collect
- MybatisHelloWorld
3213213333332132
//测试入口TestMyBatis
package com.base.helloworld.test;
import java.io.IOException;
import org.apache.ibatis.io.Resources;
import org.apache.ibatis.session.SqlSession;
import org.apache.ibat
- Java|urlrewrite|URL重写|多个参数
7454103
javaxmlWeb工作
个人工作经验! 如有不当之处,敬请指点
1.0 web -info 目录下建立 urlrewrite.xml 文件 类似如下:
<?xml version="1.0" encoding="UTF-8" ?>
<!DOCTYPE u
- 达梦数据库+ibatis
darkranger
sqlmysqlibatisSQL Server
--插入数据方面
如果您需要数据库自增...
那么在插入的时候不需要指定自增列.
如果想自己指定ID列的值, 那么要设置
set identity_insert 数据库名.模式名.表名;
----然后插入数据;
example:
create table zhabei.test(
id bigint identity(1,1) primary key,
nam
- XML 解析 四种方式
aijuans
android
XML现在已经成为一种通用的数据交换格式,平台的无关性使得很多场合都需要用到XML。本文将详细介绍用Java解析XML的四种方法。
XML现在已经成为一种通用的数据交换格式,它的平台无关性,语言无关性,系统无关性,给数据集成与交互带来了极大的方便。对于XML本身的语法知识与技术细节,需要阅读相关的技术文献,这里面包括的内容有DOM(Document Object
- spring中配置文件占位符的使用
avords
1.类
<?xml version="1.0" encoding="UTF-8"?><!DOCTYPE beans PUBLIC "-//SPRING//DTD BEAN//EN" "http://www.springframework.o
- 前端工程化-公共模块的依赖和常用的工作流
bee1314
webpack
题记: 一个人的项目,还有工程化的问题嘛? 我们在推进模块化和组件化的过程中,肯定会不断的沉淀出我们项目的模块和组件。对于这些沉淀出的模块和组件怎么管理?另外怎么依赖也是个问题? 你真的想这样嘛? var BreadCrumb = require(‘../../../../uikit/breadcrumb’); //真心ugly。
- 上司说「看你每天准时下班就知道你工作量不饱和」,该如何回应?
bijian1013
项目管理沟通IT职业规划
问题:上司说「看你每天准时下班就知道你工作量不饱和」,如何回应
正常下班时间6点,只要是6点半前下班的,上司都认为没有加班。
Eno-Bea回答,注重感受,不一定是别人的
虽然我不知道你具体从事什么工作与职业,但是我大概猜测,你是从事一项不太容易出现阶段性成果的工作
- TortoiseSVN,过滤文件
征客丶
SVN
环境:
TortoiseSVN 1.8
配置:
在文件夹空白处右键
选择 TortoiseSVN -> Settings
在 Global ignote pattern 中添加要过滤的文件:
多类型用英文空格分开
*name : 过滤所有名称为 name 的文件或文件夹
*.name : 过滤所有后缀为 name 的文件或文件夹
--------
- 【Flume二】HDFS sink细说
bit1129
Flume
1. Flume配置
a1.sources=r1
a1.channels=c1
a1.sinks=k1
###Flume负责启动44444端口
a1.sources.r1.type=avro
a1.sources.r1.bind=0.0.0.0
a1.sources.r1.port=44444
a1.sources.r1.chan
- The Eight Myths of Erlang Performance
bookjovi
erlang
erlang有一篇guide很有意思: http://www.erlang.org/doc/efficiency_guide
里面有个The Eight Myths of Erlang Performance: http://www.erlang.org/doc/efficiency_guide/myths.html
Myth: Funs are sl
- java多线程网络传输文件(非同步)-2008-08-17
ljy325
java多线程socket
利用 Socket 套接字进行面向连接通信的编程。客户端读取本地文件并发送;服务器接收文件并保存到本地文件系统中。
使用说明:请将TransferClient, TransferServer, TempFile三个类编译,他们的类包是FileServer.
客户端:
修改TransferClient: serPort, serIP, filePath, blockNum,的值来符合您机器的系
- 读《研磨设计模式》-代码笔记-模板方法模式
bylijinnan
java设计模式
声明: 本文只为方便我个人查阅和理解,详细的分析以及源代码请移步 原作者的博客http://chjavach.iteye.com/
import java.sql.Connection;
import java.sql.DriverManager;
import java.sql.PreparedStatement;
import java.sql.ResultSet;
- 配置心得
chenyu19891124
配置
时间就这样不知不觉的走过了一个春夏秋冬,转眼间来公司已经一年了,感觉时间过的很快,时间老人总是这样不停走,从来没停歇过。
作为一名新手的配置管理员,刚开始真的是对配置管理是一点不懂,就只听说咱们公司配置主要是负责升级,而具体该怎么做却一点都不了解。经过老员工的一点点讲解,慢慢的对配置有了初步了解,对自己所在的岗位也慢慢的了解。
做了一年的配置管理给自总结下:
1.改变
从一个以前对配置毫无
- 对“带条件选择的并行汇聚路由问题”的再思考
comsci
算法工作软件测试嵌入式领域模型
2008年上半年,我在设计并开发基于”JWFD流程系统“的商业化改进型引擎的时候,由于采用了新的嵌入式公式模块而导致出现“带条件选择的并行汇聚路由问题”(请参考2009-02-27博文),当时对这个问题的解决办法是采用基于拓扑结构的处理思想,对汇聚点的实际前驱分支节点通过算法预测出来,然后进行处理,简单的说就是找到造成这个汇聚模型的分支起点,对这个起始分支节点实际走的路径数进行计算,然后把这个实际
- Oracle 10g 的clusterware 32位 下载地址
daizj
oracle
Oracle 10g 的clusterware 32位 下载地址
http://pan.baidu.com/share/link?shareid=531580&uk=421021908
http://pan.baidu.com/share/link?shareid=137223&uk=321552738
http://pan.baidu.com/share/l
- 非常好的介绍:Linux定时执行工具cron
dongwei_6688
linux
Linux经过十多年的发展,很多用户都很了解Linux了,这里介绍一下Linux下cron的理解,和大家讨论讨论。cron是一个Linux 定时执行工具,可以在无需人工干预的情况下运行作业,本文档不讲cron实现原理,主要讲一下Linux定时执行工具cron的具体使用及简单介绍。
新增调度任务推荐使用crontab -e命令添加自定义的任务(编辑的是/var/spool/cron下对应用户的cr
- Yii assets目录生成及修改
dcj3sjt126com
yii
assets的作用是方便模块化,插件化的,一般来说出于安全原因不允许通过url访问protected下面的文件,但是我们又希望将module单独出来,所以需要使用发布,即将一个目录下的文件复制一份到assets下面方便通过url访问。
assets设置对应的方法位置 \framework\web\CAssetManager.php
assets配置方法 在m
- mac工作软件推荐
dcj3sjt126com
mac
mac上的Terminal + bash + screen组合现在已经非常好用了,但是还是经不起iterm+zsh+tmux的冲击。在同事的强烈推荐下,趁着升级mac系统的机会,顺便也切换到iterm+zsh+tmux的环境下了。
我为什么要要iterm2
切换过来也是脑袋一热的冲动,我也调查过一些资料,看了下iterm的一些优点:
* 兼容性好,远程服务器 vi 什么的低版本能很好兼
- Memcached(三)、封装Memcached和Ehcache
frank1234
memcachedehcachespring ioc
本文对Ehcache和Memcached进行了简单的封装,这样对于客户端程序无需了解ehcache和memcached的差异,仅需要配置缓存的Provider类就可以在二者之间进行切换,Provider实现类通过Spring IoC注入。
cache.xml
<?xml version="1.0" encoding="UTF-8"?>
- Remove Duplicates from Sorted List II
hcx2013
remove
Given a sorted linked list, delete all nodes that have duplicate numbers, leaving only distinct numbers from the original list.
For example,Given 1->2->3->3->4->4->5,
- Spring4新特性——注解、脚本、任务、MVC等其他特性改进
jinnianshilongnian
spring4
Spring4新特性——泛型限定式依赖注入
Spring4新特性——核心容器的其他改进
Spring4新特性——Web开发的增强
Spring4新特性——集成Bean Validation 1.1(JSR-349)到SpringMVC
Spring4新特性——Groovy Bean定义DSL
Spring4新特性——更好的Java泛型操作API
Spring4新
- MySQL安装文档
liyong0802
mysql
工作中用到的MySQL可能安装在两种操作系统中,即Windows系统和Linux系统。以Linux系统中情况居多。
安装在Windows系统时与其它Windows应用程序相同按照安装向导一直下一步就即,这里就不具体介绍,本文档只介绍Linux系统下MySQL的安装步骤。
Linux系统下安装MySQL分为三种:RPM包安装、二进制包安装和源码包安装。二
- 使用VS2010构建HotSpot工程
p2p2500
HotSpotOpenJDKVS2010
1. 下载OpenJDK7的源码:
http://download.java.net/openjdk/jdk7
http://download.java.net/openjdk/
2. 环境配置
▶
- Oracle实用功能之分组后列合并
seandeng888
oracle分组实用功能合并
1 实例解析
由于业务需求需要对表中的数据进行分组后进行合并的处理,鉴于Oracle10g没有现成的函数实现该功能,且该功能如若用JAVA代码实现会比较复杂,因此,特将SQL语言的实现方式分享出来,希望对大家有所帮助。如下:
表test 数据如下:
ID,SUBJECTCODE,DIMCODE,VALUE
1&nbs
- Java定时任务注解方式实现
tuoni
javaspringjvmxmljni
Spring 注解的定时任务,有如下两种方式:
第一种:
<?xml version="1.0" encoding="UTF-8"?>
<beans xmlns="http://www.springframework.org/schema/beans"
xmlns:xsi="http
- 11大Java开源中文分词器的使用方法和分词效果对比
yangshangchuan
word分词器ansj分词器Stanford分词器FudanNLP分词器HanLP分词器
本文的目标有两个:
1、学会使用11大Java开源中文分词器
2、对比分析11大Java开源中文分词器的分词效果
本文给出了11大Java开源中文分词的使用方法以及分词结果对比代码,至于效果哪个好,那要用的人结合自己的应用场景自己来判断。
11大Java开源中文分词器,不同的分词器有不同的用法,定义的接口也不一样,我们先定义一个统一的接口:
/**
* 获取文本的所有分词结果, 对比