微信小程序接入微信支付
开通商户号
微信支付前提是:注册了微信平台后,必须开通企业商户号,需要把工商登记证明,企业银行账户开户证明,组织机构代码等提交上去进行审核https://pay.weixin.qq.com/index.php/apply/applyment_home/guide_normal

开通商户号之后,我们需要得到密钥,和证书等相关信息,根据如下文档生成:https://pay.weixin.qq.com/wiki/doc/apiv3/open/pay/chapter2_8_1.shtml
小程序绑定微信支付
没有微信小程序的请先开通[企业版才可以],小程序开通微信支付,即申请或复用微信支付商户号,申请完小程序后,登录小程序后台。点击左侧导航栏的微信支付,在页面中进行开通

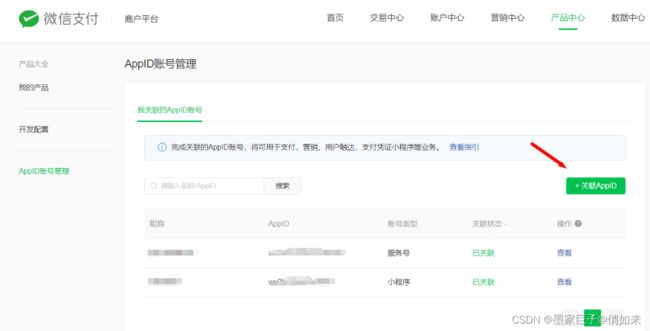
绑定APPID : 然后需要添加关联APPID进行绑定,效果如下

同意授权:回到微信小程序后台 - 在功能中找到:微信支付,去同意授权
接入SDK
微信支付需要准备如下几个参数,参考文档:
https://pay.weixin.qq.com/wiki/doc/apiv3/open/pay/chapter2_8_1.shtml
- 微信小程序的APPID
- 微信支付商户号ID :merchantId , 微信支付平台去获取
- 微信支付证书 :微信支付平台去获取
- 微信支付商户证书序列号:merchantSerialNumber
- 微信支付商户APIV3密钥 : apiV3key
微信提供了SDK方便我们接入微信支付:
-
小程序开发指引:https://pay.weixin.qq.com/wiki/doc/apiv3/open/pay/chapter2_8_2.shtml,
-
小程序支付文档:https://pay.weixin.qq.com/wiki/doc/apiv3/apis/chapter3_5_1.shtml
-
小程序接口列表:https://pay.weixin.qq.com/wiki/doc/apiv3/open/pay/chapter2_8_3.shtml
-
小程序,代码案例参考:https://github.com/wechatpay-apiv3/wechatpay-java/blob/main/service/src/example/java/com/wechat/pay/java/service/payments/jsapi/JsapiServiceExtensionExample.java
第一步,我们加入微信提供的Maven包
<dependencies>
    <dependency>
        <groupId>com.github.wechatpay-apiv3</groupId>
        <artifactId>wechatpay-java</artifactId>
        <version>0.2.8</version>
    </dependency>
    <dependency>
        <groupId>com.github.wechatpay-apiv3</groupId>
        <artifactId>wechatpay-apache-httpclient</artifactId>
        <version>0.4.9</version>
    </dependency>
</dependencies>
JSAPI 支付和 APP 支付推荐使用服务拓展类 JsapiServiceExtension 和 AppServiceExtension,两者包含了下单并返回调起支付参数方法。 下面是微信平台提供的快速接入代码案例
/** Native 支付下单为例 */
public class QuickStart {

    public static String appid = "";
    /** 商户号 */
    public static String merchantId = "";
    /** 商户API私钥路径 */
    public static String privateKeyPath = "D:\\itsource\\data\\apiclient_key.pem";
    /** 商户证书序列号 */
    public static String merchantSerialNumber = "";
    /** 商户APIV3密钥 */
    public static String apiV3key = "";

    public static void main(String[] args) {
        // 使用自动更新平台证书的RSA配置
        // 一个商户号只能初始化一个配置,否则会因为重复的下载任务报错
        Config config =
                new RSAAutoCertificateConfig.Builder()
                        .merchantId(merchantId)
                        .privateKeyFromPath(privateKeyPath)
                        .merchantSerialNumber(merchantSerialNumber)
                        .apiV3Key(apiV3key)
                        .build();
        // 构建service
        JsapiServiceExtension service = new JsapiServiceExtension.Builder().config(config).build();
        // request.setXxx(val)设置所需参数,具体参数可见Request定义
        PrepayRequest request = new PrepayRequest();
        Amount amount = new Amount();
        amount.setTotal(100);
        request.setAmount(amount);

        Payer payer = new Payer();
        //支付者的微信OpenId
        payer.setOpenid("xxxx");
        request.setPayer(payer);
        request.setAppid(appid);
        request.setMchid(merchantId);

    	//分账
        SettleInfo settleInfo = new SettleInfo();
        settleInfo.setProfitSharing(true);
        request.setSettleInfo(settleInfo);

        request.setDescription("测试商品标题");
        request.setNotifyUrl("https://notify_url");
        request.setOutTradeNo("out_trade_no_001"+ DateFormatUtils.format(new Date(),"HHmmss"));
        // 调用下单方法,得到应答
        PrepayWithRequestPaymentResponse response = service.prepayWithRequestPayment(request);
        System.out.println(response);

    }
}
我们需要根据上面的代码案例,分装自己的微信支付逻辑,编写支付Controller接口。小程序端需要请求支付接口。并把返回值相应给APP端,PrepayWithRequestPaymentResponse结果中保护了如下几个结果值
● “timeStamp”: 时间搓
● “nonceStr”: 随机字符串,不长于32位
● “package”: 小程序下单接口返回的prepay_id参数值,“prepay_id=xxxx”
● “signType”: 签名类型,默认为RSA,仅支持RSA
● “paySign”:签名,使用字段appId、timeStamp、nonceStr、package计算得出的签名值
小程序调起支付
小程序端拿到后台返回的支付参数,然后调用wx.requestPayment 调用微信在支付组件完成支付
wx.requestPayment({
      timeStamp: result.timeStamp,
      nonceStr: result.nonceStr,
      package: result.packageVal,
      signType: result.signType,//'MD5',
      paySign: result.paySign,
      success (payRes) {
          console.log(res);
      },
      fail (error) {
          console.log(error);
      }
})
微信支付结果回调
微信支付结果通知:https://pay.weixin.qq.com/wiki/doc/apiv3/apis/chapter3_5_5.shtml
微信支付平台通过notify_url 回调我们的接口来通知我们支付结果,因为我们的项目是在内网部署,如果是线上环境就不存在这个问题,所以这个请求是调不通的,我们需要做内网穿透把我们的应用映射到外网,这样的话支付平台才能回调我们。
Natapp内网穿透教程地址:https://natapp.cn/article/natapp_newbie ,最终效果如下:
当访问该域名相当于在访问:127.0.0.1:10010 ,只不过该域名可以外网访问
我们需要把构建支付请求的参数中的notify_url 修改为该域名地址:比如:
request.setNotifyUrl("http://5qsems.natappfree.cc/pay/wx/notify");
那么该地址对应了 支付服务的controller接口。我们需要去编写对应的notify的controller接口,参考文档小程序支付通知:https://pay.weixin.qq.com/wiki/doc/apiv3/apis/chapter3_5_5.shtml 。 根据文档所述,微信通过指定的notify__url来进行支付结果通知,支付结果通知是以POST 方法访问商户设置的通知url,通知的数据以JSON 格式通过请求主体(BODY)传输,通知的数据包括了加密的支付结果详情。我们需要对结果进行签名验证以及参数解密后再进行业务处理。
对于结果应答,接收成功:HTTP应答状态码需返回200或204,无需返回应答报文。接收失败:HTTP应答状态码需返回5XX或4XX,同时需返回应答报文,格式如下:
{
    "code": "FAIL",
    "message": "失败"
}
支付结果通知处理可以查考官方给的案例:https://github.com/wechatpay-apiv3/wechatpay-java ,找到 回调通知验签和解密部分:
首先,你需要在你的服务器上创建一个公开的 HTTP 端点,接受来自微信支付的回调通知。 当接收到回调通知,使用 notification 中的 NotificationParser 解析回调通知。具体步骤如下:
- 使用回调通知请求的数据,构建 RequestParam。
● HTTP 头 Wechatpay-Signature
● HTTP 头 Wechatpay-Nonce
● HTTP 头 Wechatpay-Timestamp
● HTTP 头 Wechatpay-Serial
● HTTP 头 Wechatpay-Signature-Type
● HTTP 请求体 body。切记使用原始报文,不要用 JSON 对象序列化后的字符串,避免验签的 body 和原文不一致。 - 初始化 RSAAutoCertificateConfig。微信支付平台证书由 SDK 的自动更新平台能力提供,也可以使用本地证书。
- 初始化 NotificationParser。
- 调用 NotificationParser.parse() 验签、解密并将 JSON 转换成具体的通知回调对象。
根据官方案例,我们编写我们自己的notify接口代码 ,如下:
● @RequestHeader Map
● HttpServletRequest :通过请求对象获取body
//支付回调
@PostMapping("/wx/notify")
public WxPayNotifyResult notifyHandler(@RequestHeader Map<String, String> headers,
                                       HttpServletRequest request,
                                       HttpServletResponse response){
    try{
    	//1.拿到body中的内容
        BufferedReader reader = request.getReader();
        StringBuilder stringBuilder = new StringBuilder();
        String line;
        while ((line = reader.readLine()) != null) {
            stringBuilder.append(line);
        }
        String body = stringBuilder.toString();
        log.info("支付结果通知 {}",body);
        //2.调用微信支付结果处理逻辑
        wxPayService.notifyHandler(body,headers);

        //3.响应码:200代表接受成功,5xx代表代表接受失败
        response.setStatus(HttpServletResponse.SC_OK);
        return WxPayNotifyResult.builder().code("SUCCESS").message("成功").build();
    }catch (Exception e){
        e.printStackTrace();
        //响应码:200代表接受成功,5xx代表代表接受失败
        response.setStatus(HttpServletResponse.SC_INTERNAL_SERVER_ERROR);
        return WxPayNotifyResult.builder().code("FAIL").message("失败").build();
    }

}
下面是根据官方案例编写的验证前面和参数解密的代码逻辑
● Transaction :他是解密出来的支付结果参数,包括支付状态,订单号,支付金额等等
public Transaction notify2Transaction(String body, Map<String, String> headers) {

    //从请求头拿到相关参数
    String nonce = headers.get("wechatpay-nonce");
    String signature = headers.get("wechatpay-signature");
    String timestamp = headers.get("wechatpay-timestamp");
    String signaturetype = headers.get("wechatpay-signature-type");
    String  serial = headers.get("wechatpay-serial");

    //构建请求参数对象
    RequestParam requestParam = new RequestParam.Builder()
            .serialNumber(serial)
            .nonce(nonce)
            .signature(signature)
            .timestamp(timestamp)
            .signType(signaturetype)
            .body(body)
            .build();

    // 初始化 NotificationParser , 这里的config是RSAAutoCertificateConfig
    NotificationParser parser = new NotificationParser(config);

    // 以支付通知回调为例,验签、解密并转换成 Transaction
        return parser.parse(requestParam, Transaction.class);

    }
剩下就是根据 Transaction 处理相应的业务结果了。
文章结束,希望对你有所帮助