springboot-config-Server配置文件服务搭建
上一篇博客我们搭建了eureka的服务端和客户端,今天我们来讲一下springboot配置文件服务的搭建,配置文件我们今天就说两种,一种是读取本地的文件,一种是读取git环境的配置文件。
Config-Sever服务搭建
pom文件
<project xmlns="http://maven.apache.org/POM/4.0.0"
         xmlns:xsi="http://www.w3.org/2001/XMLSchema-instance"
         xsi:schemaLocation="http://maven.apache.org/POM/4.0.0 http://maven.apache.org/xsd/maven-4.0.0.xsd">
    <modelVersion>4.0.0modelVersion>

    <groupId>com.mhb.configgroupId>
    <artifactId>configartifactId>
    <version>1.0-SNAPSHOTversion>

    <name>Config Servername>
    <description>Config Server demo projectdescription>

    <parent>
        <groupId>org.springframework.bootgroupId>
        <artifactId>spring-boot-starter-parentartifactId>
        <version>2.0.5.RELEASEversion>
        <relativePath/>
    parent>

    <dependencies>
        <dependency>
            <groupId>org.springframework.cloudgroupId>
            <artifactId>spring-cloud-config-serverartifactId>
        dependency>

        <dependency>
            <groupId>org.springframework.bootgroupId>
            <artifactId>spring-boot-starter-testartifactId>
            <scope>testscope>
        dependency>
    dependencies>

    <properties>
        <project.build.sourceEncoding>UTF-8project.build.sourceEncoding>
        <java.version>1.8java.version>
    properties>

    <dependencyManagement>
        <dependencies>
            <dependency>
                <groupId>org.springframework.cloudgroupId>
                <artifactId>spring-cloud-dependenciesartifactId>
                <version>Finchley.SR2version>
                <type>pomtype>
                <scope>importscope>
            dependency>
        dependencies>
    dependencyManagement>

    <build>
        <plugins>
            <plugin>
                <groupId>org.springframework.bootgroupId>
                <artifactId>spring-boot-maven-pluginartifactId>
            plugin>
        plugins>
    build>
project>
重点添加spring-cloud-config-server服务,这是配置服务的jar包,其他的都是正常的maven配置。
本地读取配置信息
在resources文件夹下创建application.yml文件,并且添加如下配置
server:
  port: 6002   # 端口
  servlet:
    context-path: /
spring:
  application:
    name: config	# 项目名称
  profiles:
    active: native	# 设置读取本地配置文件
  cloud:
    config:
      server:
        native:
          search-locations: classpath:/config	# 读取文件的路径
          add-label-locations: false
这样我们就会读取该路径下的文件,spring.profiles.active=native表示读取本地配置,search-locations表示我们查找文件的路径,add-label-locations这个是在git的时候才用到,这个设置成false就可以了,因为默认是true。
读取git配置文件
server:
  port: 6002

spring:
  application:
    name: config	#项目名称
  cloud:
    config:
      server:
        git:
          uri: http://*.*.*.*:3000/ermuv587/config-profile	# 配置文件git地址
          timeout: 4			# 超时时间,默认是5秒,这里随便设置
          searchPaths: dev,test,prod # 寻找路径,
          force-pull: true	# 强制拉取覆盖
      label: master	# 默认git要拉取的分支
映射文件格式如下
- /{application}/{profile}[/{label}]
- /{application}-{profile}.yml
- /{label}/{application}-{profile}.yml
- /{application}-{profile}.properties
- /{label}/{application}-{profile}.properties
创建git下的配置文件

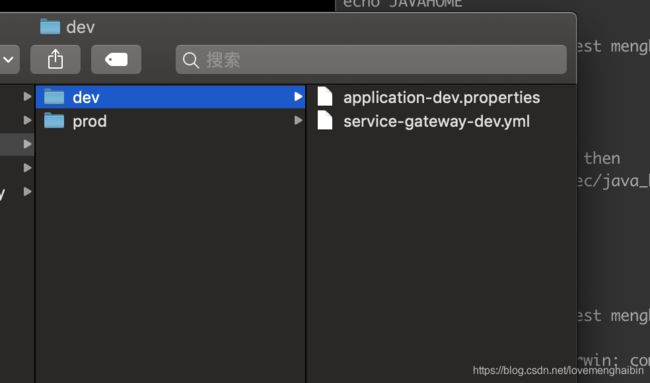
如图,文件夹格式如下,具体内容随便写,比如我就在application-dev.properties中加了这么一句话jdbc.driver=net.sf.log4jdbc.DriverSpy111,在application-prod.properties加了这么一句jdbc.driver=net.sf.log4jdbc.DriverSpy222,然后添加到git上,这样就可以了,然后启动服务类。
启动类
在启动类中,要加注解@EnableDiscoveryClient,具体如下:
package hello;

import org.springframework.boot.SpringApplication;
import org.springframework.boot.autoconfigure.SpringBootApplication;
import org.springframework.cloud.client.discovery.EnableDiscoveryClient;

@EnableDiscoveryClient
@SpringBootApplication
public class ClientApplication {
    public static void main(String[] args) {
        SpringApplication.run(ClientApplication.class, args);
    }
}
这样一个config的服务项目就搭建起来了,直接启动该服务即可。
测试git获取配置文件信息
新建一个项目,普通项目就可以,并创建一个Controller类,然后添加如下代码
在项目下的resource文件夹下创建bootstrap.yml文件下添加如下配置:
spring:
  application:
    name: service-gateway
  cloud:
    config:
      uri: http://localhost:6002
      label: master
      profile: dev
      username: *******
      password: ********
在pom.xml文件下添加
<dependency>
    <groupId>org.springframework.cloudgroupId>
    <artifactId>spring-cloud-config-clientartifactId>
    <version>2.0.2.RELEASEversion>
dependency>
profile为设置访问的那个文件,例如这里的dev就是访问service-gateway-dev.properties和application-dev.properties,如果是prod,这表示访问service-gateway-prod.properties和application-prod.properties,label是访问的git项目下的分支,username是git的用户名,password是git的密码。
测试类如下:
import org.springframework.beans.factory.annotation.Value;
import org.springframework.web.bind.annotation.RequestMapping;
import org.springframework.web.bind.annotation.RequestParam;
import org.springframework.web.bind.annotation.RestController;

@RestController
public class HelloController {

    @Value("${jdbc.driver}")
    private String propertyName;

    @RequestMapping("/greeting")
    public String greeting(@RequestParam(value = "name", defaultValue = "World") String name) {
        System.out.println(propertyName);
        return name;
    }

}
启动项目后我们会看到控制台有如下输出就表示我们成功的拉取了配置信息。
Fetching config from server at : http://localhost:6002
 Located environment: name=service-gateway, profiles=[dev], label=master, version=4bff23c7b8950799ab99a1112909848ea16c80d9, state=null
访问连接http://localhost:8080/greeting会在控制台输出net.sf.log4jdbc.DriverSpy111,如果你把bootstrap.yml文件的profile的属性改成了prod,则访问的结果就会是net.sf.log4jdbc.DriverSpy222,同理访问本地的也是一样的,但是需要在config的服务项目中的resources文件夹下创建config文件夹,然后在里边创建文件。
小结
有点的话,在我看来就是配置集中管理,并且能够省却很多的冗余配置,公共配置可以放到application-{profile}.properties文件下,其他的自主配置放到项目名下的文件中即可。缺点的话,就是一个项目也要弄这个的话,确实是稍微麻烦了点。