K8s集群部署-详细步骤
不够详细,后面有时间再编辑
安装
关闭防火墙
systemctl stop firewalld
systemctl disable firewalld
关闭swap, selinux
swapoff -a && sed -i '/ swap / s/^\(.*\)$/#\1/g' /etc/fstab
setenforce 0 && sed -i 's/^SELINUX=.*/SELINUX=disabled/' /etc/selinux/config
systemctl reboot #重启生效
free ‐m #查看下swap交换区是否都为0,如果都为0则swap关闭成功
主节点加入:
cat >> /etc/hosts << EOF
192.168.201.100 master-node
192.168.201.101 work‐node-1
192.168.201.102 work‐node-2
EOF将桥接的IPv4流量传递到iptables
cat > /etc/sysctl.d/k8s.conf << EOF
net.bridge.bridge‐nf‐call‐ip6tables = 1
net.bridge.bridge‐nf‐call‐iptables = 1
EOF
sysctl -w net.bridge.bridge-nf-call-iptables=1
sysctl ‐‐system设置时间同步
yum install ntpdate ‐y
ntpdate time.windows.com添加k8s yum源
cat > /etc/yum.repos.d/kubernetes.repo << EOF
[kubernetes]
name=Kubernetes
baseurl=https://mirrors.aliyun.com/kubernetes/yum/repos/kubernetes-el7-x86_64
enabled=1
gpgcheck=0
repo_gpgcheck=0
gpgkey=https://mirrors.aliyun.com/kubernetes/yum/doc/yum-key.gpg https://mirrors.aliyun.com/kubernetes/yum/doc/rpm-package-key.gpg
EOF
安装指定版本
yum install kubeadm-1.23.1-0 kubectl-1.23.1-0 kubelet-1.23.1-0 -y开机启动kubelet
systemctl enable kubelet
systemctl start kubelet
查看安装
yum list installed | grep kubelet
yum list installed | grep kubeadm
yum list installed | grep kubectl
kubelet --version启动
主节点启动:
kubeadm init ‐‐apiserver‐advertise‐address=192.168.65.160 ‐‐image‐repository registry.aliyuncs.com/goo
gle_containers ‐‐kubernetes‐version v1.18.0 ‐‐service‐cidr=10.96.0.0/12 ‐‐pod‐network‐cidr=10.244.0.0/16
kubeadm init ‐‐apiserver‐advertise‐address=192.168.192.137 ‐‐image‐repository registry.aliyuncs.com/google_containers ‐‐kubernetes‐version v1.23.1 ‐‐service‐cidr=10.96.0.0/12 ‐‐pod‐network‐cidr=10.244.0.0/16kubeadm init ‐‐apiserver‐advertise‐address=192.168.201.100 ‐‐image‐repository registry.aliyuncs.com/google_containers ‐‐kubernetes‐version v1.23.1 ‐‐service‐idr=10.96.0.0/12 ‐‐pod‐network‐cidr=10.244.0.0/16
[root@master-node ~]# kubeadm init ‐‐apiserver‐advertise‐address=192.168.201.100 ‐‐image‐repository registry.aliyuncs.com/google_containers ‐‐kubernetes‐version v1.23.1 ‐‐service‐idr=10.96.0.0/12 ‐‐pod‐network‐cidr=10.244.0.0/16
unknown command "‐‐apiserver‐advertise‐address=192.168.201.100" for "kubeadm init"
To see the stack trace of this error execute with --v=5 or higher
复制的格式有误,需手动敲一下
启动成功:
[root@master-node ~]# kubeadm init --apiserver-advertise-address=192.168.201.100 --image-repository registry.aliyuncs.com/google_containers --kubernetes-version v1.23.1 --service-cidr=10.96.0.0/12 --pod-network-cidr=10.244.0.0/16
[init] Using Kubernetes version: v1.23.1
[preflight] Running pre-flight checks
[preflight] Pulling images required for setting up a Kubernetes cluster
[preflight] This might take a minute or two, depending on the speed of your internet connection
[preflight] You can also perform this action in beforehand using 'kubeadm config images pull'
[certs] Using certificateDir folder "/etc/kubernetes/pki"
[certs] Generating "ca" certificate and key
[certs] Generating "apiserver" certificate and key
[certs] apiserver serving cert is signed for DNS names [kubernetes kubernetes.default kubernetes.default.svc kubernetes.default.svc.cluster.local master-node] and IPs [10.96.0.1 192.168.201.100]
[certs] Generating "apiserver-kubelet-client" certificate and key
[certs] Generating "front-proxy-ca" certificate and key
[certs] Generating "front-proxy-client" certificate and key
[certs] Generating "etcd/ca" certificate and key
[certs] Generating "etcd/server" certificate and key
[certs] etcd/server serving cert is signed for DNS names [localhost master-node] and IPs [192.168.201.100 127.0.0.1 ::1]
[certs] Generating "etcd/peer" certificate and key
[certs] etcd/peer serving cert is signed for DNS names [localhost master-node] and IPs [192.168.201.100 127.0.0.1 ::1]
[certs] Generating "etcd/healthcheck-client" certificate and key
[certs] Generating "apiserver-etcd-client" certificate and key
[certs] Generating "sa" key and public key
[kubeconfig] Using kubeconfig folder "/etc/kubernetes"
[kubeconfig] Writing "admin.conf" kubeconfig file
[kubeconfig] Writing "kubelet.conf" kubeconfig file
[kubeconfig] Writing "controller-manager.conf" kubeconfig file
[kubeconfig] Writing "scheduler.conf" kubeconfig file
[kubelet-start] Writing kubelet environment file with flags to file "/var/lib/kubelet/kubeadm-flags.env"
[kubelet-start] Writing kubelet configuration to file "/var/lib/kubelet/config.yaml"
[kubelet-start] Starting the kubelet
[control-plane] Using manifest folder "/etc/kubernetes/manifests"
[control-plane] Creating static Pod manifest for "kube-apiserver"
[control-plane] Creating static Pod manifest for "kube-controller-manager"
[control-plane] Creating static Pod manifest for "kube-scheduler"
[etcd] Creating static Pod manifest for local etcd in "/etc/kubernetes/manifests"
[wait-control-plane] Waiting for the kubelet to boot up the control plane as static Pods from directory "/etc/kubernetes/manifests". This can take up to 4m0s
[apiclient] All control plane components are healthy after 5.503459 seconds
[upload-config] Storing the configuration used in ConfigMap "kubeadm-config" in the "kube-system" Namespace
[kubelet] Creating a ConfigMap "kubelet-config-1.23" in namespace kube-system with the configuration for the kubelets in the cluster
NOTE: The "kubelet-config-1.23" naming of the kubelet ConfigMap is deprecated. Once the UnversionedKubeletConfigMap feature gate graduates to Beta the default name will become just "kubelet-config". Kubeadm upgrade will handle this transition transparently.
[upload-certs] Skipping phase. Please see --upload-certs
[mark-control-plane] Marking the node master-node as control-plane by adding the labels: [node-role.kubernetes.io/master(deprecated) node-role.kubernetes.io/control-plane node.kubernetes.io/exclude-from-external-load-balancers]
[mark-control-plane] Marking the node master-node as control-plane by adding the taints [node-role.kubernetes.io/master:NoSchedule]
[bootstrap-token] Using token: 0h3sva.210pheplmd2rsotf
[bootstrap-token] Configuring bootstrap tokens, cluster-info ConfigMap, RBAC Roles
[bootstrap-token] configured RBAC rules to allow Node Bootstrap tokens to get nodes
[bootstrap-token] configured RBAC rules to allow Node Bootstrap tokens to post CSRs in order for nodes to get long term certificate credentials
[bootstrap-token] configured RBAC rules to allow the csrapprover controller automatically approve CSRs from a Node Bootstrap Token
[bootstrap-token] configured RBAC rules to allow certificate rotation for all node client certificates in the cluster
[bootstrap-token] Creating the "cluster-info" ConfigMap in the "kube-public" namespace
[kubelet-finalize] Updating "/etc/kubernetes/kubelet.conf" to point to a rotatable kubelet client certificate and key
[addons] Applied essential addon: CoreDNS
[addons] Applied essential addon: kube-proxy

Your Kubernetes control-plane has initialized successfully!

To start using your cluster, you need to run the following as a regular user:

  mkdir -p $HOME/.kube
  sudo cp -i /etc/kubernetes/admin.conf $HOME/.kube/config
  sudo chown $(id -u):$(id -g) $HOME/.kube/config

Alternatively, if you are the root user, you can run:

  export KUBECONFIG=/etc/kubernetes/admin.conf

You should now deploy a pod network to the cluster.
Run "kubectl apply -f [podnetwork].yaml" with one of the options listed at:
  https://kubernetes.io/docs/concepts/cluster-administration/addons/

Then you can join any number of worker nodes by running the following on each as root:

kubeadm join 192.168.201.100:6443 --token 0h3sva.210pheplmd2rsotf \
        --discovery-token-ca-cert-hash sha256:d50a7454ce983ced7878dd3d55b3052addc394ffd519283796f6e9240decf61c
mkdir -p $HOME/.kube
sudo cp -i /etc/kubernetes/admin.conf $HOME/.kube/config
sudo chown $(id -u):$(id -g) $HOME/.kube/config
[root@master-node ~]# mkdir -p $HOME/.kube
[root@master-node ~]# sudo cp -i /etc/kubernetes/admin.conf $HOME/.kube/config
[root@master-node ~]# sudo chown $(id -u):$(id -g) $HOME/.kube/config
[root@master-node ~]# kubectl get nodes
NAME          STATUS     ROLES                  AGE     VERSION
master-node   NotReady   control-plane,master   3m48s   v1.23.1
加入节点
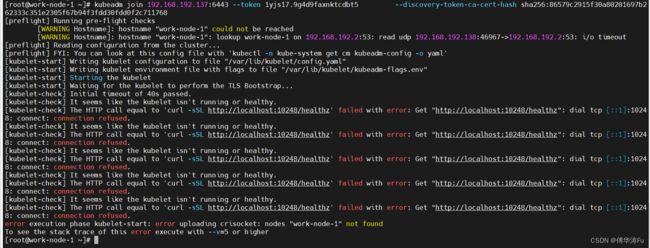
kubeadm join 192.168.192.137:6443 --token 1yjs17.9g4d9faxnktcdbt5 \
        --discovery-token-ca-cert-hash sha256:86579c2915f30a80201697b262333c351e2305f67b94f3fdd30fdd0f2c711768
部署容器网络(master执行)
Calico是一个纯三层的数据中心网络方案,是目前Kubernetes主流的网络方案。下载YAML:
wget https://docs.projectcalico.org/manifests/calico.yaml
下载完后还需要修改里面定义Pod网络(CALICO_IPV4POOL_CIDR),与前面kubeadm init的–pod-network-cidr指定的一样。
- name: CALICO_IPV4POOL_CIDR
value: "10.20.0.0/16"
网络插件可能下载不成功,可以在以下链接中复制yaml文件内容:
calico.yaml_傅华涛Fu的博客-CSDN博客
[root@master-node ~]# kubectl apply -f https://docs.projectcalico.org/manifests/calico.yaml
poddisruptionbudget.policy/calico-kube-controllers created
serviceaccount/calico-kube-controllers created
serviceaccount/calico-node created
serviceaccount/calico-cni-plugin created
configmap/calico-config created
customresourcedefinition.apiextensions.k8s.io/bgpconfigurations.crd.projectcalico.org created
customresourcedefinition.apiextensions.k8s.io/bgpfilters.crd.projectcalico.org created
customresourcedefinition.apiextensions.k8s.io/bgppeers.crd.projectcalico.org created
customresourcedefinition.apiextensions.k8s.io/blockaffinities.crd.projectcalico.org created
customresourcedefinition.apiextensions.k8s.io/caliconodestatuses.crd.projectcalico.org created
customresourcedefinition.apiextensions.k8s.io/clusterinformations.crd.projectcalico.org created
customresourcedefinition.apiextensions.k8s.io/felixconfigurations.crd.projectcalico.org created
customresourcedefinition.apiextensions.k8s.io/globalnetworkpolicies.crd.projectcalico.org created
customresourcedefinition.apiextensions.k8s.io/globalnetworksets.crd.projectcalico.org created
customresourcedefinition.apiextensions.k8s.io/hostendpoints.crd.projectcalico.org created
customresourcedefinition.apiextensions.k8s.io/ipamblocks.crd.projectcalico.org created
customresourcedefinition.apiextensions.k8s.io/ipamconfigs.crd.projectcalico.org created
customresourcedefinition.apiextensions.k8s.io/ipamhandles.crd.projectcalico.org created
customresourcedefinition.apiextensions.k8s.io/ippools.crd.projectcalico.org created
customresourcedefinition.apiextensions.k8s.io/ipreservations.crd.projectcalico.org created
customresourcedefinition.apiextensions.k8s.io/kubecontrollersconfigurations.crd.projectcalico.org created
customresourcedefinition.apiextensions.k8s.io/networkpolicies.crd.projectcalico.org created
customresourcedefinition.apiextensions.k8s.io/networksets.crd.projectcalico.org created
clusterrole.rbac.authorization.k8s.io/calico-kube-controllers created
clusterrole.rbac.authorization.k8s.io/calico-node created
clusterrole.rbac.authorization.k8s.io/calico-cni-plugin created
clusterrolebinding.rbac.authorization.k8s.io/calico-kube-controllers created
clusterrolebinding.rbac.authorization.k8s.io/calico-node created
clusterrolebinding.rbac.authorization.k8s.io/calico-cni-plugin created
daemonset.apps/calico-node created
deployment.apps/calico-kube-controllers created
查看节点:
[root@master-node ~]# kubectl get nodes
NAME          STATUS     ROLES                  AGE     VERSION
master-node   NotReady   control-plane,master   16m     v1.23.1
work-node-1   NotReady                    5m8s    v1.23.1
work-node-2   NotReady                    4m48s   v1.23.1
稍等一会全部节点就绪:
[root@master-node ~]# kubectl get nodes
NAME          STATUS   ROLES                  AGE   VERSION
master-node   Ready    control-plane,master   29m   v1.23.1
work-node-1   Ready                     17m   v1.23.1
work-node-2   Ready                     17m   v1.23.1
默认token有效期为24小时,当过期之后,该token就不可用了。这时就需要重新创建token,可以直接使用命令快捷生成:
kubeadm token create --print-join-command
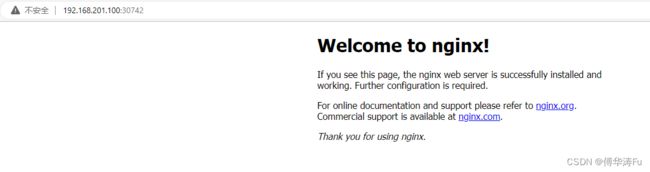
部署Nginx
[root@master-node ~]# kubectl create deployment nginx --image=nginx
deployment.apps/nginx created
[root@master-node ~]# kubectl expose deployment nginx --port=80 --type=NodePort
service/nginx exposed
[root@master-node ~]# kubectl get pod,svc -o wide
NAME                         READY   STATUS             RESTARTS   AGE   IP             NODE          NOMINATED NODE   READINESS GATES
pod/nginx-85b98978db-qmmfh   0/1     ImagePullBackOff   0          90s   10.244.154.1   work-node-1

NAME                 TYPE        CLUSTER-IP      EXTERNAL-IP   PORT(S)        AGE   SELECTOR
service/kubernetes   ClusterIP   10.96.0.1               443/TCP        43m
service/nginx        NodePort    10.100.52.211           80:30742/TCP   53s   app=nginx
[root@master-node ~]#
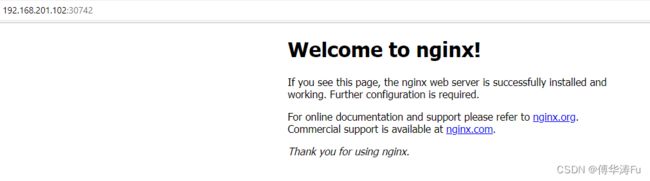
任意节点访问:IP地址:端口号,如192.168.201.100:30742

问题:
1、[ERROR FileContent--proc-sys-net-bridge-bridge-nf-call-iptables]: /proc/sys/net/bridge/bridge-nf-call-iptables contents are not set to 1
sysctl -w net.bridge.bridge-nf-call-iptables=1
[知识讲解篇-159] k8s 中为什么要开启bridge-nf-call-iptables - 知乎
2、[kubelet-check] The HTTP call equal to 'curl -sSL http://localhost:10248/healthz' failed with error: Get "http://localhost:10248/healthz": dial tcp [::1]:10248: connect: connection refused.
[root@master-node ~]# kubeadm init --apiserver-advertise-address=192.168.201.100 --image-repository registry.aliyuncs.com/google_containers --kubernetes-version v1.23.1 --service-cidr=10.96.0.0/12 --pod-network-cidr=10.244.0.0/16
[init] Using Kubernetes version: v1.23.1
[preflight] Running pre-flight checks
[preflight] Pulling images required for setting up a Kubernetes cluster
[preflight] This might take a minute or two, depending on the speed of your internet connection
[preflight] You can also perform this action in beforehand using 'kubeadm config images pull'
[certs] Using certificateDir folder "/etc/kubernetes/pki"
[certs] Generating "ca" certificate and key
[certs] Generating "apiserver" certificate and key
[certs] apiserver serving cert is signed for DNS names [kubernetes kubernetes.default kubernetes.default.svc kubernetes.default.svc.cluster.local master-node] and IPs [10.96.0.1 192.168.201.100]
[certs] Generating "apiserver-kubelet-client" certificate and key
[certs] Generating "front-proxy-ca" certificate and key
[certs] Generating "front-proxy-client" certificate and key
[certs] Generating "etcd/ca" certificate and key
[certs] Generating "etcd/server" certificate and key
[certs] etcd/server serving cert is signed for DNS names [localhost master-node] and IPs [192.168.201.100 127.0.0.1 ::1]
[certs] Generating "etcd/peer" certificate and key
[certs] etcd/peer serving cert is signed for DNS names [localhost master-node] and IPs [192.168.201.100 127.0.0.1 ::1]
[certs] Generating "etcd/healthcheck-client" certificate and key
[certs] Generating "apiserver-etcd-client" certificate and key
[certs] Generating "sa" key and public key
[kubeconfig] Using kubeconfig folder "/etc/kubernetes"
[kubeconfig] Writing "admin.conf" kubeconfig file
[kubeconfig] Writing "kubelet.conf" kubeconfig file
[kubeconfig] Writing "controller-manager.conf" kubeconfig file
[kubeconfig] Writing "scheduler.conf" kubeconfig file
[kubelet-start] Writing kubelet environment file with flags to file "/var/lib/kubelet/kubeadm-flags.env"
[kubelet-start] Writing kubelet configuration to file "/var/lib/kubelet/config.yaml"
[kubelet-start] Starting the kubelet
[control-plane] Using manifest folder "/etc/kubernetes/manifests"
[control-plane] Creating static Pod manifest for "kube-apiserver"
[control-plane] Creating static Pod manifest for "kube-controller-manager"
[control-plane] Creating static Pod manifest for "kube-scheduler"
[etcd] Creating static Pod manifest for local etcd in "/etc/kubernetes/manifests"
[wait-control-plane] Waiting for the kubelet to boot up the control plane as static Pods from directory "/etc/kubernetes/manifests". This can take up to 4m0s
[kubelet-check] Initial timeout of 40s passed.
[kubelet-check] It seems like the kubelet isn't running or healthy.
[kubelet-check] The HTTP call equal to 'curl -sSL http://localhost:10248/healthz' failed with error: Get "http://localhost:10248/healthz": dial tcp [::1]:10248: connect: connection refused.
[kubelet-check] It seems like the kubelet isn't running or healthy.
[kubelet-check] The HTTP call equal to 'curl -sSL http://localhost:10248/healthz' failed with error: Get "http://localhost:10248/healthz": dial tcp [::1]:10248: connect: connection refused.
[kubelet-check] It seems like the kubelet isn't running or healthy.
[kubelet-check] The HTTP call equal to 'curl -sSL http://localhost:10248/healthz' failed with error: Get "http://localhost:10248/healthz": dial tcp [::1]:10248: connect: connection refused.
[kubelet-check] It seems like the kubelet isn't running or healthy.
[kubelet-check] The HTTP call equal to 'curl -sSL http://localhost:10248/healthz' failed with error: Get "http://localhost:10248/healthz": dial tcp [::1]:10248: connect: connection refused.
[kubelet-check] It seems like the kubelet isn't running or healthy.
[kubelet-check] The HTTP call equal to 'curl -sSL http://localhost:10248/healthz' failed with error: Get "http://localhost:10248/healthz": dial tcp [::1]:10248: connect: connection refused.

        Unfortunately, an error has occurred:
                timed out waiting for the condition

        This error is likely caused by:
                - The kubelet is not running
                - The kubelet is unhealthy due to a misconfiguration of the node in some way (required cgroups disabled)

        If you are on a systemd-powered system, you can try to troubleshoot the error with the following commands:
                - 'systemctl status kubelet'
                - 'journalctl -xeu kubelet'

        Additionally, a control plane component may have crashed or exited when started by the container runtime.
        To troubleshoot, list all containers using your preferred container runtimes CLI.

        Here is one example how you may list all Kubernetes containers running in docker:
                - 'docker ps -a | grep kube | grep -v pause'
                Once you have found the failing container, you can inspect its logs with:
                - 'docker logs CONTAINERID'

error execution phase wait-control-plane: couldn't initialize a Kubernetes cluster
To see the stack trace of this error execute with --v=5 or higher

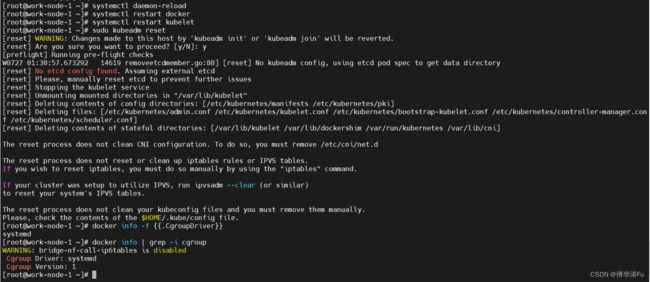
/etc/docker/daemon.json:
{
	"exec-opts": [ "native.cgroupdriver=systemd" ]
}
解决K8s安装中节点初始化时 [kubelet-check] The HTTP call equal to ‘curl -sSL http://localhost:10248/healthz‘ 问题._鹰KING的博客-CSDN博客
再重启:
[root@master-node ~]# systemctl daemon-reload
[root@master-node ~]# systemctl restart docker
[root@master-node ~]# systemctl restart kubelet
[root@master-node ~]# sudo kubeadm reset

systemctl daemon-reload
systemctl restart docker
systemctl restart kubelet
sudo kubeadm reset
参考文献:
Kubeadm、Kubelet 和 Kubectl 安装部署 Kubernetes (上) - 简书
https://www.cnblogs.com/jinzhenshui/p/16724379.html
https://github.com/kubernetes/kubernetes/blob/v1.23.1/build/dependencies.yaml
https://github.com/kubernetes/kubernetes/blob/master/CHANGELOG/CHANGELOG-1.23.md
https://www.cnblogs.com/xiaoyingzhanchi/p/14320177.html
https://www.cnblogs.com/skystep/articles/15362851.html