SpringBoot原理复习 SpringBoot配置文件 bean和第三方bean @Conditional注解、@Import注解复习 自动配置简要原理 配置一个简单的starter
1、知道SpringBoot中配置文件的优先级
配置文件分3类:
.properties
.yaml
.yml
注意可以顺便复习一下yml文件的格式。
优先级顺序:
properties > yml > yaml
对于jar包的2种方式:
Java系统属性配置
命令行参数
优先级顺序:
命令行参数 > 系统属性参数
其他方法:
jar包同级下建立配置文件
总优先级顺序
jar包同级文件 > 命令行参数 > 系统属性参数 > properties参数 > yml参数 > yaml参数
2、能够说出bean的两种常见的作用域及如何设置作用域
两种常见作用域
单例 singleton
容器内同名称的bean只有一个实例
非单例 prototype
每次使用该bean时会创建新的实例
设置方法
在对应对象前加入@Scope参数。
单例:
@Scope  // 默认为单例singleton模式。
// 同下
@Scope("singleton")
非单例:
@Scope("prototype") // 非单例模式举例:
@Scope("prototype")
@Lazy
@Service
public class TestServiceImpl2 implements TestService {

    public TestServiceImpl2() {
        System.out.println("hahaha");
    }

    @Override
    public void test() {
        System.out.println("2 is testing~");
    }
}
可以自己再做一些测试。
3、能通过@Bean注解来管理第三方bean
比如引入dom4j。
首先在pom.xml配置,略写了。
然后有两种方法管理第三方类:
方法一:在启动类上添加
在启动类中添加用@Bean注释过的第三方类:
@SpringBootApplication
public class MyWeb14Starter {
    public static void main(String[] args) {
        SpringApplication.run(MyWeb14Starter.class, args);
    }

    @Bean
    public SAXReader saxReader() {
        return new SAXReader();
    }
}
然后可以用测试类测试。将这个第三方bean注入容器,即可使用:
@SpringBootTest
public class ThirdBeanTest {

    @Autowired
    private SAXReader saxReader;

    @Test
    public void test() throws DocumentException {
        System.out.println(saxReader);
        InputStream is = ClassLoader.getSystemResourceAsStream("haha\\a.xml");
        Document doc = saxReader.read(is);
        Element rootElement = doc.getRootElement();
        String name = rootElement.element("name").getText();
        String age = rootElement.element("age").getText();

        System.out.println(name + ": " + age);
    }
}
测试运行结果如下:
方法二:在配置类中添加
在能被启动类扫描的地方下建立一个配置类,比如config下的CommonConfig:
@Configuration
public class CommonConfig {
    @Bean
    public SAXReader reader(TestServiceImpl2 service){
        System.out.println(service);  // 注意,为了区分结果,打印了一下service
        return new SAXReader();
    }
}
测试类还是同上:
@SpringBootTest
public class ThirdBeanTest {

    @Autowired
    private SAXReader saxReader;

    @Test
    public void test() throws DocumentException {
        System.out.println(saxReader);
        InputStream is = ClassLoader.getSystemResourceAsStream("haha\\a.xml");
        Document doc = saxReader.read(is);
        Element rootElement = doc.getRootElement();
        String name = rootElement.element("name").getText();
        String age = rootElement.element("age").getText();

        System.out.println(name + ": " + age);
    }
}
结果如下:
打印了hahaha是因为我在TestServiceImpl2类的无参构造中定义了一下打印的。
@Scope("prototype")
@Lazy
@Service
public class TestServiceImpl2 implements TestService {

    public TestServiceImpl2() {
        System.out.println("hahaha");  // 看这里看这里~
    }

    @Override
    public void test() {
        System.out.println("2 is testing~");
    }
}
4.、能说出@Conditional注解的作用
作条件判断,符合的bean对象才能注入到IOC容器中。
常见的有3类:
-
@ConditionalOnClass:判断环境中有对应字节码文件,才注册bean到IOC容器。
-
@ConditionalOnMissingBean:判断环境中没有对应的bean(类型或名称),才注册bean到IOC容器。
-
@ConditionalOnProperty:判断配置文件中有对应属性和值,才注册bean到IOC容器。
最常用的是第三个。演示如下:
第三方bean:
@Configuration
public class CommonConfig {
    @Bean
    @ConditionalOnProperty(name = "hello", havingValue = "haha")
    public SAXReader reader(TestServiceImpl2 service){
        System.out.println(service);
        return new SAXReader();
    }
}
测试类同上:
@SpringBootTest
public class ThirdBeanTest {

    @Autowired
    private SAXReader saxReader;

    @Test
    public void test() throws DocumentException {
        System.out.println(saxReader);
        InputStream is = ClassLoader.getSystemResourceAsStream("haha\\a.xml");
        Document doc = saxReader.read(is);
        Element rootElement = doc.getRootElement();
        String name = rootElement.element("name").getText();
        String age = rootElement.element("age").getText();

        System.out.println(name + ": " + age);
    }
}
结果报错如下:
在application.properties文件中更改如下:
hello=haha运行结果如下:
5、能说出@Import注解的作用
手动指定导入Bean的文件夹。
导入普通类
普通类如下:
@Component
public class Haha {
    public Haha() {
        System.out.println("happy happy happy~");
    }
}
启动类上使用@Import注解:
@Import(Haha.class)
@SpringBootApplication
public class MyWeb14Starter {
    public static void main(String[] args) {
        SpringApplication.run(MyWeb14Starter.class, args);
    }

//    @Bean
//    public SAXReader saxReader() {
//        return new SAXReader();
//    }
}
运行启动类,结果如下:
还有配置类、接口实现类都可以。
6、能简要的说出springboot自动配置的原理
启动类是配置类
ctrl + 鼠标左键点入@SpringBootApplication,可以看到如下:
@Target({ElementType.TYPE})
@Retention(RetentionPolicy.RUNTIME)
@Documented
@Inherited
@SpringBootConfiguration  // 看这里看这里!
@EnableAutoConfiguration
@ComponentScan(
    excludeFilters = {@Filter(
    type = FilterType.CUSTOM,
    classes = {TypeExcludeFilter.class}
), @Filter(
    type = FilterType.CUSTOM,
    classes = {AutoConfigurationExcludeFilter.class}
)}
)
再点入@SpringBootConfiguration:
@Target({ElementType.TYPE})
@Retention(RetentionPolicy.RUNTIME)
@Documented
@Configuration  // 看这里看这里
@Indexed
这是一个Configuration类,配置类。
启动类自带组件扫描
再回到@SpringBootApplication注解上:
@Target({ElementType.TYPE})
@Retention(RetentionPolicy.RUNTIME)
@Documented
@Inherited
@SpringBootConfiguration
@EnableAutoConfiguration
@ComponentScan(  // 看这里的组件扫描
    excludeFilters = {@Filter(
    type = FilterType.CUSTOM,
    classes = {TypeExcludeFilter.class}
), @Filter(
    type = FilterType.CUSTOM,
    classes = {AutoConfigurationExcludeFilter.class}
)}
)
可以看到它自带@ComponentScan组件扫描。
封装了Import注解
再看@SpringBootApplication里面的@EnableAutoConfiguration注解:
@Target({ElementType.TYPE})
@Retention(RetentionPolicy.RUNTIME)
@Documented
@Inherited
@SpringBootConfiguration
@EnableAutoConfiguration  // 看这个看这个
@ComponentScan(
    excludeFilters = {@Filter(
    type = FilterType.CUSTOM,
    classes = {TypeExcludeFilter.class}
), @Filter(
    type = FilterType.CUSTOM,
    classes = {AutoConfigurationExcludeFilter.class}
)}
)
注解中如下:
@Target({ElementType.TYPE})
@Retention(RetentionPolicy.RUNTIME)
@Documented
@Inherited
@AutoConfigurationPackage
@Import({AutoConfigurationImportSelector.class})  // 看这个看这个
看这个import的:
public class AutoConfigurationImportSelector implements DeferredImportSelector/*看这个*/, BeanClassLoaderAware, ...再看这个DeferredImportSelector类:
public interface DeferredImportSelector extends ImportSelectorAutoConfigurationImportSelector类,实现了ImportSelector中的selectImports方法:
public String[] selectImports(AnnotationMetadata annotationMetadata) {
    if (!this.isEnabled(annotationMetadata)) {
        return NO_IMPORTS;
    } else {
        AutoConfigurationImportSelector.AutoConfigurationEntry autoConfigurationEntry = this.getAutoConfigurationEntry(annotationMetadata);
        return StringUtils.toStringArray(autoConfigurationEntry.getConfigurations());
    }
}
进入getAutoConfigurationEntry方法:
protected AutoConfigurationImportSelector.AutoConfigurationEntry getAutoConfigurationEntry(AnnotationMetadata annotationMetadata) {
        if (!this.isEnabled(annotationMetadata)) {
            return EMPTY_ENTRY;
        } else {
            AnnotationAttributes attributes = this.getAttributes(annotationMetadata);
            List configurations = this.getCandidateConfigurations(annotationMetadata, attributes);
            configurations = this.removeDuplicates(configurations);
            Set exclusions = this.getExclusions(annotationMetadata, attributes);
            this.checkExcludedClasses(configurations, exclusions);
            configurations.removeAll(exclusions);
            configurations = this.getConfigurationClassFilter().filter(configurations);
            this.fireAutoConfigurationImportEvents(configurations, exclusions);
            return new AutoConfigurationImportSelector.AutoConfigurationEntry(configurations, exclusions);
        }
    }
进入getCandidateConfigurations方法:
protected List getCandidateConfigurations(AnnotationMetadata metadata, AnnotationAttributes attributes) {
        List configurations = new ArrayList(SpringFactoriesLoader.loadFactoryNames(this.getSpringFactoriesLoaderFactoryClass(), this.getBeanClassLoader()));
        ImportCandidates.load(AutoConfiguration.class, this.getBeanClassLoader()).forEach(configurations::add);
        Assert.notEmpty(configurations, "No auto configuration classes found in META-INF/spring.factories nor in META-INF/spring/org.springframework.boot.autoconfigure.AutoConfiguration.imports. If you are using a custom packaging, make sure that file is correct.");
        return configurations;
    }
看这个"No auto configuration classes found in META-INF/spring.factories nor in META-INF/spring/org.springframework.boot.autoconfigure.AutoConfiguration.imports. If you are using a custom packaging, make sure that file is correct."
这个META-INF文件夹下的就是自动配置的文件。我们可以找到进去看看:
7、知道如何自定义一个简单的starter
新建项目
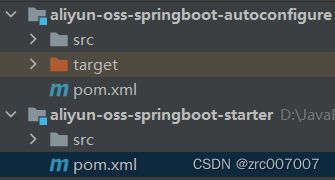
新建aliyun-oss-springboot-autoconfigure项目和aliyun-oss-springboot-starter项目。
配置pom文件
依赖关系是 主项目 -> 自定义starter -> 自定义autoconfigure。首先配置starter:
    4.0.0

    com.heiha
    aliyun-oss-springboot-starter
    1.0-SNAPSHOT


        11
        11


            com.heiha
            aliyun-oss-springboot-autoconfigure
            1.0-SNAPSHOT
然后配置autoconfigure:
    4.0.0

    com.heiha
    aliyun-oss-springboot-autoconfigure
    1.0-SNAPSHOT


        11
        11


            org.springframework.boot
            spring-boot-starter-web
            2.7.5


            com.aliyun.oss
            aliyun-sdk-oss
            3.15.1


            org.projectlombok
            lombok
            1.18.24


            org.springframework
            spring-context
            5.3.23
            compile
配置autoconfigure项目
配置Configuration类:
@Configuration
@EnableConfigurationProperties(AliOSSProperties.class)
public class OSSConfig {
    @Bean
    public AliOSSUtils aliOSSUtils(AliOSSProperties properties) {
        return new AliOSSUtils(properties);
    }
}
配置properties类:
@Data
@Component
@ConfigurationProperties(prefix = "aliyun.oss")
public class AliOSSProperties {
    //区域
    private String endpoint;
    //身份ID
    private String accessKeyId ;
    //身份密钥
    private String accessKeySecret ;
    //存储空间
    private String bucketName;
}
配置utils类:
/**
 * 阿里云 OSS 工具类
 */
@Component
public class AliOSSUtils {

    // Endpoint以华东1(杭州)为例,其它Region请按实际情况填写。
    @Value("${aliyun.oss.endpoint}")
    private String endpoint;

    // RAM用户的访问密钥(AccessKey ID和AccessKey Secret)。
    @Value("${aliyun.oss.accessKeyId}")
    private String accessKeyId;
    @Value("${aliyun.oss.accessKeySecret}")
    private String accessKeySecret;

    // 填写Bucket名称,例如examplebucket。
    @Value("${aliyun.oss.bucketName}")
    private String bucketName;

    public AliOSSUtils(AliOSSProperties properties) {
    }

    /**
     * 实现上传图片到OSS
     */
    public String upload(MultipartFile file) throws IOException {
        // 获取上传的文件的输入流
        InputStream inputStream = file.getInputStream();

        // 避免文件覆盖
        String originalFilename = file.getOriginalFilename();
        String fileName = UUID.randomUUID().toString() + originalFilename.substring(originalFilename.lastIndexOf("."));

        //上传文件到 OSS
        OSS ossClient = new OSSClientBuilder().build(endpoint, accessKeyId, accessKeySecret);
        ossClient.putObject(bucketName, fileName, inputStream);

        //文件访问路径
        String url = endpoint.split("//")[0] + "//" + bucketName + "." + endpoint.split("//")[1] + "/" + fileName;
        // 关闭ossClient
        ossClient.shutdown();
        return url;// 把上传到oss的路径返回
    }

}
配置主项目
在pom中引入自定义starter:
    com.heiha
    aliyun-oss-springboot-starter
    1.0-SNAPSHOT
配置中写好阿里云的参数:
aliyun:
  oss:
    endpoint: https://oss-cn-beijing.aliyuncs.com
    accessKeyId: ****
    accessKeySecret: ****
    bucketName: heiha-huahua
编写controller:
@RestController
public class UploadController {
    @Autowired
    private AliOSSUtils ali;

//    @PostMapping("/upload")
//    public Result upload(String username, String age, MultipartFile image) throws IOException {
//        UUID uuid = UUID.randomUUID();
//        String originalFilename = image.getOriginalFilename();
//        int i = originalFilename.lastIndexOf(".");
//        String newFileName = uuid + originalFilename.substring(i);
//        image.transferTo(new File("D:\\mmimg\\" + newFileName));
//        return Result.success();
//    }

    @PostMapping("/upload")
    public Result upload(MultipartFile image) throws IOException {
        String url = ali.upload(image);
        return Result.success(url);
    }
}


