Eureka学习笔记
1 环境搭建
1.1 在主项目下使用Spring Initializar新建子module
1.2 修改pom.xml
<project xmlns="http://maven.apache.org/POM/4.0.0" xmlns:xsi="http://www.w3.org/2001/XMLSchema-instance"
         xsi:schemaLocation="http://maven.apache.org/POM/4.0.0 https://maven.apache.org/xsd/maven-4.0.0.xsd">
    <parent>
        <artifactId>springcloud1artifactId>
        <groupId>cn.tedugroupId>
        <version>0.0.1-SNAPSHOTversion>
    parent>
    <modelVersion>4.0.0modelVersion>

    <artifactId>sp05-eurekaartifactId>
    <version>0.0.1-SNAPSHOTversion>
    <name>sp05-eurekaname>
    <description>Demo project for Spring Bootdescription>
    <properties>
        <java.version>1.8java.version>
    properties>
    <dependencies>
        <dependency>
            <groupId>org.springframework.cloudgroupId>
            <artifactId>spring-cloud-starter-netflix-eureka-serverartifactId>
        dependency>
    dependencies>
project>
1.3 编辑application.yml配置文件
server:
  port: 2001 # 配置eureka的访问端口号
eureka:
  server:
    enable-self-preservation: false # 禁用自我保护模式,原因在下面有解释
  instance:
    hostname: eureka1 # 指定主机名称
  client:
    register-with-eureka: false # 禁用向自己注册
    fetch-registry: false # 禁用从自己拉取注册表信息
1.4 在项目的主启动类上添加@EnableEurekaServer注解,启用eureka的自动配置类
package com.example.sp05;

import org.springframework.boot.SpringApplication;
import org.springframework.boot.autoconfigure.SpringBootApplication;
import org.springframework.cloud.netflix.eureka.server.EnableEurekaServer;

@EnableEurekaServer
@SpringBootApplication
public class Sp05EurekaApplication {
    public static void main(String[] args) {
        SpringApplication.run(Sp05EurekaApplication.class, args);
    }
}
1.5 启动测试
打开http://localhost:2001就可以看到类似下面的页面了

此时eureka server就配置好了
1.6 服务启动说明
本文为了更加贴合实际一些,把eureka服务放到了172.18.6.173这台计算机上,本机地址是172.18.6.192,下文只要是启动eureka的就是173的计算机,其他的子项目的修改都是在192这台本地计算机上
2 Eureka的四条运行机制
- 注册
客户端会一次一次的反复注册,直到注册成功为止 - 拉取
客户端每隔30秒,重复的摘取、刷新本地缓存的注册表 - 心跳
客户端每隔30秒向服务器发送心跳,如果服务器连续3次收不到一个服务的心跳,就会删除该服务的注册信息 - 自我保护模式
网络不稳定,或网络中断时,15分钟内85%的服务器都出现心跳异常(只要有一次未正常接收到心跳就会被算作异常),会自动进入保护模式
这种特殊情况下,会保护所有的注册信息不删除。主要是因为此时会判断为网络的问题,服务提供者本身并无问题,因此还会保持住注册信息。
等待网络恢复正常后,会自动退出自我保护模式。
开发调试期间应该禁用保护模式,避免影响测试,因为开发期间有可能会把各个模块一起停掉,这样很容易让eureka进入自我保护模式,导致注册信息不删除,影响测试。生产环境下还是应该启用保护模式的。
3 添加Eureka客户端
3.1 添加eureka客户端依赖
要把 sp02-itemservice、sp03-userservice、sp04-orderservice以客户端的形式注册到eureka中,需要先在这三个项目的pom.xml中添加依赖
3.1.1 直接编辑 pom.xml文件
添加如下依赖
<dependency>
    <groupId>org.springframework.cloud</groupId>
    <artifactId>spring-cloud-starter-netflix-eureka-client</artifactId>
</dependency>
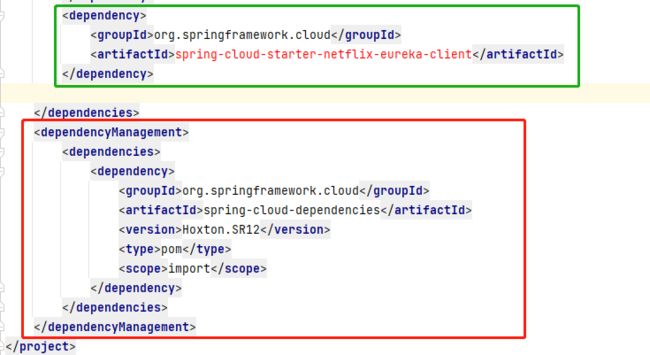
3.1.2 或使用 Edit Starters,点击右键 => Generate


会自动添加下面图中框起来的两个部分,这里我们关于spring-cloud-dependencies的依赖我们已经在父工程里面设置了,所以此处直接删除掉dependencyManagement标记就可以了。
3.2 访问方式
3.2.1 编辑hosts文件,添加如下两行
172.18.6.173 eureka1
172.18.6.173 eureka2
这样我们就可以在浏览器里面使用http://eureka1:2001来访问刚才的那个eureka的页面了
 ### 3.2.2 直接使用IP地址的方式来访问

3.3 编辑application.yml配置文件
添加eureka服务器地址
eureka: # 此处是顶级,即顶着最左侧开始写
  client:
    service-url:
      defaultZone: http://172.18.6.173:2001/eureka
defaultZone 默认地点,/eureka子路径是提供客户端调用的REST地址,浏览器无法直接访问。 如果有购买云服务端的Eureka则此处根据云服务商的要求配置即可
3.4 在启动类上添加@EnableEurekaClient注解
import org.springframework.boot.SpringApplication;
import org.springframework.boot.autoconfigure.SpringBootApplication;
import org.springframework.cloud.netflix.eureka.EnableEurekaClient;

@EnableEurekaClient
@SpringBootApplication
public class Sp02ItemserviceApplication {

    public static void main(String[] args) {
        SpringApplication.run(Sp02ItemserviceApplication.class, args);
    }
}
3.5 复制启动配置
使用不同的配置来启动同一个module
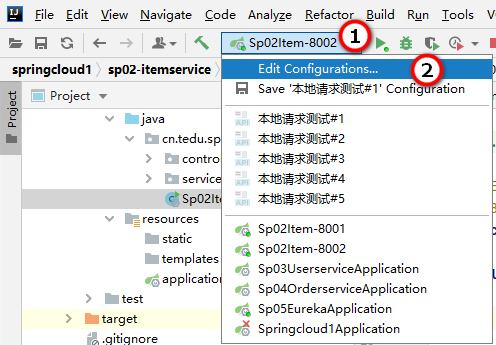

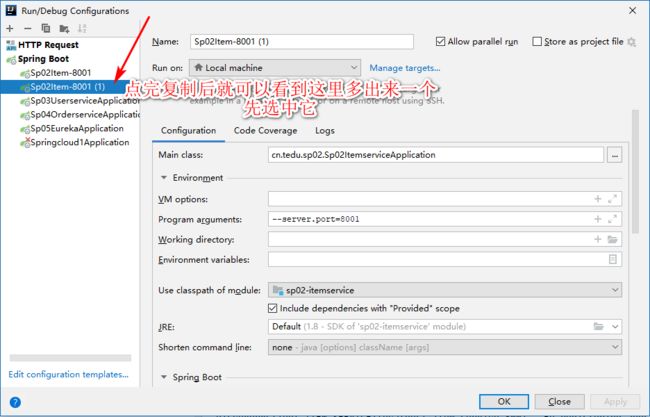

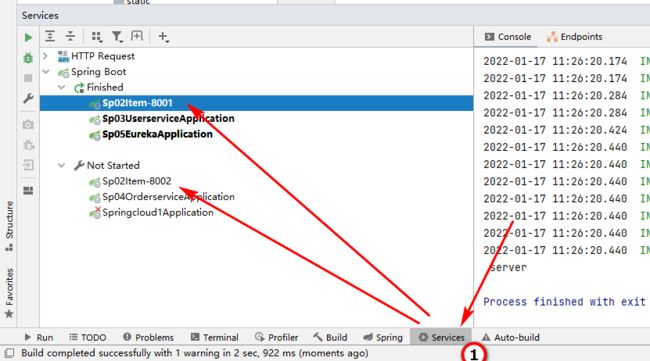
这样配置完成后,就可以在IDEA下方的service小窗口中看到这两个配置了,然后就可以在这两个配置上点右键做启动、重启、停止等操作了
3.6 服务注册地址
分别启动了这两个子module后在eureka的界面里面就可以看到这两个服务了
3.7 使用IP地址注册
eureka默认情况下,有可能是使用主机名来注册,这样局域网内如果所有计算机都没有开启Computer Broswer服务,则无法通过计算机名称来访问对应的服务,甚至有的直接注册成localhost:item-service:8001这样的,别的计算机通过注册中心拿到的地址是http://localhost:8002这样就没法访问正确的服务器了
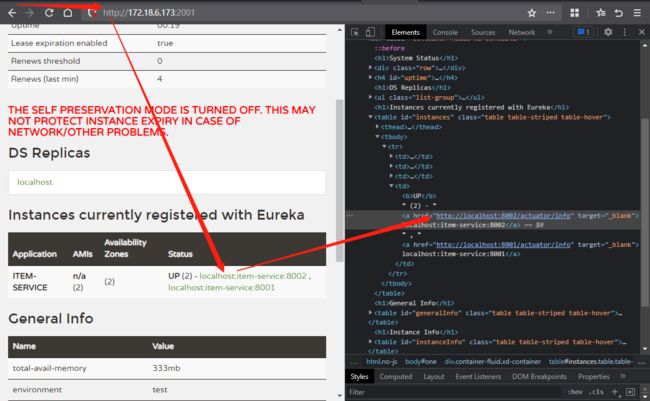
鉴于以上,我们最好是使用IP地址的形式来注册,也有推荐使用网卡过滤等配置的,但仍有可能自动配置出错,这里还是推荐手动指定IP地址进行注册,可以人工管理。比如电脑上有两块网卡,分别处于不同的子网,那么由eureka自动选择的话,很有可能不会选择到正确子网的那个网卡,导致出现问题,所以强烈建议手动指定本机IP地址进行注册
eureka:
  client:
    service-url:
      defaultZone: http://172.18.6.173:2001/eureka
  instance:
    ip-address: 172.18.6.192 # 指定本机地址
    prefer-ip-address: true # 使用IP地址进行注册
这样配置好了,重新启动后再次查看eureka注册中心可以发现,虽然还是显示localhost:item-service:8002这样子,但是其指向的地址已经变成了http://172.18.6.192:8002/这种IP的形式

4 模拟eureka集群
4.1 在sp05-eureka项目里面分别设置两个yml配置文件
application-eureka1.yml文件内容
server:
  port: 2001
eureka:
  server:
    enable-self-preservation: false
  instance:
    hostname: eureka1
  client:
    register-with-eureka: true
    fetch-registry: true
    service-url:
      defaultZone: http://172.18.6.173:2002/eureka
application-eureka2.yml文件内容
server:
  port: 2002
eureka:
  server:
    enable-self-preservation: false
  instance:
    hostname: eureka2
  client:
    register-with-eureka: true
    fetch-registry: true
    service-url:
      defaultZone: http://172.18.6.173:2001/eureka
4.2 复制,做两个启动配置
再次编辑启动配置文件,启动参数处输入--spring.profiles.active=eureka1
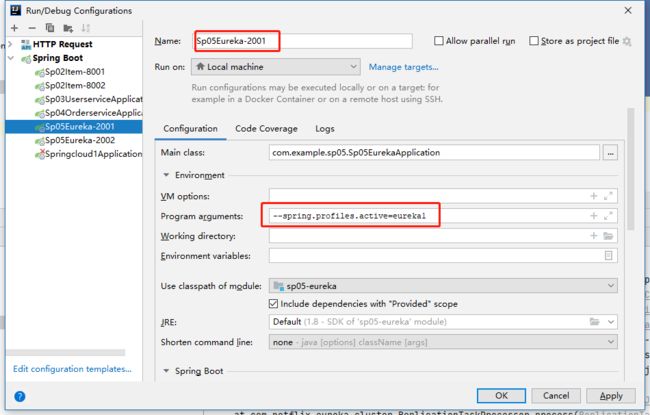
复制一份启动配置文件,启动参数处输入--spring.profiles.active=eureka2,配置的名字也要记得改哦

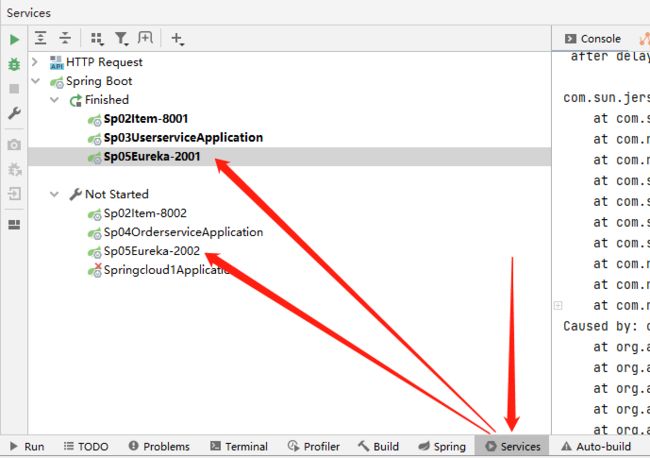
把两个配置文件都点键启动后就可以看到两个eureka里面把对方作为了自己的DSReplicas


此时两个eureka项目就都启动起来了,下面修改eureka客户端的application.yml文件,在原有eureka地址的后面添加,http://eureka2:2002/eureka,如下图
eureka:
  client:
    service-url:
      defaultZone: http://eureka1:2001/eureka,http://eureka2:2002/eureka
或
eureka:
  client:
    service-url:
      defaultZone: http://172.18.6.173:2001/eureka,http://172.18.6.173:2002/eureka
这样配置的意思是说让每个子项目同时连接这两个地址的eureka,子项目都启动起来后,如果有一个注册中心down掉了,还可以继续使用另外一个

5 使用Feign实现远程调用
5.1 改造sp04-orderservice
5.1.1 添加feign的依赖
<dependency>
    <groupId>org.springframework.cloud</groupId>
    <artifactId>spring-cloud-starter-openfeign</artifactId>
</dependency>
5.1.2 启动类上添加@EnableFeignClients
package cn.tedu.sp04;

import org.springframework.boot.SpringApplication;
import org.springframework.boot.autoconfigure.SpringBootApplication;
import org.springframework.cloud.openfeign.EnableFeignClients;

@EnableFeignClients
@SpringBootApplication
public class Sp04OrderserviceApplication {

    public static void main(String[] args) {
        SpringApplication.run(Sp04OrderserviceApplication.class, args);
    }

}
5.1.3 添加feign/UserClient和feign/ItemClient
package cn.tedu.sp04.feign;

import cn.tedu.sp01.pojo.Item;
import cn.tedu.web.util.JsonResult;
import org.springframework.cloud.openfeign.FeignClient;
import org.springframework.web.bind.annotation.GetMapping;
import org.springframework.web.bind.annotation.PathVariable;
import org.springframework.web.bind.annotation.PostMapping;
import org.springframework.web.bind.annotation.RequestBody;

import java.util.List;

@FeignClient(name="item-service",contextId = "remoteItemService")
public interface ItemClient {

    @GetMapping("/{orderId}")
    public JsonResult<List<Item>> getOrder(@PathVariable("orderId") String orderId);

    @PostMapping("/decreaseNumber")
    public JsonResult<?> decreaseNumber(@RequestBody List<Item> list);
}
package cn.tedu.sp04.feign;

import cn.tedu.sp01.pojo.User;
import cn.tedu.web.util.JsonResult;
import org.springframework.cloud.openfeign.FeignClient;
import org.springframework.web.bind.annotation.GetMapping;
import org.springframework.web.bind.annotation.PathVariable;
import org.springframework.web.bind.annotation.RequestParam;

@FeignClient(value = "user-service",contextId="userClient")
public interface UserClient {

    @GetMapping("/{userId}")
    public JsonResult<User> getUser(@PathVariable("userId") Integer userId) ;

    @GetMapping("/{userId}/score")
    public JsonResult addUserScore(@PathVariable("userId")Integer userId,@RequestParam("score") Integer score);

}
- 关于Feigh里面出现
@PathVariable注解里面到底要不要填写值的问题 比如上面的@PathVariable("userId"),这个可以先检查一下IDEA的settings => Build,Execution,Deployment => Compliler => Java Compiler界面的Override compiler parameters per-module下面是否都有-parameters,意思是编译后的字节码文件中依然保留我们所声明的变量名字,否则会被改成var1、var2类似这样的,运行时就会报错了

5.1.4 修改OrderServiceImpl
package cn.tedu.sp04.service;

import cn.tedu.sp04.feign.ItemClient;
import cn.tedu.sp04.feign.UserClient;
import com.netflix.discovery.converters.Auto;
import lombok.extern.slf4j.Slf4j;
import org.springframework.beans.factory.annotation.Autowired;
import org.springframework.stereotype.Service;
import pojo.Item;
import pojo.Order;
import pojo.User;
import service.OrderService;

import java.util.List;

@Slf4j
@Service
public class OrderServiceImpl implements OrderService {

    @Autowired
    private UserClient userClient;

    @Autowired
    private ItemClient itemClient;

    @Override
    public Order getOrder(String orderId) {
        User user = userClient.getUser(1).getData();
        List<Item> items = itemClient.getItems(orderId).getData();
        Order order = new Order();
        order.setId(orderId);
        order.setUser(user);
        order.setItems(items);
        return order;
    }

    @Override
    public void addOrder(Order order) {
        List<Item> items = order.getItems();
        itemClient.decreaseNumber(items);
        User user = order.getUser();
        userClient.addScore(user.getId(),10);
        log.info("保存订单:{}", order);
    }
}
5.1.5 请求测试
############################
# order-service
############################
# 根据id查询订单
GET http://localhost:8201/1
# 返回如下结果
#{
#  "code": 200,
#  "msg": null,
#  "data": {
#    "id": "1",
#    "user": {
#      "id": 1,
#      "username": "新用户1",
#      "password": "新用户的密码:1"
#    },
#    "items": [
#      {
#        "id": 0,
#        "name": "商品0",
#        "count": 0
#      },
#      {
#        "id": 1,
#        "name": "商品1",
#        "count": 1
#      },
#      {
#        "id": 2,
#        "name": "商品2",
#        "count": 2
#      },
#      {
#        "id": 3,
#        "name": "商品3",
#        "count": 3
#      },
#      {
#        "id": 4,
#        "name": "商品4",
#        "count": 4
#      },
#      {
#        "id": 5,
#        "name": "商品5",
#        "count": 5
#      },
#      {
#        "id": 6,
#        "name": "商品6",
#        "count": 6
#      },
#      {
#        "id": 7,
#        "name": "商品7",
#        "count": 7
#      },
#      {
#        "id": 8,
#        "name": "商品8",
#        "count": 8
#      },
#      {
#        "id": 9,
#        "name": "商品9",
#        "count": 9
#      }
#    ]
#  }
#}
5.2 Feign中集成的Ribbon的重试参数
Feign是通过Ribbon来实现负载均衡的,发起了远程请求后如果第一个接收请求的服务器没有在规定时间内完成响应,则应该果断放弃掉,然后转发到下一个服务器进行请求,或直接失败掉此次访问。
- ribbon.MaxAutoRetries
单台服务器首次请求失败后的重试次数,默认0 。较为常用
即如果此参数设置为1,则首次请求失败后,会再进行一尝试,即总共发送两次请求,如果第二次还是失败,则本台服务器本次请求判定为失败 - ribbon.MaxAutoRetriesNextServer
首次首台服务器包括尝试请求全部失败后更换服务器的次数,默认1。较为常用
如果此参数设置为1的话,那么在首台服务器的请求全部失败后,会再更换1台服务器请进首次请求,失败后会再进行ribbon.MaxAutoRetries次的请求尝试,如果仍然失败,则判定本次请求完全失败 - ribbon.ReadTimeout
超时时间,默认1000 - ribbon.ConnectTimeout
与后台服务器建立连接的超时时间,默认1000 - ribbon.OkToRetryOnAllOperations
是否对所有的请求都重试,默认只对GET请求重试。主要是因为GET请求一般情况下都不会修改数据

