ShardingSphere-Proxy读写分离详解与实战
![]()
| ShardingSphere |
算法刷题专栏 | 面试必备算法 | 面试高频算法
越难的东西,越要努力坚持,因为它具有很高的价值,算法就是这样✨
作者简介:硕风和炜,CSDN-Java领域优质创作者,保研|国家奖学金|高中学习JAVA|大学完善JAVA开发技术栈|面试刷题|面经八股文|经验分享|好用的网站工具分享
恭喜你发现一枚宝藏博主,赶快收入囊中吧
人生如棋,我愿为卒,行动虽慢,可谁曾见我后退一步?
| ShardingSphere |
![]()
![]()
目录
-
- 一.ShardingSphere-Proxy核心概念
- 二.ShardingSphere-Proxy读写分离详解与实战
-
- 2.1 实战环境准备
- 2.2 shardingproxy服务器上修改配置文件config-readwrite-splitting.yaml
- 2.3 命令行远程连接简单测试
- 2.4 创建SpringBoot程序 - 引入依赖
- 2.5 创建SpringBoot程序 - 实体类
- 2.6 创建SpringBoot程序 - 数据库Mapper接口 & 主启动类
- 2.7 创建SpringBoot程序 - 配置信息连接代理
- 三.ShardingSphere-Proxy读写分离实战测试
-
- 3.1 编写测试 - 读写分离 - 主库插入
- 3.2 编写测试 - 读写分离 - 从库读取
- 四.总结
- 五.共勉
一.ShardingSphere-Proxy核心概念
Sharding-Proxy是ShardingSphere的第二个产品,定位为透明化的数据库代理端,提供封装了数据库二进制协议的服务端版本,用于完成对异构语言的支持。 目前先提供MySQL版本,它可以使用任何兼容MySQL协议的访问客户端(如:MySQL Command Client, MySQL Workbench等操作数据,对DBA更加友好。
- 向应用程序完全透明,可直接当做MySQL使用
- 适用于任何兼容MySQL协议的客户端
![]()
二.ShardingSphere-Proxy读写分离详解与实战
2.1 实战环境准备
注意:这篇文章的实战讲解是建立在之前的文章实操基础上的,如果你之前的环境还没有搭建好,可以先去搭建好环境,然后再来学习本篇文章的实战就会非常快,事半功倍!
- 在
192.168.10.134服务器(shardingproxy)上部署的ShardingSphere-Proxy代理192.168.10.132服务器和192.168.10.133服务器; - 之前在
192.168.10.132服务器(node1-shardingsphere)和192.168.10.133服务器(node2-shardingsphere)配置的MySQL读写分离一主一从架构; - 同步的数据库test;
2.2 shardingproxy服务器上修改配置文件config-readwrite-splitting.yaml
#schemaName用来指定->逻辑表名
schemaName: readwrite_splitting_db

dataSources:
  write_ds:
    url: jdbc:mysql://192.168.10.132:3306/test?serverTimezone=UTC&useSSL=false&characterEncoding=utf-8
    username: root
    password: root
    connectionTimeoutMilliseconds: 30000
    idleTimeoutMilliseconds: 60000
    maxLifetimeMilliseconds: 1800000
    maxPoolSize: 50
    minPoolSize: 1
  read_ds_0:
    url: jdbc:mysql://192.168.10.133:3306/test?serverTimezone=UTC&useSSL=false&characterEncoding=utf-8
    username: root
    password: root
    connectionTimeoutMilliseconds: 30000
    idleTimeoutMilliseconds: 60000
    maxLifetimeMilliseconds: 1800000
    maxPoolSize: 50
    minPoolSize: 1

rules:
- !READWRITE_SPLITTING
  dataSources:
    readwrite_ds:
      staticStrategy:
        writeDataSourceName: write_ds
        readDataSourceNames:
          - read_ds_0
2.3 命令行远程连接简单测试
mysql -h192.168.10.134 -P13308 -uroot -p
逻辑库建立
2.4 创建SpringBoot程序 - 引入依赖
<dependencies>
    <dependency>
        <groupId>org.springframework.bootgroupId>
        <artifactId>spring-boot-starter-webartifactId>
    dependency>

    <dependency>
        <groupId>mysqlgroupId>
        <artifactId>mysql-connector-javaartifactId>
        <scope>runtimescope>
    dependency>

    <dependency>
        <groupId>com.baomidougroupId>
        <artifactId>mybatis-plus-boot-starterartifactId>
        <version>3.3.1version>
    dependency>

    <dependency>
        <groupId>org.projectlombokgroupId>
        <artifactId>lombokartifactId>
        <optional>trueoptional>
    dependency>

    <dependency>
        <groupId>org.springframework.bootgroupId>
        <artifactId>spring-boot-starter-testartifactId>
        <scope>testscope>
        <exclusions>
            <exclusion>
                <groupId>org.junit.vintagegroupId>
                <artifactId>junit-vintage-engineartifactId>
            exclusion>
        exclusions>
    dependency>
dependencies>
2.5 创建SpringBoot程序 - 实体类
编写与读写分离test数据库Products表中对应的实体类
@TableName("products")
@Data
public class Products {

    @TableId(value = "pid",type = IdType.AUTO)
    private Long pid;

    private String pname;

    private Integer price;

    private String flag;

}
2.6 创建SpringBoot程序 - 数据库Mapper接口 & 主启动类
编写对应的数据库持久层UserMapper接口
@Repository
public interface ProductsMapper extends BaseMapper<Products> {
}
@Repository注解的类需要交给我们的Spring容器进行管理,因此需要我们在主启动类加上扫描接口的注解。
@SpringBootApplication
@MapperScan("com.ljw.mapper")
public class ShardingproxyDemoApplication{

    public static void main(String[] args) {
        SpringApplication.run(ShardingproxyDemoApplication.class, args);
    }
}
2.7 创建SpringBoot程序 - 配置信息连接代理
# 应用名称
spring.application.name=sharding-proxy-demo

# mysql数据库 ---> 连接的是 proxy
spring.datasource.driver-class-name=com.mysql.jdbc.Driver
spring.datasource.url=jdbc:mysql://192.168.10.134:13308/readwrite_splitting_db?serverTimezone=GMT%2B8&useSSL=false&characterEncoding=utf-8
spring.datasource.username=root
spring.datasource.password=root

# mybatis日志
mybatis-plus.configuration.log-impl=org.apache.ibatis.logging.stdout.StdOutImpl
三.ShardingSphere-Proxy读写分离实战测试
3.1 编写测试 - 读写分离 - 主库插入
	@Autowired
    private ProductsMapper productsMapper;

    @Test
    public void testInsert(){
        Products products = new Products();
        products.setPname("手机");
        products.setPrice(8080);
        products.setFlag("1");
        productsMapper.insert(products);
    }
启动成功!
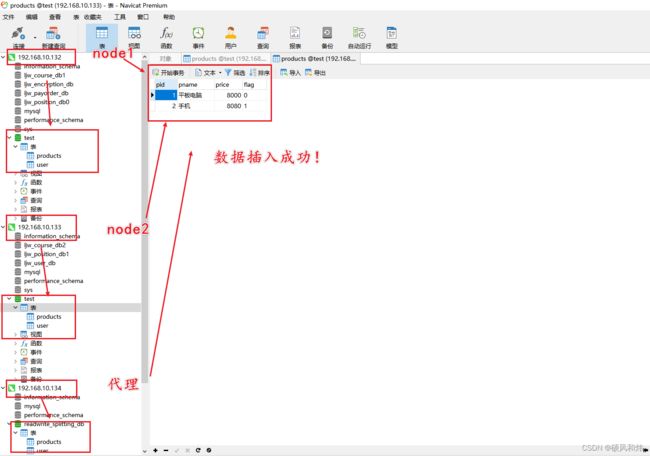
数据库中数据插入成功 & 成功同步!
3.2 编写测试 - 读写分离 - 从库读取
    @Autowired
    private ProductsMapper productsMapper;

    @Test
    public void testSelect(){
        productsMapper.selectList(null).forEach(System.out::println);
    }
执行成功!
四.总结
本篇文章主要讲解了ShardingSphere-Proxy读写分离详解与实战,实操过程非常重要,大家一定要动手亲自实践一下,必须掌握。下节预告,ShardingSphere-Proxy垂直分片详解与实战,大家敬请期待呦!!!。
五.共勉
| 最后,我想和大家分享一句一直激励我的座右铭,希望可以与大家共勉! |
![]()


