MyBatis-Plus 的基础增删改查
目录
1. 简介
2. 准备工作
3. MyBatis-Plus 实现增删改查
1. MyBatis-Plus 简介
MyBatis-Plus(简称 MP)是 MyBatis 的增强工具,在 MyBatis 的基础上只做增强不做改变,为简化开发、提高效率而生.
2. 准备工作
2.1 准备数据表
DROP TABLE IF EXISTS user;

CREATE TABLE user
(
    id BIGINT(20) NOT NULL COMMENT '主键ID',
    name VARCHAR(30) NULL DEFAULT NULL COMMENT '姓名',
    age INT(11) NULL DEFAULT NULL COMMENT '年龄',
    email VARCHAR(50) NULL DEFAULT NULL COMMENT '邮箱',
    PRIMARY KEY (id)
);
2.2 插入数据
INSERT INTO user (id, name, age, email) VALUES
(1, 'Jone', 18, '[email protected]'),
(2, 'Jack', 20, '[email protected]'),
(3, 'Tom', 28, '[email protected]'),
(4, 'Sandy', 21, '[email protected]'),
(5, 'Billie', 24, '[email protected]');
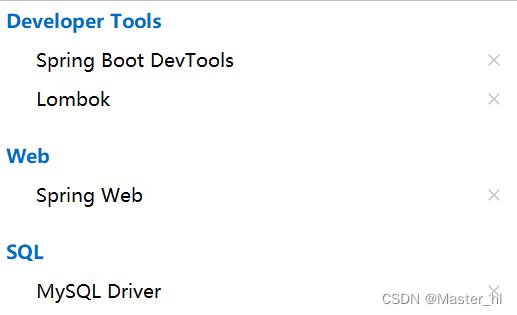
2.3 创建一个 SpringBoot 项目, 添加如下常用依赖
不要添加 MyBatis 依赖, 因为等下添加 MyBatis-Plus 依赖后 MyBatis 依赖也会自动添加进来
2.4 添加 MyBatis-Plus 依赖 (官网有)
    com.baomidou
    mybatis-plus-boot-starter
    3.5.3.1
2.5 添加 application.properties 配置文件
# 1.配置 MySQL 连接信息
spring.datasource.url=jdbc:mysql://127.0.01:3306/mybatis_plus?characterEncoding=utf8
spring.datasource.username=root
# MySQL 的密码
spring.datasource.password=316772
spring.datasource.driver-class-name=com.mysql.jdbc.Driver
# 2.配置 MyBatis XML 保存目录
mybatis.mapper-locations=classpath:mapper/**Mapper.xml
# 配置 MyBatis 打印 SQL 日志
mybatis.configuration.log-impl=org.apache.ibatis.logging.stdout.StdOutImpl
logging.level.com.mplus.mpdemo=debug
其中数据库名称,密码以及最后一行的包名需要根据自己的来设置.
并且需要在 resource 目录下创建 mapper 文件夹. 然后分模块创建好对应的文件夹: config controller, dao, model, service, util.
3. MyBatis-Plus 实现增删改查
3.1 @TableName, @TableId, @TableField 注解的使用
@TableName
它是一个表名注解, 用来修饰实体类的, 加在实体类的头上, 表示这个实体类对应数据库哪张表.
@TableName("sys_user")
public class User {
    private Long id;
    private String name;
    private Integer age;
    private String email;
}
@TableId
@TableId 是一个主键注解, 是用来修饰实体类主键字段的, 如果不给这个字段加上 type = IdType.AUTO, 那么它默认就会使用雪花算法给你生成 ID, 那样看起来怪难受的, 而且还不连续, 所以我们可以手动给他设置为数据库自增 ID
@TableField
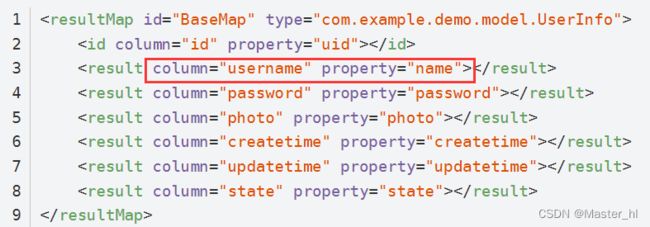
这个注解是用于表字段重命名的, 为什么需要重命名呢, 因为数据库的代码风格和 Java 的代码风格不一样, 所以有时候, 人们会因为风格或者表达语义, 就会使得表字段和实体类属性不一致.
以前我们使用 MyBatis 的时候, 表字段重命名非常麻烦, 需要使用到 resultMap 来解决, 以前的写法如下 :
而到了 MyBatis-Plus 之后, 就彻底解放双手了, 只需要一个注解就能搞定.
@TableName("sys_user")
public class User {
    @TableId(type = IdType.AUTO)
    private Long id;
    @TableField("nickname") // 表字段重命名
    private String name;
    private Integer age;
    private String email;
}
3.2 准备 model 实体类
@Data
public class User {
    // 设置 id 为数据库自增 ID
    @TableId(type = IdType.AUTO)
    private long id;
    private String name;
    private int age;
    private String email;
}
我的 IDEA 不知为啥, 加了 Data 注解, 也无法使用 get, set 方法, 于是需要手动添加.(因人而异)
3.3 准备 mapper 接口
public interface UserMapper extends BaseMapper {

}
① 在学 MyBatis 的时候呢, 每个 mapper 接口都需要手动加上一个 @mapper 注解, 这样的话.如果有非常多的接口, 那每个类都需要加上这个注解, 就显得很笨重了, 到了 MyBatis-Plus 的时候,, 它只需要在启动类上面加上一个 @MapperScan 注解, 并指定扫描的 mapper 路径就解决了.
@MapperScan("com.mplus.mpdemo.dao")② 以前使用 MyBatis 来写 增删改查, 需要写对应的好几个抽象方法, 而在 Mybatis-Plus 中我们只需要继承 BaseMapper, 并指定对应的实体类泛型参数即可使用 BaseMapper 中的所有的增删改查方法.
3.4 单元测试新增方法
首先在 UserMapper 接口中, 右击 generate, 选择 test, 然后生成单元测试类, 然后在类上添加 @SpringBootTest 注解, 然后属性注入 UserMapper 接口.
@Test
public void insert() {
    User user = new User();
    user.setName("张三");
    user.setAge(18);
    user.setEmail("[email protected]");
    // 添加操作
    int result = userMapper.insert(user);
    System.out.println("添加: " + result);
}
3.5 单元测试修改方法
@Test
public void update() {
    User user = new User();
    user.setName("张三丰");
    // 修改操作
    UpdateWrapper wrapper = new UpdateWrapper<>();
    wrapper.eq("id",6);
    int result = userMapper.update(user,wrapper);
    System.out.println("修改: " + result);
}
当然修改方法不只这一个, 大家可以去官网自行扩展.
3.6 单元测试删除方法
@Test
public void delete() {
    // 删除操作
    int result = userMapper.deleteById(6);
    System.out.println("删除: " + result);
}
删除方法也一样, 也可以使用 wrapper 等其他方式.
3.7 单元测试查询方法
@Test
public void getAll() {
    QueryWrapper queryWrapper = new QueryWrapper();
    // 查询 id > 3 的数据
    queryWrapper.gt("id", 3);
    // 查询操作
    List list = userMapper.selectList(queryWrapper);
    for(User user : list) {
        System.out.println(user.toString());
    }
}
4. 完善 Sevice 层和 controller 层代码
mp 中的 sevice 写法呢, 需要两部分, 一个是 service 接口的定义, 一个是 service 的实现.
41. 创建 IUserService 接口
public interface IUserService extends IService {
}
4.2 创建 impl.UserServiceImpl.java 实现
@Service
public class UserServiceImpl extends ServiceImpl
    implements IUserService{
}
这时候, 我们所需要的增删改查的方法就都可以通过 IUserService 对象来调用了.
4.3 完善 controller
增删查都有了, 修改也是照猫画虎.
@RestController
@RequestMapping("/user")
public class UserController {

    @Autowired
    private IUserService userService;
    // 新增
    @RequestMapping("/add")
    public int add(User user) {
        // 非空效验
        if(user == null || !StringUtils.hasLength(user.getName())) {
            return 0;
        }
        // 执行数据库的添加操作
        boolean result = userService.save(user);
        return result ? 1 : 0;
    }
    // 查询
    @RequestMapping("/getlist")
    public List getList() {
        List list = userService.list();
        return list;
    }
    // 删除
    @RequestMapping("/del")
    public int remove() {
        boolean result = userService.removeById(6);
        return result ? 1 : 0;
    }
}

