linux+与+开发板共享,实现开发板与ubuntu的共享--根文件系统NFS--Samba共享
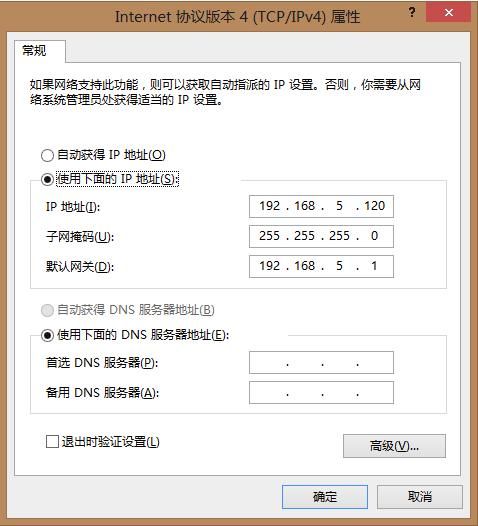
虚拟机要选择桥接,并且禁用有线和无线网卡,开启本地连接,本地连接属性要写如下:
ip地址是在连上板子后,windows cmd 下 ipconfig得出的
板子的网线最好连接交换机或者路由器,再由用另一根网线连到电脑上面
如果直接板子连在电脑上的话,有时候nfs可能不行,因为网线这时候相当于是在全双工通信模式,
两个tx两个rx,所以不一定连的通,此时就需要用如下的samba和tftp去传输文件
虚拟机要设置静态ip
vim /etc/network/interfaces
# interfaces(5) file used by ifup(8) and ifdown(8)
auto lo
iface lo inet loopback
auto eth0
iface eth0 inet static
address 192.168.5.10
gateway 192.168.5.1
netmask 255.255.255.0
nameserver 114.114.114.114
这个是国内的,如果是8.8.8.8这是谷歌的,谷歌现在服务器已经不在中国,所以你这样设置就上不了网
#auto eth0
#iface eth0 inet dhcp
/etc/init.d/networking restart
搭建网络文件系统 NFS
除此方法外,还有samba和tftp等方法供你参考
这个比较好,因为可以实现即时同步
因为如果不搭建,每次都要用linux去编译,然后再重新烧录,所以太耗时
挂载NFS文件系统
1、执行以下命令安装NFS服务,安装后会自动运行(一般主机都已经安装该服务)
$sudo apt-get install nfs-kernel-server portmap
2、他的配置文件为/etc/exports, 用vi编辑器编辑,增加内容如下,以后将通过网络文件系统访问新增加的目录,如/work/nfs_root目录。
/work/nfs_root *(rw, sync, no_root_squash)
3、修改完毕后,执行以下命令重启NFS服务
$sudo /etc/init.d/nfs-kernel-server restart (针对ubuntu)
$sudo /etc/init.d/nfs restart (针对fc, redhat) 或者运行service nfs restart命令
service nfs-kernel-server status
4.1 显示出共享出来的目录
$ showmount -e
4.2 将nfs的rootnfs目录挂载到本地磁盘上。
$ sudo mount -t nfs localhost:/rootnfs /mnt
4.3 查看挂载情况
$ df
4.4 卸载挂载
$ sudo umount /mnt
改IP
ifconfig eth0 192.168.1.4 10.10.10.0 up
255.255.255.0如果是3个255
那么ip的前三个就是同一网段,192.168.1.3
sudo ifconfig eth0 down
sudo ifconfig eth0 up
查找名为a.c的文件
find-name "a.c"
在当前目录下搜索含有abc字样的文件
grep "ab" * -nr
find | grep *abc*
方法一:配置samba
以下两种方法开发板上面要进入文件系统去操作,
此时开发板是没有ip地址的,需要自己手动去配置
ifconfig eth0 192.168.5.11 up
258 # to the drivers directory for these users to have write rights in it
259 ; write list = root, @lpadmin
260 [sky]
261 path = /home/share_sky
262 available = yes
263 browseable = yes
264 public = yes
265 writable = yes
266 valid users = sky
windows下win+R \\ip地址 ubuntu的ip
tftp.exe放在共享目录下,打开程序,选择服务器的 选项,ip选择本地的ip
再启动开发板,用CRT,进入根文件系统
输入命令
tftp -gr a.txt 192.168.5.120
作用是把服务器192.168.5.120上的a.txt放在了开发板上
虚拟机ubuntu设置静态ip和动态ip
vim /etc/network/interfaces
1 # interfaces(5) file used by ifup(8) and ifdown(8)
2 auto lo
3 iface lo inet loopback
4 #auto eth0
5 #iface eth0 inet static
6 #address 192.168.99.10
7 #gateway 192.168.99.1
8 #netmask 255.255.255.0
9 #nameserver 114.114.114.114
10
11 auto eth0
12 iface eth0 inet dhcp
~
/etc/init.d/networking restart
方法二 ubuntu 安装tftp
"-l -s /tftpboot"
tftp -gr haha.c 192.168.5.10 从服务器获取haha.c (此时虚拟机的ubuntu就是服务器)
haha.c是在服务器的tftpboot目录下的,开发板获取该目录下的文件
下面这句可能有问题
mount -t vfat -o nolock 192.168.5.10:/root/myroot/rootfs /mnt

