java之POI解析excel


3 创建Java程序
3.1 版本说明
Spring Boot: 2.1.13
Apache POI: 4.0.1
JDK: 1.8
IDE: IDEA
Office Excel: 2010
3.2 创建项目
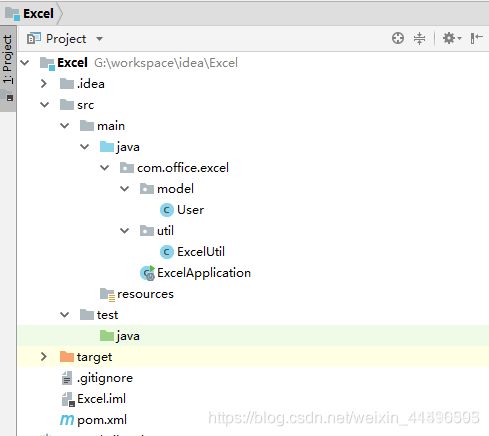
创建一个名为Excel的Spring Boot项目,并添加maven依赖和相应的Java代码,最后的项目结构如下图所示:

pom.xml文件内容如下所示:
    4.0.0

    com.office.excel
    office-excel
    0.0.1-SNAPSHOT
    Excel
    Java使用POI操作Excel文档示例


        org.springframework.boot
        spring-boot-starter-parent
        2.1.3.RELEASE


        1.8


            org.springframework.boot
            spring-boot-starter


            org.springframework.boot
            spring-boot-starter-test
            test


            org.apache.poi
            poi
            4.0.1


            org.apache.poi
            poi-ooxml
            4.0.1


                org.springframework.boot
                spring-boot-maven-plugin
User类程序如下所示:
package com.office.excel.model;

/**
 * 用户信息封装类
 */
public class User {

    private Long id;
    private String name;
    private Boolean sex;
    private Integer age;
    private String birthday;

    public Long getId() {
        return id;
    }

    public void setId(Long id) {
        this.id = id;
    }

    public String getName() {
        return name;
    }

    public void setName(String name) {
        this.name = name;
    }

    public Boolean getSex() {
        return sex;
    }

    public void setSex(Boolean sex) {
        this.sex = sex;
    }

    public Integer getAge() {
        return age;
    }

    public void setAge(Integer age) {
        this.age = age;
    }

    public String getBirthday() {
        return birthday;
    }

    public void setBirthday(String birthday) {
        this.birthday = birthday;
    }

    @Override
    public String toString() {
        return "User{" +
                "id=" + id +
                ", name='" + name + '\'' +
                ", sex=" + sex +
                ", age=" + age +
                ", birthday='" + birthday + '\'' +
                '}';
    }
}
ExcelUtil类程序如下所示:
package com.office.excel.util;

import com.office.excel.model.User;
import org.apache.poi.hssf.usermodel.HSSFWorkbook;
import org.apache.poi.ss.usermodel.BorderStyle;
import org.apache.poi.ss.usermodel.Cell;
import org.apache.poi.ss.usermodel.CellStyle;
import org.apache.poi.ss.usermodel.CellType;
import org.apache.poi.ss.usermodel.Font;
import org.apache.poi.ss.usermodel.HorizontalAlignment;
import org.apache.poi.ss.usermodel.Row;
import org.apache.poi.ss.usermodel.Sheet;
import org.apache.poi.ss.usermodel.VerticalAlignment;
import org.apache.poi.ss.usermodel.Workbook;
import org.apache.poi.ss.util.CellRangeAddress;
import org.apache.poi.ss.util.RegionUtil;
import org.apache.poi.xssf.usermodel.XSSFWorkbook;
import java.io.File;
import java.io.FileInputStream;
import java.io.FileOutputStream;
import java.io.IOException;
import java.io.InputStream;
import java.util.ArrayList;
import java.util.List;

/**
 * Excel文档工具类
 */
public class ExcelUtil {

    /**
     * 把数据写入到Excel文件
     * @param fileName 自动生成的Excel文件的全路径文件名称
     * @param users 要写入到Excel文件中的数据
     */
    public static void writeExcel(String fileName, List users) throws IOException {
        Workbook workbook = null;
        Sheet sheet = null;
        Row row = null;
        Cell cell = null;

        //创建Excel文件
        File excelFile = new File(fileName.trim());

        //创建Excel工作薄
        if (excelFile.getName().endsWith("xlsx")) {
            workbook = new XSSFWorkbook();
        } else {
            workbook = new HSSFWorkbook();
        }

        //创建Excel表单
        sheet = workbook.createSheet();

        //设置列宽,宽度为256的整数倍
        sheet.setColumnWidth(1, 5120);
        sheet.setColumnWidth(2, 3840);
        sheet.setColumnWidth(3, 2560);
        sheet.setColumnWidth(4, 2560);
        sheet.setColumnWidth(5, 5120);

        //设置默认行高(默认为300)
        sheet.setDefaultRowHeight((short) 512);

        //设置合并单元格
        CellRangeAddress titleCellAddresses = new CellRangeAddress(1,2,1,5);
        sheet.addMergedRegion(titleCellAddresses);

        //创建标题行
        row = sheet.createRow(1);
        cell = row.createCell(1, CellType.STRING);
        cell.setCellStyle(getTitleCellStyle(workbook));
        cell.setCellValue("User信息表格");

        //设置合并单元格的边框,这个需要放在创建标题行之后
        setRegionBorderStyle(BorderStyle.THIN, titleCellAddresses, sheet);

        //创建表头行
        row = sheet.createRow(3);
        cell = row.createCell(1, CellType.STRING);
        cell.setCellStyle(getHeaderCellStyle(workbook));
        cell.setCellValue("ID");
        cell = row.createCell(2, CellType.STRING);
        cell.setCellStyle(getHeaderCellStyle(workbook));
        cell.setCellValue("姓名");
        cell = row.createCell(3, CellType.STRING);
        cell.setCellStyle(getHeaderCellStyle(workbook));
        cell.setCellValue("性别");
        cell = row.createCell(4, CellType.STRING);
        cell.setCellStyle(getHeaderCellStyle(workbook));
        cell.setCellValue("年龄");
        cell = row.createCell(5, CellType.STRING);
        cell.setCellStyle(getHeaderCellStyle(workbook));
        cell.setCellValue("生日");

        //创建表体行
        for(int i = 0; i < users.size(); i++) {
            row = sheet.createRow(i + 4);
            cell = row.createCell(1, CellType.NUMERIC);
            cell.setCellStyle(getBodyCellStyle(workbook));
            cell.setCellValue(users.get(i).getId());
            cell = row.createCell(2, CellType.STRING);
            cell.setCellStyle(getBodyCellStyle(workbook));
            cell.setCellValue(users.get(i).getName());
            cell = row.createCell(3, CellType.BOOLEAN);
            cell.setCellStyle(getBodyCellStyle(workbook));
            cell.setCellValue(users.get(i).getSex());
            cell = row.createCell(4, CellType.NUMERIC);
            cell.setCellStyle(getBodyCellStyle(workbook));
            cell.setCellValue(users.get(i).getAge());
            cell = row.createCell(5, CellType.STRING);
            cell.setCellStyle(getBodyCellStyle(workbook));
            cell.setCellValue(users.get(i).getBirthday());
        }

        //把Excel工作薄写入到Excel文件
        FileOutputStream os = new FileOutputStream(excelFile);
        workbook.write(os);
        os.flush();
        os.close();
    }

    /**
     * 从Excel文件读取数据
     * @param fileName 要读取的Excel文件的全路径文件名称
     * @return 从Excel文件中批量导入的用户数据
     */
    public static List readExcel(String fileName) throws IOException {
        Workbook workbook = null;
        Sheet sheet = null;
        Row row = null;

        //读取Excel文件
        File excelFile = new File(fileName.trim());
        InputStream is = new FileInputStream(excelFile);

        //获取Excel工作薄
        if (excelFile.getName().endsWith("xlsx")) {
            workbook = new XSSFWorkbook(is);
        } else {
            workbook = new HSSFWorkbook(is);
        }
        if (workbook == null) {
            System.err.println("Excel文件有问题,请检查!");
            return null;
        }

        //获取Excel表单
        sheet = workbook.getSheetAt(0);

        List users = new ArrayList<>();
        for(int rowNum = 4; rowNum <= sheet.getLastRowNum(); rowNum++) {
            //获取一行
            row = sheet.getRow(rowNum);
            User user = new User();
            user.setId(Long.valueOf(getStringValue(row.getCell(1))));
            user.setName(getStringValue(row.getCell(2)));
            user.setSex(Boolean.valueOf(getStringValue(row.getCell(3))));
            user.setAge(Integer.valueOf(getStringValue(row.getCell(4))));
            user.setBirthday(getStringValue(row.getCell(5)));
            users.add(user);
        }
        is.close();
        return users;
    }

    /**
     * 设置合并单元格的边框
     * @param style 要设置的边框的样式
     * @param cellAddresses 要设置的合并的单元格
     * @param sheet 要设置的合并的单元格所在的表单
     */
    private static void setRegionBorderStyle(BorderStyle style, CellRangeAddress cellAddresses, Sheet sheet) {
        RegionUtil.setBorderTop(style, cellAddresses, sheet);
        RegionUtil.setBorderBottom(style, cellAddresses, sheet);
        RegionUtil.setBorderLeft(style, cellAddresses, sheet);
        RegionUtil.setBorderRight(style, cellAddresses, sheet);
    }

    /**
     * 设置普通单元格的边框
     * @param style 要设置的边框的样式
     * @param cellStyle 单元格样式对象
     */
    private static void setCellBorderStyle(BorderStyle style, CellStyle cellStyle) {
        cellStyle.setBorderTop(style);
        cellStyle.setBorderBottom(style);
        cellStyle.setBorderLeft(style);
        cellStyle.setBorderRight(style);
    }

    /**
     * 设置标题单元格样式
     * @param workbook 工作薄对象
     * @return 单元格样式对象
     */
    private static CellStyle getTitleCellStyle(Workbook workbook) {
        CellStyle cellStyle = workbook.createCellStyle();

        //设置字体
        Font font = workbook.createFont();
        font.setFontName("黑体");
        font.setFontHeightInPoints((short) 24);
        font.setColor((short) 10);
        cellStyle.setFont(font);

        //设置文字居中显示
        cellStyle.setAlignment(HorizontalAlignment.CENTER);
        cellStyle.setVerticalAlignment(VerticalAlignment.CENTER);

        return cellStyle;
    }


    /**
     * 设置表头单元格样式
     * @param workbook 工作薄对象
     * @return 单元格样式对象
     */
    private static CellStyle getHeaderCellStyle(Workbook workbook) {
        CellStyle cellStyle = workbook.createCellStyle();

        //设置字体
        Font font = workbook.createFont();
        font.setFontName("宋体");
        font.setFontHeightInPoints((short) 20);
        font.setBold(true);
        cellStyle.setFont(font);

        //设置文字居中显示
        cellStyle.setAlignment(HorizontalAlignment.CENTER);
        cellStyle.setVerticalAlignment(VerticalAlignment.CENTER);

        //设置单元格的边框
        setCellBorderStyle(BorderStyle.THIN, cellStyle);

        return cellStyle;
    }

    /**
     * 设置表体单元格样式
     * @param workbook 工作薄对象
     * @return 单元格样式对象
     */
    private static CellStyle getBodyCellStyle(Workbook workbook) {
        CellStyle cellStyle = workbook.createCellStyle();

        //设置字体
        Font font = workbook.createFont();
        font.setFontName("宋体");
        font.setFontHeightInPoints((short) 16);
        cellStyle.setFont(font);

        //设置文字居中显示
        cellStyle.setAlignment(HorizontalAlignment.CENTER);
        cellStyle.setVerticalAlignment(VerticalAlignment.CENTER);

        //设置单元格的边框
        setCellBorderStyle(BorderStyle.THIN, cellStyle);

        return cellStyle;
    }

    /**
     * 获取单元格的值的字符串
     * @param cell 单元格对象
     * @return cell单元格的值的字符串
     */
    private static String getStringValue(Cell cell) {
        if (cell == null) {
            return null;
        }
        CellType cellType = cell.getCellType();
        switch (cellType) {
            case STRING:
                return cell.getStringCellValue();
            case NUMERIC:
                double value = cell.getNumericCellValue();
                return String.valueOf(Math.round(value));
            case BOOLEAN:
                return String.valueOf(cell.getBooleanCellValue());
            default:
                return null;
        }
    }

}
ExcelApplication主启动类程序如下所示:
package com.office.excel;

import com.office.excel.model.User;
import com.office.excel.util.ExcelUtil;
import org.springframework.boot.SpringApplication;
import org.springframework.boot.autoconfigure.SpringBootApplication;
import java.io.IOException;
import java.text.SimpleDateFormat;
import java.util.ArrayList;
import java.util.Date;
import java.util.List;

/**
 * Java使用POI生成和读取Excel文件主程序
 */
@SpringBootApplication
public class ExcelApplication {

    //Excel文件路径
    private static String excelFile = "E://User.xls";

    public static void main(String[] args) throws IOException {
        SpringApplication.run(ExcelApplication.class, args);

        /**
         * 自动生成Excel文件
         */
        ExcelUtil.writeExcel(excelFile, getExcelData());

        /**
         * 自动读取Excel文件
         */
        List users = ExcelUtil.readExcel(excelFile);

        /**
         * 查看批量导入的用户数据
         */
        printList(users);
    }

    /**
     * 创建写入到Excel中的数据
     * @return 用户数据集合
     */
    private static List getExcelData() {
        SimpleDateFormat sdf = new SimpleDateFormat("yyyy-MM-dd");
        List users = new ArrayList<>();
        for(int i = 1; i <= 10; i++) {
            User user = new User();
            user.setId((long) i);
            user.setName("user" + i);
            user.setSex((i % 2) == 0);
            user.setAge(i);
            user.setBirthday(sdf.format(new Date()));
            users.add(user);
        }
        return users;
    }

    /**
     * 打印用户数据
     * @param users 要打印的用户数据集合
     */
    private static void printList(List users) {
        if(users == null) {
            System.out.println("用户数据为空");
            return;
        }
        for(User user : users) {
            System.out.println(user.toString());
        }
    }

}
4 测试
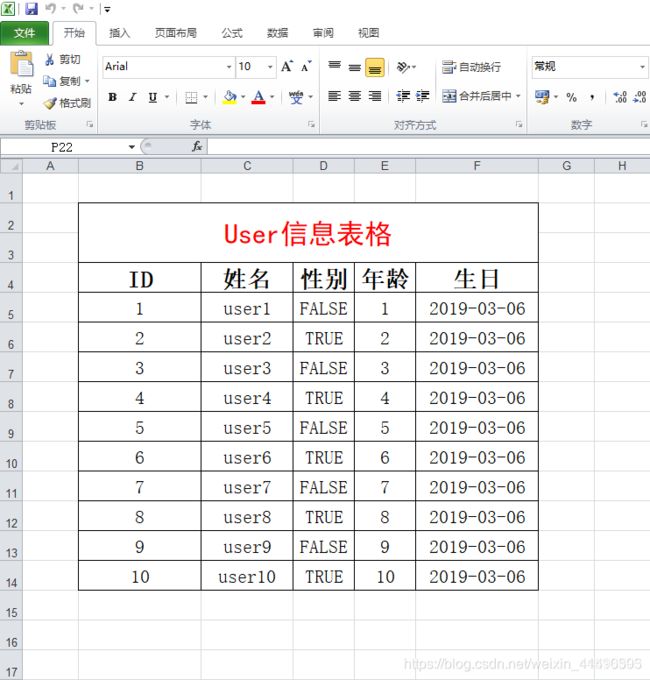
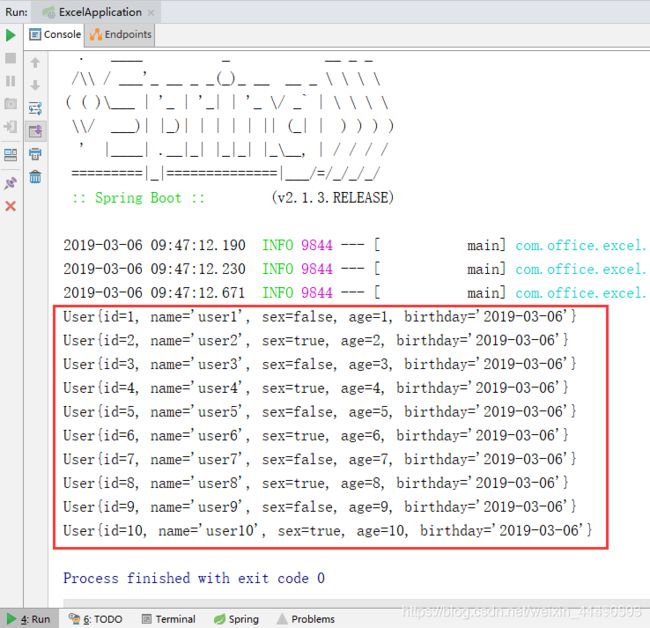
直接运行ExcelApplication主程序,即可在E盘根目录下生成一个名为User.xlsx的Excel文件,打开后即为第2节中的目标效果,并且IDEA控制台上也打印出了从自动生成的User.xlsx文档中批量导入的用户数据(如下图):

至此,Java使用POI自动生成Excel文档并且从Excel文档批量导入数据的操作都已实现。
文章出自:https://blog.csdn.net/weixin_44516305/article/details/88218820#1__2