深度学习实践——模型部署优化实践
系列实验
深度学习实践——卷积神经网络实践:裂缝识别
深度学习实践——循环神经网络实践
深度学习实践——模型部署优化实践
深度学习实践——模型推理优化练习
源码:
1. 对应的github地址 https://github.com/Asionm/streamlit_demo
2. 对应的gitee地址 https://gitee.com/asionm/streamlit_demo
模型部署优化实践
- 模型部署优化实践
-
- 通用识别模型部署
-
- 图像物体识别部署过程
- 视频物体识别推理部署
- 算式识别模型部署
- 模型性能反馈机制
- demo链接
- 参考资料
模型部署优化实践
通用识别模型部署
对于通用识别模型,我选择了Faster R-CNN,对应的卷积神经网络为restnet50。为了节省时间与资源,直接选择了预训练模型。而对于模型的部署我选择了具有不错的UI设计的streamlit开源web软件。对于模型的部署我首先是选择图像识别的,但是后面认为直接图像识别无比较多的新意,所以想着是否可以加多时间维度,识别一个视频里面的物体。于是部署步骤分为图像识别部署与视频识别部署,下面为详细的部署过程。
图像物体识别部署过程
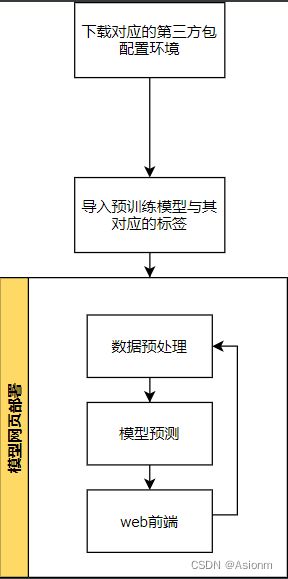
图像识别的部署主要分为数据预处理、模型预测、web前端布置三个方面,其具体流程可以归纳为下面的流程图。
-
安装并导入相应的包
在requirements.txt对应的目录下打开终端,并输入下面指令进行安装,
pip install -r requirements.txt安装完成后导入对应的包,
from PIL import Image
from torchvision import models, transforms
from torchvision.utils import draw_bounding_boxes
import torch
import time
import streamlit as st
其中draw_bounding_boxes主要用于绘制识别框,而streamlit为对应的Web UI程序,而这里的time主要用来计时。
-
导入预训练模型与相应标签
model = models.detection.fasterrcnn_resnet50_fpn(pretrained=True,progress=True)导入标签以及对标签进行索引处理,
inst_classes = [ '__background__', 'person', 'bicycle', 'car', 'motorcycle', 'airplane', 'bus', 'train', 'truck', 'boat', 'traffic light', 'fire hydrant', 'N/A', 'stop sign', 'parking meter', 'bench', 'bird', 'cat', 'dog', 'horse', 'sheep', 'cow', 'elephant', 'bear', 'zebra', 'giraffe', 'N/A', 'backpack', 'umbrella', 'N/A', 'N/A', 'handbag', 'tie', 'suitcase', 'frisbee', 'skis', 'snowboard', 'sports ball', 'kite', 'baseball bat', 'baseball glove', 'skateboard', 'surfboard', 'tennis racket', 'bottle', 'N/A', 'wine glass', 'cup', 'fork', 'knife', 'spoon', 'bowl', 'banana', 'apple', 'sandwich', 'orange', 'broccoli', 'carrot', 'hot dog', 'pizza', 'donut', 'cake', 'chair', 'couch', 'potted plant', 'bed', 'N/A', 'dining table', 'N/A', 'N/A', 'toilet', 'N/A', 'tv', 'laptop', 'mouse', 'remote', 'keyboard', 'cell phone', 'microwave', 'oven', 'toaster', 'sink', 'refrigerator', 'N/A', 'book', 'clock', 'vase', 'scissors', 'teddy bear', 'hair drier', 'toothbrush' ] inst_class_to_idx = {cls: idx for (idx, cls) in enumerate(inst_classes)} -
数据预处理
将传入的图片处理为Tensor格式以用于预测,
def data_preprocess(image): transform = transforms.Compose([ transforms.ToTensor()]) img = Image.open(image) batch_t = torch.unsqueeze(transform(img), 0) imgg = transform(img) return batch_t, imgg -
模型预测
对图片进行预测,同时在预测时调用streamlit进行实时网页内容渲染,
def predict(model,image): batch_t, img = data_preprocess(image) time_start = time.time() model.eval() outputs = model(batch_t) time_end = time.time() time_sum = time_end - time_start st.write('Just', time_sum, 'second!') st.write(outputs) time_start = time.time() # draw bboxes,labels on the raw input image for the object candidates with score larger than score_threshold score_threshold = .8 st.write([inst_classes[label] for label in outputs[0]['labels'][outputs[0]['scores'] > score_threshold]]) output_labels = [inst_classes[label] for label in outputs[0]['labels'][outputs[0]['scores'] > score_threshold]] output_boxes = outputs[0]['boxes'][outputs[0]['scores'] > score_threshold] images = img * 255.0; images = images.byte() result = draw_bounding_boxes(images, boxes=output_boxes, labels=output_labels, width=5) st.image(result.permute(1, 2, 0).numpy(), caption='Processed Image.', use_column_width=True) time_end = time.time() time_sum = time_end - time_start st.write('Draw', time_sum, 'second!') return outputs -
模型部署
对网页进行Web UI设置,
st.title("Simple Object Detection Application")
st.write("")
file_up = st.file_uploader("Upload an image", type = "jpg")
if file_up is not None:
    # display image that user uploaded
    image = Image.open(file_up)
    st.image(image, caption = 'Uploaded Image.', use_column_width = True)
    st.write("")
    labels = predict(file_up)
对代码编辑完成后在终端中输入下面指令启动web服务,
streamlit run deploy.py运行后下图为效果图,可以看到基本上都是可以进行上传并识别的,预训练模型的准确率较高,但是页面功能相对来说比较单调。于是对页面进行升级添加视频识别功能。
视频物体识别推理部署
上面的部署均只是基于照片的,那是否可以添加时间维度来进行物体识别呢,于是就尝试识别视频中的物体。下面为基于图像物体识别的视频识别推理的部署流程。
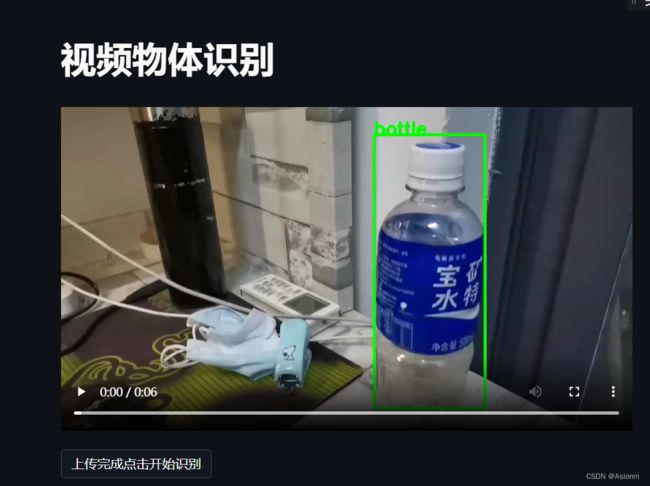
对于视频物体识别其实本质上的部署方法与图片的基本一致,它只是抽取视频的每一帧进行推理预测,然后再将识别框与标签添加会帧中并写入视频文件中,最后完成整个视频的物体识别。相对图片来说视频的物体识别所需要的计算资源更加多,所以对于视频的效果我只是随便拍了6s钟的视频进行预测。
下图为效果图:
以下为代码部分(主要参考于:https://blog.csdn.net/weixin_42618420/article/details/125577321):
代码基本与图像物体识别的一致,但是在此基础上添加了内容,在网页上添加了一些选择框。具体可见源码文件。
-
主体运行函数
def start_video(path): # cv2.namedWindow(window_name) cap = cv2.VideoCapture(path) # 打开视频流(若path=0表示开启摄像头流) width = int(cap.get(cv2.CAP_PROP_FRAME_WIDTH)) # 获取原视频的宽 height = int(cap.get(cv2.CAP_PROP_FRAME_HEIGHT)) # 获取原视频的搞 fps = int(cap.get(cv2.CAP_PROP_FPS)) # 帧率 fourcc = int(cap.get(cv2.CAP_PROP_FOURCC)) # 视频的编码 # 视频对象的输出 out = cv2.VideoWriter('./123.mp4', fourcc, 20.0, (width, height)) while cap.isOpened(): # 读取一帧数据,一帧就是一张图 ok, frame = cap.read() if not ok: break frame = object_detection_api(frame, 0.8) try: if len(frame) == 1: print(frame.all()) continue except (AttributeError, TypeError): if frame == 0: continue # 输入'q'退出程序 # cv2.imshow(window_name, frame) out.write(frame) c = cv2.waitKey(1) # 延时1ms切换到下一帧图像 if c & 0xFF == ord('q'): break # 释放摄像头并销毁所有窗口 cap.release() # out.release() cv2.destroyAllWindows() -
每帧物体识别接口
def object_detection_api(img, threshold=0.5, rect_th=3, text_size=1, text_th=3): boxes, pred_cls = get_prediction(img, threshold) # Get predictions if boxes == 0: return 0 for i in range(len(boxes)): # Draw Rectangle with the coordinates boxes[i][0] = tuple(map(lambda x:int(x),boxes[i][0])) boxes[i][1] = tuple(map(lambda x: int(x), boxes[i][1])) cv2.rectangle(img, boxes[i][0], boxes[i][1], color=(0, 255, 0), thickness=rect_th) # Write the prediction class cv2.putText(img, pred_cls[i], boxes[i][0], cv2.FONT_HERSHEY_SIMPLEX, text_size, (0, 255, 0), thickness=text_th) return img -
获取预测框与标签
def get_prediction(img, threshold):
    model.eval()
    transform = transforms.Compose([transforms.ToTensor()])  # Defing PyTorch Transform
    img = transform(img)  # Apply the transform to the image
    img = img.to(DEVICE)
    # model的返回结果
    pred = model([img])  # pred包含了预测的边框顶点、类型和置信度
    # 预测的类型
    pred_class = [inst_classes[i] for i in list(pred[0]['labels'].cpu().numpy())]  # Get the Prediction Score
    # 方框的位置
    pred_boxes = [[(i[0], i[1]), (i[2], i[3])] for i in list(pred[0]['boxes'].detach().cpu().numpy())]  # Bounding boxes
    # 置信度(注意此处分数已经按从高到低排列)
    pred_score = list(pred[0]['scores'].detach().cpu().numpy())
    try:
        pred_t = [pred_score.index(x) for x in pred_score if x > threshold][-1]
        # Get list of index with score greater than threshold.
        pred_boxes = pred_boxes[:pred_t + 1]
        pred_class = pred_class[:pred_t + 1]
        return pred_boxes, pred_class
    except IndexError:
        return 0, 0
运行指令:
streamlit run video_deplot.py
算式识别模型部署
-
yolo训练
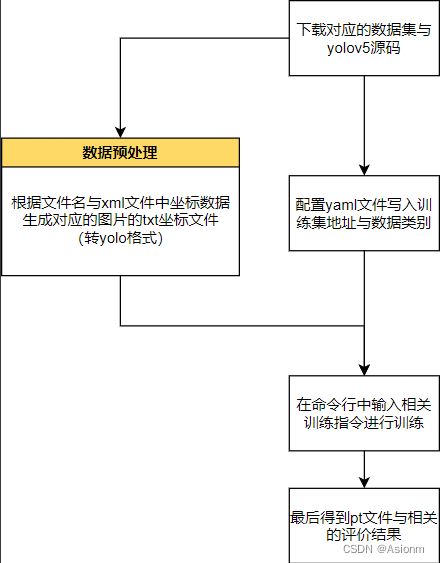
对于算式识别,我预先利用了群里的数据集与yolov5进行训练。其训练的主要流程如下:
对于yolo的训练,主要在于转换格式,因为yolo的只支持自身的Yolo格式,转换完成后只需要改写yaml配置文件即可直接根据官网提供的训练命令行进行训练。最后结果输出至run文件夹中。
-
数据类型转换 (代码参考于:https://blog.csdn.net/Thebest_jack/article/details/125637099)
# 该脚本文件需要修改第10行(classes)即可 # -*- coding: utf-8 -*- import xml.etree.ElementTree as ET from tqdm import tqdm import os from os import getcwd sets = ['train', 'test', 'val'] # 这里使用要改成自己的类别 classes = ['equation'] def convert(size, box): dw = 1. / (size[0]) dh = 1. / (size[1]) x = (box[0] + box[1]) / 2.0 - 1 y = (box[2] + box[3]) / 2.0 - 1 w = box[1] - box[0] h = box[3] - box[2] x = x * dw w = w * dw y = y * dh h = h * dh x = round(x, 6) w = round(w, 6) y = round(y, 6) h = round(h, 6) return x, y, w, h # 后面只用修改各个文件夹的位置 def convert_annotation(image_id): # try: in_file = open('./Annotations/%s.xml' % (image_id), encoding='utf-8') out_file = open('./labels/%s.txt' % (image_id), 'w', encoding='utf-8') tree = ET.parse(in_file) root = tree.getroot() size = root.find('size') w = int(size.find('width').text) h = int(size.find('height').text) for obj in root.iter('object'): difficult = obj.find('difficult').text cls = obj.find('name').text if cls not in classes or int(difficult) == 1: continue cls_id = classes.index(cls) xmlbox = obj.find('bndbox') b = (float(xmlbox.find('xmin').text), float(xmlbox.find('xmax').text), float(xmlbox.find('ymin').text), float(xmlbox.find('ymax').text)) b1, b2, b3, b4 = b # 标注越界修正 if b2 > w: b2 = w if b4 > h: b4 = h b = (b1, b2, b3, b4) bb = convert((w, h), b) out_file.write(str(cls_id) + " " + " ".join([str(a) for a in bb]) + '\n') # 这一步生成的txt文件写在data.yaml文件里 wd = getcwd() for image_set in sets: if not os.path.exists('./labels/'): os.makedirs('./labels/') image_ids = open('./Imagesets/%s.txt' % (image_set)).read().strip().split() list_file = open('./%s.txt' % (image_set), 'w') for image_id in tqdm(image_ids): list_file.write('./JPEGImages/%s.jpg\n' % (image_id)) convert_annotation(image_id) list_file.close() -
yaml文件编写
path: ../datasets/custom train: images/train val: images/train names: 0: equation -
训练指令
python train.py --data test.yaml --weights yolov5s.pt --img 640
-
-
yolo算式模型部署
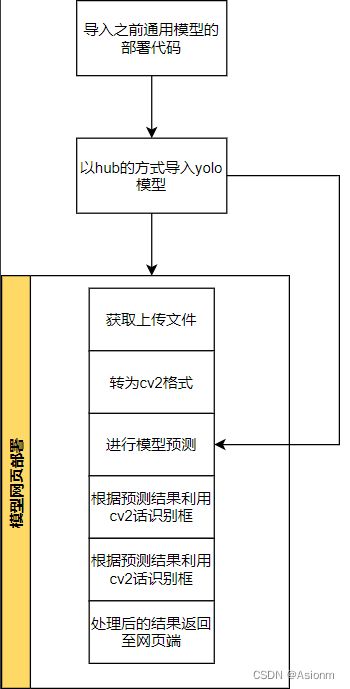
在训练完成后,同样依靠于streamlit进行模型部署,其部署流程图如下,基本上与通用识别模型的一致。
与通用模型的不同的是yolo中使用的是cv2对图片进行处理,而不是直接利用torch的函数进行处理的,然后模型导入的方式也不同,是通过hub将整个yolo源码进行了导入。下面为详细的代码模块。
-
模型导入
模型是以Hub的方式导入的。
model_equation = torch.hub.load('./yolov5-master', 'custom', source ='local', path='best.pt',force_reload=True) -
部署主函数
部署函数整体的运行逻辑包括了前端一些元素的布置以及预测的调用。
def equation_run(): st.title("算式识别") st.write("") file_up = st.file_uploader("请上传图片", type="jpg") place_holder = st.empty() if file_up is not None: # display image that user uploaded image = Image.open(file_up) place_holder.image(image, caption='已上传的图片', use_column_width=True) place_holder.write("") frame = np.array(image) frame = cv2.cvtColor(frame, cv2.COLOR_BGR2RGB) results = detectx(frame, model=model_equation) ### DETECTION HAPPENING HERE frame = cv2.cvtColor(frame, cv2.COLOR_RGB2BGR) frame = plot_boxes(results, frame) place_holder.empty() place_holder.image(frame) -
预测函数
预测函数主要返回标签与坐标。
def detectx (frame, model): frame = [frame] print(f"[INFO] Detecting. . . ") results = model(frame) labels, cordinates = results.xyxyn[0][:, -1], results.xyxyn[0][:, :-1] return labels, cordinates -
绘制框函数
绘制框函数主要是通过输入框的坐标位置与图片,然后用opencv来绘制框与文字,最后返回加工过的图片。
def plot_boxes(results, frame):

    """
    --> This function takes results, frame and classes
    --> results: contains labels and coordinates predicted by model on the given frame
    --> classes: contains the strting labels

    """
    labels, cord = results
    n = len(labels)
    x_shape, y_shape = frame.shape[1], frame.shape[0]

    print(f"[INFO] Total {n} detections. . . ")
    print(f"[INFO] Looping through all detections. . . ")

    ### looping through the detections
    for i in range(n):
        row = cord[i]
        if row[4] >= 0.55: ### threshold value for detection. We are discarding everything below this value
            print(f"[INFO] Extracting BBox coordinates. . . ")
            x1, y1, x2, y2 = int(row[0]*x_shape), int(row[1]*y_shape), int(row[2]*x_shape), int(row[3]*y_shape) ## BBOx coordniates

            cv2.rectangle(frame, (x1, y1), (x2, y2), (0, 255, 0), 2) ## BBox
            cv2.rectangle(frame, (x1, y1-20), (x2, y1), (0, 255,0), -1) ## for text label background
            cv2.putText(frame, "equation", (x1, y1), cv2.FONT_HERSHEY_SIMPLEX, 0.5,(255,255,255), 2)
    return frame
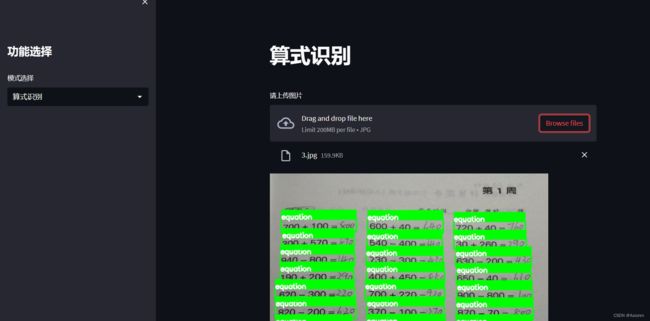
最后的运行的效果图如下,具体只需要将图片进行上传即可自动进行算式识别,并将识别出来标签坐标以框与文本的形式加工至原图片中,然后再渲染回web前端。
-
模型性能反馈机制
在部署完上面的模型后,我想对web前端再添加一功能那就是反馈功能。由于有一些预测结果其实并不准确的,而机器是无法发现是否正确的,那么就需要使用者来提供相关的信息,使得模型后续可以优化改进。
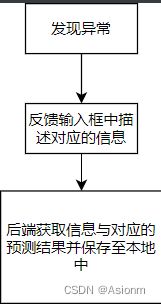
而对于反馈机制,我的想法是在预测结果的页面中添加一个输入框,让使用者在发现异常的时候可以提供一些信息。而这些信息是对于对应的图片的,那么当使用者提供反馈的同时也要保存相应的预测结果以便后面分析。于是根据此思路,反馈机制的代码逻辑可见下面的流程图,
反馈机制主要是对图像预测之后才会出现,当图像未被预测前是不会出现反馈输入框的。对应反馈机制的代码实现,主要通过添加函数来实现,函数主要涉及到的操作是文件的读写。下面为函数代码内容:
def feedback(p_image,type="pic"):
st.write("")
st.title("问题反馈:")
feedinput = st.text_input("", "若发现预测存在问题可以在下面的输入框中为我们提供相关信息,您所提供的信息将对我们帮助很大!")
confirm_bnt = st.button("确认反馈")
if confirm_bnt:
if type == "pic":
img = Image.fromarray(p_image)
name = f"./feedback/pictures/{time.time()}.jpg"
img.save(name)
with open(f"./feedback/"
f"{time.localtime().tm_mday}.md", 'a+') as f:
f.write(f"## {feedinput}
")
f.write(f"")
st.success('反馈成功!感谢您的支持!', icon="✅")
elif type=="video":
name = f"./feedback/videos/{time.time()}.mp4"
shutil.copy(p_image, name)
with open(f"./feedback/"
f"{time.localtime().tm_mday}.md", 'a+') as f:
f.write(f"## {feedinput}")
f.write(f"")
st.success('反馈成功!感谢您的支持!', icon="✅")
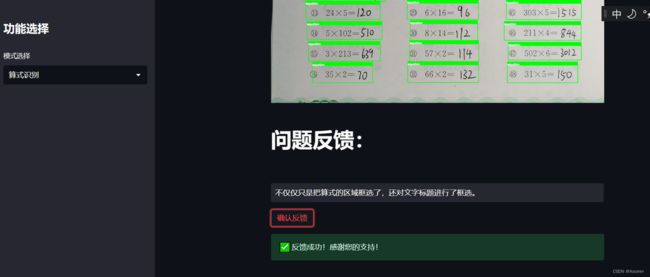
最后以算式识别为例来测试其效果,下面为效果图。下面这张图是输入反馈内容并提交后所截取的。
对于反馈功能不能仅仅只是在前端摆设,而应该在后端有所记录,所以当提交反馈后,后端会记录对于的反馈内容与相应的预测结果。结果会保存至一markdown文件中如下图所示。
最后的运行只要运行feedback_deploy.py即可,其他文件均是迭代文件。
streamlit run feedback_deploy.py
demo链接
- 对应的github地址 https://github.com/Asionm/streamlit_demo
- 对应的gitee地址 https://gitee.com/asionm/streamlit_demo
文件说明(主文件为feedback_deploy.py):
-
yolov5-master 官方源文件用于导入模型
-
feedback文件夹用于存储反馈信息
-
123.mp4视频预测的结果视频
-
best.pt算式识别权重文件
-
openh264-1.8.0-win64.dll用于解决opencv的一些问题
-
voc2yolo.py voc格式转yolo格式
-
pic_deploy.py 图片识别推理部署代码
-
video_deploy.py 在7基础上添加视频
-
yolo_deploy.py 在8的基础上添加算式识别模块
-
feedback_deploy.py在9的基础上添加反馈模块
参考资料
【1】http://172.31.70.106/dlcourse/html/ModelDeploy/modeldeployIntro.html
【2】https://github.com/streamlit/demo-self-driving/blob/master/streamlit_app.py
【3】https://blog.csdn.net/weixin_42618420/article/details/125577321
【4】https://blog.csdn.net/Thebest_jack/article/details/125637099)
