手撕SpringBoot的自定义启动器
一. 前言
哈喽,大家好,最近金九银十,又有不少小伙伴私信辉哥,说自己在面试时被问到SpringBoot如何自定义启动器,结果自己不知道该怎么回答。那么今天就手把手地带着大家,去看看在SpringBoot中到底该怎么实现自定义启动器。
二. 什么是SpringBoot自动装配?
在进行代码实现之前,我们先来看看什么是SpringBoot的自动装配。与自动装配对应的是手动装配,比如我们以前使用xml配置文件,引入spring或者引入mybatis时需要配置数据源、配置mybatis扫描、配置数据库连接池等。
而在SpringBoot中,我们只需要引入对应的mybatis启动器、druid启动器和数据库驱动,配置文件就可以自动根据配置数据库地址、用户和密码等信息快速地完成框架的搭建。也就是说,我们只要引入启动器,再配置一些必要的初始化连接参数,就可以直接使用,而不需要再自己创建很多复杂的配置,就可完成Bean类之间的依赖。
这一切都依赖于SpringBoot的自动装配!而自动装配则离不开starter启动器这个核心!那么starter启动器是怎么实现的呢?为了让大家搞明白这个问题,就给大家手写一个自定义的启动器。
三. 自定义启动器
1.第一步:首先创建一个java-maven的父工程
    4.0.0
    com.qfedu
    springboot-auto
    1.0-SNAPSHOT
    pom


        org.springframework.boot
        spring-boot-starter-parent
        2.1.3.RELEASE
2.第二步:创建一个子工程
3.引入依赖
        springboot-auto
        com.qfedu
        1.0-SNAPSHOT

    4.0.0
    demo


            org.springframework.boot
            spring-boot-starter-web


            org.springframework.boot
            spring-boot-starter-test
            test
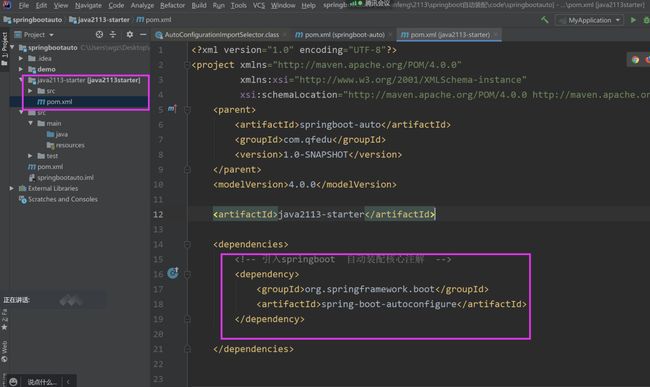
4.第三步:创建另一个子模块 java2113-starter作为启动器
5.引入依赖
        org.springframework.boot
        spring-boot-autoconfigure
6.第四步:编写代码
package com.qfedu.java2113;

public class HelloService {
    private String msg;
    public String sayHello(){
        return "hello" + msg;
    }

    public String getMsg() {
        return msg;
    }


    public void setMsg(String msg) {
        this.msg = msg;
    }
}
7.编写配置文件:application.properties
hello.msg=byebye8.HelloServiceProperties类中读取配置文件的配置数据hello.msg
package com.qfedu.java2113;

import org.springframework.boot.context.properties.ConfigurationProperties;

// 读取配置文件中 以 hello为前缀的值 设置到  msg
@ConfigurationProperties(prefix = "hello")
public class HelloServiceProperties {
    private static  final String MSG = "world";
    private String msg = MSG;
    public String getMsg() {
        return msg;
    }

    public void setMsg(String msg) {
        this.msg = msg;
    }
}
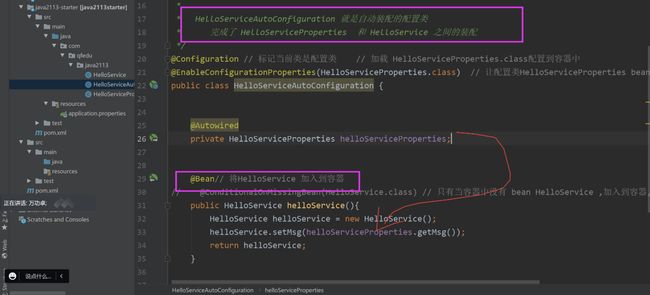
9.完成自动配置的类HelloServiceAutoConfiguration.java
package com.qfedu.java2113;

import org.springframework.beans.factory.annotation.Autowired;
import org.springframework.boot.autoconfigure.condition.ConditionalOnMissingBean;
import org.springframework.boot.context.properties.EnableConfigurationProperties;
import org.springframework.context.annotation.Bean;
import org.springframework.context.annotation.Configuration;

/***
 * hello-2009-starter 启动器 对应的配置 类 HelloServiceAutoConfiguration
 * 每一个启动器都有一个 这样的配置类
 * HelloServiceAutoConfiguration 的 作用是
 * 将HelloServiceProperties 加入到容器
 * 将 HelloService 加入到容器 并且和  HelloServiceProperties 进行装配
 * HelloServiceAutoConfiguration 就是自动装配的配置类
 * 完成了 HelloServiceProperties  和 HelloService 之间的装配
 */
@Configuration //标记当前类是配置类,加载 HelloServiceProperties.class配置到容器中
@EnableConfigurationProperties(HelloServiceProperties.class)  // 让配置类HelloServiceProperties bean加入到容器中
public class HelloServiceAutoConfiguration {
    @Autowired
    private HelloServiceProperties helloServiceProperties;
    @Bean// 将HelloService 加入到容器
//    @ConditionalOnMissingBean(HelloService.class) // 只有当容器中没有 bean HelloService ,加入到容器,如果有就不需要加入到容器了
    public HelloService helloService(){
        HelloService helloService = new HelloService();
        helloService.setMsg(helloServiceProperties.getMsg());
        return helloService;
    }
}
10.第五步:让自动装配类生效
在resources 创建 resources\META-INF\spring.factories
# Auto Configure  让自定义的 自动配置类生效
org.springframework.boot.autoconfigure.EnableAutoConfiguration=\
com.qfedu.java2113.HelloServiceAutoConfiguration
11.安装到本地maven仓库
执行 mvn install命令。
12.第六步:在demo中引入java2113-starter 启动器
13.第七步:编写代码,使用自定义启动器
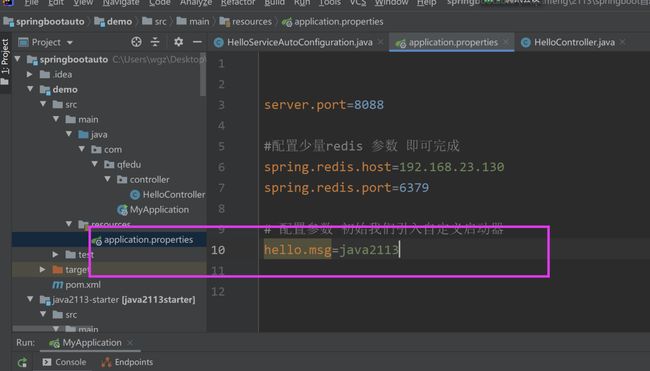
13.1 配置文件初始化
13.2 使用
    @Autowired
    private HelloService helloService;

    @RequestMapping("/getHellMsg")
    public String getHellMsg(){
        return  "获取msg:"+ helloService.getMsg();
    }
14.第八步:测试看效果
四. 总结
哈,现在你跟着写出来了吗?这样我们就通过自定义启动器,很好地理解了SpringBoot的运行原理,特别是SpringBoot的自动装配原理。大家可以跟着辉哥上面的实现步骤,一步步地来,只要效果出来了,再逆向反推实现过程。你就会发现,原来很多所谓的实现原理也并不难。
千锋教育Java入门全套视频教程(java核心技术,适合java零基础,Java自学必备)


