谷粒商城学习笔记
docker
安装docker
docker官方centos镜像下载地址:https://docs.docker.com/engine/install/centos/
步骤:
- 先卸载,如果不是root用户在前边加上sudo
sudo yum remove docker \
                  docker-client \
                  docker-client-latest \
                  docker-common \
                  docker-latest \
                  docker-latest-logrotate \
                  docker-logrotate \
                  docker-engine
- 安装docker需要依赖的一些包
 sudo yum install -y yum-utils

 sudo yum-config-manager \
    --add-repo \
    https://download.docker.com/linux/centos/docker-ce.repo
- 安装引擎啥的
sudo yum install docker-ce docker-ce-cli containerd.io docker-compose-plugin
- 启动docker
sudo systemctl start docker
- 查看docker的版本:docker -v; 查看docker中安装的镜像列表:docker images
- 设置docker开机自启:sudo systemctl enable docker
docker镜像加速
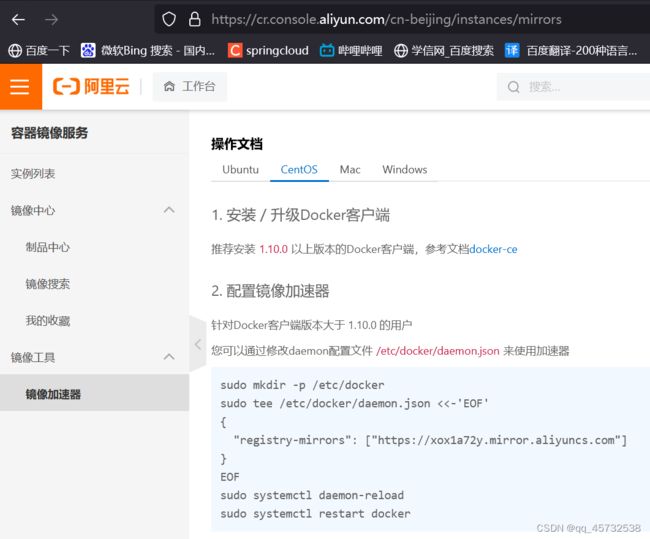
下载docker镜像一般都去dockerhub这个网站,但是会比较慢,所以需要配置下阿里云加速
进入aliyun.com,进入弹性计算,选容器镜像服务,选镜像加速器,执行命令即可
docker安装mysql
下载地址:https://hub.docker.com/
下载命令:docker pull mysql:5.7(如果不加5.7默认下载的是最新版本)
下载完后查看docker中的所有镜像:docker images
启动MySQL镜像:
 sudo docker run \
 -p 3306:3306 --name mysql \
 -v /mydata/mysql/log:/var/log/mysql \
 -v /mydata/mysql/data:/var/lib/mysql \
 -v /mydata/mysql/conf:/etc/mysql \
 -e MYSQL_ROOT_PASSWORD=root \
 -d mysql:5.7
解释:这里指定将物理机的3306端口映射到MySQL的3306端口上,并给启动的容器起了个名字叫MySQL,然后对目录进行了挂载,将容器中的目录挂载到外部物理机上,-e是初始化root用户的密码,-d是启动指定的镜像资源
查看docker中正在运行的镜像:docker ps
每个容器都是相互独立且隔离的,每个容器就相当于一个独立的Linux
进入到某个容器中:docker exec -it mysql(MySQL是容器的名字,或者也可以填容器的id) /bin/bash
docker重启MySQL镜像:docker restart mysql
docker安装redis
下载镜像:docker pull redis
需要先创建需要挂载的路径:mkdir -p /mydata/redis/conf touch /mydata/redis/conf/redis.conf
启动redis容器:
docker run -p 6379:6379 --name redis -v /mydata/redis/data:/data\
-v /mydata/redis/conf/redis.conf:/etc/redis/redis.conf\
-d redis redis-server /etc/redis/redis.conf
注:这里的redis-server /etc/redis/redis.conf意思是让redis-server以redis.conf这个文件进行启动
启动redis容器的客户端:docker exec -it redis redis-cli
设置redis和MySQL容器开机自动启动
sudo docker update redis --restart=always
sudo docker update mysql --restart=always
redis持久化配置
cd /mydata/redis/conf;
vim redis.conf
添加上: appendonly yes(表示启动AOF的持节化策略)
重启redis:docker restart redis
redis可视化工具:redis-desktop-manager
idea相关配置及项目创建
安装lombok,mybatisx这两个插件,其中mybatisx是由mybatisplus开发的用于快速从mapper的Java文件定位到xml文件。
创建git仓库。下边的选项这么选

在idea中新建,选择from version control,输入创建的仓库地址,即可创建成功;
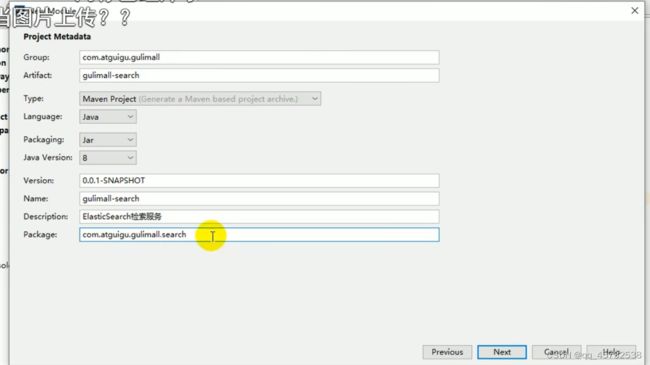
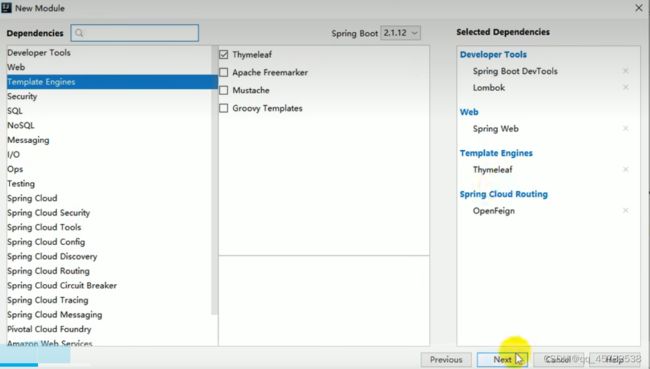
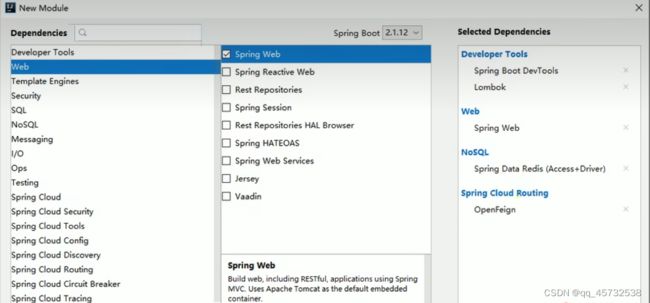
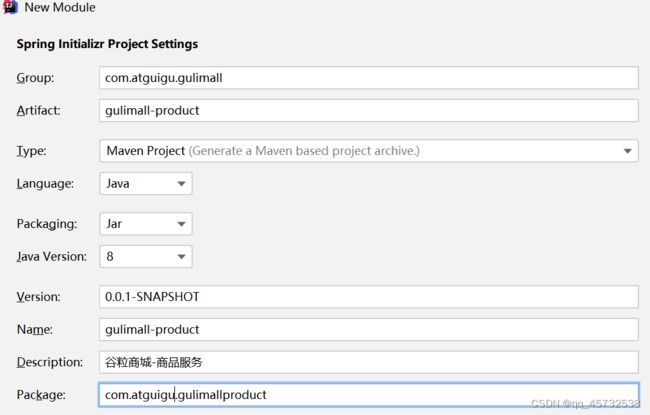
创建子模块,选择spring initialize,具体如下:
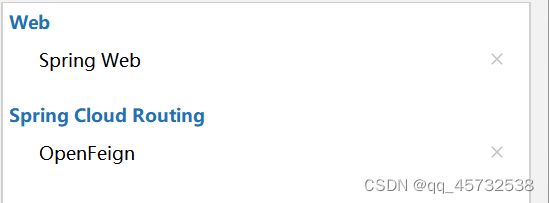
先导入两个必要组件:
同理创建出以下几个项目:

创建聚合pom
在gulimall根目录下创建pom文件,内容为:
<?xml version="1.0" encoding="UTF-8"?>
<project xmlns="http://maven.apache.org/POM/4.0.0" xmlns:xsi="http://www.w3.org/2001/XMLSchema-instance"
         xsi:schemaLocation="http://maven.apache.org/POM/4.0.0 https://maven.apache.org/xsd/maven-4.0.0.xsd">
    <modelVersion>4.0.0</modelVersion>
    <groupId>com.atguigu.gulimall</groupId>
    <artifactId>gulimall</artifactId>
    <version>0.0.1-SNAPSHOT</version>
    <name>gulimall</name>
    <description>聚合服务</description>
    <packaging>pom</packaging>
    <modules>
        <module>guliall-order</module>
        <module>gulimall-coupon</module>
        <module>gulimall-member</module>
        <module>gulimall-product</module>
        <module>gulimall-ware</module>
    </modules>
</project>
然后把他加进来,并刷新项目,就会出来,旁边还有个(root)
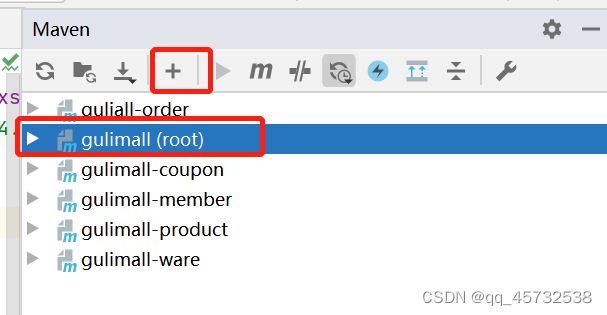
添加忽略文件
视频中修改的.gitignore文件,但是我觉得在idea中设置也一样
进入File>Settings>Editor>File types,最下边输入框替换成下边内容
*.classpath;*.gitignore;*.hprof;*.idea;*.iml;*.project;*.pyc;*.pyo;*.rbc;*.settings;*.sh;*.yarb;*~;.DS_Store;.git;.hg;.svn;CVS;__pycache__;_svn;logs;target;vssver.scc;vssver2.scc;
这里其实还可以加一些东西,比如把.mvn目录下的文件忽略,总之提交上去的子模块下只有src和pom文件是最干净的。
将数据库和表创建一下
这里的创建就不说了。。。。。。。。。。。。。
人人开源后台管理系统
去gitee上下载该项目:https://gitee.com/renrenio
前端项目下载:git clone https://gitee.com/renrenio/renren-fast-vue.git
后端项目下载:git clone https://gitee.com/renrenio/renren-fast.git
- 把renren-fast这个项目中的.git文件删除,然后把这个项目放到gulimall文件夹下,把renren-fast-vue这项目中的.git文件删除用vscode打开
- 把renren-fast这个项目中sql文件夹下的sql语句复制下,然后新建个数据库gulimall_admin,执行语句创建表。
- 在总的pom文件中的标签下添加renren-fast
- 修改application-dev.yml文件修改数据库配置
- 使用vscode启动renren-fast-vue项目
代码生成器(逆向工程搭建,这里以生成product模块代码举例)
-
克隆逆向工程代码,并删除.git文件,然后将该项目作为一个子项目放到gulimall项目中
git clone https://gitee.com/renrenio/renren-generator.git -
在最外边的pom中加上
renren-generator -
浏览器访问 localhost:80
-
由于我们不想再Controller中使用shiro的权限注解,我们可以修改一下代码生成规则,使生成的代码中不包含该权限注解:

-
在页面上生成代码后,复制main文件夹到要生成文件的模块
-
创建公共模块guli-common,将公共的类和依赖放到common中,其他模块进行依赖;(注意这里创建模块的时候选择maven)
-
在模块pom文件中加上公共依赖,比如这里是为product模块生成代码,就在该模块中加上这个依赖:
com.atguigu.gulimall
gulimall-common
0.0.1-SNAPSHOT
-
从renren-fast中复制公共类到common中,因为renren-generator生成的代码中许多代码是需要依赖renren-fast中的一些类,所以这里需要将renren-fast中的一些类放到自定义的公共模块renren-common中,如图:
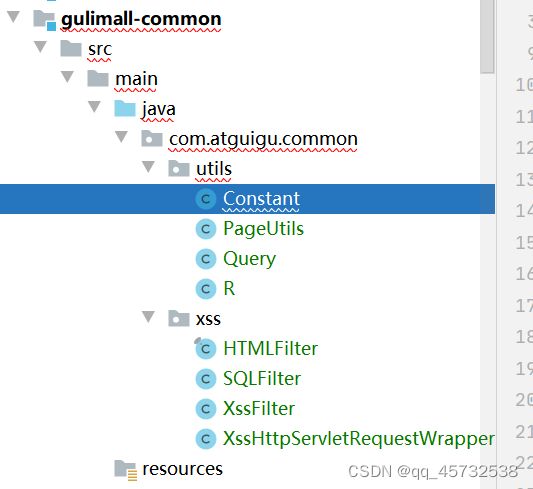
-
common模块添加公共依赖
 <dependency>
            <groupId>com.baomidou</groupId>
            <artifactId>mybatis-plus-boot-starter</artifactId>
            <version>3.2.0</version>
        </dependency>
        <dependency>
            <groupId>org.projectlombok</groupId>
            <artifactId>lombok</artifactId>
            <version>1.18.8</version>
        </dependency>

        <dependency>
            <groupId>org.apache.httpcomponents</groupId>
            <artifactId>httpcore</artifactId>
            <version>4.4.12</version>
        </dependency>

        <dependency>
            <groupId>commons-lang</groupId>
            <artifactId>commons-lang</artifactId>
            <version>2.6</version>
        </dependency>
整合mybatis-plus
- 整合Mybatis-plus
1)导入依赖(已在common模块中添加):
com.baomidou
mybatis-plus-boot-starter
3.2.0
2)配置:
1,导入数据库驱动
mysql
mysql-connector-java
8.0.17
2,在application.yml中配置数据源相关信息
3,配置mybatis-plus
1)使用@MapperScan
2) 告诉mybatis-plus,sql映射文件
3)配置主键生成策略
product模块最终的application.yml文件如下:
spring:
  datasource:
    data-username: root
    data-password: qazq
    url: jdbc:mysql://localhost:3306/gulimall_pms
    driver-class-name: com.mysql.jdbc.Driver
  # 配置xml文件扫描位置
mybatis-plus:
  mapper-locations: classpath:/mapper/**/*.xml
  # 配置主键自增策略
  global-config:
    db-config:
      id-type: auto
生成其他模块代码
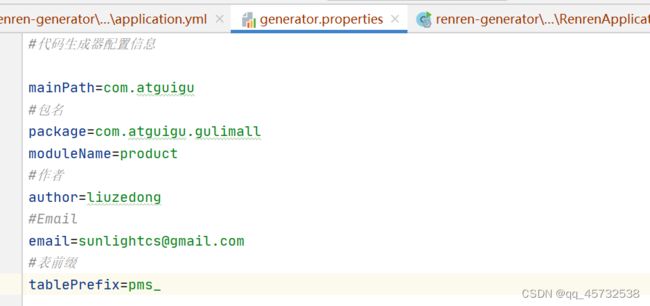
- 修改generator.properties的代码,这里生成的是coupon模块的代码
#代码生成器配置信息
mainPath=com.atguigu
#包名
package=com.atguigu.gulimall
moduleName=coupon
#作者
author=liuzedong
#Email
email=sunlightcs@gmail.com
#表前缀
tablePrefix=sms_
- 然后修改yml中的数据库连接
- 运行项目生成代码
- 在页面选中所有表生成代码,然后将生成的main文件夹替换到coupon模块的main,然后再coupon模块中添加上公共模块的依赖
        <dependency>
            <groupId>com.atguigu.gulimall</groupId>
            <artifactId>gulimall-common</artifactId>
            <version>0.0.1-SNAPSHOT</version>
        </dependency>
- 添加application.yml
spring:
  datasource:
    username: root
    password: qazq
    url: jdbc:mysql://localhost:3306/gulimall_sms?serverTimezone=GMT
    driver-class-name: com.mysql.jdbc.Driver
  # 配置xml文件扫描位置
mybatis-plus:
  mapper-locations: classpath:/mapper/**/*.xml
  # 配置主键自增策略
  global-config:
    db-config:
      id-type: auto
- 其他模块同理
分布式组件-SpringCloud Alibaba
官方文档:https://github.com/alibaba/spring-cloud-alibaba/blob/2.2.x/README-zh.md

SpsringCloud Alibaba技术搭建方案:
- Nacos: 注册中心(服务发现/注册)
- Nacos:配置中心(动态配置管理)
- Ribbon:负载均衡
- Feign:声明式HTTP客户端(调用远程服务)
- Sentinel:服务容错(限流、降级、熔断)
- Gateway:API网关
- Sleuth:调用链路监控
- Seata:分布式事务解决方案
先在common模块中的pom中引入springcloud的依赖管理:
<dependencyManagement>
    <dependencies>
        <dependency>
            <groupId>com.alibaba.cloud</groupId>
            <artifactId>spring-cloud-alibaba-dependencies</artifactId>
            <version>{project-version}</version>
            <type>pom</type>
            <scope>import</scope>
        </dependency>
    </dependencies>
</dependencyManagement>
Nacos(注册中心)
- 在common的pom中加上nacos的依赖:
 <dependency>
     <groupId>com.alibaba.cloud</groupId>
     <artifactId>spring-cloud-starter-alibaba-nacos-discovery</artifactId>
 </dependency>
- 在application.yml中加上nacos依赖:
spring:
	cloud:
	    nacos:
	      discovery:
	        server-addr: 127.0.0.1:8848
- 下载nacos并启动,这个就不说了
- 在启动类上添加@EnableDiscoveryClient注解
- 启动服务,访问nacos看看服务有没有被注册上去
- 需要在配置文件加上应用的名字,会在nacos中显示
spring.application.name: gulimall_couple
Feign
如果想要在一个服务中调用另一个服务
- 需要在服务中引入依赖open-feign
- 编写一个接口,告诉springcloud这个接口需要调用远程接口服务.声明接口的每一个方法都是调用哪个远程服务的那个请求。
@FeignClient("微服务名称")
public interface aaaa(){
@RequestMapping("/coupon/coupon/member/list")
public R methodaaa();
}
- 开启远程调用
在启动类上加上注解
@EnableFeignClients(basePackages=“com.atguigu.gulimall.member.feign”)
Nacos(配置中心)
- 在common模块中加上依赖
- 服务注册发现发现
<dependency>
	<groupId>com.alibaba.cloud</groupId>
	<artifactId>spring-cloud-starter-alibaba-nacos-discovery</artifactId>
</dependency>
- 配置中心来做配置管理
<dependency>
	<groupId>com.alibaba.cloud</groupId>
	<artifactId>spring-cloud-starter-alibaba-nacos-config</artifactId>
</dependency>
- 在src/main/resources下创建bootstrap.properties文件
配置如下:
spring.application.name= gulimall-coupon      //这里对应nacos中的Dataid
spring.cloud.nacos.config.server-addr=39.105.135.68:8848
spring.cloud.nacos.config.namespace=50a3f08d-35c9-4a69-9bb1-5067ba52aff8   //这里是命名空间对应的字符串
spring.cloud.nacos.config.group=1111  //这里是配置所属于的分组
```代码
- 在nacos上创建配置文件,文件的dataid是gulimall-coupon,然后将项目中的配置粘贴到该文件里
- 在controller上加上@RefreshScope注解,就表示通过!@Value注解获取的配置都是实时从nacos中获取得到的。
- 如果配置中心和当前应用的配置文件中都配置了相同的项,优先使用配置中心的配置。
**细节**
   1)命名空间,配置隔离:默认是public;默认新增的所有配置都在public空间。
       1. 开发,测试,生产:利用命名空间来做环境隔离。
       注意:在bootstrap.properties配置上,需要使用哪个命名空间下的配置
       2.每一个微服务之互相隔离配置,每一个微服务都创建自己的命名空间只加载自己命名空             间下的所有配置(可以基于环境进行隔离,也可以基于微服务进行隔离,这里将每一个微服务      对应的配置文件都放到nacos中对应的namespce中)
       2)配置集:所有的配置的集合
       3)配置集ID: 类似文件名
       4)  配置分组:默认所有的配置集都属于:DEFAULT_GROUP;
**每个微服务创建自己的命名空间,使用配置分组区分环境,dev,test,prod环境**
  通常会将配置提出来,比如数据源相关的配置,mybatis相关的配置,都单独放到一个配置文件中,然后在bootstrap.yml中进行引用:
```java
spring.cloud.nacos.config.ext-config[0].data-id=datasource.yml
spring.cloud.nacos.config.ext-config[0].group=dev
spring.cloud.nacos.config.ext-config[0].refresh=true
假如在@Value没有在nacos上找到配置,默认就会去application.yml中获取配置值。
Gateway
- 创建一个新的模块:gulimall-gateway,添加网关依赖和common依赖
- 开启服务的注册发现,在启动类上加注解:@EnableDiscoveryClient
- 在nacos中创建配置文件,将一些配置写进去,在bootstrap.properties中加上nacos中配置文件的相关信息
- 现在需要实现,url中有qq就路由到www.qq.com,url中有baidu就路由到www.baidu.com
配置文件如下:
spring:
  cloud:
    gateway:
      routes:
        - id: test_route       //这个是url的id
          uri: https://www.baidu.com   //这个是url
          predicates:
            - Query=url,baidu     //这个是url的断言,即匹配规则,这里表示匹配url中包含baidu的url

        - id: qq_route
          uri: https://www.qq.com
          predicates:
            - Query=url,qq
配置网关路由与路径重写
例如:
spring:
  cloud:
    gateway:
      routes:
        - id: test_route       //这个是url的id
          uri: lb://renren-fast   //lb表示使用负载均衡的方式访问服务,lb后边跟的是注册在nacos上的服务名称
          predicates:
            - Path=/api/**
            - filters:
              RewritePath=/api/(?.*),/renren-fast/$\{segment}
如果不加,假如网关项目是88端口,前端项目发送的路劲是:http://localhost:88/api/captcha.jpg ,网关转发的路径是http://renren-fast:8080/api/capcha.jpg,如果加上filters,则访问的是http://renren-fast:8080/renren-fast/captcha.jpg
配置跨域
在gateway项目中加上一个配置类,并使用@Configuration和@Bean注解注释表示交给容器进行管理。
import org.springframework.context.annotation.Bean;
import org.springframework.context.annotation.Configuration;
import org.springframework.web.cors.CorsConfiguration;
import org.springframework.web.cors.reactive.CorsWebFilter;
import org.springframework.web.cors.reactive.UrlBasedCorsConfigurationSource;

@Configuration
public class GulimallCorsConfiguration {

    @Bean
    public CorsWebFilter corsWebFilter(){
        UrlBasedCorsConfigurationSource source = new UrlBasedCorsConfigurationSource();

        CorsConfiguration corsConfiguration = new CorsConfiguration();

        //1、配置跨域
        corsConfiguration.addAllowedHeader("*");  //允许携带哪些请求头的跨域
        corsConfiguration.addAllowedMethod("*");  //允许使用那种请求方法的跨域
        corsConfiguration.addAllowedOrigin("*");  //允许哪些来源(域名:端口)的跨域
        corsConfiguration.setAllowCredentials(true);//允许携带cookie的跨域

        source.registerCorsConfiguration("/**",corsConfiguration);//允许哪些请求路径的跨域
        return new CorsWebFilter(source);
    }
}
前端
这里就不说了,自己看视频。。。。。
对象存储oss
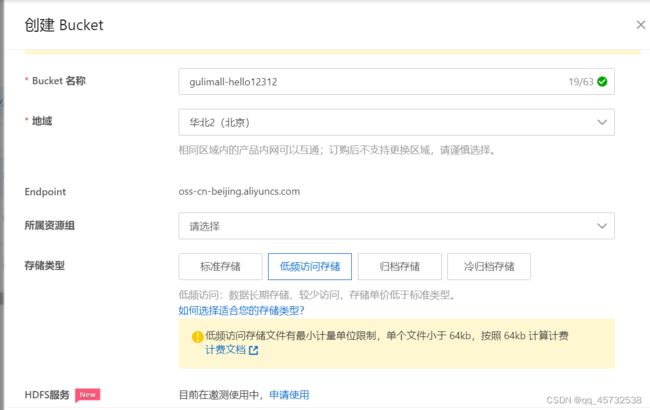
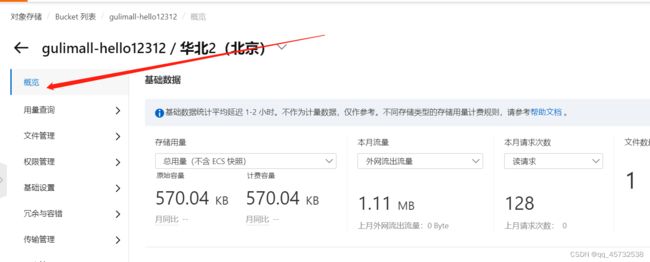
Bucket:通常一个项目创建一个Bucket
Object: Object是对象是 OSS 存储数据的基本单元,也被称为OSS的文件
使用Java代码上传文件到oss
- 导入依赖
<dependency>
	<groupId>com.aliyun.oss</groupId>
	<artifactId>aliyun-sdk-oss<artifactId>
	<version>3.5.0</version>
</dependency>
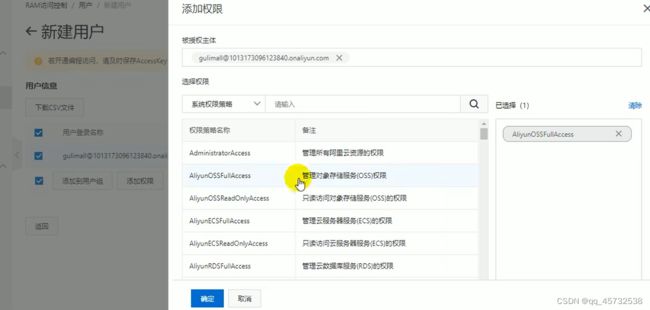
- 开通AccessKey,鼠标放在头像上,选择AccessKey,弹出框选择开通子账户那个
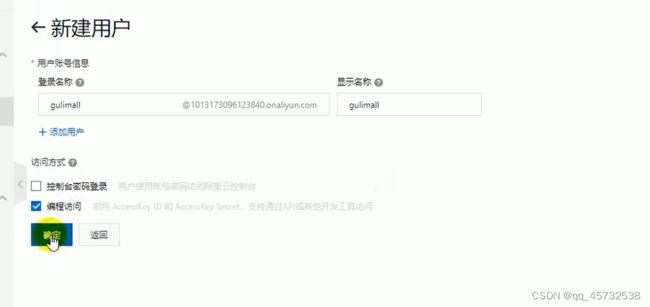 这样就得到了accessKeyId和accessKeySecret;
还有一个变量是EndPoint,在oss控制台去找:
 throws Exception {
// Endpoint以华东1(杭州)为例,其它Region请按实际情况填写。
String endpoint = "https://oss-cn-hangzhou.aliyuncs.com";
// 阿里云账号AccessKey拥有所有API的访问权限,风险很高。强烈建议您创建并使用RAM用户进行API访问或日常运维,请登录RAM控制台创建RAM用户。
String accessKeyId = "yourAccessKeyId";
String accessKeySecret = "yourAccessKeySecret";
// 填写Bucket名称,例如examplebucket。
String bucketName = "examplebucket";
// 填写Object完整路径,例如exampledir/exampleobject.txt。Object完整路径中不能包含Bucket名称。
String objectName = "exampledir/exampleobject.txt";
// 创建OSSClient实例。
OSS ossClient = new OSSClientBuilder().build(endpoint, accessKeyId, accessKeySecret);
try {
InputStream inputStream=new FileInputStream("文件地址");
ossClient.putObject(bucketName, objectName, inputStream);
} catch (ClientException ce) {
ce.printStatic();
}
}
直接使用springcloud Alibaba配置oss
- 导入依赖
com.alibaba.cloud>
spring-cloud-starter-alicloud-oss
- 在application.yml中添加配置信息
spring
cloud:
alicloud:
access-key: LTESAFEIAF234LFNAW3RNFA
seret-key: o93rjlfsoae453fnalse34iewr324re
oss:
endpoint: oss-cn-beijing.aliyuncs.com
2. 代码就变简单了
@Auowired
OSSClient ossClient;

public void demo(){
  String bucketName = "examplebucket";
  String objectName = "exampledir/exampleobject.txt";
  InputStream inputStream=new FileInputStream("文件地址");
  ossClient.putObject(bucketName, objectName, inputStream);
  ossClient.shutDown();
}
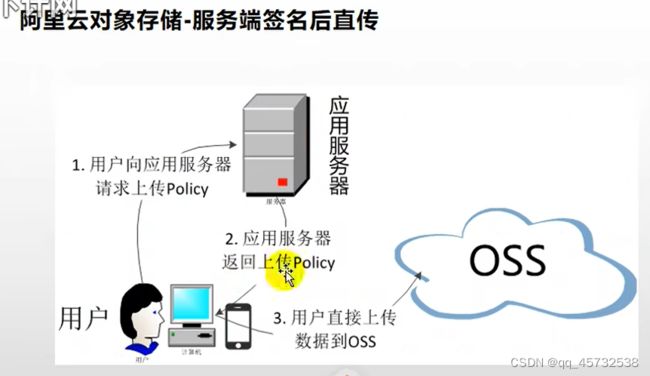
OSS获取服务端签名
以上方法是将文件上传到服务器,服务器再上传到oss,这样太消耗带宽,我们需要只是从服务器上获取到签名密钥,然后前端带着签名直接上传到oss
后期我们有非常多的第三方需要调用,比如发送短信,查看物流,等等,我们就可以为整个项目创建一个微服务来整合各种第三方功能。创建一个controller用于接收获取签名的请求:
@RestController
public class OssController {

    @Autowired
    OSS ossClient;

    @Value("${spring.cloud.alicloud.oss.endpoint}")
    private String endpoint;
    @Value("${spring.cloud.alicloud.oss.bucket}")
    private String bucket;

    @Value("${spring.cloud.alicloud.access-key}")
    private String accessId;


    @RequestMapping("/oss/policy")
    public R policy() {
        //https://gulimall-hello.oss-cn-beijing.aliyuncs.com/hahaha.jpg

        String host = "https://" + bucket + "." + endpoint; // host的格式为 bucketname.endpoint
        // callbackUrl为 上传回调服务器的URL,请将下面的IP和Port配置为您自己的真实信息。
//        String callbackUrl = "http://88.88.88.88:8888";
        String format = new SimpleDateFormat("yyyy-MM-dd").format(new Date());
        String dir = format + "/"; // 用户上传文件时指定的前缀。

        Map<String, String> respMap = null;
        try {
            long expireTime = 30;
            long expireEndTime = System.currentTimeMillis() + expireTime * 1000;
            Date expiration = new Date(expireEndTime);
            PolicyConditions policyConds = new PolicyConditions();
            policyConds.addConditionItem(PolicyConditions.COND_CONTENT_LENGTH_RANGE, 0, 1048576000);
            policyConds.addConditionItem(MatchMode.StartWith, PolicyConditions.COND_KEY, dir);

            String postPolicy = ossClient.generatePostPolicy(expiration, policyConds);
            byte[] binaryData = postPolicy.getBytes("utf-8");
            String encodedPolicy = BinaryUtil.toBase64String(binaryData);
            String postSignature = ossClient.calculatePostSignature(postPolicy);

            respMap = new LinkedHashMap<String, String>();
            respMap.put("accessid", accessId);
            respMap.put("policy", encodedPolicy);
            respMap.put("signature", postSignature);
            respMap.put("dir", dir);
            respMap.put("host", host);
            respMap.put("expire", String.valueOf(expireEndTime / 1000));
            // respMap.put("expire", formatISO8601Date(expiration));
        } catch (Exception e) {
            // Assert.fail(e.getMessage());
            System.out.println(e.getMessage());
        }

        return R.ok().put("data",respMap);
    }
}
- 配置网关
因为我们所有的请求都是走网关的,所以需要配置一下网关,由网关转发到新建的微服务,在配置文件中新增如下:
- id: third_party_route
  uri:lb://gulimall-third-party
  predicates:
  	- RewritePath=/api/thirdparty/(?<segment>.*),/$\{segment}
网关端口是88,所以请求路径是 localhost:88/api/thirdparty/oss/policy
oss前端配置
使用elementui提供的上传组件,需要把上传路径改一下:
 在上传的时候需要先调用获取签名的接口,然后带着签名调用上传接口。这里的前端上传有封装,封装成了组件< single-upload>,在资料中可以找到,就在upload文件夹中。
oss设置跨域
因为调用oss的gulimall-hello12312.oss-cn-beijing.aliyuncs.com是在当前页面url调用的,所以需要在阿里云上设置下跨域:
-
设置跨域规则
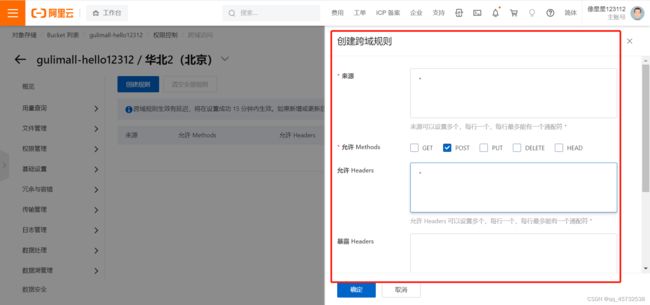 关于springboot提供的一些校验注解:
在实体类上:@Email表示必须是一个邮箱,@NotNull,@URL,@Pattern(regexp=“正则表达式”),@Min,@Max等
在controller接受参数的实体类上:加上@Valid,表示开启校验
给校验的bean后紧跟一个BingResult,就可以获取到校验的结果
统一异常处理
创建一个类,加上RestControllerAdvice注解即可:
/**
 * 集中处理所有异常
 */
@Slf4j
//@ResponseBody
//@ControllerAdvice(basePackages = "com.atguigu.gulimall.product.controller")
@RestControllerAdvice(basePackages = "com.atguigu.gulimall.product.controller")
public class GulimallExceptionControllerAdvice {


    @ExceptionHandler(value= MethodArgumentNotValidException.class)
    public R handleVaildException(MethodArgumentNotValidException e){
        log.error("数据校验出现问题{},异常类型:{}",e.getMessage(),e.getClass());
        BindingResult bindingResult = e.getBindingResult();

        Map<String,String> errorMap = new HashMap<>();
        bindingResult.getFieldErrors().forEach((fieldError)->{
            errorMap.put(fieldError.getField(),fieldError.getDefaultMessage());
        });
        return R.error(BizCodeEnume.VAILD_EXCEPTION.getCode(),BizCodeEnume.VAILD_EXCEPTION.getMsg()).put("data",errorMap);
    }

    @ExceptionHandler(value = Throwable.class)
    public R handleException(Throwable throwable){

        log.error("错误:",throwable);
        return R.error(BizCodeEnume.UNKNOW_EXCEPTION.getCode(),BizCodeEnume.UNKNOW_EXCEPTION.getMsg());
    }
}
ElasticSearch
索引 类比==>数据库
类型类比==>表(已废除)
文档类比==>数据
属性类比==>列名
docker安装es
安装elastic search
dokcer中安装elastic search
下载ealastic search(存储和检索)和kibana(可视化检索)
docker pull elasticsearch:7.4.2
docker pull kibana:7.4.2
注意版本要统一

配置
mkdir -p /usr/local/elasticsearch/plugins
mkdir -p /usr/local/elasticsearch/config
mkdir -p /usr/local/elasticsearch/data

# es可以被远程任何机器访问
echo "http.host: 0.0.0.0" >/usr/local/elasticsearch/config/elasticsearch.yml

# 递归更改权限,es需要访问
chmod -R 777 /usr/local/elasticsearch

启动Elastic search
# 9200是用户交互端口 9300是集群心跳端口
# -e指定是单阶段运行
# -e指定占用的内存大小,生产时可以设置32G
sudo docker run --name elasticsearch -p 9200:9200 -p 9300:9300 \
-e  "discovery.type=single-node" \
-e ES_JAVA_OPTS="-Xms64m -Xmx512m" \
-v /usr/local/elasticsearch/config/elasticsearch.yml:/usr/share/elasticsearch/config/elasticsearch.yml \
-v /usr/local/elasticsearch/data:/usr/share/elasticsearch/data \
-v  /usr/local/elasticsearch/plugins:/usr/share/elasticsearch/plugins \
-d elasticsearch:7.4.2
docker安装kibana
docker pull kibana:7.4.2
启动kibana:
sudo docker run --name kibana -e ELASTICSEARCH_HOSTS=http://192.168.11.129:9200  -p 5601:5601 -d kibana:7.4.2
docker run --name kibana -e ELASTICSEARCH_HOSTS=http://192.168.20.10:9200 -p 5601:5601 \
访问:192.168.20.10:5610
测试
查看elasticsearch版本信息: http://192.168.11.129:9200
{
    "name": "66718a266132",
    "cluster_name": "elasticsearch",
    "cluster_uuid": "xhDnsLynQ3WyRdYmQk5xhQ",
    "version": {
        "number": "7.4.2",
        "build_flavor": "default",
        "build_type": "docker",
        "build_hash": "2f90bbf7   b93631e52bafb59b3b049cb44ec25e96",
        "build_date": "2019-10-28T20:40:44.881551Z",
        "build_snapshot": false,
        "lucene_version": "8.2.0",
        "minimum_wire_compatibility_version": "6.8.0",
        "minimum_index_compatibility_version": "6.0.0-beta1"
    },
    "tagline": "You Know, for Search"
}

显示elasticsearch 节点信息http://192.168.11.129:9200/_cat/nodes
127.0.0.1 14 99 25 0.29 0.40 0.22 dilm * 66718a266132

66718a266132代表上面的结点
*代表是主节点

访问Kibana: http://192.168.56.10:5601/app/kibana
match_phrase:在进行值匹配的时候不会对搜索条件进行分词。当然如果在match下加个keyword属性就不会分词,就会当作整体查询,和下文的term功能一样了。

bool:用来组合多种条件查询
在 Postman 中,向 ES 服务器发 GET 请求 :http://127.0.0.1:9200/student/_search
{
 "query": {
 "bool": {
 "must": [
 {
 "match": {
 "name": "zhangsan"
 }
 }
 ],
 "must_not": [
 {
 "match": {
 "age": "40"
 }
 }
 ],
 "should": [
 {
 "match": {
 "sex": "男"
 }
 }
 ]
 }
 } }
should:这个意思是应该满足,就是说不满足也没事,但是会影响得分,即满足了的话得分会高。
must_not:这个不会贡献相关性得分。会被解析成filter
filter:里边的条件都是进行过滤的,都不会贡献相关性得分
term:这个和match一样,都是用来进行匹配的,区别在于match会分词,term会把他当作一个keyword整体,不会分词,所以 就是建议如果是精确的值,使用term匹配,文本值使用match匹配。
aggregation:执行聚合
terms:这是一种值分布的聚合类型,统计出某个变量有几种结果,每个结果有几个(这个我感觉有点像group by)

映射Mapping
Maping是用来定义一个文档(document),以及它所包含的属性(field)是如何存储和索引的。比如:使用maping来定义:
哪些字符串属性应该被看做全文本属性(full text fields);
哪些属性包含数字,日期或地理位置;
文档中的所有属性是否都能被索引(all 配置);
日期的格式;
自定义映射规则来执行动态添加属性;
查看mapping信息:GET bank/_mapping
创建索引并指定映射
PUT /my_index
{
  "mappings": {
    "properties": {
      "age": {
        "type": "integer"
      },
      "email": {
        "type": "keyword" # 指定为keyword
      },
      "name": {
        "type": "text" # 全文检索。保存时候分词,检索时候进行分词匹配
      }
    }
  }
}

输出:
{
  "acknowledged" : true,
  "shards_acknowledged" : true,
  "index" : "my_index"
}

查看映射GET /my_index
GET /my_index
输出结果:
{
  "my_index" : {
    "aliases" : { },
    "mappings" : {
      "properties" : {
        "age" : {
          "type" : "integer"
        },
        "email" : {
          "type" : "keyword"
        },
        "employee-id" : {
          "type" : "keyword",
          "index" : false
        },
        "name" : {
          "type" : "text"
        }
      }
    },
    "settings" : {
      "index" : {
        "creation_date" : "1588410780774",
        "number_of_shards" : "1",
        "number_of_replicas" : "1",
        "uuid" : "ua0lXhtkQCOmn7Kh3iUu0w",
        "version" : {
          "created" : "7060299"
        },
        "provided_name" : "my_index"
      }
    }
  }
}

添加新的字段映射/my_index/_mapping
PUT /my_index/_mapping
{
  "properties": {
    "employee-id": {
      "type": "keyword",
      "index": false # 字段不能被检索。检索
    }
  }
}
这里的 “index”: false,表明新增的字段不能被检索,只是一个冗余字段。
不能更新映射
对于已经存在的字段映射,我们不能更新。更新必须创建新的索引,进行数据迁移。
数据迁移
先创建一个新的索引
创建new_twitter的正确映射。

然后使用如下方式进行数据迁移。
6.0以后写法
POST reindex
{
  "source":{
      "index":"twitter"
   },
  "dest":{
      "index":"new_twitters"
   }
}
分词
如果一个属性的type是“text”,那么保存时候分词,检索时候进行分词匹配
例如:
POST _analyze
{
"analyzer": "standard", //表示使用标准分词器对下边的text内容进行分词
"text": "The 2 Brown-Foxes bone."
}
执行结果:
{
"tokens" : [
{
"token" : "the",
"start_offset" : 0,
"end_offset" : 3,
"type" : "" ,
"position" : 0
},
{
"token" : "2",
"start_offset" : 4,
"end_offset" : 5,
"type" : "" ,
"position" : 1
},
{
"token" : "brown",
"start_offset" : 6,
"end_offset" : 11,
"type" : "" ,
"position" : 2
},
{
"token" : "foxes",
"start_offset" : 12,
"end_offset" : 17,
"type" : "" ,
"position" : 3
},
{
"token" : "bone",
"start_offset" : 18,
"end_offset" : 22,
"type" : "" ,
"position" : 4
}
]
}
安装中文分词器
(1) 安装ik分词器
所有的语言分词,默认使用的都是“Standard Analyzer”,但是这些分词器针对于中文的分词,并不友好。为此需要安装中文的分词器。
在前面安装的elasticsearch时,我们已经将elasticsearch容器的“/usr/share/elasticsearch/plugins”目录,映射到宿主机的“ /usr/local/elasticsearch/plugins”目录下
1.下载“/elasticsearch-analysis-ik-7.4.2.zip”文件
https://github.com/medcl/elasticsearch-analysis-ik/releases/download/v7.4.2/elasticsearch-analysis-ik-7.4.2.zip
2. 然后解压到目录 /usr/local/elasticsearch/plugins/ik下即可。
3. 安装完毕后,需要重启elasticsearch容器。
使用kibana测试:
(2) 测试分词器
使用默认分词器
GET _analyze
{
"text":"我是中国人"
}
请观察执行结果:
{
"tokens" : [
{
"token" : "我",
"start_offset" : 0,
"end_offset" : 1,
"type" : "" ,
"position" : 0
},
{
"token" : "是",
"start_offset" : 1,
"end_offset" : 2,
"type" : "" ,
"position" : 1
},
{
"token" : "中",
"start_offset" : 2,
"end_offset" : 3,
"type" : "" ,
"position" : 2
},
{
"token" : "国",
"start_offset" : 3,
"end_offset" : 4,
"type" : "" ,
"position" : 3
},
{
"token" : "人",
"start_offset" : 4,
"end_offset" : 5,
"type" : "" ,
"position" : 4
}
]
}
GET _analyze
{
"analyzer": "ik_smart",
"text":"我是中国人"
}
输出结果:
{
"tokens" : [
{
"token" : "我",
"start_offset" : 0,
"end_offset" : 1,
"type" : "CN_CHAR",
"position" : 0
},
{
"token" : "是",
"start_offset" : 1,
"end_offset" : 2,
"type" : "CN_CHAR",
"position" : 1
},
{
"token" : "中国人",
"start_offset" : 2,
"end_offset" : 5,
"type" : "CN_WORD",
"position" : 2
}
]
}
GET _analyze
{
"analyzer": "ik_max_word",
"text":"我是中国人"
}
输出结果:
{
"tokens" : [
{
"token" : "我",
"start_offset" : 0,
"end_offset" : 1,
"type" : "CN_CHAR",
"position" : 0
},
{
"token" : "是",
"start_offset" : 1,
"end_offset" : 2,
"type" : "CN_CHAR",
"position" : 1
},
{
"token" : "中国人",
"start_offset" : 2,
"end_offset" : 5,
"type" : "CN_WORD",
"position" : 2
},
{
"token" : "中国",
"start_offset" : 2,
"end_offset" : 4,
"type" : "CN_WORD",
"position" : 3
},
{
"token" : "国人",
"start_offset" : 3,
"end_offset" : 5,
"type" : "CN_WORD",
"position" : 4
}
]
}
自定义词库
快捷安装nginx
这里安装nginx的方式是先用一个命令启动nginx容器,然后再把容器内配置文件复制出来放到本地文件夹下,然后再删除容器,然后在用一个命令启动nginx容器,这种启动nginx的方式我也是第一次见,咱也不知道为什么,就先跟着这么配置启动吧
随便启动一个nginx实例,只是为了复制出配置
docker run -p 80:80 --name nginx -d nginx:1.10
这个命令如果发现docker中没有nginx镜像会先主动下载在启动nginx容器
mkdir /mydata
cd /mydata
docker container cp nginx:/etc/nginx/ .
# 然后停止容器,再删除容器
docker stop nginx
docker rm nginx
然后把nginx改名成conf,再创建一个nginx,把conf放到nginx目录下
mv nginx conf
mkdir nginx
mv conf nginx
启动新的nginx容器;命令如下
docker run -p 80:80 --name nginx \
 -v /mydata/nginx/html:/usr/share/nginx/html \
 -v /mydata/nginx/logs:/var/log/nginx \
 -v /mydata/nginx/conf/:/etc/nginx \
 -d nginx:1.10
然后去到/mydata/nginx/html目录下创建一个index.html文件,再随便添加点内容,在浏览器直接访问ip:80即可,因为默认展示的就是index.html这个文件。
然后在/mydata/nginx/html目录下创建一个es目录,在es目录下创建fenci.txt,将自定义的词库放到这个文件里。
修改/usr/local/elasticsearch/plugins/ik/config中的IKAnalyzer.cfg.xml
<?xml version="1.0" encoding="UTF-8"?>
<!DOCTYPE properties SYSTEM "http://java.sun.com/dtd/properties.dtd">
<properties>
	<comment>IK Analyzer 扩展配置</comment>
	<!--用户可以在这里配置自己的扩展字典 -->
	<entry key="ext_dict"></entry>
	 <!--用户可以在这里配置自己的扩展停止词字典-->
	<entry key="ext_stopwords"></entry>
	<!--用户可以在这里配置远程扩展字典 -->
	 <entry key="remote_ext_dict">http://39.105.135.68/es/fenci.txt</entry>
	<!--用户可以在这里配置远程扩展停止词字典-->
	<!-- <entry key="remote_ext_stopwords">words_location</entry> -->
</properties>
重启es:docker restart elasticsearch
测试:
GET _analyze
{
   "analyzer": "ik_smart",
   "text":"我是中国人"
}
结果:
{
  "tokens" : [
    {
      "token" : "我",
      "start_offset" : 0,
      "end_offset" : 1,
      "type" : "CN_CHAR",
      "position" : 0
    },
    {
      "token" : "是",
      "start_offset" : 1,
      "end_offset" : 2,
      "type" : "CN_CHAR",
      "position" : 1
    },
    {
      "token" : "中国人",
      "start_offset" : 2,
      "end_offset" : 5,
      "type" : "CN_WORD",
      "position" : 2
    }
  ]
}
设置es每次重启都自动启动:docker update elasticsearch --restart=always
spring boot整合es
<dependency>
    <groupId>org.elasticsearch.client</groupId>
    <artifactId>elasticsearch-rest-high-level-client</artifactId>
    <version>7.4.2</version>
</dependency>

在spring-boot-dependencies中所依赖的ES版本位6.8.5,要改掉
<properties>
    <java.version>1.8</java.version>
    <elasticsearch.version>7.4.2</elasticsearch.version>
</properties>
注:如果@Configuration注解没法用,需要确保springboot版本一致
3. 加上common包
<dependency>
        <groupId>com.atguigu.gulimall</groupId>
        <artifactId>gulimall-common</artifactId>
        <version>0.0.1-SNAPSHOT</version>
    </dependency>
- application.properties配置nacos
spring.cloud.nacos.discovery.server-addr=127.0.0.1:8848
spring.application.name=gulimall-search - 启动类上加@EnableDiscoveryClient
- 创建一个配置类交给容器管理
@Configuration
public class GulimallElasticSearchConfig {
    @Bean
    public RestHighLevelClient esRestClient(){
        RestClientBuilder builder=null;
        builder=RestClient.builder(new HttpHost("192.169.56.10",9200,"http"));
        RestHighLevelClient client=new RestHighLevelClient(builder);
        return client;
    }
}
- 配置统一安全访问请求头
官方建议把requestOptions创建成单实例
@Configuration
public class GuliESConfig {
    public static final RequestOptions COMMON_OPTIONS;
    static {
        RequestOptions.Builder builder = RequestOptions.DEFAULT.toBuilder();

        COMMON_OPTIONS = builder.build();
    }
}
测试:
Test
public void indexData() throws IOException {

    // 设置索引
    IndexRequest indexRequest = new IndexRequest ("users");
    indexRequest.id("1");

    User user = new User();
    user.setUserName("张三");
    user.setAge(20);
    user.setGender("男");
    String jsonString = JSON.toJSONString(user);

    //设置要保存的内容,指定数据和类型
    indexRequest.source(jsonString, XContentType.JSON);

    //执行创建索引和保存数据
    IndexResponse index = client.index(indexRequest, GulimallElasticSearchConfig.COMMON_OPTIONS);

    System.out.println(index);

}
测试复杂检索:
@Test
    public void find() throws IOException {
        // 1 创建检索请求
        SearchRequest searchRequest = new SearchRequest();
        searchRequest.indices("bank");
        SearchSourceBuilder sourceBuilder = new SearchSourceBuilder();
        // 构造检索条件
//        sourceBuilder.query();
//        sourceBuilder.from();
//        sourceBuilder.size();
//        sourceBuilder.aggregation();
        sourceBuilder.query(QueryBuilders.matchQuery("address","mill"));
        //AggregationBuilders工具类构建AggregationBuilder
        // 构建第一个聚合条件:按照年龄的值分布
        TermsAggregationBuilder agg1 = AggregationBuilders.terms("agg1").field("age").size(10);// 聚合名称
// 参数为AggregationBuilder
        sourceBuilder.aggregation(agg1);
        // 构建第二个聚合条件:平均薪资
        AvgAggregationBuilder agg2 = AggregationBuilders.avg("agg2").field("balance");
        sourceBuilder.aggregation(agg2);

        System.out.println("检索条件"+sourceBuilder.toString());

        searchRequest.source(sourceBuilder);

        // 2 执行检索
        SearchResponse response = client.search(searchRequest, GuliESConfig.COMMON_OPTIONS);
        // 3 分析响应结果
        System.out.println(response.toString());
    }


把检索结果封装为java bean
// 3.1 获取java bean
SearchHits hits = response.getHits();
SearchHit[] hits1 = hits.getHits();
for (SearchHit hit : hits1) {
    hit.getId();
    hit.getIndex();
    String sourceAsString = hit.getSourceAsString();
    Account account = JSON.parseObject(sourceAsString, Account.class);
    System.out.println(account);

}


Account(accountNumber=970, balance=19648, firstname=Forbes, lastname=Wallace, age=28, gender=M, address=990 Mill Road, employer=Pheast, email=forbeswallace@pheast.com, city=Lopezo, state=AK)
Account(accountNumber=136, balance=45801, firstname=Winnie, lastname=Holland, age=38, gender=M, address=198 Mill Lane, employer=Neteria, email=winnieholland@neteria.com, city=Urie, state=IL)
Account(accountNumber=345, balance=9812, firstname=Parker, lastname=Hines, age=38, gender=M, address=715 Mill Avenue, employer=Baluba, email=parkerhines@baluba.com, city=Blackgum, state=KY)
Account(accountNumber=472, balance=25571, firstname=Lee, lastname=Long, age=32, gender=F, address=288 Mill Street, employer=Comverges, email=leelong@comverges.com, city=Movico, state=MT)

获取检索到的分析信息
 // 3.2 获取检索到的分析信息
  Aggregations aggregations = response.getAggregations();
  Terms agg21 = aggregations.get("agg2");
  for (Terms.Bucket bucket : agg21.getBuckets()) {
      String keyAsString = bucket.getKeyAsString();
      System.out.println(keyAsString);
  }
商品上架
上架其实就是把数据放到es里,在页面上检索的时候就能检索的到了。
如果一个字段是冗余字段,在创建mapping的时候就需要加上这两个属性 “index”:“false”,“doc_values”:"false"表示不能被检索,不能被聚合。
**nested用法:**如果一个属性内部的数据是数组,那他的type值应该是nested,因为es默认会把数组进行扁平化处理,不设置nested检索的时候会出现问题。设置如图:

在接下来的逻辑里,先根据spuid查询到商品信息,然后再各种完善字段信息,通过远程调用别的服务等各种方式,数据组装完成后就开始调用es服务保存数据了。
Nginx搭建域名访问环境
反向代理就是,我们提供服务的服务器集群之间通信使用的是内网ip,只在nginx机器上对外暴露公网ip,nginx转发到集群服务中。

注:查看nginx容器启动日志的命令:docker logs nginx
一般来说,nginx转发请求到网关,网关再将请求转发到微服务,微服务可以部署多台,而这里的网关也可以部署成多个,nginx转发的时候也可以采用负载均衡的方式,这样的话需要在nginx配置文件配置一下上游服务器:
来到nginx.conf文件:
upstrewam gulimall{
 server: 192.168.23.22:88;
 server: 192.142.23.11:83;
 ...
 ...
}
server{
	listen:80;
	server_name:gulimall;
	location /{
	proxy_set_host Host $host;  //表示如果路由到网关的话会带上请求头,否则默认会丢掉请求头信息
	proxy_pass http://gulimall;//使用上游服务器的方式配置目标地址
  }

}
同时在网关需要配置下转发规则:
id: gulimall_host_route
uri: lb://gulimall-product
predicates:
	- Host=**.gulimall.com,gulimall.com
压力测试
压力测试考察当前软硬件环境下系统所能承受的最大负荷并帮助找出系统瓶颈所在。压测都是为了系统在线上的处理能力和稳定性维持在一个标准范围内,做到心中有数
下载JMeter:https://jmeter.apache.org/download_jmeter.cgi
双击jmeter.bat,然后创建线程组:
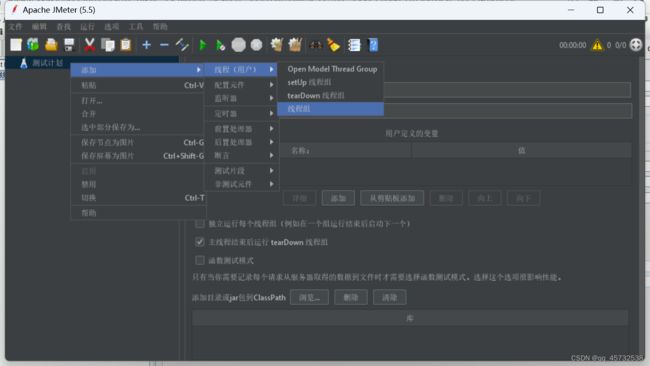 测试参数以及测试计划下需要加上的结果统计:
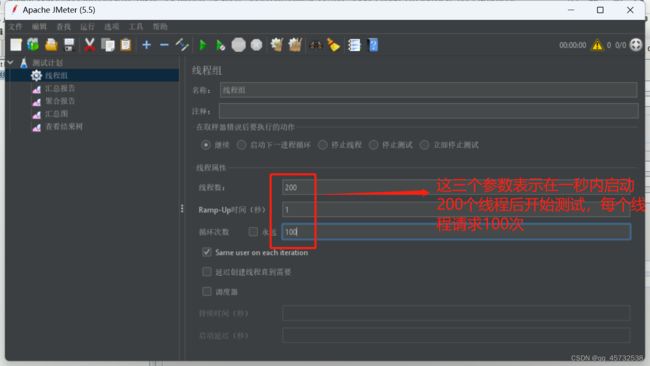 JMeter Address Already in use 错误解决
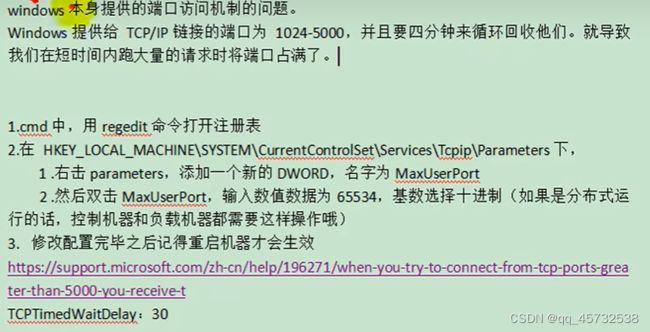 优化
优化
SQL耗时越小越好,一般情况下微秒级别
命中率越高越好,一般情况下不能低于95%
锁等待次数越低越好,等待时间越短越好
中间件越多,性能损失越大,大多都损失在网络交互了
这里关于压力测试的知识打算先不看了,用到的时候再看吧,不然看了又都忘了。。。。。。。
缓存与分布式锁
引入redis依赖
<dependency>
            <groupId>org.springframe.boot</groupId>
            <artifactId>spring-boot-starter-redis</artifactId>
        </dependency>
配置文件上加:
redis:
host:192.253.23.22
port:6379
password:qazq
压力测试出的内存泄漏问题及解决:
出现这个问题的主要原因是lettuce客户端没有及时释放连接,springboot2.0以后默认使用lettuce作为操作redis的客户端。它使用netty进行网络通信。解决方案是改用jedis客户端连接redis,只需要改下依赖即可:
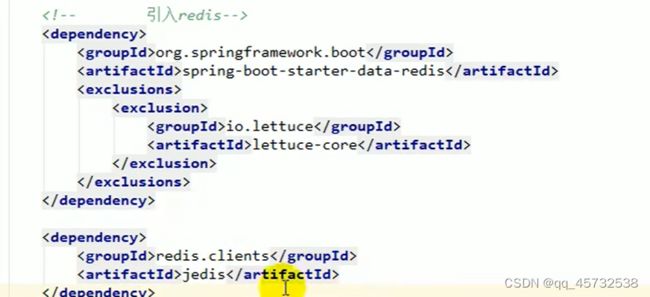 lettuce、jedis是操作redis的底层客户端,spring再次封装成了redisTemplate
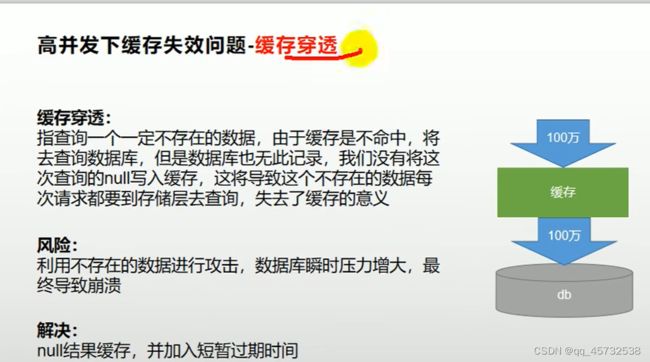
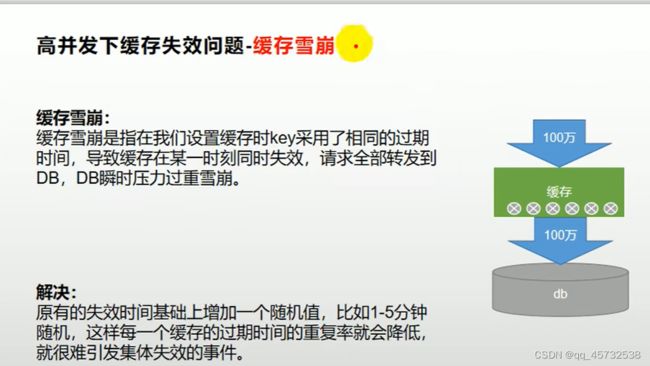
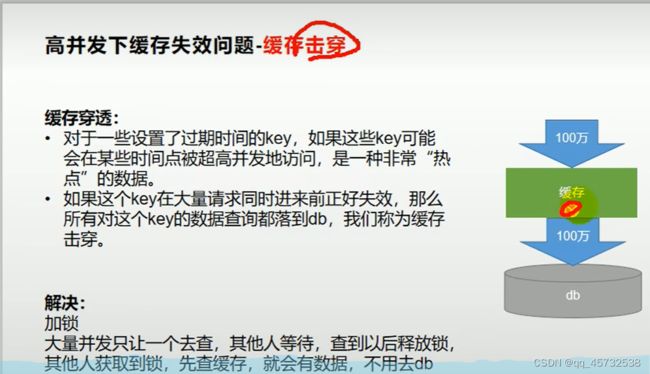
缓存穿透、缓存雪崩、缓存击穿:
分布式锁(redisson)
老师说redisson分布式锁和juc的用法都一样,看来我得复习下juc
158这个视频花了40多分钟来手动实现分布式锁,但是159又说可以使用redisson,真服了这个老六
so:以后使用redisson作所有分布式锁,分布式对象等功能
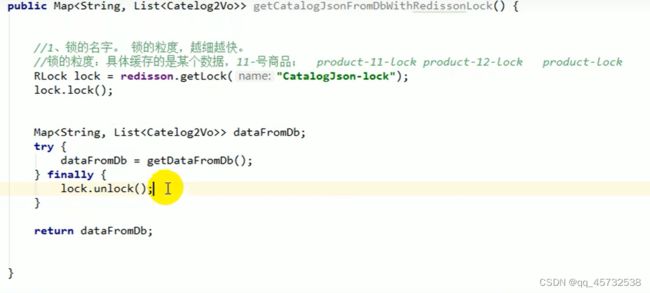
RLock lock=redisson.getLock(“anyLock”);
lock.lock(); //获取锁,如果获取不到就会等待
redis分布式锁的原理:setnx,同一时刻只能设置成功一个。前提,锁的key是一定的,value可以变
为了防止一个锁中的代码还没执行完就宕机了,导致这个锁没有释放,其他机器的线程都进不来,就会出现死锁问题,解决方法是给这个锁设置一个自动过期时间,而redisson提供了看门狗机制,会自动给锁续期,lock.lock()获取锁后,会默认给这个锁设置30秒的过期时间,如果30秒过了还没有执行完业务代码,看门狗会继续续期。但是也可以使用lock.lock(10,TimeUnit.SECOND)方法,表示就给这个锁设置10秒的过期时间,如果过了10秒不会自动续期,这样如果业务代码执行超过十秒,在释放锁的时候会报异常,因为这个锁已经过期了。但是实际上用第二种方式加锁的人更多,因为不用自动续期,效率高,而且如果业务代码执行时间超过了10秒,业务也基本就废了。
读写锁
改数据加读锁,写数据加写锁
RReadWriteLock lock=redisson.getReadWriteLock(“rw-lock”);
RLock rLock=lock.writeLock(); //加写锁
RLock rLock=lock.readLock(); //加读锁
这样保证了一定能读到最新数据,修改期间,写锁是一个排他锁(互斥锁),即只能有一个,读锁是一个共享锁,有没有都一样
写锁没释放读锁就必须等待
写写互斥,读读可以,读写互斥
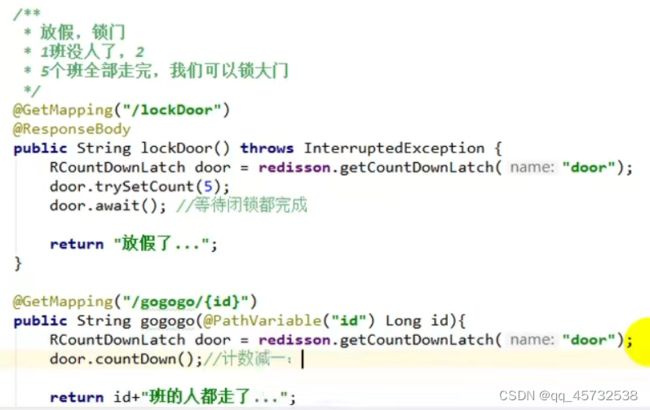
闭锁
比如这个,先运行lockDoor,会阻塞在await那里。在运行gogogo,每运行一个计数就减一,运行5次后,await就会继续向下运行了。
信号量
在redis里创建一个park,初始5。调用/park后,park值就减一,调用/go后,park值就加一,如果此时park值是0,调用/park后,会被阻塞在park.acquire()这里,只有当再次调用/go后,park值变为了1,park.acquire()才会继续向下运行。这东西可以用做限流。
![]()
缓存数据和数据库数据一致性问题
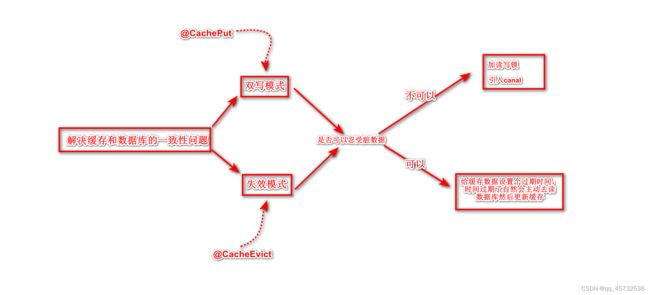
可以采用失效模式:即先更新数据库,在删除缓存。但这样在大数据量情况下就可能会出现脏数据,所以为了避免脏数据,有以下两种解决方案:
- 采用读写锁,保证并发读写、写写的时候排好队,读读的时候无所谓(所以只有写的时候才会出现阻塞,读读跟没有锁一样)
- 如果我可以容忍脏数据存在一段时间,我可以给缓存数据设置个过期时间,时间过期了自然会主动去读数据库然后更新缓存
整合springCache简化缓存开发
- 引入依赖
<dependency>
    <groupId>org.springframework.b oot</groupId>
    <artifactId>spring-boot-starter-cache</artifactId>
</dependency>
- 写配置
(1)自动配置了哪些
CacheAutoConfiguration会导入RedisCacheConfiguration,自动配好了缓存管理器RedisCacheManager
(2)配置使用redis作为缓存
spring:
cache:
#指定缓存类型为redis
type: redis
redis:
time-to-live: 3600000 # 指定redis中的过期时间为1h,这里的值是以毫秒为单位的
key-prefix=CACHE_ # 如果指定了前缀就用给指定的前缀,如果没有就默认使用缓存的名字作前缀,推荐不修改
use-key-prefix=false # 是否启用前缀,默认true,推荐不去修改
cache-null-values=true #是否存储为null的数据,可以用作防止缓存穿透 - 测试使用缓存
@Cacheable:触发将数据保存到缓存的操作,如果加上sync=true这个属性,就相当于加上了本锁,可以用来解决缓存击穿问题。
这个注解代表当前方法的结果需要缓存,如果缓存中有,方法不用调用。如果缓存中没有,会调用方法,最后将方法的结果放入缓存。这里的({”category"})相当于是在redis里创建了一个文件夹(分区),再将key,value对的数据放到里边
比如是这么写的@Cacheable(value={“category”} key=“#root.method.name”) 那么redis里存数据的key就是该方法的名字,如果配置了前缀可能还带有前缀,如果key想指定自定义字符串,需要这么写key=" ‘字符串’ "
 @CacheEvict:触发将数据从缓存删除的操作
@CachePut:不影响方法执行更新缓存
@Caching:组合以上多个操作
@CacheConfig:在类级别共享缓存的相同配置
1)开启缓存功能,在启动类上加:@EnableCaching
2)只要使用注解就能完成缓存操作
默认行为:
1)如果缓存中有,方法不用调用
2)key默认自动生成,缓存的名字::SimpleXey【】(自主生成的key值),实际上“缓存的名字::”的作用是为了好展示,这样使用 redis那个图形工具看就多了一个上下级,实际只展示::后边的自主生成的key值
3)缓存的value的值。默认使用jdk序列化机制,将序列化后的数据存到redis
4)默认ttl时间 -1
自定义:
1)指定生成的缓存使用的key,要这么写"’ key的值 '",因为这里默认使用的是spel表达式
2)指定缓存的数据的存活时间,配置文件中修改ttl
3)将数据保存为json格式
设置缓存数据的序列化方式
默认使用jdk进行序列化(可读性差),默认ttl为-1永不过期,自定义序列化方式需要编写配置类
只需要在项目中加上一个配置类:
@Configuration
public class MyCacheConfig {
    @Bean
    public RedisCacheConfiguration redisCacheConfiguration( CacheProperties cacheProperties) {

        CacheProperties.Redis redisProperties = cacheProperties.getRedis();
        org.springframework.data.redis.cache.RedisCacheConfiguration config = org.springframework.data.redis.cache.RedisCacheConfiguration
                .defaultCacheConfig();

        config = config.serializeKeysWith(
                RedisSerializationContext.SerializationPair.fromSerializer(new StringRedisSerializer()));

        //指定缓存序列化方式为json
        config = config.serializeValuesWith(
                RedisSerializationContext.SerializationPair.fromSerializer(new GenericJackson2JsonRedisSerializer()));
        //设置配置文件中的各项配置,如过期时间;如果不加的话,配置文件中关于缓存的那些配置就都失效了
        if (redisProperties.getTimeToLive() != null) {
            config = config.entryTtl(redisProperties.getTimeToLive());
        }

        if (redisProperties.getKeyPrefix() != null) {
            config = config.prefixKeysWith(redisProperties.getKeyPrefix());
        }
        if (!redisProperties.isCacheNullValues()) {
            config = config.disableCachingNullValues();
        }
        if (!redisProperties.isUseKeyPrefix()) {
            config = config.disableKeyPrefix();
        }
        return config;
    }
}
@CacheEvict的使用
@CacheEvict(value=“category”,key=“‘getLevel1Categorys’”)这个注解放在方法上就表示调
用这个方法后会删除缓存,这里的value指定的是删除缓存的分区,这里的key指定是要删除分区下的
哪个key。这个注解成就了解决缓存一致性方法中的失效模式
@Caching:
@Caching(evict={
@CacheEvict(value=“category”,key=“‘getLevel1Categorys’”),
@CacheEvict(value=“category”,key=“‘getLevel2Categorys’”)
})
@Caching是可以同时整合多种缓存操作,如果把上边的例子加上方法上,就表示执行方法后
会删除category下key是getLevel1Categorys和getLevel2Categorys的缓存。
但是关于删除缓存还有一种方式,@CacheEvict(value=“category”,allEntries=true)这就表示
删除category分区下的所有数据。所以我们建议同一种类型的数据放到同一个分区下,因为
是修改了一个数据后还可能修改缓存中另一个相关联的数据。
@CachePut注解表示该方法返回的数据同时也是修改后最新的数据,就会同步更新redis
中的值,该注解实现了解决缓存一致性方法中的双写模式
Spring-Cache的不足:
读模式:
缓存穿透:查询一个null数据。解决:缓存空数据;在配置文件种配置一下:cache-null-values=true
缓存击穿:大量并发进来同时查询一个正好过期的数据。解决:加我们之前说的分布式锁redisson;或者加本地锁,cacheable这个注解
	       默认是无锁的,只需要加上sync=true,就相当于加上了本地锁来解决击穿的问题了。
缓存雪崩:大量的key同时过期。解决:加随机时间。加上过期时间。:spring.cache.redis.time-to-live=3600000
写模式:(缓存与数据库一致。这个问题springcache没有给出解决方案,我们可以使用以下的方式解决)
	1)读写加锁。
	2)引入Canal。感知到Mysql的更新去更新数据库
	3)读多写多,直接去数据库查询就行

    一般数据:(读多写少,即时性,一致性要求不高的数据);完全可以使用spring-cache;写模式(只要缓存的数据有过期时间就可以)
   特殊数据:特殊设计
es检索业务相关
从第173集以后就开始讲在项目中使用es,先是讲封装条件查询的请求对象,然后再讲查询结果的封装对象。然后又开始讲使用kibanan封装各种请求条件。然后又开始讲在java代码中做各种条件的封装,代码在MallSearchServiceImpl这个类中。因为都是一些类似在搬砖的代码,我就没看,如果用到的话再去看吧。
异步
关于创建线程,线程池相关的知识去看文档
CompletableFuture异步编排
线程之间的执行需要有一个顺序,completableFuture就是干这个的
认证服务
在这里我直接从第283集开始看了,即放弃了单点登录、reabbitmq、feign的知识,我觉得这些知识需要我自己去实践,而且之前也都学过。
事务
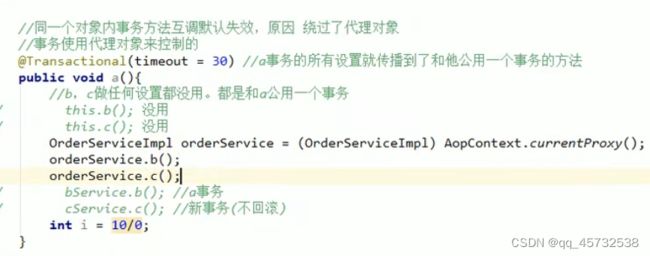
使用springboot提供的@Transactional这个事务注解的时候有一个坑,就是本类方法内事务互调失效

秒杀
秒杀具有瞬间高并发的特点。准对这一特点必须要做限流+异步+缓存(页面静态化)+独立部署。
创建项目
关于定时任务改成异步
sentinel
- 在common模块中加上依赖
<dependency>
	<groupId>com.alibaba.cloud</groupId>
	<artifactId>spring-cloud-starter-alibaba-sentinel</artifactId>
</dependency>
- 下载控制台jar包
https://github.com/alibaba/Sentinel/releases/download/1.8.6/sentinel-dashboard-1.8.6.jar - 启动控制台
java -jar sentinel-dashboard-1.8.6.jar --server.port=8333 - 在每个微服务中添加配置信息
spring.cloud.sentinel.transport.dashboard=localhost:8333 //这个是控制台的地址
spring.cloud.sentinel.transport.port=8719 //这个是数据的传输端口 - 在控制台调整参数。【默认所有的流控设置保存在内存中,重启失效】
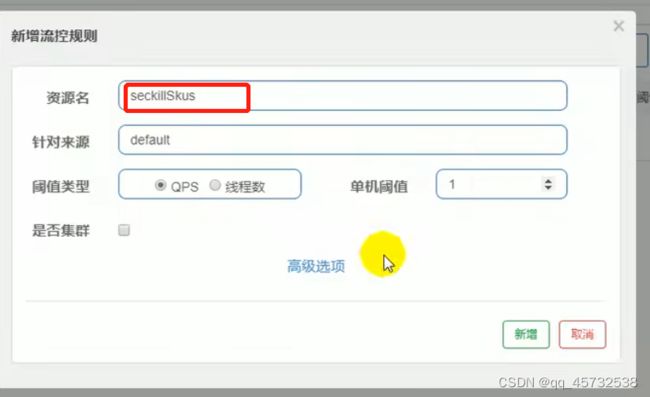
- 点击流控规则,新增流控规则,单机阈值是1表示一秒钟只能有一个

7. 导入actuator依赖
<dependency>
	<groupId>org.springframework.boot</groupId>
	<artifactId>spring-boot-starter-actuator</artifactId>
</dependency>
- 添加接口暴露
management.endppoints.web.exposure.include=* - 配置接口访问超过流控时自定义返回内容
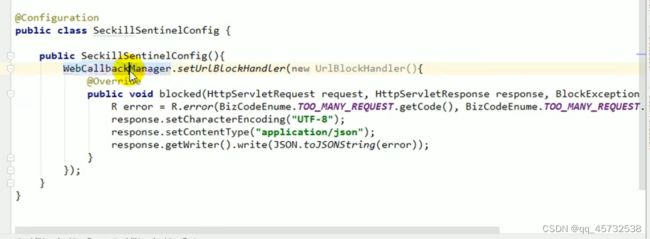
新创建一个配置文件,内容如下:
  @Configuration
  public class SeckillSentinelConfig{
     public SeckillSentinelConfig{
      WebCallbackManager.setUrlBlockHandler(new UrlBlockHandler){
      @Override
      public void blocked(HttpServletRequest request,HttpServletResponse response,BlockException e){
     response.getWriter().write("请求次数过多"));
}
})
}
}
注:解决Autowire循环依赖问题:使用构造器注入,如果类只有一个有参构造,就会从容器中获取对象注入

Sentinel降级熔断
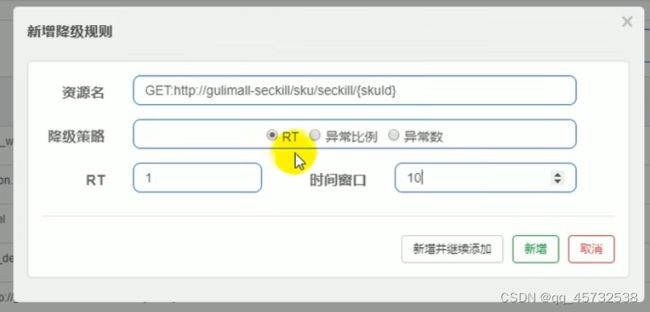
调用方的熔断保护:
添加配置:feign.sentinel.enabled=true
调用方添加降级规则:下图表示一秒内如果有5个请求响应时间超过指定的一毫秒,则后边10秒内的请求直接熔断走降级
 远程服务添加降级策略(不常用):超大流量的时候,必须牺牲一些远程服务。在服务的提供方(远程服务)指定降级策略;提供方式在运行。但是不运行自己的业务逻辑
,返回的是默认的熔断数据(限流的数据)。
就是之前限流那里配置的超过指定流量后默认的返回内容,这个配置文件应该在每个服务中都加上:

自定义受保护的资源
- 受保护的是一段业务代码
  try(Entry entry=SphU.entry("seckillSkus")){
      //业务逻辑
   }catch(Exception e){}
- 受保护的是一个方法,则基于注解实现
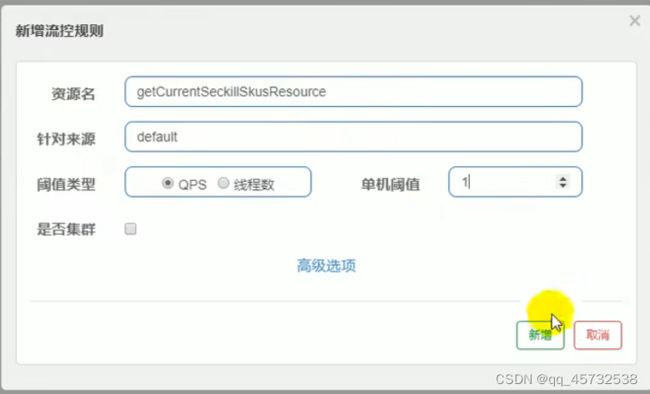
@SentinelResource(value=“getCurrentSeckillSkusResource”,blockHandler=“blockHandler”)
这里的blockHandler指的是如果超过指定流控或者降级规则,就会调用的回调方法
添加流控规则,资源名要和配置的一样:
无论是上边那个一定要配置被限流以后的默认返回,url请求的话就不用了,因为我们设置了统一返回,就是如下配置:
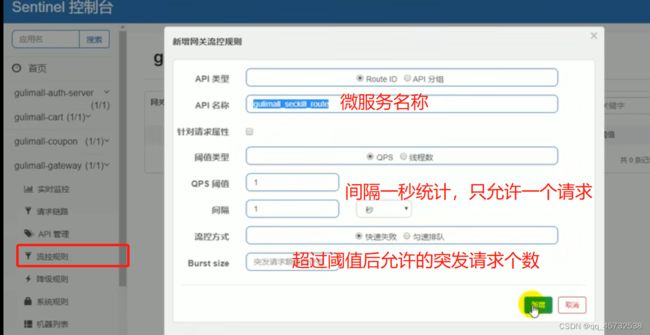
网关流控
在网关模块引入依赖
<dependency>
	<groupId>com.alibaba.cloud</groupId>
	<artifactId>spring-cloud-alibaba-sentinel-gateway</artifactId>
	<version>2.1.0RELEASE</version>
</dependency>
api分组,批量对api设置流控

新增流控规则时,Api名称选择设置的分组:
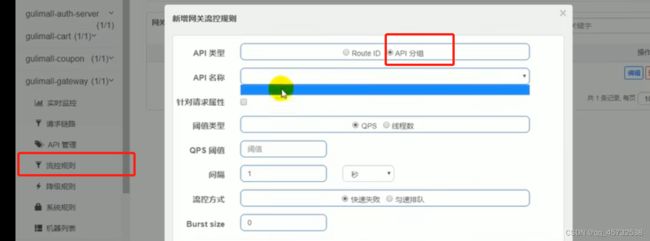 设置网关超过流控数后返回的状态码:
spring.cloud.sentinel.scg.fallback.response-status=400
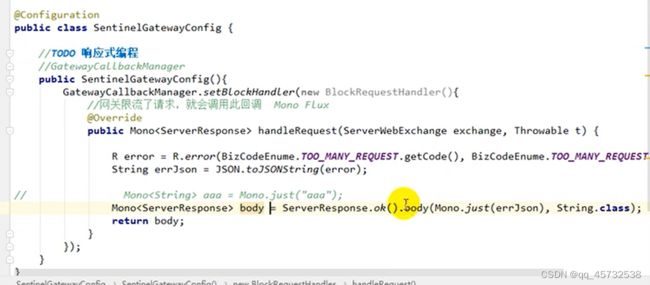
定制网关流控返回内容
Sleuth+zipkin服务链路追踪
网关上没必要加
- 在common项目添加依赖
<dependency>
	<groupId>org.springframework.cloud</groupId>
	<artifactId>spring-cloud-starter-zipkin</artifactId>
</dependency>

