springcloud+springboot+Eureka+Feign+Ribbon+Hystrix+Zuul
Springcloud集成Eureka
Eureka服务端和客户端
本实例采用springboot,eureka和feign/ribbon,hystrix,zuul,mybatis,redis
1. 新建项目springcloud-muyan-service-common-dependencies,这个项目只是统一管理pom中的jar,详细的pom文件为:
    4.0.0


        org.springframework.boot
        spring-boot-starter-parent
        2.0.2.RELEASE


    com.muyan
    springcloud-muyan-service-dependencies
    1.0.0-SNAPSHOT
    pom

    springcloud-muyan-service-dependencies
    http://www.funtl.com
    2018-Now


        1.8
        UTF-8
        UTF-8


        Finchley.RC1


                org.springframework.cloud
                spring-cloud-dependencies
                ${spring-cloud.version}
                pom
                import


                org.springframework.boot
                spring-boot-starter-jdbc


                org.mybatis.spring.boot
                mybatis-spring-boot-starter
                1.1.1


                mysql
                mysql-connector-java
                runtime
                8.0.11


                com.alibaba
                druid-spring-boot-starter
                1.1.0


                org.apache.maven.plugins
                maven-compiler-plugin

                    true


                org.apache.maven.plugins
                maven-jar-plugin


                        false


                                    true
                                    true
                                    true


                org.apache.maven.plugins
                maven-resources-plugin


                org.apache.maven.plugins
                maven-install-plugin


                org.apache.maven.plugins
                maven-clean-plugin


                    org.apache.maven.plugins
                    maven-javadoc-plugin


                            prepare-package

                                jar


                    net.alchim31.maven
                    yuicompressor-maven-plugin
                    1.5.1


                            prepare-package

                                compress


                        UTF-8
                        false
                        true
                        30000
                        true

                            **/*.js
                            **/*.css


                            **/*.min.js
                            **/*.min.css


                src/main/java

                    **/*.java


                src/main/resources


            aliyun-repos
            Aliyun Repository
            http://maven.aliyun.com/nexus/content/groups/public

                true


                false


            sonatype-repos
            Sonatype Repository
            https://oss.sonatype.org/content/groups/public

                true


                false


            sonatype-repos-s
            Sonatype Repository
            https://oss.sonatype.org/content/repositories/snapshots

                false


                true


            spring-snapshots
            Spring Snapshots
            https://repo.spring.io/snapshot

                true


            spring-milestones
            Spring Milestones
            https://repo.spring.io/milestone

                false


            aliyun-repos
            Aliyun Repository
            http://maven.aliyun.com/nexus/content/groups/public

                true


                false
2. 新建一个注册中心,让其他的服务能够将服务暴露在注册中心上,所以此处新建项目springcloud-muyan-service-eureka
- 2.1 在pom文件中加入jar依赖下面为详细的pom文件,主要是引入
            org.springframework.cloud
            spring-cloud-starter-netflix-eureka-server
            2.0.0.RELEASE
详细的pom如下:
    4.0.0


        com.muyan
        springcloud-muyan-service-dependencies
        1.0.0-SNAPSHOT
        ../springcloud-muyan-service-common-dependencies/pom.xml


    springcloud-muyan-service-eureka
    jar

    springcloud-muyan-service-eureka
    eureka server


            org.springframework.boot
            spring-boot-starter-test
            test


            org.springframework.cloud
            spring-cloud-starter-netflix-eureka-server
            2.0.0.RELEASE


                org.springframework.boot
                spring-boot-maven-plugin

                    com.springcloud.muyan.service.eureke.EurekaApplication
2.2 因为此项目只是作为一个注册中心,所以不需要过多的代码,只需要启动此项目,并说明是注册中心,所以在项目的启动类上加上Eureka的注解
@EnableEurekaServer表示为注册中心服务,下面为详细代码:
package com.springcloud.muyan.service.eureka;

import org.springframework.boot.SpringApplication;
import org.springframework.boot.autoconfigure.SpringBootApplication;
import org.springframework.cloud.netflix.eureka.server.EnableEurekaServer;

/**
 * @ClassName EurekaApplication
 * @Description
 * @Author muyan
 * @Date2018/12/29 14:53
 * @Version 1.0
 **/
@SpringBootApplication
@EnableEurekaServer
public class EurekaApplication {
    public static void main(String[] args) {
        SpringApplication.run(EurekaApplication.class,args);
    }
}
2.3 在配置文件中做些说明,提供对外服务名称,具体暴露服务的ip和端口,在application.yml中加入Eureka的配置,详见如下:
说明:因为此项目本身就是个服务,需要别的服务来注册到自己的项目上,本身自己不需要向注册自己注册自己,所以加上
registerWithEureka: false和fetchRegistry: false
spring:
  application:
    # 对外的服务名
    name: springcloud-muyan-service-eureka

server:
  #分配端口
  port: 8001

eureka:
  instance:
    #eureka的主机
    hostname: localhost
  client:
    #不向注册中心注册自己
    registerWithEureka: false
    fetchRegistry: false
    serviceUrl:
      #对外提供的服务地址
      defaultZone: http://${eureka.instance.hostname}:${server.port}/eureka/
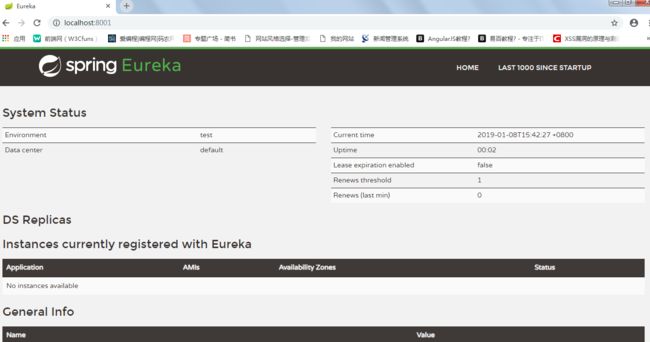
2.4 启动此项目,通过地址查看Eureka是否启动成功,
http://localhost:8081,如下图所以表示我们的注册中心启动正常,只是我们还没有写任何服务,所以都是空的。
3. 我们注册中心已经完成了,现在我们需要建立服务提供方,新建项目springcloud-muyan-service-provider,取名为服务,所以我们就上全套,在此服务和后台数据库交互,查出来数据和写一条数据,并且我们也加入缓存机制,所以我们既要引入Eureka的客户端,还要引入Mybatis和Redis
3.1 在pom文件中加入Eureka的相关jar,详细内容如下:因为我们的常用jar都在项目common-dependeance,所以我们加入
        com.muyan
        springcloud-muyan-service-dependencies
        1.0.0-SNAPSHOT
        ../springcloud-muyan-service-common-dependencies/pom.xml
注意:我们新建的是服务,所以必须引入web和jdbc、mysql、redis,下面是详细的pom文件:
    4.0.0


        com.muyan
        springcloud-muyan-service-dependencies
        1.0.0-SNAPSHOT
        ../springcloud-muyan-service-common-dependencies/pom.xml


    springcloud-muyan-service-provider
    jar

    springcloud-muyan-service-provider
    eureka provider client


            org.springframework.boot
            spring-boot-starter-web


            org.springframework.boot
            spring-boot-starter-test
            test


            org.springframework.boot
            spring-boot-starter-jdbc
            2.1.0.RELEASE


            org.springframework.cloud
            spring-cloud-starter-netflix-eureka-server
            2.0.0.RELEASE


            org.mybatis.spring.boot
            mybatis-spring-boot-starter
            1.1.1


            mysql
            mysql-connector-java
            runtime
            8.0.11


            com.alibaba
            druid-spring-boot-starter
            1.1.0


            redis.clients
            jedis
            2.1.0
            jar
            compile


            org.springframework.boot
            spring-boot-starter-data-redis


                org.springframework.boot
                spring-boot-maven-plugin

                    com.springcloud.muyan.service.ProviderApplication
3.2 下面我们介绍一下服务提供者的具体配置文件,首先应该是数据库的配置,因为我们是要具体链接数据库的,这个大家都知道和springmvc区别不大,只是yml和properties的书写方式不同、完了就是redis的配置了,自己安装一个redis并启动起来,在此处链接到redis即可、完了就是向哪个注册中心去注册,当然是我们刚刚写好的注册中心了,还记得吗我们的端口是
#eureka的配置
eureka:
  client:
    serviceUrl:
      defaultZone: http://localhost:8001/eureka/
还有就是告诉系统我们的mybatis的配置文件在哪里,因为一般情况mybatis默认不打印sql,所以我们加入logging.level
在resources文件夹下的application.xml中的配置如下
spring:
  application:
    name: springcloud-muyan-service-provider
  datasource:
    url: jdbc:mysql://localhost:3306/world?serverTimezone=GMT%2B8&useUnicode=true&characterEncoding=UTF-8&useSSL=false
    #GMT%2B8代表: 东八区
    username: root
    password: root
    driver-class-name: com.mysql.cj.jdbc.Driver
    type: com.alibaba.druid.pool.DruidDataSource
    filters: stat
    maxActive: 20
    initialSize: 1
    maxWait: 60000
    minIdle: 1
    timeBetweenEvictionRunsMillis: 60000
    minEvictableIdleTimeMillis: 300000
    validationQuery: select 'x'
    testWhileIdle: true
    testOnBorrow: false
    testOnReturn: false
    poolPreparedStatements: true
    maxOpenPreparedStatements: 20
  redis:
    host: 127.0.0.1
    port: 6379
    password:
    timeout: 1000
    database: 0
    jedis:
      pool:
        max-active: 10
        max-idle: 8
        min-idle: 2
        max-wait: 100
server:
  port: 8082
#eureka的配置
eureka:
  client:
    serviceUrl:
      defaultZone: http://localhost:8001/eureka/
mybatis:
  mapperLocations: classpath:config/*.xml
  typeAliasesPackage: com.springcloud.muyan.service.dao
#日志输出mybatis里面的sql
logging:
  level:
    com.springcloud.muyan.service.dao: debug
3.3 因为是服务提供者,本实例中加入redis和mybatis,所以在resources下新建config文件夹,用来存放mapper的xml文件,名称为UserMapper.xml,此处我们默认mybatis的基础知识大家都已经掌握的差不多了,如果不懂的同学,先去学习一些mybatis在springmvc中的使用。
切记在springboot中,所以的配置文件必须放到resources下面,不能再java下面
insert into user_t(username,password,age) values (#{userName},#{password},#{age})
3.4 此处我们是单表的增删改查,所以我们新建实体类,此处为UserPojo,内容详见下:
package com.springcloud.muyan.service.pojo;

import java.io.Serializable;

/**
 * @ClassName UserPojo
 * @Description
 * @Author muyan
 * @Date2018/12/29 17:29
 * @Version 1.0
 **/
public class UserPojo  implements Serializable {
    //id
    private int id;
    //用户名
    private String userName;
    //密码
    private String password;
    //年龄
    private int age;

    public int getId() {
        return id;
    }

    public void setId(int id) {
        this.id = id;
    }

    public String getUserName() {
        return userName;
    }

    public void setUserName(String userName) {
        this.userName = userName;
    }

    public String getPassword() {
        return password;
    }

    public void setPassword(String password) {
        this.password = password;
    }

    public int getAge() {
        return age;
    }

    public void setAge(int age) {
        this.age = age;
    }

    @Override
    public String toString() {
        return "World[id="+id+",userName="+userName+",password="+password+",age="+age+"]";
    }

}
3.5 编写完了UserMapper的xml文件,那我们新建与之对应的接口,新建mapper.xml文件的接口UserMapper.java
package com.springcloud.muyan.service.dao;

import com.springcloud.muyan.service.pojo.UserPojo;
import org.apache.ibatis.annotations.Mapper;

import java.util.List;

/**
 * @InterfaceName UserMapper
 * @Description
 * @Author muyan
 * @Date2018/12/29 17:28
 * @Version 1.0
 **/
@Mapper
public interface UserMapper {

    //获取用户中所有的信息
    public List getUser();

    //新增一条用户信息到数据库中
    public void insertUser(UserPojo userPojo);
}
3.6 有了mapper,那我们是不是该写业务层了,那我们新建service接口和service接口的实现类
因为我们使用了redis,所以在业务层我们加入redis的注解
@Cacheable(value="allUserInfo")和@CacheEvict(value = "allUserInfo" ,allEntries = true),Spring为我们提供了几个注解来支持Spring Cache。其核心主要是@Cacheable和@CacheEvict。使用@Cacheable标记的方法在执行后Spring Cache将缓存其返回结果,而使用@CacheEvict标记的方法会在方法执行前或者执行后移除Spring Cache中的某些元素
package com.springcloud.muyan.service.service;

import com.springcloud.muyan.service.pojo.UserPojo;

import java.util.List;

/**
 * @InterfaceName ProviderService
 * @Description
 * @Author muyan
 * @Date2018/12/29 17:05
 * @Version 1.0
 **/
public interface ProviderService {

    //获取用户中所有的信息
    public List getUser();

    //新增一条用户信息到数据库中
    public void insertUser(UserPojo userPojo);
}
实现类:
package com.springcloud.muyan.service.service.impl;

import com.springcloud.muyan.service.dao.UserMapper;
import com.springcloud.muyan.service.pojo.UserPojo;
import com.springcloud.muyan.service.service.ProviderService;
import org.springframework.beans.factory.annotation.Autowired;
import org.springframework.cache.annotation.CacheEvict;
import org.springframework.cache.annotation.Cacheable;
import org.springframework.stereotype.Service;
import org.springframework.transaction.annotation.Transactional;

import java.util.List;

/**
 * @ClassName ProviderServiceImpl
 * @Description
 * @Author muyan
 * @Date2018/12/29 17:05
 * @Version 1.0
 **/
@Service
public class ProviderServiceImpl implements ProviderService {

    @Autowired
    private UserMapper userMapper;

    /**
     * 获取用户中所有的信息
     * @return
     */
    @Override
    @Cacheable(value="allUserInfo")
    public List getUser(){
//        System.out.println("开始查询.....");
//        try {
//            Thread.sleep(3 * 1000l);
//        } catch (InterruptedException e) {
//            e.printStackTrace();
//        }
//        System.out.println("查询结束......");
        return userMapper.getUser();
    }


    /**
     * 新增一条用户信息到数据库中
     * @param userPojo
     * 说明:
     * 1:采用redis中的CacheEvict,新增一条数据之后,必须清除整个获取用户的redis缓存,这样保证数据每次都是最新的
     * 2:allEntries是否刷新所有的缓存,设置为false,不刷新所有,只刷新当前这一个缓存
     */
    @Override
    @Transactional
    @CacheEvict(value = "allUserInfo" ,allEntries = true)
    public void insertUser(UserPojo userPojo) {
        System.out.println( "新增用户的信息为:username=" + userPojo.getUserName() + ",password=" + userPojo.getPassword() + ",age=" + userPojo.getAge() );
        userMapper.insertUser(userPojo);
    }
}
3.7 有了业务层,我们需要一个controller新建providerController,里面就三个方法啊,第一个是获取端口号,第二个是查询所有数据到前台,最后一个方法是向数据库中插入一条数据。用来调用service
package com.springcloud.muyan.service.controller;

import com.springcloud.muyan.service.pojo.UserPojo;
import com.springcloud.muyan.service.service.ProviderService;
import org.springframework.beans.factory.annotation.Autowired;
import org.springframework.beans.factory.annotation.Value;
import org.springframework.web.bind.annotation.*;

import java.util.List;

/**
 * @ClassName ProviderController
 * @Description
 * @Author muyan
 * @Date2018/12/29 15:10
 * @Version 1.0
 **/
@RestController
public class ProviderController {

    @Value("${server.port}")
    private String port;

    @Autowired
    private ProviderService providerService;

    @RequestMapping(value = "getName", method = RequestMethod.GET)
    public String getName(@RequestParam(value = "name") String name){
        String result = "获取的名字是:" + name + ",端口是:" + port;
        return result;
    }

    /**
     * 获取所有用户信息
     * @Author muyan
     * @param
     * @return
     */
    @RequestMapping(value = "getUser",method = RequestMethod.GET)
    public List getUser(){
        long beginTime=System.currentTimeMillis();
        List list  = providerService.getUser();
        long time=System.currentTimeMillis()-beginTime;
        System.out.println("消耗查询的时间为:" + time);
        return list;
    }


    /**
     * 新增用户
     * @Author muyan
     * @param userPojo
     * @return
     * 说明:
     * 参数传递是的是对象,所以此处必须是用@RequestBody修饰参数,否则会出现参数传递是空
     */
    @RequestMapping(value = "/insertUser")
    public String insertUser(@RequestBody UserPojo userPojo){
        String result = "新增成功";
        try {
            System.out.println( "controller===>新增用户的信息为:username=" + userPojo.getUserName() + ",password=" + userPojo.getPassword() + ",age=" + userPojo.getAge() );
            providerService.insertUser( userPojo );
        }catch (Exception e){
            result = "新增失败";
            e.printStackTrace();
        }
        return result;
    }
}
3.8 一切貌似都已经合情合理了,那我们就准备启动,所以在启动类上,我们需要做些注解,告诉spring我们要启动加载哪些东西,编写启动类,启动类上要加入注解
@EnableEurekaClient和@MapperScan,是EnaleEnrekaClient不在是Server了。
package com.springcloud.muyan.service;

import com.alibaba.druid.pool.DruidDataSource;
import org.mybatis.spring.annotation.MapperScan;
import org.springframework.boot.SpringApplication;
import org.springframework.boot.autoconfigure.SpringBootApplication;
import org.springframework.boot.context.properties.ConfigurationProperties;
import org.springframework.cloud.netflix.eureka.EnableEurekaClient;
import org.springframework.context.annotation.Bean;
import org.springframework.context.annotation.ComponentScan;

import javax.sql.DataSource;

/**
 * @ClassName ProviderApplication
 * @Description
 * @Author muyan
 * @Date2018/12/29 15:09
 * @Version 1.0
 **/
@SpringBootApplication
@EnableEurekaClient
@ComponentScan("com.springcloud.muyan.service")
@MapperScan(value = {"classpath:config/*.xml","com.springcloud.muyan.service.dao"})
public class ProviderApplication {
    public static void main(String[] args) {
        SpringApplication.run(ProviderApplication.class,args);
    }

    @Bean
    @ConfigurationProperties(prefix = "spring.datasource")
    public DataSource druidDataSource(){
        DruidDataSource druidDataSource = new DruidDataSource();
        return  druidDataSource;
    }
}
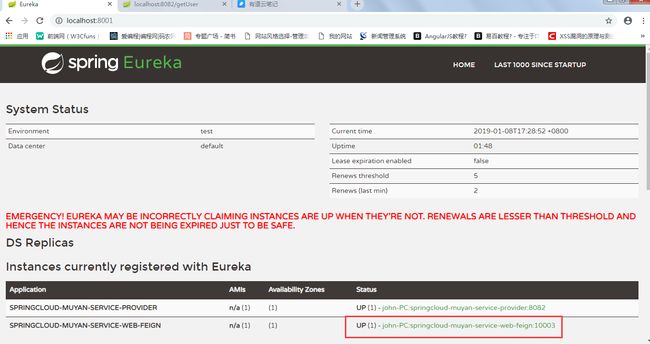
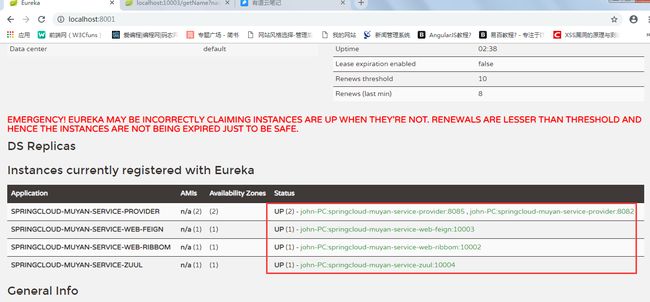
做完了我们是不是该试一下了,看看我们的服务能够正常启动,并注册到注册中心上。 我们先看我们的Eureka注册中心 http://localhost:8081
出现在注册中心了,表示注册没问题,那我们访问以下controller,看看里面调用方法是否合适。
没问题,返回似乎xml而不是我们要的json,那我们做个处理,只需要在方法的requestMapping里面加入
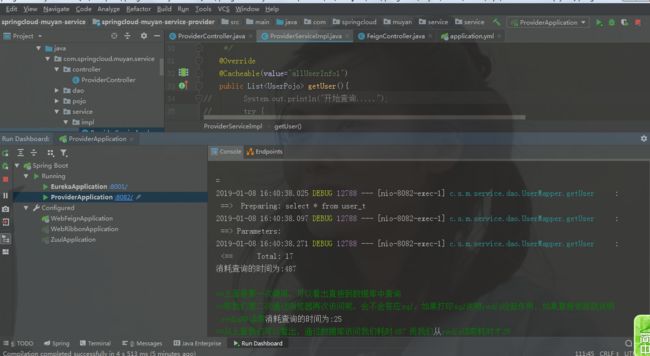
produces = {"application/json;charset=UTF-8"},完了重启再访问,好了一个服务可以了,我们此处加入redis,那我们再测试一下redis是不是合适,我们再controller中有调用service之前取系统时间,和调用之后的时间,完了相减看出耗费的时间,并在redis客户端查看,
@RequestMapping(value = "getUser",method = RequestMethod.GET,produces = {"application/json;charset=UTF-8"})
    public List getUser(){
        long beginTime=System.currentTimeMillis();
        List list  = providerService.getUser();
        long time=System.currentTimeMillis()-beginTime;
        System.out.println("消耗查询的时间为:" + time);
        return list;
    }
4: 既然已经有了服务了,那我们是不是可以再写服务来相互调用了,原谅我的懒惰,我就不再写一个复杂服务了,因为要集成mybatis和redis等,作为实例我随便写个简单的服务,此处模拟一个消费方来远程调用我们刚编写好的服务类。新建消费方,本实例只做了一个服务和一个消费方,消费方调用有两种实现方法RestTemplate+Ribbon和Feign,下面就分别介绍两种调用方法,先看Feign的方法
4.1 新建服务消费方springcloud-muyan-service-web-feign,主要是依赖feign包,故此我们需要加入
        org.springframework.cloud
        spring-cloud-starter-openfeign
        2.0.0.RELEASE
详细的pom文件如下:
    4.0.0


        com.muyan
        springcloud-muyan-service-dependencies
        1.0.0-SNAPSHOT
        ../springcloud-muyan-service-common-dependencies/pom.xml


    springcloud-muyan-service-web-feign
    jar

    springcloud-muyan-service-web-feign
    eureka cosumer client for feign


            org.springframework.boot
            spring-boot-starter-web


            org.springframework.boot
            spring-boot-starter-tomcat


            org.springframework.boot
            spring-boot-starter-thymeleaf


            org.springframework.boot
            spring-boot-starter-actuator


            org.springframework.boot
            spring-boot-starter-test
            test


            org.springframework.cloud
            spring-cloud-starter-netflix-eureka-server
            2.0.0.RELEASE


            org.springframework.cloud
            spring-cloud-starter-openfeign
            2.0.0.RELEASE


            net.sourceforge.nekohtml
            nekohtml


            org.springframework.cloud
            spring-cloud-starter-netflix-hystrix
            2.0.2.RELEASE


            org.springframework.cloud
            spring-cloud-starter-netflix-hystrix-dashboard
            2.0.1.RELEASE


                org.springframework.boot
                spring-boot-maven-plugin

                    com.springcloud.muyan.service.web.feign.WebFeignApplication
4.2 配置文件也没别的过多说明,只是将自己注册到Eureka的服务中,新建配置文件application.xml
spring:
  application:
    name: springcloud-muyan-service-web-feign
  thymeleaf:
    cache: false
    mode: LEGACYHTML5
    encoding: UTF-8
    servlet:
      content-type: text/html

server:
  port: 10003

eureka:
  client:
    serviceUrl:
      defaultZone: http://localhost:8001/eureka/

#开启feign支持hystrix  (注意,一定要开启,旧版本默认支持,新版本默认关闭)
# #修改调用超时时间(默认是1秒就算超时)
# 设置为true表示开启熔断hystrix,设置false表示关闭熔断机制
feign:
  hystrix:
    enabled: true
  client:
    config:
      default:
        connectTimeout: 10000 #10s就超时
        readTimeout: 10000
4.3 新建实体类UserPojo
package com.springcloud.muyan.service.web.feign.pojo;

import java.io.Serializable;

/**
 * @ClassName UserPojo
 * @Description
 * @Author muyan
 * @Date2018/12/29 18:25
 * @Version 1.0
 **/
public class UserPojo  implements Serializable {

    //id
    private int id;

    //用户名
    private String userName;
    //密码
    private String password;
    //年龄
    private int age;

    public int getId() {
        return id;
    }

    public void setId(int id) {
        this.id = id;
    }

    public String getUserName() {
        return userName;
    }

    public void setUserName(String userName) {
        this.userName = userName;
    }

    public String getPassword() {
        return password;
    }

    public void setPassword(String password) {
        this.password = password;
    }

    public int getAge() {
        return age;
    }

    public void setAge(int age) {
        this.age = age;
    }

    @Override
    public String toString() {
        return "World[id="+id+",userName="+userName+",password="+password+",age="+age+"]";
    }

}
4.4 负责的服务需要自己再编写该服务的service和mybatis,此处只是展示如何调用远程服务,所以此服务的service层和mapper层都省略,新建service接口,专门负责调用远程服务,需要把调用的远程服务的接口声明到这里,这是feign调用远程服务的方式
package com.springcloud.muyan.service.web.feign.services;

import com.springcloud.muyan.service.web.feign.pojo.UserPojo;
import org.springframework.cloud.openfeign.FeignClient;
import org.springframework.web.bind.annotation.RequestBody;
import org.springframework.web.bind.annotation.RequestMapping;
import org.springframework.web.bind.annotation.RequestMethod;
import org.springframework.web.bind.annotation.RequestParam;

import java.util.List;

/**
 * @InterfaceName FeignService
 * @Description
 * @Author muyan
 * @Date2018/12/29 16:39
 * @Version 1.0
 * fallback = FeignClientFallback.class,后面是你自定义的降级处理类,降级类一定要实现FeignService
 * 采用feign方法调用远程服务,必须编写一个接口,此接口声明需要调用远端服务的声明方法,
 * FeignClient中的value为调用远程服务的名称
 **/
@FeignClient(value = "springcloud-muyan-service-provider" ,fallback = FeignClientFallback.class)
public interface FeignService {

    @RequestMapping(value = "getName",method = RequestMethod.GET)
    public String getName(@RequestParam(value = "name") String name);

    @RequestMapping(value = "getUser",method = RequestMethod.GET)
    public List getUser();

    @RequestMapping(value = "insertUser")
    public String insertUser(@RequestBody UserPojo userPojo);
}
不知道同学们有没有发现新奇之处,这里采用一个注解
@FeignClient,value里面是要调用哪个服务,我们调用是我们新建的服务Provider,我们已经启动的服务查看自己的服务名在哪里呢,对就在每个服务自己的application.yml文件中,我们的服务名叫:
spring:
  application:
    name: springcloud-muyan-service-provider
我们的value的值刚好是这个里面的name,他会告诉feign到注册中心找名字为springcloud-muyan-service-provider的服务,通过注册中心会找到我们需要的服务,而不管我们的服务是在那台机器上,端口是多少,这不是我们消费方该管的,我们只需告诉注册中心服务名就可以实现调用远程服务,神奇吧。“没办法 就是这么强大 哈哈哈” 完了在这个类中给需要调用的远程服务编写一个接口,因为我们的服务提供类中有三个方法,所以我们此处也编写这三个方法的接口。
不知道有没有同学想过,如果我们消费方调用服务提供方,如果服务挂掉了怎么办,会出现上面情况呢,大家有没有碰到,对!会出现浏览器转圈,等待超时,这对我们互联网访问是不允许的,不能让用户在电脑旁边等待呀,那怎么办呢,这里就有给大家说说熔断机制了,这里 采用Hystrix,相信大家已经发现我们pom文件中加入了
        org.springframework.cloud
        spring-cloud-starter-netflix-hystrix
        2.0.2.RELEASE


        org.springframework.cloud
        spring-cloud-starter-netflix-hystrix-dashboard
        2.0.1.RELEASE
并且我们再FeignService中加入了fallback = FeignClientFallback.class,这样告诉系统,如果调用远程服务出现任何错误问题导致失败时,执行类FeignClientFallback,那我们看看这个类里到底有什么
4.5 因为我们采用熔断机制hystrix,所以我们要用服务的降级处理,所以我们新建类FeignClientFallback类,这个类是给那个远程接口降级,那我们就实现哪个接口,它是对降级接口的处理,所以要实现类FeignService
package com.springcloud.muyan.service.web.feign.services;

import com.springcloud.muyan.service.web.feign.pojo.UserPojo;
import org.springframework.stereotype.Component;

import java.util.ArrayList;
import java.util.List;

/**
 * 针对调用远端服务,错降级处理
 * @ClassName FeignClientFallback
 * @Description
 * @Author muyan
 * @Date2019/1/2 19:05
 * @Version 1.0
 * 因为是对FeignService进行降级处理,所以必须实现目标的接口,符合面向接口变成规范
 **/
@Component
public class FeignClientFallback implements  FeignService{
    @Override
    public String getName(String name) {
        String message = "调用springcloud-muyan-service-provider服务失败,熔断getName方法";
        System.out.println( "调用springcloud-muyan-service-provider服务失败,熔断getName方法" );
        return message;
    }

    @Override
    public List getUser() {
        System.out.println( "请求超时,熔断getUser方法" );
        UserPojo userPojo = new UserPojo();
        List list = new ArrayList(  );
        list.add( userPojo );
        return list;
    }

    @Override
    public String insertUser(UserPojo userPojo) {
        String message = "调用springcloud-muyan-service-provider服务失败,熔断insertUser方法";
        System.out.println( "调用springcloud-muyan-service-provider服务失败,熔断insertUser方法" );
        return message;
    }
}
这样我们调用任何一个远程失败,我们都立即给浏览器返回接口调用异常,请稍后重试等提示。为了我们可以经常监控哪些服务在哪些服务下会经常性的失败,我们加入hystrix的仪表盘,用于监控!并且可以配置多长时间返回给客户端,为此我们在application.yml中加入以下配置:
#开启feign支持hystrix  (注意,一定要开启,旧版本默认支持,新版本默认关闭)
# #修改调用超时时间(默认是1秒就算超时)
# 设置为true表示开启熔断hystrix,设置false表示关闭熔断机制
feign:
  hystrix:
    enabled: true
  client:
    config:
      default:
        connectTimeout: 10000 #10s就超时
        readTimeout: 10000
4.6 对熔断机制我们要做监控,所以加入熔断仪表盘,新建类HystrixDashboardConfiguration
package com.springcloud.muyan.service.web.feign.config;

import com.netflix.hystrix.contrib.metrics.eventstream.HystrixMetricsStreamServlet;
import org.springframework.boot.web.servlet.ServletRegistrationBean;
import org.springframework.context.annotation.Bean;
import org.springframework.context.annotation.Configuration;

/**
 * @ClassName HystrixDashboardConfiguration
 * @Description
 * @Author muyan
 * @Date2019/1/3 10:40
 * @Version 1.0
 **/
@Configuration
public class HystrixDashboardConfiguration {

    /**
     * 因为此处springboot里面没有web.xml,所以此处采用代码注册一下servlet
     * servlet的名称是:HystrixMetricsStreamServlet
     * servlet的url为:hystrix.stream
     * @return
     */
    @Bean
    public ServletRegistrationBean getServlet(){
        HystrixMetricsStreamServlet hystrixMetricsStreamServlet = new HystrixMetricsStreamServlet();
        ServletRegistrationBean servletRegistrationBean = new ServletRegistrationBean( hystrixMetricsStreamServlet );
        servletRegistrationBean.setLoadOnStartup( 1 );
        servletRegistrationBean.addUrlMappings( "/hystrix.stream" );
        servletRegistrationBean.setName( "HystrixMetricsStreamServlet" );
        return  servletRegistrationBean;
    }
}
4.7 说了这么多,我们换没有新建我们的controller了,新建feign的controller类,用来通过feign调用远程服务
package com.springcloud.muyan.service.web.feign.controller;

import com.springcloud.muyan.service.web.feign.pojo.UserPojo;
import com.springcloud.muyan.service.web.feign.services.FeignService;
import org.springframework.beans.factory.annotation.Autowired;
import org.springframework.web.bind.annotation.RequestMapping;
import org.springframework.web.bind.annotation.RequestMethod;
import org.springframework.web.bind.annotation.RequestParam;
import org.springframework.web.bind.annotation.RestController;

import java.util.HashMap;
import java.util.List;
import java.util.Map;

/**
 * @ClassName FeignController
 * @Description
 * @Author muyan
 * @Date2018/12/29 16:41
 * @Version 1.0
 **/
@RestController
public class FeignController {

    @Autowired
    private FeignService feignService;

    /**
     * 获取具体调用哪个微服务,如果后台将provider服务启动两个端口,多次调用,会打印不同的微服务端口,模拟负载均衡
     * @param name
     * @return
     */
    @RequestMapping(value = "/getName",method = RequestMethod.GET)
    public String getName(@RequestParam(value = "name") String name){
        return  feignService.getName(name);
    }

    /**
     * 从provider服务中获取所有用户信息
     * 这里加了produces = {"application/json;charset=UTF-8"}  可以将后台查询出来的结果,从xml变成json
     * @return
     */
    @RequestMapping(value = "/getUser",method = RequestMethod.GET,produces = {"application/json;charset=UTF-8"})
    public List getUser(){
        return feignService.getUser();
    }

    /**
     * 向远处服务发送新增一条用户请求
     * @param name
     * @param password
     * @param age
     * @return
     */
    @RequestMapping(value = "insertUser",method = RequestMethod.GET)
    public String insertUser(@RequestParam(value = "name") String name,
                             @RequestParam(value = "password") String password,
                             @RequestParam(value = "age") int age){
        UserPojo userPojo  = new UserPojo();
        userPojo.setUserName( name );
        userPojo.setPassword( password );
        userPojo.setAge( age );
        System.out.println( "客户端===》新增用户的信息为:username=" + userPojo.getUserName() + ",password=" + userPojo.getPassword() + ",age=" + userPojo.getAge() );
        return feignService.insertUser( userPojo );
    }


}
4.8 启动类需要加入一些特殊的注解
@EnableDiscoveryClient,@EnableFeignClients,@EnableCircuitBreaker,@EnableHystrixDashboard告诉spring启动的时候我们要启动hystrix的相关服务。
package com.springcloud.muyan.service.web.feign;

import org.springframework.boot.SpringApplication;
import org.springframework.boot.autoconfigure.SpringBootApplication;
import org.springframework.cloud.client.circuitbreaker.EnableCircuitBreaker;
import org.springframework.cloud.client.discovery.EnableDiscoveryClient;
import org.springframework.cloud.netflix.hystrix.EnableHystrix;
import org.springframework.cloud.netflix.hystrix.dashboard.EnableHystrixDashboard;
import org.springframework.cloud.openfeign.EnableFeignClients;

/**
 * @ClassName WebFeignApplication
 * @Description
 * @Author muyan
 * @Date2018/12/29 16:35
 * @Version 1.0
 **/
@SpringBootApplication
@EnableDiscoveryClient
@EnableFeignClients
//添加熔断降级注解
@EnableCircuitBreaker
//开启熔断器仪表盘监控
@EnableHystrixDashboard
public class WebFeignApplication {

    public static void main(String[] args) {
        SpringApplication.run(WebFeignApplication.class,args);
    }
}
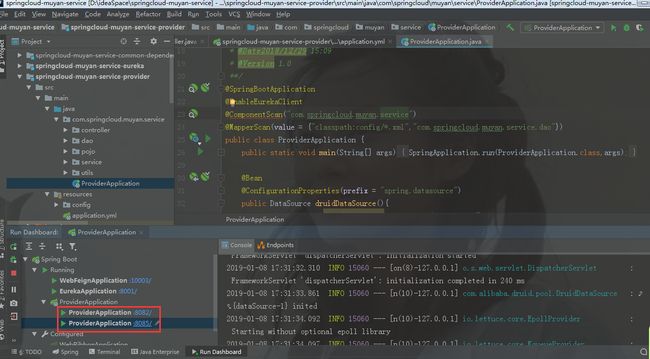
为了模拟集群,我们需要模拟将我们的服务部署到不同的虚拟机上,我们启动两次我们的服务,只是将我们服务的application.yml中的server.port修改为不同的值,再次启动服务我们访问
http://localhost:8001我们访问我们的服务消费方localhost:10003来调用远程服务,先测试负载均衡是不是实现了访问集群
每次访问以下,调用不同的服务,采用轮训的客户端负载均衡,这和nginx的服务端负载均衡不一样。 再调用远程的服务获取用户所有信息
那我们再试试熔断机制,将其中的一个服务停了,再访问试试,会出现以下情况
这是什么情况呢: 因为我们再熔断机制中实现了这个方法。
@Override
    public List getUser() {
        System.out.println( "请求超时,熔断getUser方法" );
        UserPojo userPojo = new UserPojo();
        List list = new ArrayList(  );
        list.add( userPojo );
        return list;
    }
我们判断如果调用失败,返回个空的结果给浏览器。
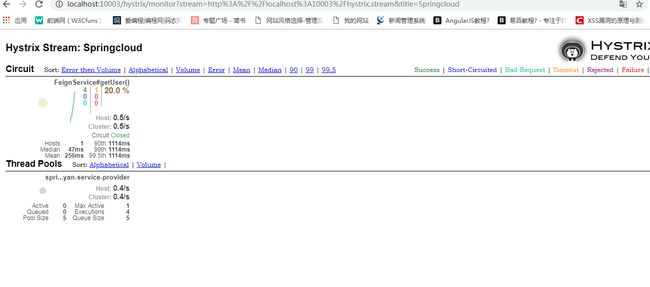
我们再看看熔断监控,我们访问
http://localhost:10003/hystrix填写完dashboard访问地址之后,填写title,点击Monitor Stream查看具体监控
说完了feign的调用方式,那我们再简单看看ribbon的方式。
5 采用resttemplate+ribbon的方法调用远程服务,新建项目springcloud-muyan-service-web-ribbon
5.1 新建pom文件,具体内容包括 主要是加入
        org.springframework.cloud
        spring-cloud-starter-netflix-ribbon
        2.0.0.RELEASE
详细的pom文件内容为:
    4.0.0


        com.muyan
        springcloud-muyan-service-dependencies
        1.0.0-SNAPSHOT
        ../springcloud-muyan-service-common-dependencies/pom.xml


    springcloud-muyan-service-web-ribbon
    jar

    springcloud-muyan-service-web-ribbon
    eureka consumer client for ribbon


            org.springframework.boot
            spring-boot-starter-web


            org.springframework.boot
            spring-boot-starter-tomcat


            org.springframework.boot
            spring-boot-starter-thymeleaf


            org.springframework.boot
            spring-boot-starter-actuator


            org.springframework.boot
            spring-boot-starter-test
            test


            org.springframework.cloud
            spring-cloud-starter-netflix-eureka-server
            2.0.0.RELEASE


            org.springframework.cloud
            spring-cloud-starter-netflix-ribbon
            2.0.0.RELEASE


            net.sourceforge.nekohtml
            nekohtml


            org.springframework.cloud
            spring-cloud-starter-netflix-hystrix
            2.0.2.RELEASE


            org.springframework.cloud
            spring-cloud-starter-netflix-hystrix-dashboard
            2.0.1.RELEASE


                org.springframework.boot
                spring-boot-maven-plugin

                    com.springcloud.muyan.service.web.ribbon.WebRibbonApplication
5.2 还是老样子,接下来我们需要看一下配置文件,新建application.xml,用来加入配置
spring:
  application:
    name: springcloud-muyan-service-web-ribbom
  thymeleaf:
    cache: false
    mode: LEGACYHTML5
    encoding: UTF-8
    servlet:
      content-type: text/html

server:
  port: 10002

eureka:
  client:
    serviceUrl:
      defaultZone: http://localhost:8001/eureka/
5.3 唯一和feign相差大的是因为ribbon需要借助于类RestTemplate,我们只使用了RestTemplate中最简单的一个功能getForEntity发起了一个get请求去调用服务端的数据,同时,我们还通过配置@LoadBalanced注解开启客户端负载均衡,RestTemplate的功能不可谓不强大,新建初始化resttemplate,新建类RestTemplateConfiguration类
package com.springcloud.muyan.service.web.ribbon.config;

import org.springframework.cloud.client.loadbalancer.LoadBalanced;
import org.springframework.context.annotation.Bean;
import org.springframework.context.annotation.Configuration;
import org.springframework.web.client.RestTemplate;

/**
 * @ClassName RestTemplateConfiguration
 * @Description
 * @Author muyan
 * @Date2018/12/29 15:51
 * @Version 1.0
 **/
@Configuration
public class RestTemplateConfiguration {

    @Bean
    @LoadBalanced
    public RestTemplate restTemplate(){
        return  new RestTemplate();
    }
}
注意:@LoadBalanced,就是因为加了这个的注解,是的ribbon可以实现轮训的客户端负载均衡。
5.4 和feign一样新建一个实体类UserPojo,方便我们传递参数
package com.springcloud.muyan.service.web.ribbon.pojo;

import java.io.Serializable;

/**
 * @ClassName UserPojo
 * @Description
 * @Author muyan
 * @Date2019/1/3 15:57
 * @Version 1.0
 **/
public class UserPojo  implements Serializable {

    //id
    private int id;

    //用户名
    private String userName;
    //密码
    private String password;
    //年龄
    private int age;

    public int getId() {
        return id;
    }

    public void setId(int id) {
        this.id = id;
    }

    public String getUserName() {
        return userName;
    }

    public void setUserName(String userName) {
        this.userName = userName;
    }

    public String getPassword() {
        return password;
    }

    public void setPassword(String password) {
        this.password = password;
    }

    public int getAge() {
        return age;
    }

    public void setAge(int age) {
        this.age = age;
    }

    @Override
    public String toString() {
        return "World[id="+id+",userName="+userName+",password="+password+",age="+age+"]";
    }
}
5.5 和feign一样,调用远程需要借助单独的类和接口,feign是编写一个接口,而ribbon是编写一个类RibbonServices,在这个类中我们就可以通过resttemplate来调用远程服务
package com.springcloud.muyan.service.web.ribbon.service;

import com.netflix.hystrix.contrib.javanica.annotation.HystrixCommand;
import com.springcloud.muyan.service.web.ribbon.pojo.UserPojo;
import org.springframework.beans.factory.annotation.Autowired;
import org.springframework.stereotype.Service;
import org.springframework.web.bind.annotation.RequestBody;
import org.springframework.web.bind.annotation.RequestMapping;
import org.springframework.web.bind.annotation.RequestMethod;
import org.springframework.web.bind.annotation.RequestParam;
import org.springframework.web.client.RestTemplate;

import java.util.ArrayList;
import java.util.List;

/**
 * @ClassName RibbonServices
 * @Description
 * @Author muyan
 * @Date2018/12/29 15:53
 * @Version 1.0
 **/
@Service
public class RibbonServices {

    @Autowired
    private RestTemplate restTemplate;

    @HystrixCommand(fallbackMethod = "failGetName")
    public String getName(String name){
        System.out.println("name======" + name);
        return  restTemplate.getForObject("http://springcloud-muyan-service-provider/getName?name="+name,String.class);
    }


    @HystrixCommand(fallbackMethod = "failGetUser")
    public List getUser(){
        return  restTemplate.getForObject( "http://springcloud-muyan-service-provider/getUser",List.class );
    }

    public List failGetUser(){
        UserPojo userPojo = new UserPojo();
        List list = new ArrayList(  );
        System.out.println( "调用远程服务springcloud-muyan-service-provider失败,熔断getUser方法" );
        return list;
    }

    public String failGetName(){
        return "调用远程服务springcloud-muyan-service-provider失败,熔断getName方法";
    }
}
说明:和feign一样,我们加入了熔断机制,所以此处我们要加上注解
@HystrixCommand,里面的fallbackmethod来实现熔断降级之后的处理方法
5.6 编写ribbon的controller类
package com.springcloud.muyan.service.web.ribbon.controller;

import com.springcloud.muyan.service.web.ribbon.pojo.UserPojo;
import com.springcloud.muyan.service.web.ribbon.service.RibbonServices;
import org.springframework.beans.factory.annotation.Autowired;
import org.springframework.web.bind.annotation.*;

import java.util.List;

/**
 * @ClassName RibbonController
 * @Description
 * @Author muyan
 * @Date2018/12/29 15:50
 * @Version 1.0
 **/
@RestController
public class RibbonController {

    @Autowired
    private RibbonServices ribbonServices;

    @RequestMapping(value = "getName",method = RequestMethod.GET)
    public String getName(@RequestParam String name){
        return ribbonServices.getName(name);
    }

    @RequestMapping(value = "getUser",method = RequestMethod.GET,produces = {"application/json;charset=UTF-8"})
    public List getUser(){
        return  ribbonServices.getUser();
    }


}
5.7 启动类,需要加入如下的注解
@EnableDiscoveryClient,@EnableHystrix,@EnableHystrixDashboard
package com.springcloud.muyan.service.web.ribbon;

import org.springframework.boot.SpringApplication;
import org.springframework.boot.autoconfigure.SpringBootApplication;
import org.springframework.cloud.client.discovery.EnableDiscoveryClient;
import org.springframework.cloud.netflix.hystrix.EnableHystrix;
import org.springframework.cloud.netflix.hystrix.dashboard.EnableHystrixDashboard;

/**
 * @ClassName WebRibbonApplication
 * @Description
 * @Author muyan
 * @Date2018/12/29 15:47
 * @Version 1.0
 **/
@SpringBootApplication
@EnableDiscoveryClient
@EnableHystrix
@EnableHystrixDashboard
public class WebRibbonApplication {
    public static void main(String[] args) {
        SpringApplication.run(WebRibbonApplication.class,args);
    }
}
< 不知道大家有没有发现问题,ribbon采用get方式拼接参数,那如果参数很多怎么办,是不是很麻烦,并且还要借助RestTemplate类。是不是此时觉得feign要好很多,其实呢,feign是在ribbon的基础上做了封装而已,所以他们都能实现负载均衡。要想了解这哥俩的详细信息,大家可以自己上网查查!
6: 网关Zuul在微服务中的使用
在 SpringCloud 体系中,Zuul 担任着网关的角色,对发送到服务端的请求进行一些预处理,比如安全验证、动态路由、负载分配等,这里我们只是简单的做个动态路由
6.1 新建项目springcloud-muyan-service-zuul,主要是依赖jar包为:
        org.springframework.cloud
        spring-cloud-starter-netflix-zuul
        2.0.1.RELEASE
具体的pom文件为:
    4.0.0


        com.muyan
        springcloud-muyan-service-dependencies
        1.0.0-SNAPSHOT
        ../springcloud-muyan-service-common-dependencies/pom.xml


    springcloud-muyan-service-zuul
    jar

    springcloud-muyan-service-zuul
    eureka client for zuul


            org.springframework.boot
            spring-boot-starter-web


            org.springframework.boot
            spring-boot-starter-tomcat


            org.springframework.boot
            spring-boot-starter-actuator


            org.springframework.boot
            spring-boot-starter-test
            test


            org.springframework.cloud
            spring-cloud-starter-netflix-eureka-server
            2.0.0.RELEASE


            org.springframework.cloud
            spring-cloud-starter-netflix-zuul
            2.0.1.RELEASE


                org.springframework.boot
                spring-boot-maven-plugin

                    com.springcloud.muyan.service.zuul.ZuulApplication
6.2 因为zuul只是个相当于过滤器的作用,所以项目中过多的代码不用,先看配置文件,编写application.yml文件,
spring:
  application:
    name: springcloud-muyan-service-zuul

server:
  port: 10004
eureka:
  client:
    serviceUrl:
      defaultZone: http://localhost:8001/eureka/
zuul:
  routes:
    feign:
      path: /feign/**
      serviceId: springcloud-muyan-service-web-feign
    ribbon:
      path: /ribbon/**
      serviceId: springcloud-muyan-service-web-ribbom
这里加入routes,当path为/feign/**时,将请求连接到feign的请求服务中去,而当path的值为/ribbon/**时,将请求连接到ribbon的请求服务中去,这样可以简单实现动态路由的作用,详细的待大家详细去了解。
6.3 在启动类上加上注解
@EnableZuulProxy,是的项目启动的时候能够加载Zuul
package com.springcloud.muyan.service.zuul;

import org.springframework.boot.SpringApplication;
import org.springframework.boot.autoconfigure.SpringBootApplication;
import org.springframework.cloud.netflix.eureka.EnableEurekaClient;
import org.springframework.cloud.netflix.zuul.EnableZuulProxy;

/**
 * @ClassName ZuulApplication
 * @Description
 * @Author muyan
 * @Date2019/1/3 15:48
 * @Version 1.0
 **/

@SpringBootApplication
@EnableEurekaClient
@EnableZuulProxy
public class ZuulApplication {

    public static void main(String[] args) {
        SpringApplication.run( ZuulApplication.class,args );
    }
}
这样会出现个问题,由于网络或者其他原因导致我们的zuul跳转有时候会失败,为此我们加入一个fallback,让其失败之后我们重新做定向。我们此处分配了两个路由连接feign和ribbon,所以为此我们必须写两个fallback,分别做失败之后的处理
6.4 新建类WebFeignFallbackProvider实现FallbackProvider这个接口,具体实现参照下方代码:
package com.springcloud.muyan.service.zuul.fallback;

import com.fasterxml.jackson.databind.ObjectMapper;
import org.springframework.cloud.netflix.zuul.filters.route.FallbackProvider;
import org.springframework.http.HttpHeaders;
import org.springframework.http.HttpStatus;
import org.springframework.http.MediaType;
import org.springframework.http.client.ClientHttpResponse;
import org.springframework.stereotype.Component;

import java.io.BufferedInputStream;
import java.io.ByteArrayInputStream;
import java.io.IOException;
import java.io.InputStream;
import java.util.HashMap;
import java.util.Map;

/**
 * @ClassName WebFeignFallbackProvider
 * @Description
 * @Author muyan
 * @Date2019/1/3 17:24
 * @Version 1.0
 **/
@Component
public class WebFeignFallbackProvider implements FallbackProvider {
    @Override
    public String getRoute() {
        return "springcloud-muyan-service-web-feign";
    }

    /**
     * 请求服务失败,则返回指定的信息给调用者
     * @param route
     * @param cause
     * @return
     */
    @Override
    public ClientHttpResponse fallbackResponse(String route, Throwable cause) {
        return new ClientHttpResponse(){
            @Override
            public HttpStatus getStatusCode() throws IOException {
                return HttpStatus.OK;
            }

            @Override
            public int getRawStatusCode() throws IOException {
                return HttpStatus.OK.value();
            }

            @Override
            public String getStatusText() throws IOException {
                return HttpStatus.OK.getReasonPhrase();
            }

            @Override
            public void close() {

            }

            @Override
            public InputStream getBody() throws IOException {
                ObjectMapper ob = new ObjectMapper(  );
                Map map = new HashMap<>(  );
                map.put( "status",200 );
                map.put( "message","网络异常,连接失败!" );
                return new ByteArrayInputStream(ob.writeValueAsString( map ).getBytes("UTF-8"));
            }

            @Override
            public HttpHeaders getHeaders() {
                HttpHeaders httpHeaders = new HttpHeaders();
                httpHeaders.setContentType( MediaType.APPLICATION_JSON_UTF8 );
                return httpHeaders;
            }
        };
    }
}
ribbon的实现类为:
package com.springcloud.muyan.service.zuul.fallback;

import com.fasterxml.jackson.databind.ObjectMapper;
import org.springframework.cloud.netflix.zuul.filters.route.FallbackProvider;
import org.springframework.http.HttpHeaders;
import org.springframework.http.HttpStatus;
import org.springframework.http.MediaType;
import org.springframework.http.client.ClientHttpResponse;
import org.springframework.stereotype.Component;

import java.io.ByteArrayInputStream;
import java.io.IOException;
import java.io.InputStream;
import java.util.HashMap;
import java.util.Map;

/**
 * @ClassName WebRibbonFallbackProvider
 * @Description
 * @Author muyan
 * @Date2019/1/3 17:35
 * @Version 1.0
 **/
@Component
public class WebRibbonFallbackProvider implements FallbackProvider {

    @Override
    public String getRoute() {
        return "springcloud-muyan-service-web-ribbom";
    }

    /**
     * 请求服务失败,则返回指定的信息给调用者
     * @param route
     * @param cause
     * @return
     */
    @Override
    public ClientHttpResponse fallbackResponse(String route, Throwable cause) {
        return new ClientHttpResponse(){
            @Override
            public HttpStatus getStatusCode() throws IOException {
                return HttpStatus.OK;
            }

            @Override
            public int getRawStatusCode() throws IOException {
                return HttpStatus.OK.value();
            }

            @Override
            public String getStatusText() throws IOException {
                return HttpStatus.OK.getReasonPhrase();
            }

            @Override
            public void close() {

            }

            @Override
            public InputStream getBody() throws IOException {
                ObjectMapper ob = new ObjectMapper(  );
                Map map = new HashMap<>(  );
                map.put( "status",200 );
                map.put( "message","网络异常,连接失败!" );
                return new ByteArrayInputStream(ob.writeValueAsString( map ).getBytes("UTF-8"));
            }

            @Override
            public HttpHeaders getHeaders() {
                HttpHeaders httpHeaders = new HttpHeaders();
                httpHeaders.setContentType( MediaType.APPLICATION_JSON_UTF8 );
                return httpHeaders;
            }
        };
    }
}
代码下载地址:
https://github.com/muyan2019/SpringCloud
