FFMPEG 将YUV420P格式数据编码成H.264

FFMPEG学习 将YUV420P格式数据编码成H.264

  • 前言
  • 一、编码流程
  • 二、代码实现
  • 三、实现效果
  • 四、总结


前言

在学习FFMPEG过程中,我们需要获取到H264码流,但是我们采集到的一般都是YUV格式的数据,这里记录一下,用FFMPEG将采集到的YUV数据编码成H.264码流的学习过程, 并把遇到的问题和心得总结一下。


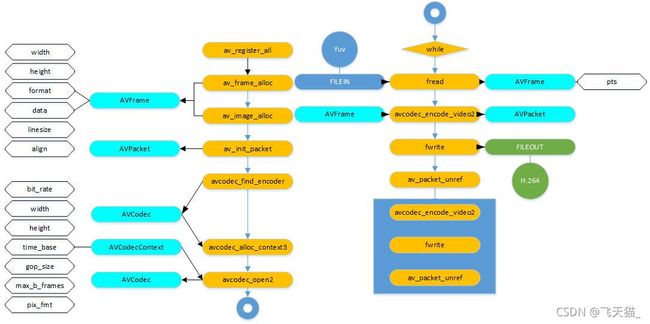
一、编码流程

FFMPEG 将YUV420P格式数据编码成H.264_第1张图片

二、代码实现

/*---------------------------------------------------------
*	文件名:transfer.c 
*	文件说明:实现YUV数据编码成H.264文件
*	作者:hzg
*	修改记录:
*		1、修改了申请图像内存的对其数值,由原来的32位对齐修改为16位对齐,解决了编码成H.264文件之后播放绿屏乱码问题
*		2、编码第22帧的时候,才开始将包置为1,编码延迟较久。疑似编码选项av_opt_set问题
----------------------------------------------------------*/
#include 
#include 
#include 
#include 
#include 
#include 
#include 
#include 
#include 
#include 
#include 
#include 

char * prename = "TestPre";
char * outname = "TestOut";
char * out_r = NULL;
int framenum = 0;

int main(int argc, char **argv)
{
    AVFrame *frame;
    AVCodec *codec = NULL;
    AVPacket packet;
    AVCodecContext *codecContext;
    int readSize=0;
    int ret=0,getPacket;
    FILE * fileIn,*fileOut;
    int frameCount=0;
    /* register all the codecs */
    av_register_all();

    if(argc!=4){
        fprintf(stdout,"usage:./test_ffmpeg xxx.yuv width height\n");
        return -1;
    }

    //1.我们需要读一帧一帧的数据,所以需要AVFrame结构
    //读出的一帧数据保存在AVFrame中。
    frame  = av_frame_alloc();
    frame->width = atoi(argv[2]);
    frame->height = atoi(argv[3]);
    fprintf(stdout,"transf para width=%d,height=%d\n",frame->width,frame->height);
    frame->format = AV_PIX_FMT_YUV420P;
	//根据指定的宽,高,和像素格式申请图像内存,最后一个参数表示内存对齐的值,32位对齐4字节,导致352*288时候绿屏,尝试修改成16位对齐
	//修改成16位对齐之后
    av_image_alloc(frame->data,frame->linesize,frame->width,frame->height,frame->format,16);
    fileIn =fopen(argv[1],"r+");

    //2.读出来的数据保存在AVPacket中,因此,我们还需要AVPacket结构体
    //初始化packet
    av_init_packet(&packet);

    //3.读出来的数据,我们需要编码,因此需要编码器
    //下面的函数找到h.264类型的编码器
    /* find the mpeg1 video encoder */
	fprintf(stdout, "find encoder AV_CODEC_ID_H264\n");
    codec = avcodec_find_encoder(AV_CODEC_ID_H264);
    if (!codec) {
        fprintf(stderr, "Codec not found\n");
        exit(1);
    }

    //有了编码器,我们还需要编码器的上下文环境,用来控制编码的过程
    codecContext = avcodec_alloc_context3(codec);//分配AVCodecContext实例
    if (!codecContext)
    {
        fprintf(stderr, "Could not allocate video codec context\n");
        return -1;
    }
	//设置编码器参数控制编码
	/* put sample parameters */
    codecContext->bit_rate = 400000;		//参数为400000的时候,编码出来的busH264文件为254KB
    /* resolution must be a multiple of two */
    codecContext->width = 352;				//输入文件bus是CIF格式,YV12 352*288
    codecContext->height = 288;
    /* frames per second */
    codecContext->time_base = (AVRational){1,25};
    /* emit one intra frame every ten frames
     * check frame pict_type before passing frame
     * to encoder, if frame->pict_type is AV_PICTURE_TYPE_I
     * then gop_size is ignored and the output of encoder
     * will always be I frame irrespective to gop_size
     */
    codecContext->gop_size = 10;			//每10帧发送一帧I帧
    /*
	* vcodec_encode_video2函数输出的延时仅仅跟max_b_frames的设置有关,  
	* 想进行实时编码,将max_b_frames设置为0便没有编码延时了
	*/
    codecContext->max_b_frames = 1;			//每两个非B帧之间最多一个B帧
    codecContext->pix_fmt = AV_PIX_FMT_YUV420P;  
	/** 
 	* ultrafast,superfast, veryfast, faster, fast, medium 
	* slow, slower, veryslow, placebo. 这是x264编码速度的选项 
	*/  
    //av_opt_set(codecContext->priv_data, "preset", "slow", 0);
	av_opt_set(codecContext->priv_data, "preset", "ultrafast", 0);
    //准备好了编码器和编码器上下文环境,现在可以打开编码器了
    fprintf(stdout, "open encoder AV_CODEC_ID_H264\n");
    if (avcodec_open2(codecContext, codec, NULL) < 0)      //根据编码器上下文打开编码器
    {
        fprintf(stderr, "Could not open codec\n");
        return -1;
    }

    //4.准备输出文件
    fileOut= fopen("test.h264","w+");
    //下面开始编码
    while(1){
        //读一帧数据出来
        readSize = fread(frame->data[0],1,frame->linesize[0]*frame->height,fileIn);
		fprintf(stdout,"fread data[0] frame->linesize[0] %d,frame->height %d,readSize %d\n",frame->linesize[0],frame->height,readSize);
        if(readSize == 0){
            fprintf(stdout,"end of file\n");
            frameCount++;
            break;
        }
        readSize = fread(frame->data[1],1,frame->linesize[1]*frame->height/2,fileIn);//本应该是25344,实际是27648,帧数变成146,实际150
		fprintf(stdout,"fread data[1] frame->linesize[1] %d,readSize %d \n",frame->linesize[1],readSize);
        readSize = fread(frame->data[2],1,frame->linesize[2]*frame->height/2,fileIn);
		fprintf(stdout,"fread data[2] frame->linesize[2] %d readSize %d \n",frame->linesize[2],readSize);
        //初始化packet
        av_init_packet(&packet);
        /* encode the image */
        frame->pts = frameCount;
		//将AVFrame中的像素信息编码为AVPacket中的码流,成功编码一个packet,将getPacket置位1
        ret = avcodec_encode_video2(codecContext, &packet, frame, &getPacket); 
        if (ret < 0) 
        {
            fprintf(stderr, "Error encoding frame\n");
            return -1;
        }
		fprintf(stdout,"had encode %d frame,and getPacket is %d\n",framenum,getPacket);	//read并encode了22帧,才开始获得一个完整编码帧
        if (getPacket) 
        {
            frameCount++;
            //获得一个完整的编码帧
            printf("Write frame %3d (size=%5d)\n", frameCount, packet.size);
            fwrite(packet.data, 1,packet.size, fileOut);
            av_packet_unref(&packet);
        }

    }
    /* flush buffer */
    for ( getPacket= 1; getPacket; frameCount++) 
    {
		fprintf(stdout,"get flush buffer getPacket %d,frameCount %d\n",getPacket,frameCount);
		fflush(stdout);
        frame->pts = frameCount;
        ret = avcodec_encode_video2(codecContext, &packet, NULL, &getPacket);
        if (ret < 0)
        {
            fprintf(stderr, "Error encoding frame\n");
            return -1;
        }

        if (getPacket) 
        {
            printf("Write frame %3d (size=%5d)\n", frameCount, packet.size);	//
            fwrite(packet.data, 1, packet.size, fileOut);
            av_packet_unref(&packet);
        }
    } 
    fclose(fileIn);
    fclose(fileOut);
    av_frame_free(&frame);
    avcodec_close(codecContext);
    av_free(codecContext);

    return 0;
}

三、实现效果

视频不好弄,直接看截图效果
FFMPEG 将YUV420P格式数据编码成H.264_第2张图片

四、总结

实现的过程中遇到过问题,深入研究一下解决了一部分,还有一些后续跟进
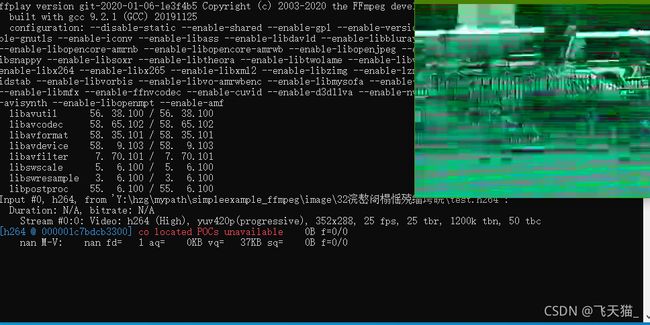
Q1:刚编的时候发现我用的YUV数据流,编码之后播放是绿色的。如图
FFMPEG 将YUV420P格式数据编码成H.264_第3张图片
A1:这里查看了下,本身的源文件是150fps,但是实际编码帧数只有146fps,继续追踪发现在读取UV数据的时候,比实际源多了16个字节,再继续追踪,发现是因为在申请帧内存的时候采用的是32位对齐,在使用源为352*288的源的时候,UV数据都多了16字节,导致读取数据异常,编码也异常了。将内存申请帧的字节对齐修改为16位对齐就解决了。
Q2:看日志打印,在编码了22帧之后,才开始置位编码成功,got_packet_ptr置1。
A2:这里问题定义为编码延迟问题,通过设置preset参数可以在压缩效率和编码时间中做一个平衡,这里建议选择可以接受的最慢的值,这边尝试将 preset 由 slow 改为 ultrafast,编程了编码13帧才开始置1。这里并不是很满意,后面再继续研究。
你可能感兴趣的:(FFMPEG,Android开发,音视频,ffmpeg,android)