案例:Docker 镜像的创建及使用(commit与dockerfile方式)
文章目录
- 1、commit方式创建镜像
-
- 1.1、前期准备
- 1.2、制成镜像
- 1.3、启动镜像
-
- 1.3.1、启动镜像+启动nginx
- 1.3.2、一个命令直接全部启动
- 1.3.3、两种方式区别
- 1.4、commit创建镜像方式的本质
- 2、Dockerfile的使用
-
- 2.1、Dockerfile指令
- 2.2、nginx镜像制作案例
- 2.3、查看构建历史:
-
- 为镜像指定环境变量,挂载目录,默认启动命令
- 2.4、run VS cmd VS entrypoint
-
- docker容器的主业
- 推荐的ENTRYPOINT 方式
- 3、commit和Dockerfile的区别
1、commit方式创建镜像
我要将一个包含nginx的容器做成一个镜像,供其他人使用,这样其他人就不必再执行nginx安装等操作。
1.1、前期准备
首先,还是启动一个容器:
docker run -it --name n1 centos /bin/bash
命名为n1。
然后在容器内部安装nginx:
yum install nginx -y
这里yum源出现问题:
![]()
解决看这里
安装成功并启动运行:
whereis nginx

/usr/sbin/nginx
在另一个终端,查看nginx情况:
docker inspect n1 # n1是该容器的name
[
    {
        "Id": "704c3c99bc66f5e22ee47be1a989701986a48aae1ad6d69b2abba2e017842fc9",
        "Created": "2023-08-06T12:27:49.98892154Z",
        "Path": "/bin/bash",
        "Args": [],
        "State": {
            "Status": "running",
            "Running": true,
            "Paused": false,
            "Restarting": false,
            "OOMKilled": false,
            "Dead": false,
            "Pid": 16981,
            "ExitCode": 0,
            "Error": "",
            "StartedAt": "2023-08-06T12:27:50.31650392Z",
            "FinishedAt": "0001-01-01T00:00:00Z"
        },
        "Image": "sha256:5d0da3dc976460b72c77d94c8a1ad043720b0416bfc16c52c45d4847e53fadb6",
        "ResolvConfPath": "/var/lib/docker/containers/704c3c99bc66f5e22ee47be1a989701986a48aae1ad6d69b2abba2e017842fc9/resolv.conf",
        "HostnamePath": "/var/lib/docker/containers/704c3c99bc66f5e22ee47be1a989701986a48aae1ad6d69b2abba2e017842fc9/hostname",
        "HostsPath": "/var/lib/docker/containers/704c3c99bc66f5e22ee47be1a989701986a48aae1ad6d69b2abba2e017842fc9/hosts",
        "LogPath": "/var/lib/docker/containers/704c3c99bc66f5e22ee47be1a989701986a48aae1ad6d69b2abba2e017842fc9/704c3c99bc66f5e22ee47be1a989701986a48aae1ad6d69b2abba2e017842fc9-json.log",
        "Name": "/n1",
        "RestartCount": 0,
        "Driver": "overlay2",
        "Platform": "linux",
        "MountLabel": "",
        "ProcessLabel": "",
        "AppArmorProfile": "",
        "ExecIDs": null,
        "HostConfig": {
            "Binds": null,
            "ContainerIDFile": "",
            "LogConfig": {
                "Type": "json-file",
                "Config": {}
            },
            "NetworkMode": "default",
            "PortBindings": {},
            "RestartPolicy": {
                "Name": "no",
                "MaximumRetryCount": 0
            },
            "AutoRemove": false,
            "VolumeDriver": "",
            "VolumesFrom": null,
            "ConsoleSize": [
                50,
                180
            ],
            "CapAdd": null,
            "CapDrop": null,
            "CgroupnsMode": "host",
            "Dns": [],
            "DnsOptions": [],
            "DnsSearch": [],
            "ExtraHosts": null,
            "GroupAdd": null,
            "IpcMode": "private",
            "Cgroup": "",
            "Links": null,
            "OomScoreAdj": 0,
            "PidMode": "",
            "Privileged": false,
            "PublishAllPorts": false,
            "ReadonlyRootfs": false,
            "SecurityOpt": null,
            "UTSMode": "",
            "UsernsMode": "",
            "ShmSize": 67108864,
            "Runtime": "runc",
            "Isolation": "",
            "CpuShares": 0,
            "Memory": 0,
            "NanoCpus": 0,
            "CgroupParent": "",
            "BlkioWeight": 0,
            "BlkioWeightDevice": [],
            "BlkioDeviceReadBps": [],
            "BlkioDeviceWriteBps": [],
            "BlkioDeviceReadIOps": [],
            "BlkioDeviceWriteIOps": [],
            "CpuPeriod": 0,
            "CpuQuota": 0,
            "CpuRealtimePeriod": 0,
            "CpuRealtimeRuntime": 0,
            "CpusetCpus": "",
            "CpusetMems": "",
            "Devices": [],
            "DeviceCgroupRules": null,
            "DeviceRequests": null,
            "MemoryReservation": 0,
            "MemorySwap": 0,
            "MemorySwappiness": null,
            "OomKillDisable": false,
            "PidsLimit": null,
            "Ulimits": null,
            "CpuCount": 0,
            "CpuPercent": 0,
            "IOMaximumIOps": 0,
            "IOMaximumBandwidth": 0,
            "MaskedPaths": [
                "/proc/asound",
                "/proc/acpi",
                "/proc/kcore",
                "/proc/keys",
                "/proc/latency_stats",
                "/proc/timer_list",
                "/proc/timer_stats",
                "/proc/sched_debug",
                "/proc/scsi",
                "/sys/firmware"
            ],
            "ReadonlyPaths": [
                "/proc/bus",
                "/proc/fs",
                "/proc/irq",
                "/proc/sys",
                "/proc/sysrq-trigger"
            ]
        },
        "GraphDriver": {
            "Data": {
                "LowerDir": "/var/lib/docker/overlay2/e256f9203c6a18429e19e0d9458494cf25de028eeb086697f77f6f12bb2bb82e-init/diff:/var/lib/docker/overlay2/0351cac31df5ec6bd716f7dd314842417100097dcad45cdbf3b2b602df85ac0d/diff",
                "MergedDir": "/var/lib/docker/overlay2/e256f9203c6a18429e19e0d9458494cf25de028eeb086697f77f6f12bb2bb82e/merged",
                "UpperDir": "/var/lib/docker/overlay2/e256f9203c6a18429e19e0d9458494cf25de028eeb086697f77f6f12bb2bb82e/diff",
                "WorkDir": "/var/lib/docker/overlay2/e256f9203c6a18429e19e0d9458494cf25de028eeb086697f77f6f12bb2bb82e/work"
            },
            "Name": "overlay2"
        },
        "Mounts": [],
        "Config": {
            "Hostname": "704c3c99bc66",
            "Domainname": "",
            "User": "",
            "AttachStdin": true,
            "AttachStdout": true,
            "AttachStderr": true,
            "Tty": true,
            "OpenStdin": true,
            "StdinOnce": true,
            "Env": [
                "PATH=/usr/local/sbin:/usr/local/bin:/usr/sbin:/usr/bin:/sbin:/bin"
            ],
            "Cmd": [
                "/bin/bash"
            ],
            "Image": "centos",
            "Volumes": null,
            "WorkingDir": "",
            "Entrypoint": null,
            "OnBuild": null,
            "Labels": {
                "org.label-schema.build-date": "20210915",
                "org.label-schema.license": "GPLv2",
                "org.label-schema.name": "CentOS Base Image",
                "org.label-schema.schema-version": "1.0",
                "org.label-schema.vendor": "CentOS"
            }
        },
        "NetworkSettings": {
            "Bridge": "",
            "SandboxID": "7ff17da73c9e66bbfbd41b199708eda43a0755d1e2719ef4e07234f4d241e385",
            "HairpinMode": false,
            "LinkLocalIPv6Address": "",
            "LinkLocalIPv6PrefixLen": 0,
            "Ports": {},
            "SandboxKey": "/var/run/docker/netns/7ff17da73c9e",
            "SecondaryIPAddresses": null,
            "SecondaryIPv6Addresses": null,
            "EndpointID": "3674d5008409dc73853dc14b6c7627ab5d5bcaf2786df5f12c43a966613256e6",
            "Gateway": "172.17.0.1",
            "GlobalIPv6Address": "",
            "GlobalIPv6PrefixLen": 0,
            "IPAddress": "172.17.0.2",
            "IPPrefixLen": 16,
            "IPv6Gateway": "",
            "MacAddress": "02:42:ac:11:00:02",
            "Networks": {
                "bridge": {
                    "IPAMConfig": null,
                    "Links": null,
                    "Aliases": null,
                    "NetworkID": "348aaaac8b83d35b8f2b750e66eefa696566a774d5791710e2b15e0e3d101332",
                    "EndpointID": "3674d5008409dc73853dc14b6c7627ab5d5bcaf2786df5f12c43a966613256e6",
                    "Gateway": "172.17.0.1",
                    "IPAddress": "172.17.0.2",
                    "IPPrefixLen": 16,
                    "IPv6Gateway": "",
                    "GlobalIPv6Address": "",
                    "GlobalIPv6PrefixLen": 0,
                    "MacAddress": "02:42:ac:11:00:02",
                    "DriverOpts": null
                }
            }
        }
    }
]
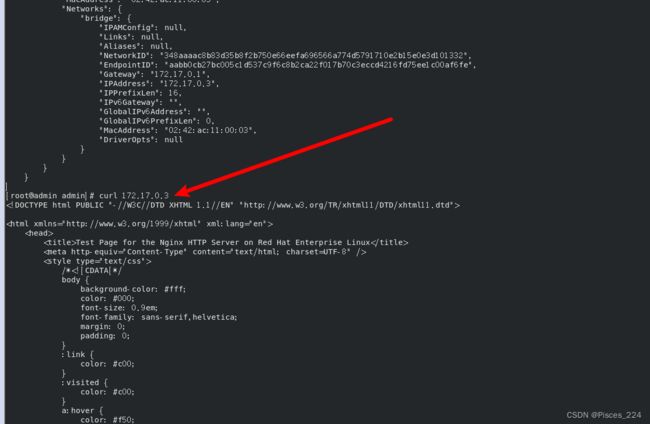
然后看到 ip是 172.17.0.2,访问nginx指令:
curl 172.17.0.2
访问成功!
<!DOCTYPE html PUBLIC "-//W3C//DTD XHTML 1.1//EN" "http://www.w3.org/TR/xhtml11/DTD/xhtml11.dtd">

<html xmlns="http://www.w3.org/1999/xhtml" xml:lang="en">
    <head>
        <title>Test Page for the Nginx HTTP Server on Red Hat Enterprise Linux</title>
        <meta http-equiv="Content-Type" content="text/html; charset=UTF-8" />
        <style type="text/css">
            /*<![CDATA[*/
            body {
                background-color: #fff;
                color: #000;
                font-size: 0.9em;
                font-family: sans-serif,helvetica;
                margin: 0;
                padding: 0;
            }
            :link {
                color: #c00;
            }
            :visited {
                color: #c00;
            }
            a:hover {
                color: #f50;
            }
            h1 {
                text-align: center;
                margin: 0;
                padding: 0.6em 2em 0.4em;
                background-color: #900;
                color: #fff;
                font-weight: normal;
                font-size: 1.75em;
                border-bottom: 2px solid #000;
            }
            h1 strong {
                font-weight: bold;
                font-size: 1.5em;
            }
            h2 {
                text-align: center;
                background-color: #900;
                font-size: 1.1em;
                font-weight: bold;
                color: #fff;
                margin: 0;
                padding: 0.5em;
                border-bottom: 2px solid #000;
            }
            hr {
                display: none;
            }
            .content {
                padding: 1em 5em;
            }
            .alert {
                border: 2px solid #000;
            }

            img {
                border: 2px solid #fff;
                padding: 2px;
                margin: 2px;
            }
            a:hover img {
                border: 2px solid #294172;
            }
            .logos {
                margin: 1em;
                text-align: center;
            }
            /*]]>*/
        </style>
    </head>

    <body>
        <h1>Welcome to <strong>nginx</strong> on Red Hat Enterprise Linux!</h1>

        <div class="content">
            <p>This page is used to test the proper operation of the
            <strong>nginx</strong> HTTP server after it has been
            installed. If you can read this page, it means that the
            web server installed at this site is working
            properly.</p>

            <div class="alert">
                <h2>Website Administrator</h2>
                <div class="content">
                    <p>This is the default <tt>index.html</tt> page that
                    is distributed with <strong>nginx</strong> on
                    Red Hat Enterprise Linux.  It is located in
                    <tt>/usr/share/nginx/html</tt>.</p>

                    <p>You should now put your content in a location of
                    your choice and edit the <tt>root</tt> configuration
                    directive in the <strong>nginx</strong>
                    configuration file
                    <tt>/etc/nginx/nginx.conf</tt>.</p>

                    <p>For information on Red Hat Enterprise Linux, please visit the <a href="http://www.redhat.com/">Red Hat, Inc. website</a>. The documentation for Red Hat Enterprise Linux is <a href="http://www.redhat.com/docs/manuals/enterprise/">available on the Red Hat, Inc. website</a>.</p>

                </div>
            </div>

            <div class="logos">
                <a href="http://nginx.net/"><img
                    src="nginx-logo.png"
                    alt="[ Powered by nginx ]"
                    width="121" height="32" /></a>
                <a href="http://www.redhat.com/"><img
                    src="poweredby.png"
                    alt="[ Powered by Red Hat Enterprise Linux ]"
                    width="88" height="31" /></a>
            </div>
        </div>
    </body>
</html>
1.2、制成镜像
将刚才的bash退回到宿主机:
注意!如果使用exit指令,退出容器时容器包括内部的镜像都停止了,我们要后台运行退出,使用如下指令:
Ctrl+P+Q

然后制作镜像:
docker commit 容器名 自定义镜像名
docker commit n1 cent-nginx:v1
docker images
1.3、启动镜像
1.3.1、启动镜像+启动nginx
docker run -it --name nginx1 cent-nginx:v1 /bin/bash
在外部,查看容器启动情况:
那么想要运行nginx,则还是手动启动:

然后另一边再访问nginx,访问成功~
docker inspect nginx1  # 查看ip

curl 172.17.0.3
启动容器还得再进入内部启动nginx,很麻烦~
1.3.2、一个命令直接全部启动
docker run -d --name nginx2 cent-nginx:v1 /usr/sbin/nginx -g "daemon off;"
1.3.3、两种方式区别
1、nginx 启动服务: /usr/sbin/nginx (不会结束一直前台跑)
2、/usr/sbin/nginx -g “daemon off;”
后面运行的命令都是容器命令,由于nginx命令没有设置到path中,所以全路径启动,
而nginx -g这个参数是指可以在外面添加指令到nginx的配置文件中,
daemon off是指nginx服务不运行在后端,而是在前台运行(container中的服务必须运行在前台)
1.4、commit创建镜像方式的本质

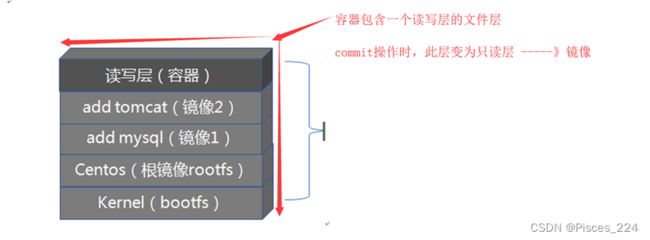
原容器与commit后的镜像,在文件系统上并无区别。只是把容器层原来的可写属性,置成了只读。于是变成了一个不可改的镜像。
2、Dockerfile的使用
2.1、Dockerfile指令
- FROM:
FROM {base镜像}
必须放在DOckerfile的第一行,表示从哪个baseimage开始构建 - MAINTAINER:
可选的,用来标识image作者的地方 - RUN
RUN都是启动一个容器、执行命令、然后提交存储层文件变更。
第一层 RUN command1 的执行仅仅是当前进程,一个内存上的变化而已,其结果不会造成任何文件。
而到第二层的时候,启动的是一个全新的容器,跟第一层的容器更完全没关系,自然不可能继承前一层构建过程中的内存变化。
而如果需要将两条命令或者多条命令联合起来执行需要加上&&。
如:cd /usr/local/src && wget xxxxxxx - CMD:
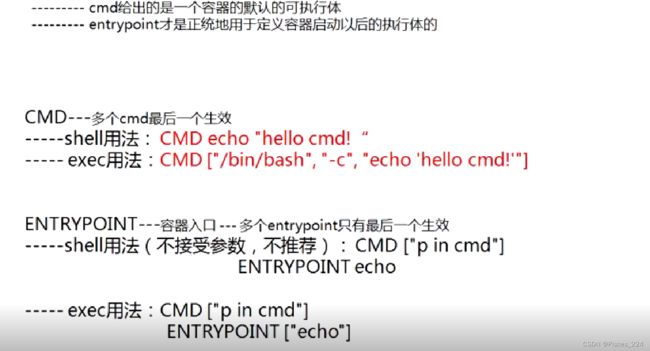
CMD的作用是作为执行container时候的默认行为(容器默认的启动命令)
当运行container的时候声明了command,则不再用image中的CMD默认所定义的命令
一个Dockerfile中只能有一个有效的CMD,当定义多个CMD的时候,只有最后一个才会起作用 - EXPOSE
EXPOSE 指令是声明运行时容器提供服务端口,这只是一个声明,在运行时并不会因为这个声明应用就会开启这个端口的服务。在 Dockerfile 中写入这样的声明有两个好处,一个是帮助镜像使用者理解这个镜像服务的守护端口,以方便配置映射;另一个用处则是在运行时使用随机端口映射时,也就是 docker run -P 时,会自动随机映射 EXPOSE 的端口。 - entrypoint:
entrypoint的作用是,把整个container变成可执行的文件,且不能够通过替换CMD的方法来改变创建container的方式。但是可以通过参数传递的方法影响到container内部
每个Dockerfile只能够包含一个entrypoint,多个entrypoint只有最后一个有效
当定义了entrypoint以后,CMD只能够作为参数进行传递 - ADD & COPY:
把host上的文件或者目录复制到image中(能够进行自动解压压缩包) - ENV:
用来设置环境变量,后续的RUN可以使用它所创建的环境变量 - WORKDIR:
用来指定当前工作目录(或者称为当前目录) - USER:
运行RUN指令的用户 - VOLUME:
用来创建一个在image之外的mount point
2.2、nginx镜像制作案例
首先,创建一个新目录,在该目录下制作:
mkdir dockerfile-nginx
cd dockerfile-nginx
![]()
然后创建并编辑Dockerfile文件:
vi Dcokerfile
文件内容如下:
# Base image
FROM centos:7

# MAINTAINER
MAINTAINER cyl

# 将nginx以及pcre源代码加入镜像
ADD nginx-1.20.1.tar.gz /usr/local/src/
ADD pcre-8.45.tar.gz /usr/local/src/

# 安装编译器
RUN yum install -y gcc gcc-c++ make openssl-devel lsof
RUN useradd -s /sbin/nologin -M nginx

# 指定工作目录
WORKDIR /usr/local/src/nginx-1.20.1/

# 编译nginx
RUN ./configure --prefix=/usr/local/nginx --user=nginx --group=nginx --with-http_ssl_module --with-http_stub_status_module --with-pcre=/usr/local/src/pcre-8.45 && make && make install
RUN echo "daemon off;" >> /usr/local/nginx/conf/nginx.conf

# 设置环境变量
ENV PATH /usr/local/nginx/sbin:$PATH

# 暴露80端口
EXPOSE 80

# 容器默认启动命令
ENTRYPOINT ["nginx"]
然后保存退出,wget下载这两个源码包:
wget http://nginx.org/download/nginx-1.13.2.tar.gz
wget http://downloads.sourceforge.net/project/pcre/pcre/8.45/pcre-8.45.tar.gz
然后开始build构建:
docker build -t cent-ngx2 . # . 表示在当前目录下构建

这里奇怪的是,我构建完毕,没有出现successfully的提示(但是nginx依然构建成功可以正常运行):

然后,run运行并指定端口映射:
docker run -d --name ngx2 -p 80:80 cent-ngx2
2.3、查看构建历史:
docker history 镜像id

此镜像层基本与dockerfile文件的RUN是一一对应的。
注:missing表示无法获取image id,通常从docker hub下载的镜像会有这个问题
以上dockerfile中指定了启动命令(前台启动),假如未指定,构建成功后,又想要制定怎么办?
为镜像指定环境变量,挂载目录,默认启动命令
docker build -t cent-ngx3
查看镜像的历史,可看到比ngx2的镜像多了几个层。

镜像的缓存特性
docker会缓存已有的镜像层,构建镜像时,如果某镜像层已经存在,就直接使用,无需创建,如果不希望在构建镜像时使用缓存,可以在docker build命令中加上–no-cache参数。dockerfile中每一个指令都会创建一个镜像层,上层依赖于下层的。无论什么时候,只要某一层发生变化,其上面所有层的缓存都会失效。除了构建时使用缓存,docker在下载镜像时也会使用
调试dockerfile
在执行dockerfile时,如果因为某种原因执行到某个指令失败了,也能够得到前一个指令成功执行构建出的容器,可以运行新的镜像,手动运行那条失败的指令,从而定位失败的原因
2.4、run VS cmd VS entrypoint
- RUN:执行命令并创建新的镜像层,常用于安装软件包;
- CMD:设置容器启动后默认执行的命令及其参数,但 docker run 后跟参数时会替换(忽略) CMD;
- ENTRYPOINT:配置容器启动时运行的命令。
docker容器的主业
docker理念里,容器启动时,应当为它指定主业是什么,如nginx容器主业就是nginx代理服务,tomcat容器就是web服务等等
1、容器创建时,必须指定主业任务,如不指定,则容器无事可干立即退出。
2、在dockerfile打包镜像时,可以使用cmd命令来指定一个默认的主业,如下:

3、既然镜像里是默认主业,即意味着创建容器时,可以覆盖此默认命令,如下

推荐的ENTRYPOINT 方式
1、镜像本身应该有稳定的主业,应当指定后即不能更改用途,于是引入ENTRYPOINT
2、使用ENTRYPOINT字义即容器入口,它不能被run中cmd覆盖,如下例:

执行:docker build -t nginxx:v3 .

以后使用nginxx:v3这个镜像时,只能做nginx服务来使用。
更详细用法看这里
3、commit和Dockerfile的区别
Commit生成的镜像和Dockerfile有以下几点区别:
- Commit生成的镜像是一个完整的镜像,而Dockerfile只是一个构建镜像的指令文件,它只能用于构建镜像,而不能用于运行容器。
- Commit生成的镜像可以直接运行容器,而Dockerfile只能用于构建镜像,不能直接运行容器。
- Commit生成的镜像可以直接推送到远程仓库,而Dockerfile不能直接推送到远程仓库,必须先构建镜像,然后再推送到远程仓库。
Docker commit的缺点如下:
- 需要在容器内操作麻烦,效率低。
- 这一点也是最重要的,使用docker commit 意味着所有对镜像的操作都是黑箱操作,生成的镜像也被称为黑箱镜像。其他人或者过一段时间后自己也不知道这个镜像是怎么做出来的,都安装了什么。但是使用Dockerfile构建的镜像,我们可以通过构建历史查看每一层做了什么。
- 而且,commit任何修改的结果仅仅是在当前层进行标记,添加,修改,而不会改动上一层。如果使用docker commit制作镜像,以及后期修改的话,每一次修改都会让镜像更加臃肿一次,所删除的上一层的东西并不会丢失,会一直如影随形的跟着这个镜像,即使根本无法访问到,这会使镜像更加臃肿。
那么为什么还要学习这种方式?
- docker commit有一些特殊的应用场合,比如被入侵后保存现场等。但是,不要使用docker commmit定制镜像,定制行为应该使用Dockerfile来完成
- Dockerfille每一步build出来的镜像正是通过docker commit 构建出来的。学习commit可以有助于我们理解dockerfile。


