chapter12:SpringBoot与检索
Spring Boot与检索视频
1. 简介
我们的应用经常需要添加检索功能,开源的ElasticSearch是目前全文搜索引擎的首选。 他可以快速的存储、搜索和分析海量数据。SpringBoot通过整合Spring Data ElasticSearch为我们提供了非常便捷的检索功能支持。
ElasticSearch是一个分布式搜索服务,提供Restful API, 底层基于Lucene,采用多shard(分片)的方式保证数据安全,并且提供自动resharding的功能,github等大型站点也是采用了ElasticSearch作为其搜索服务。
2. 安装elasticsearch
使用docker安装elasticsearch镜像,docker安装可以参考 : docker安装
下载镜像
docker search elasticsearch
docker pull elasticsearch
运行镜像,因为elasticsearch是java写的,产品默认内存配置是2GB,我使用虚拟机安装的CentOS7系统内存不够,可以在运行镜像时指定运行elasticsearch的最大,最小内存配置为256m。9200是对外访问的http端口,9300是集群节点之间的通信端口。
docker run -e ES_JAVA_OPTS="-Xms256m -Xmx256m" -d -p 9200:9200 -p 9300:9300 --name elasticsearch01 elasticsearch:latest
tips:docker hub经常访问不到,下载镜像慢。
可以使用国内的镜像,修改镜像仓库参考:Linux docker设置国内镜像
运行elasticsearch成功后, 访问http://192.168.111.129:9200/, 返回如下json串信息表示启动成功。
{
  "name" : "ScvrTuB",
  "cluster_name" : "elasticsearch", // 节点名称
  "cluster_uuid" : "h2HwBRL3Q9qB44fKYUYVOQ",
  "version" : {
    "number" : "5.6.12",
    "build_hash" : "cfe3d9f",
    "build_date" : "2018-09-10T20:12:43.732Z",
    "build_snapshot" : false,
    "lucene_version" : "6.6.1"
  },
  "tagline" : "You Know, for Search"
}
3. 快速入门
使用手册文档
以员工文档的形式存储为例: 一个文档代表一个员工数据。存储数据到ElasticSearch的行为叫做索引, 但在索引一个文档之前,需要确定将文档存储在哪里。
一个ElasticSearch集群可以包含多个索引,相应的每个索引可以包含多个类型。这些不同的类型存储着多个文档, 每个文档又有多个属性。
用关系型数据库来类比,索引-数据库,类型-表,文档-表中的记录行,属性-列。

将 HTTP 命令由 PUT 改为 GET 可以用来检索文档,同样的,可以使用 DELETE 命令来删除文档,以及使用 HEAD 指令来检查文档是否存在。如果想更新已存在的文档,只需再次 PUT 。
3.1 索引员工文档
对于员工目录,我们将做如下操作:
- 每个员工索引一个文档,文档包含该员工的所有信息。
- 每个文档都将是
employee类型 。 - 该类型位于 索引
megacorp内。 - 该索引保存在我们的 Elasticsearch 集群中。
实践中这非常简单(尽管看起来有很多步骤),我们可以通过一条命令完成所有这些动作:
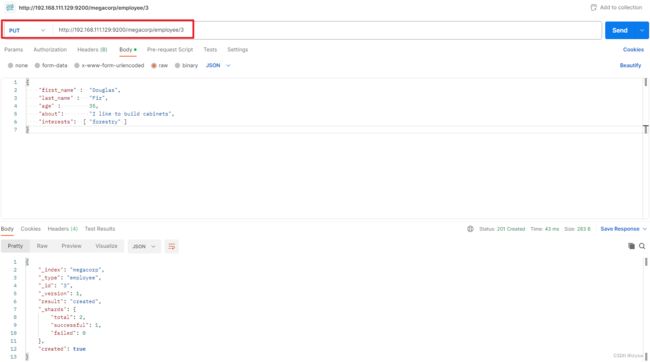
# put请求
http://192.168.111.129:9200/megacorp/employee/1
{
    "first_name" : "John",
    "last_name" :  "Smith",
    "age" :        25,
    "about" :      "I love to go rock climbing",
    "interests": [ "sports", "music" ]
}
注意,路径 /megacorp/employee/1 包含了三部分的信息:
megacorp索引名称employee类型名称1特定雇员的ID
响应结果
{
    "_index": "megacorp",
    "_type": "employee",
    "_id": "1",
    "_version": 1,
    "result": "created",
    "_shards": {
        "total": 2,
        "successful": 1,
        "failed": 0
    },
    "created": true
}
同样的方式添加id=2,id=3的员工对象信息
3.2 检索文档
检索员工信息
# get请求
http://192.168.111.129:9200/megacorp/employee/1
curl -X GET http://192.168.111.129:9200/megacorp/employee/1
响应结果
{
    "_index": "megacorp",
    "_type": "employee",
    "_id": "1",
    "_version": 1,
    "found": true,
    "_source": {
        "first_name": "John",
        "last_name": "Smith",
        "age": 25,
        "about": "I love to go rock climbing",
        "interests": [
            "sports",
            "music"
        ]
    }
}
3.3 删除文档
删除员工信息
# DELETE请求
http://192.168.111.129:9200/megacorp/employee/1
curl -X DELETE http://192.168.111.129:9200/megacorp/employee/1
响应结果
{
  "found": true,
  "_index": "megacorp",
  "_type": "employee",
  "_id": "1",
  "_version": 2,
  "result": "deleted",
  "_shards": {
    "total": 2,
    "successful": 1,
    "failed": 0
  }
}
删除后再次查询 http://192.168.111.129:9200/megacorp/employee/1的结果, 已经无法查询到了。
{
    "_index": "megacorp",
    "_type": "employee",
    "_id": "1",
    "found": false
}
也可以使用HEAD请求方式来检查文档是否存在,如果没有索引到文档,会报404;
C:\Users\18482>curl --head HEAD http://192.168.111.129:9200/megacorp/employee/1
curl: (6) Could not resolve host: HEAD
HTTP/1.1 404 Not Found
content-type: application/json; charset=UTF-8
content-length: 64
如果索引到文档返回1。
C:\Users\18482>curl --head HEAD http://192.168.111.129:9200/megacorp/employee/2
curl: (6) Could not resolve host: HEAD
HTTP/1.1 200 OK
content-type: application/json; charset=UTF-8
content-length: 260
3.4 轻量搜索
查询所有员工信息。
C:\Users\18482>curl http://192.168.111.129:9200/megacorp/employee/_search
响应结果,查询到存在的2条文档。
{
  "took": 4,
  "timed_out": false,
  "_shards": {
    "total": 5,
    "successful": 5,
    "skipped": 0,
    "failed": 0
  },
  "hits": {
    "total": 2,
    "max_score": 1,
    "hits": [
      {
        "_index": "megacorp",
        "_type": "employee",
        "_id": "2",
        "_score": 1,
        "_source": {
          "first_name": "Jane",
          "last_name": "Smith",
          "age": 32,
          "about": "I like to collect rock albums",
          "interests": [
            "music"
          ]
        }
      },
      {
        "_index": "megacorp",
        "_type": "employee",
        "_id": "3",
        "_score": 1,
        "_source": {
          "first_name": "Douglas",
          "last_name": "Fir",
          "age": 35,
          "about": "I like to build cabinets",
          "interests": [
            "forestry"
          ]
        }
      }
    ]
  }
}
3.5 指定查询参数搜索
搜索姓氏为 Smith 的雇员
curl -X GET http://192.168.111.129:9200/megacorp/employee/_search?q=last_name:Smith
返回结果给出了所有的 Smith
{
    "took": 6,
    "timed_out": false,
    "_shards": {
        "total": 5,
        "successful": 5,
        "skipped": 0,
        "failed": 0
    },
    "hits": {
        "total": 1,
        "max_score": 0.2876821,
        "hits": [
            {
                "_index": "megacorp",
                "_type": "employee",
                "_id": "2",
                "_score": 0.2876821,
                "_source": {
                    "first_name": "Jane",
                    "last_name": "Smith",
                    "age": 32,
                    "about": "I like to collect rock albums",
                    "interests": [
                        "music"
                    ]
                }
            }
        ]
    }
}
3.6 查询表达式搜索
使用 JSON 构造了一个请求。我们可以像这样重写之前的查询所有名为 Smith 的搜索 .
# get请求
http://192.168.111.129:9200/megacorp/employee/_search
{
    "query" : {
        "match" : {
            "last_name" : "Smith"
        }
    }
}
返回结果与之前的查询一样 。
3.7 过滤器filter
搜索姓氏为 Smith 的员工,但这次我们只需要年龄大于 30 的。查询需要稍作调整,使用过滤器 filter ,它支持高效地执行一个结构化查询。
# get请求
http://192.168.111.129:9200/megacorp/employee/_search
{
    "query" : {
        "bool": {
            "must": {
                "match" : {
                    "last_name" : "smith"
                }
            },
            "filter": {
                "range" : {
                    "age" : { "gt" : 30 }
                }
            }
        }
    }
}
3.8 全文搜索
搜索下所有喜欢攀岩(rock climbing)的员工:
# get请求
http://192.168.111.129:9200/megacorp/employee/_search
{
    "query" : {
        "match" : {
            "about" : "rock climbing"
        }
    }
}
3.9 短语搜索
找出一个属性中的独立单词是没有问题的,但有时候想要精确匹配一系列单词或者_短语_ 。 比如, 我们想执行这样一个查询,仅匹配同时包含 “rock” 和 “climbing” ,并且 二者以短语 “rock climbing” 的形式紧挨着的雇员记录。
为此对 match 查询稍作调整,使用一个叫做 match_phrase 的查询:
# get请求
http://192.168.111.129:9200/megacorp/employee/_search
{
    "query" : {
        "match_phrase" : {
            "about" : "rock climbing"
        }
    }
}
3.10 高亮搜索
许多应用都倾向于在每个搜索结果中 高亮 部分文本片段,以便让用户知道为何该文档符合查询条件。在 Elasticsearch 中检索出高亮片段也很容易。
再次执行前面的查询,并增加一个新的 highlight 参数:
# get请求
http://192.168.111.129:9200/megacorp/employee/_search
{
    "query" : {
        "match_phrase" : {
            "about" : "rock climbing"
        }
    },
    "highlight": {
        "fields" : {
            "about" : {}
        }
    }
}
当执行该查询时,返回结果与之前一样,与此同时结果中还多了一个叫做 highlight 的部分。这个部分包含了 about 属性匹配的文本片段,并以 HTML 标签 封装:
{
    "took": 142,
    "timed_out": false,
    "_shards": {
        "total": 5,
        "successful": 5,
        "skipped": 0,
        "failed": 0
    },
    "hits": {
        "total": 1,
        "max_score": 0.53484553,
        "hits": [
            {
                "_index": "megacorp",
                "_type": "employee",
                "_id": "1",
                "_score": 0.53484553,
                "_source": {
                    "first_name": "John",
                    "last_name": "Smith",
                    "age": 25,
                    "about": "I love to go rock climbing",
                    "interests": [
                        "sports",
                        "music"
                    ]
                },
                "highlight": {
                    "about": [
                        "I love to go rock climbing"
                    ]
                }
            }
        ]
    }
}
4. 项目使用ElasticSearch
4.1 创建项目及配置
创建Springboot项目,导入相关依赖
<project xmlns="http://maven.apache.org/POM/4.0.0" xmlns:xsi="http://www.w3.org/2001/XMLSchema-instance"
         xsi:schemaLocation="http://maven.apache.org/POM/4.0.0 https://maven.apache.org/xsd/maven-4.0.0.xsd">
    <modelVersion>4.0.0modelVersion>
    <parent>
        <groupId>org.springframework.bootgroupId>
        <artifactId>spring-boot-starter-parentartifactId>
        <version>1.5.12.RELEASEversion>
        <relativePath/>
    parent>
    <groupId>com.cryswgroupId>
    <artifactId>springboot03-elasticsearchartifactId>
    <version>0.0.1-SNAPSHOTversion>
    <name>springboot03-elasticsearchname>
    <description>springboot03-elasticsearchdescription>
    <properties>
        <java.version>1.8java.version>
    properties>
    <dependencies>

        <dependency>
            <groupId>org.springframework.bootgroupId>
            <artifactId>spring-boot-starter-data-elasticsearchartifactId>
        dependency>

        <dependency>
            <groupId>org.springframework.bootgroupId>
            <artifactId>spring-boot-starter-webartifactId>
        dependency>

        <dependency>
            <groupId>org.projectlombokgroupId>
            <artifactId>lombokartifactId>
            <optional>trueoptional>
        dependency>
        <dependency>
            <groupId>org.springframework.bootgroupId>
            <artifactId>spring-boot-starter-testartifactId>
            <scope>testscope>
        dependency>
    dependencies>

    <build>
        <plugins>
            <plugin>
                <groupId>org.springframework.bootgroupId>
                <artifactId>spring-boot-maven-pluginartifactId>
                <configuration>
                    <excludes>
                        <exclude>
                            <groupId>org.projectlombokgroupId>
                            <artifactId>lombokartifactId>
                        exclude>
                    excludes>
                configuration>
            plugin>
        plugins>
    build>

project>
springboot默认支持两种技术来和elasticsearch交互。
- Jest(默认不生效),需要导入jest的工具包
- SpringData ElasticSearch,如果启动项目报连接超时,可能是ES版本和SpringBoot版本不适配。
- ElasticsearchAutoConfiguration, 配置了Client来交互ES;
- ElasticsearchDataAutoConfiguration 配置了ElasticsearchTemplate;
- ElasticsearchRepository接口提供了类似JPA操作数据库的api一样操作ES的api;
如果使用jest,需要导入Jtest的依赖才会生效。
<dependency>
    <groupId>io.searchboxgroupId>
    <artifactId>jestartifactId>
    <version>5.3.3version>
dependency>
添加Jtest配置,指定elasticSearch服务地址
#jedis
spring.elasticsearch.jest.uris=http://192.168.111.129:9200
如果是使用SpringData ElasticSearch,配置如下:
#spring data elasticsearch
spring.data.elasticsearch.cluster-name=elasticsearch
spring.data.elasticsearch.cluster-nodes=192.168.111.129:9300
4.2 测试索引文档
@SpringBootTest
@RunWith(SpringRunner.class)
public class Springboot03ElasticsearchApplicationTests {

    @Autowired
    private JestClient jestClient;
    @Test
    public void createIndex() throws IOException {
        // 给ElasticSearch中索引一个文档
        Article article = Article.builder().id(1).title("好消息").author("张三").content("hello world").build();
        // 构建一个索引
        Index index = new Index.Builder(article).index("atguigu").type("article").build();
        // 执行
        jestClient.execute(index);
    }

    @Data
    @Builder
    @AllArgsConstructor
    @NoArgsConstructor
	class Article {
        @JestId
        private Integer id;
        private String author;
        private String title;
        private String content;
	}
}
4.3 测试搜索文档
@SpringBootTest
@RunWith(SpringRunner.class)
public class Springboot03ElasticsearchApplicationTests {

    @Autowired
    private JestClient jestClient;
    @Test
    public void search() throws IOException {
        String jsonStr = "{\n" +
                "  \"query\": {\n" +
                "    \"match\": {\n" +
                "      \"content\": \"hello\"\n" +
                "    }\n" +
                "  }\n" +
                "}";

        Search search = new Search.Builder(jsonStr).addIndex("atguigu").addType("article").build();
        SearchResult searchResult = jestClient.execute(search);
        System.out.println("查询结果:" + searchResult.getJsonString());
    }
}
5. ElasticsearchRepository
ElasticsearchRepository用到的是SpringData elasticsearch, 所以需要加上相关的配置。
#spring data elasticsearch
spring.data.elasticsearch.cluster-name=elasticsearch
spring.data.elasticsearch.cluster-nodes=192.168.111.129:9300
5.1 自定义接口
ElasticsearchRepository类似Jpa的使用,提供了常用增删查改的api方法给我们使用,只需要自定义接口实现ElasticsearchRepository即可。
public interface BookRepository extends ElasticsearchRepository<Book, Integer> {

    List<Book> findByBookName(String bookName);
}
5.1 测试公共api
@SpringBootTest
@RunWith(SpringRunner.class)
public class Springboot03ElasticsearchApplicationTests {
    @Autowired
    private BookRepository bookRepository;
    // 索引文档
    @Test
    public void createIndexOfBook() {
        Book book = Book.builder().id(1).author("李四").bookName("java核心技术").build();
        bookRepository.index(book);
    }

    @AllArgsConstructor
    @NoArgsConstructor
    @Data
    @Builder
    @Document(indexName = "atguigu", type = "book")
    public class Book {
        private Integer id;
        private String bookName;
        private String author;
    }
}
5.2 测试自定义api
@SpringBootTest
@RunWith(SpringRunner.class)
public class Springboot03ElasticsearchApplicationTests {
    @Autowired
    private BookRepository bookRepository;

    @Test
    public void findByBookName() {
        List<Book> books = bookRepository.findByBookName("java");
        System.out.println("打印查询结果:");
        books.forEach(System.out::println);
    }
}
更多查看 spring-data-elasticsearch
6. 自动配置
ElasticsearchAutoConfiguration配置类提供了Client, ElasticsearchProperties封装了配置属性,可以通过spring.data.elasticsearch.xxx修改配置属性的值。
@Configuration
@ConditionalOnClass({ Client.class, TransportClientFactoryBean.class,
		NodeClientFactoryBean.class })
@EnableConfigurationProperties(ElasticsearchProperties.class)
public class ElasticsearchAutoConfiguration implements DisposableBean {
    // 创建Client客户端来操作elasticsearch
    @Bean
	@ConditionalOnMissingBean
	public Client elasticsearchClient() {
		try {
			return createClient();
		}
		catch (Exception ex) {
			throw new IllegalStateException(ex);
		}
	}

	private Client createClient() throws Exception {
		if (StringUtils.hasLength(this.properties.getClusterNodes())) {
			return createTransportClient();
		}
		return createNodeClient();
	}

	private Client createNodeClient() throws Exception {
		Settings.Builder settings = Settings.settingsBuilder();
		for (Map.Entry<String, String> entry : DEFAULTS.entrySet()) {
			if (!this.properties.getProperties().containsKey(entry.getKey())) {
				settings.put(entry.getKey(), entry.getValue());
			}
		}
		settings.put(this.properties.getProperties());
		Node node = new NodeBuilder().settings(settings)
				.clusterName(this.properties.getClusterName()).node();
		this.releasable = node;
		return node.client();
	}
}
ElasticsearchDataAutoConfiguration提供了ElasticsearchTemplate模板。
@Configuration
@ConditionalOnClass({ Client.class, ElasticsearchTemplate.class })
@AutoConfigureAfter(ElasticsearchAutoConfiguration.class)
public class ElasticsearchDataAutoConfiguration {
    @Bean
	@ConditionalOnMissingBean
	@ConditionalOnBean(Client.class)
	public ElasticsearchTemplate elasticsearchTemplate(Client client,
			ElasticsearchConverter converter) {
		try {
            // 实际使用Client交互
            // org.elasticsearch.client.Client
			return new ElasticsearchTemplate(client, converter);
		}
		catch (Exception ex) {
			throw new IllegalStateException(ex);
		}
	}
}
ElasticsearchRepository提供了常用的增删查改的api
@NoRepositoryBean
public interface ElasticsearchRepository<T, ID extends Serializable> extends ElasticsearchCrudRepository<T, ID> {

	<S extends T> S index(S entity);

	Iterable<T> search(QueryBuilder query);

	Page<T> search(QueryBuilder query, Pageable pageable);

	Page<T> search(SearchQuery searchQuery);

	Page<T> searchSimilar(T entity, String[] fields, Pageable pageable);

	void refresh();

	Class<T> getEntityClass();
}