Braindecode系列 (3):BCIC IV 2a 数据集的数据增强
Braindecode系列:BCIC IV 2a 数据集的数据增强
- 0. 引言
- 1. 加载和预处理数据集
-
- 1.1 加载
- 1.2 预处理
- 1.3 提取窗口
- 1.4 将数据集拆分为训练数据集和验证数据集
- 2. 定义一个Transform
-
- 2.1 操作一个会话并可视化转换后的数据
- 2.2 使用数据增强训练模型
- 3. 创建模型
-
- 3.1 创建具有所需增强的脑电图调节器
- 3.2 手动合成变换
- 3.3 在数据集级别设置数据增强
- 4. 总结
0. 引言
在Braindecode系列中,我会介绍跟BCI IV 2a有关的所有相关示例。
在前面的章节中,我们介绍了Braindecode中,为训练模型创建了两种受支持的配置: trialwise decoding 和 cropped decoding。在本章节中,我会展示如何使用数据增强来训练EEG深度模型。它遵循了 trialwise decoding 示例,并且还说明了transform 对输入信号的影响。文章主要包括以下几个部分:
-
加载和预处理数据集
- 加载
- 预处理
- 提取窗口
- 将数据集拆分为训练数据集和验证数据集
-
定义一个Transform
- 操作一个会话并可视化转换后的数据
- 使用数据增强训练模型
-
创建模型
- 创建具有所需增强的脑电图调节器
- 手动合成变换
- 在数据集级别设置数据增强
注意:配置环境部分内容参考该系列的上一篇文章!!!
1. 加载和预处理数据集
1.1 加载
对数据集进行加载,具体代码如下:
from skorch.helper import predefined_split
from skorch.callbacks import LRScheduler

from braindecode import EEGClassifier
from braindecode.datasets import MOABBDataset

subject_id = 3
dataset = MOABBDataset(dataset_name="BNCI2014001", subject_ids=[subject_id])
1.2 预处理
对加载后的数据进行预处理操作,具体代码如下:
from braindecode.preprocessing import (
    exponential_moving_standardize, preprocess, Preprocessor)
from numpy import multiply

low_cut_hz = 4.  # low cut frequency for filtering
high_cut_hz = 38.  # high cut frequency for filtering
# Parameters for exponential moving standardization
factor_new = 1e-3
init_block_size = 1000
# Factor to convert from V to uV
factor = 1e6

preprocessors = [
    Preprocessor('pick_types', eeg=True, meg=False, stim=False),  # Keep EEG sensors
    Preprocessor(lambda data: multiply(data, factor)),  # Convert from V to uV
    Preprocessor('filter', l_freq=low_cut_hz, h_freq=high_cut_hz),  # Bandpass filter
    Preprocessor(exponential_moving_standardize,  # Exponential moving standardization
                 factor_new=factor_new, init_block_size=init_block_size)
]

preprocess(dataset, preprocessors)
1.3 提取窗口
对数据进行提取窗口操作,同trialwise decoding 示例,具体代码如下:
from braindecode.preprocessing import create_windows_from_events

trial_start_offset_seconds = -0.5
# Extract sampling frequency, check that they are same in all datasets
sfreq = dataset.datasets[0].raw.info['sfreq']
assert all([ds.raw.info['sfreq'] == sfreq for ds in dataset.datasets])
# Calculate the trial start offset in samples.
trial_start_offset_samples = int(trial_start_offset_seconds * sfreq)

# Create windows using braindecode function for this. It needs parameters to
# define how trials should be used.
windows_dataset = create_windows_from_events(
    dataset,
    trial_start_offset_samples=trial_start_offset_samples,
    trial_stop_offset_samples=0,
    preload=True,
)
1.4 将数据集拆分为训练数据集和验证数据集
将处理后的数据根据session进行分割,并将分割后的数据切分为训练集和验证集,具体代码如下:
splitted = windows_dataset.split('session')
train_set = splitted['session_T']
valid_set = splitted['session_E']
2. 定义一个Transform
数据可以通过Transform进行操作,Transform是可调用的对象。Transform通常由自定义数据加载程序处理,但也可以直接对输入数据进行调用,如下所示,以便于说明。
首先,我们需要定义一个Transform。在这里,我们选择了FrequencyShift,它随机转换给定范围内的所有频率。具体代码如下:
from braindecode.augmentation import FrequencyShift

transform = FrequencyShift(
    probability=1.,  # defines the probability of actually modifying the input
    sfreq=sfreq,
    max_delta_freq=2.  # the frequency shifts are sampled now between -2 and 2 Hz
)
2.1 操作一个会话并可视化转换后的数据
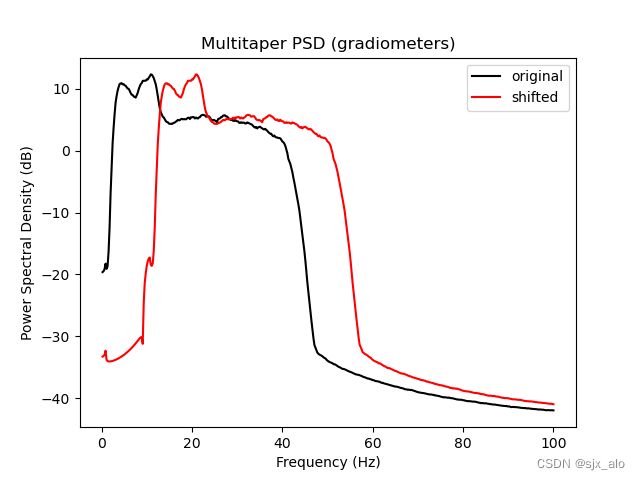
接下来,让我们扩充一个会话,以显示由此产生的频率偏移。一个mne Epoch的数据用在这里来说明 mne function 的用法。
import torch

epochs = train_set.datasets[0].windows  # original epochs
X = epochs.get_data()
# This allows to apply the transform with a fixed shift (10 Hz) for
# visualization instead of sampling the shift randomly between -2 and 2 Hz
X_tr, _ = transform.operation(torch.as_tensor(X).float(), None, 10., sfreq)
转换后的会话的psd现在已经偏移了10 Hz,正如可以在psd图上看到的那样。具体代码如下:
import mne
import matplotlib.pyplot as plt
import numpy as np


def plot_psd(data, axis, label, color):
    psds, freqs = mne.time_frequency.psd_array_multitaper(data, sfreq=sfreq,
                                                          fmin=0.1, fmax=100)
    psds = 10. * np.log10(psds)
    psds_mean = psds.mean(0).mean(0)
    axis.plot(freqs, psds_mean, color=color, label=label)


_, ax = plt.subplots()
# 绘制原始psd图
plot_psd(X, ax, 'original', 'k')
# 绘制偏移后的psd图
plot_psd(X_tr.numpy(), ax, 'shifted', 'r')

ax.set(title='Multitaper PSD (gradiometers)', xlabel='Frequency (Hz)',
       ylabel='Power Spectral Density (dB)')
ax.legend()
plt.show()
2.2 使用数据增强训练模型
既然我们知道了如何实例化Transforms,现在是时候学习如何使用它们来训练模型并尝试提高其泛化能力了。具体内容在第三部分进行展示。
3. 创建模型
创建一个要训练的模型。具体代码如下:
from braindecode.util import set_random_seeds
from braindecode.models import ShallowFBCSPNet

cuda = torch.cuda.is_available()  # check if GPU is available, if True chooses to use it
device = 'cuda' if cuda else 'cpu'
if cuda:
    torch.backends.cudnn.benchmark = True

# Set random seed to be able to roughly reproduce results
# Note that with cudnn benchmark set to True, GPU indeterminism
# may still make results substantially different between runs.
# To obtain more consistent results at the cost of increased computation time,
# you can set `cudnn_benchmark=False` in `set_random_seeds`
# or remove `torch.backends.cudnn.benchmark = True`
seed = 20200220
set_random_seeds(seed=seed, cuda=cuda)

n_classes = 4

# Extract number of chans and time steps from dataset
n_channels = train_set[0][0].shape[0]
input_window_samples = train_set[0][0].shape[1]

model = ShallowFBCSPNet(
    n_channels,
    n_classes,
    input_window_samples=input_window_samples,
    final_conv_length='auto',
)
3.1 创建具有所需增强的脑电图调节器
为了使用数据扩充进行训练,可以使用自定义数据加载器进行训练。多个Transforms可以传递给它,并将依次应用于AugmentedDataLoader对象中的批处理数据。
首先,定义模型中使用的transforms 的功能结构。具体代码如下:
from braindecode.augmentation import AugmentedDataLoader, SignFlip

freq_shift = FrequencyShift(
    probability=.5,
    sfreq=sfreq,
    max_delta_freq=2.  # the frequency shifts are sampled now between -2 and 2 Hz
)

sign_flip = SignFlip(probability=.1)

transforms = [
    freq_shift,
    sign_flip
]

# Send model to GPU
if cuda:
    model.cuda()
然后,将该transforms用于模型的训练之中。该模型训练实例遵循trial-wise示例。与之不同的是,AugmentedDataLoader用作train iterator,transforms 列表作为参数传递。具体代码如下:
注意:这里AugmentedDataLoader的意思是为了说明输入数据进行了数据增强,并没有明确的定义!!!
lr = 0.0625 * 0.01
weight_decay = 0

batch_size = 64
n_epochs = 4

clf = EEGClassifier(
    model,
    iterator_train=AugmentedDataLoader,  # This tells EEGClassifier to use a custom DataLoader
    iterator_train__transforms=transforms,  # This sets the augmentations to use
    criterion=torch.nn.NLLLoss,
    optimizer=torch.optim.AdamW,
    train_split=predefined_split(valid_set),  # using valid_set for validation
    optimizer__lr=lr,
    optimizer__weight_decay=weight_decay,
    batch_size=batch_size,
    callbacks=[
        "accuracy",
        ("lr_scheduler", LRScheduler('CosineAnnealingLR', T_max=n_epochs - 1)),
    ],
    device=device,
)
# Model training for a specified number of epochs. `y` is None as it is already
# supplied in the dataset.
clf.fit(train_set, y=None, epochs=n_epochs)
3.2 手动合成变换
上述变换同组合传递是等效的,即:3.1节 = 3.2节+3.3节的内容。将相同转换的组合传递给EEG分类器是等效的(尽管更详细):
from braindecode.augmentation import Compose

composed_transforms = Compose(transforms=transforms)
3.3 在数据集级别设置数据增强
还要注意,大多数transforms也可以通过transform参数将它们直接传递给WindowsDataset对象,这在其他库中最常见。但是,建议如上所述使用AugmentedDataLoader,因为它与所有转换都兼容,并且可能更高效。具体代码如下:
train_set.transform = composed_transforms
4. 总结
到此,使用 Braindecode系列(3):BCIC IV 2a 数据集的数据增强 已经介绍完毕了!!! 如果有什么疑问欢迎在评论区提出,对于共性问题可能会后续添加到文章介绍中。
如果觉得这篇文章对你有用,记得点赞、收藏并分享给你的小伙伴们哦。
