Bert详细学习及代码实现详解
BERT概述
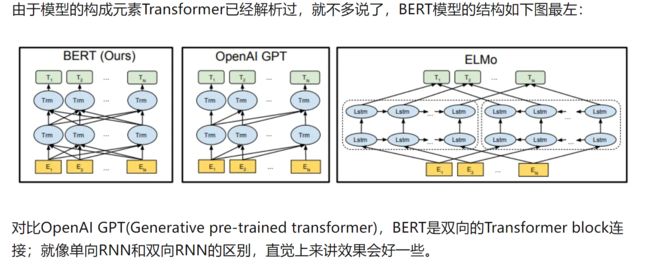
BERT的全称是Bidirectional Encoder Representation from Transformers,即双向Transformer的Encoder,因为decoder是不能获要预测的信息的。在大型语料库(Wikipedia + BookCorpus)上训练一个大型模型(12 层到 24 层 Transformer)很长时间(1M 更新步骤),这就是 BERT。
-
模型的主要创新点都在pre-train方法上,即用了
Masked LM和Next Sentence Prediction两种方法分别捕捉词语和句子级别的representation。- Masked LM --> word
- Next Sentence Prediction --> sentence
Mask掩码
在原始预处理代码中,我们随机选择 WordPiece 标记进行掩码。
例如:
Input Text: the man jumped up , put his basket on phil ##am ##mon ' s head
Original Masked Input: [MASK] man [MASK] up , put his [MASK] on phil [MASK] ##mon ' s head
全字掩码改进:
Whole Word Masked Input: the man [MASK] up , put his basket on [MASK] [MASK] [MASK] ' s head
改进思想:
训练是相同的——我们仍然独立预测每个屏蔽的 WordPiece 标记。改进来自于这样的事实:对于已拆分为多个 WordPieces 的单词,原始预测任务过于“简单”。
- 一次预测一个mask太简单了,把原来的mask周围的词全部都mask掉,提高难度。
Enmbedding
三种Embedding求和构成的:
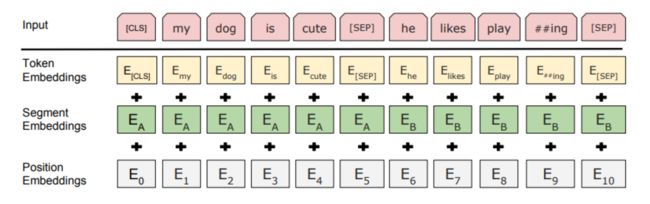
- Token Embeddings是词向量,第一个单词是CLS标志,可以用于之后的分类任务
- Segment Embeddings用来区别两种句子,因为预训练不光做LM还要做以两个句子为输入的分类任务
- Position Embeddings和之前文章中的Transformer不一样,不是三角函数而是学习出来的
Pre-training Task 1: Masked Language Model
为什么要bidirection?
意思就是如果使用预训练模型处理其他任务,那人们想要的肯定不止某个词左边的信息,而是左右两边的信息。
- 在训练过程中作者
随机mask 15%的token,而不是把像cbow一样把每个词都预测一遍。最终的损失函数只计算被mask掉那个token。
Input: the man went to the [MASK1] . he bought a [MASK2] of milk.
Labels: [MASK1] = store; [MASK2] = gallon
mask的技巧:
Mask如何做也是有技巧的,如果一直用标记[MASK]代替(在实际预测时是碰不到这个标记的)会影响模型,所以随机mask的时候10%的单词会被替代成其他单词,10%的单词不替换,剩下80%才被替换为[MASK]。
- 要注意的是Masked LM预训练阶段模型是不知道真正被mask的是哪个词,所以模型每个词都要关注。
sequence_length:
- 因为序列长度太大(512)会影响训练速度,所以90%的steps都用
seq_len=128训练,余下的10%步数训练512长度的输入。
Pre-training Task 2: Next Sentence Prediction
因为涉及到QA和NLI之类的任务,增加了第二个预训练任务
- 目的是让模型理解两个句子之间的联系。训练的输入是句子A和B,B有一半的几率是A的下一句,输入这两个句子,模型预测B是不是A的下一句。预训练的时候可以达到97-98%的准确度。
注意:作者特意说了语料的选取很关键,要选用document-level的而不是sentence-level的,这样可以具备抽象连续长序列特征的能力。
Sentence A: the man went to the store .
Sentence B: he bought a gallon of milk .
Label: IsNextSentence
Sentence A: the man went to the store .
Sentence B: penguins are flightless .
Label: NotNextSentence
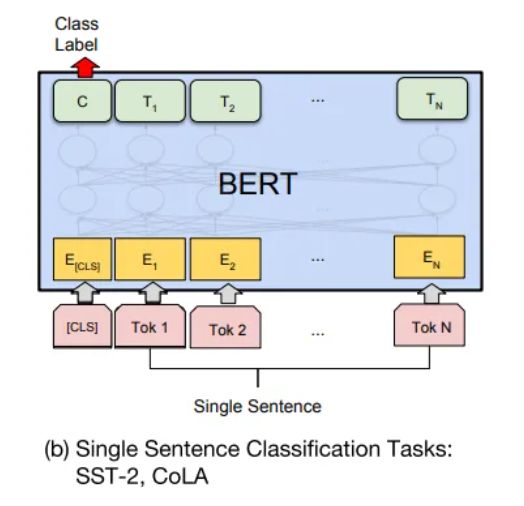
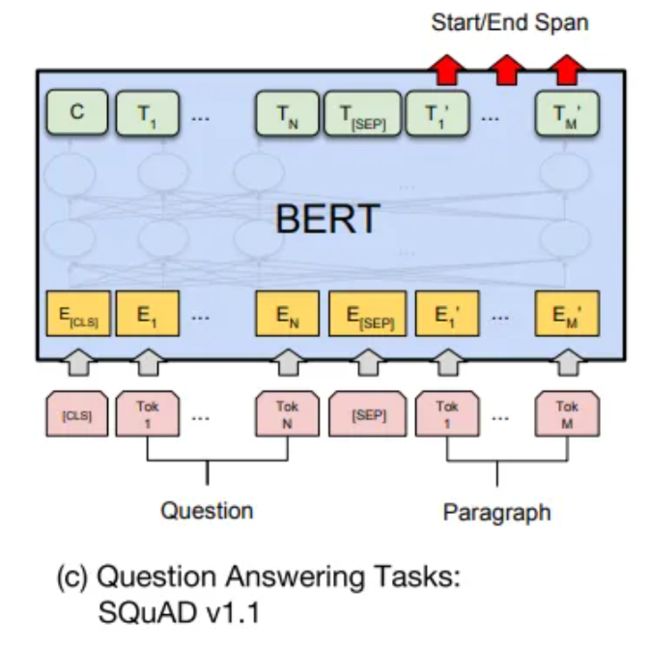
fine-tuning
code:run_classifier.py / run_squad.py(tpu)
Sentence (and sentence-pair) classification tasks
在运行此示例之前,您必须通过运行此脚本下载 GLUE 数据并将其解压到某个目录 $GLUE_DIR 。接下来,下载 BERT-Base 检查点并将其解压缩到某个目录 $BERT_BASE_DIR 。
此示例代码在 Microsoft Research Paraphrase Corpus (MRPC) 语料库上微调 BERT-Base ,该语料库仅包含 3,600 个示例,并且可以在大多数 GPU 上在几分钟内进行微调。
export BERT_BASE_DIR=/path/to/bert/uncased_L-12_H-768_A-12
export GLUE_DIR=/path/to/glue

python run_classifier.py \
  --task_name=MRPC \
  --do_train=true \
  --do_eval=true \
  --data_dir=$GLUE_DIR/MRPC \
  --vocab_file=$BERT_BASE_DIR/vocab.txt \
  --bert_config_file=$BERT_BASE_DIR/bert_config.json \
  --init_checkpoint=$BERT_BASE_DIR/bert_model.ckpt \
  --max_seq_length=128 \
  --train_batch_size=32 \
  --learning_rate=2e-5 \
  --num_train_epochs=3.0 \
  --output_dir=/tmp/mrpc_output/
***** Eval results *****
  eval_accuracy = 0.845588
  eval_loss = 0.505248
  global_step = 343
  loss = 0.505248
训练完分类器后,您可以使用 --do_predict=true 命令在推理模式下使用它。输入文件夹中需要有一个名为 test.tsv 的文件。输出将在输出文件夹中名为 test_results.tsv 的文件中创建。每行将包含每个样本的输出,列是类概率。
export BERT_BASE_DIR=/path/to/bert/uncased_L-12_H-768_A-12
export GLUE_DIR=/path/to/glue
export TRAINED_CLASSIFIER=/path/to/fine/tuned/classifier

python run_classifier.py \
  --task_name=MRPC \
  --do_predict=true \
  --data_dir=$GLUE_DIR/MRPC \
  --vocab_file=$BERT_BASE_DIR/vocab.txt \
  --bert_config_file=$BERT_BASE_DIR/bert_config.json \
  --init_checkpoint=$TRAINED_CLASSIFIER \
  --max_seq_length=128 \
  --output_dir=/tmp/mrpc_output/
影响内存使用的因素有:
-
max_seq_length :发布的模型使用高达 512 的序列长度进行训练,但您可以使用更短的最大序列长度进行微调以节省大量内存。这是由示例代码中的 max_seq_length 标志控制的。
-
train_batch_size :内存使用量也与批量大小成正比。
-
模型类型, BERT-Base 与 BERT-Large : BERT-Large 模型比 BERT-Base 需要更多的内存。
-
优化器:BERT的默认优化器是Adam,它需要大量额外的内存来存储 m 和 v 向量。切换到内存效率更高的优化器可以减少内存使用量,但也会影响结果。我们还没有尝试过其他优化器进行微调。
Using BERT to extract fixed feature vectors
在某些情况下,与其对整个预训练模型进行端到端的微调,不如获得预训练的上下文嵌入,这些嵌入是从预训练的隐藏层生成的每个输入标记的固定上下文表示。 -训练有素的模型。这也应该可以缓解大部分内存不足问题。
# Sentence A and Sentence B are separated by the ||| delimiter for sentence
# pair tasks like question answering and entailment.
# For single sentence inputs, put one sentence per line and DON'T use the
# delimiter.
echo 'Who was Jim Henson ? ||| Jim Henson was a puppeteer' > /tmp/input.txt

python extract_features.py \
  --input_file=/tmp/input.txt \
  --output_file=/tmp/output.jsonl \
  --vocab_file=$BERT_BASE_DIR/vocab.txt \
  --bert_config_file=$BERT_BASE_DIR/bert_config.json \
  --init_checkpoint=$BERT_BASE_DIR/bert_model.ckpt \
  --layers=-1,-2,-3,-4 \
  --max_seq_length=128 \
  --batch_size=8
If you need to maintain alignment between the original and tokenized words (for projecting training labels), see the Tokenization section below.
注意:您可能会看到类似 Could not find trained model in model_dir: /tmp/tmpuB5g5c, running initialization to predict. 的消息 此消息是预期的,它仅意味着我们正在使用 init_from_checkpoint() API 而不是保存的模型 API。如果您不指定检查点或指定无效的检查点,该脚本将会抱怨。
tokenalization
-
实例化 tokenizer = tokenization.FullTokenizer 的实例
-
使用 tokens = tokenizer.tokenize(raw_text) 对原始文本进行标记。
-
截断至最大序列长度。 (您最多可以使用 512 个,但出于内存和速度原因,您可能希望使用更短的长度。)
-
在正确的位置添加 [CLS] 和 [SEP] 标记。
在我们描述处理单词级任务的一般方法之前,了解我们的分词器到底在做什么非常重要。它有三个主要步骤:
-
(1) 文本规范化:将所有空白字符转换为空格,并(对于 Uncased 模型)将输入小写并去掉重音标记。例如, John Johanson’s, → john johanson’s, 。
-
(2) 标点符号分割:分割两侧的所有标点符号(即在所有标点符号周围添加空格)。标点符号定义为 (a) 任何具有 P* Unicode 类的字符,(b) 任何非字母/数字/空格 ASCII 字符(例如,像 $ 这样的字符在技术上不是标点)。例如, john johanson’s, → john johanson ’ s ,
-
(3) WordPiece 标记化:将空格标记化应用于上述过程的输出,并对每个标记单独应用 WordPiece 标记化。 (我们的实现直接基于 tensor2tensor 中的实现,该实现是链接的)。例如, john johanson ’ s , → john johan ##son ’ s ,
### Input
orig_tokens = ["John", "Johanson", "'s",  "house"]
labels      = ["NNP",  "NNP",      "POS", "NN"]

### Output
bert_tokens = []

# Token map will be an int -> int mapping between the `orig_tokens` index and
# the `bert_tokens` index.
orig_to_tok_map = []

tokenizer = tokenization.FullTokenizer(
    vocab_file=vocab_file, do_lower_case=True)

bert_tokens.append("[CLS]")
for orig_token in orig_tokens:
  orig_to_tok_map.append(len(bert_tokens))
  bert_tokens.extend(tokenizer.tokenize(orig_token))
bert_tokens.append("[SEP]")

# bert_tokens == ["[CLS]", "john", "johan", "##son", "'", "s", "house", "[SEP]"]
# orig_to_tok_map == [1, 2, 4, 6]
分类任务


预训练模型
每个 .zip 文件包含三项:
-
包含预训练权重(实际上是 3 个文件)的 TensorFlow 检查点 ( bert_model.ckpt )。
-
用于将 WordPiece 映射到单词 id 的词汇文件 ( vocab.txt )。
-
指定模型超参数的配置文件 ( bert_config.json )。
代码详解
https://github.com/google-research/bert/blob/master/run_classifier.py
输入组成:
- guid: Unique id for the example.
text_a: string. The untokenized text of the first sequence. For single sequence tasks, only this sequence must be specified.
text_b: (Optional) string. The untokenized text of the second sequence. Only must be specified for sequence pair tasks.
label: (Optional) string. The label of the example. This should be specified for train and dev examples, but not for test examples.