(三)手把手教你写天气预报程序:运用WebClient获取天气和json数据解析
上一节我们练习了UserControl,这次我们就要把UserControl运用到实际的布局上面来。
首先,把MainPage中的原来的测试UserControl的代码删除,在ContentPanel添加代码:
<Grid.ColumnDefinitions>

                <ColumnDefinition Width="250"/>

                <ColumnDefinition Width="200"/>

            </Grid.ColumnDefinitions>

            <Grid.RowDefinitions>

                <RowDefinition Height="200"/>

                <RowDefinition Height="100"/>

                <RowDefinition Height="100"/>

                <RowDefinition Height="100"/>

                <RowDefinition Height="100"/>

            </Grid.RowDefinitions>

            <my:ForeCastTemplate x:Name="day1" Grid.Column="1" Grid.Row="1"

                                 Height="100" Width="200"/>

            <my:ForeCastTemplate x:Name="day2" Grid.Column="1" Grid.Row="2"

                                 Height="100" Width="200"/>

            <my:ForeCastTemplate x:Name="day3" Grid.Column="1" Grid.Row="3"

                                 Height="100" Width="200"/>

            <my:ForeCastTemplate x:Name="day4" Grid.Column="1" Grid.Row="4"

                                 Height="100" Width="200"/>

            <Image x:Name="todayImage" Height="200" Width="250"/>

            <TextBlock x:Name="todaytemp" Grid.Column="0" Grid.Row="1"

                           Width="250" Height="100" HorizontalAlignment="Left"

                           VerticalAlignment="Center" FontSize="40"/>

            <TextBlock x:Name="todayWhe" Grid.Column="1" Grid.Row="0"

                           Width="200" Height="200" HorizontalAlignment="Left"

                           VerticalAlignment="Center" FontSize="24"

                           TextWrapping="Wrap"/>

            <TextBlock x:Name="todaydate" Grid.Column="0" Grid.Row="2"

                           Width="250" Height="100" HorizontalAlignment="Left"

                           VerticalAlignment="Center" FontSize="24"

                           TextWrapping="Wrap"/>

            <TextBlock x:Name="wtInfo" TextWrapping="Wrap" Grid.Column="0"

                           Grid.Row="3" Grid.RowSpan="2" FontSize="24"/>
在设计框显示如下:
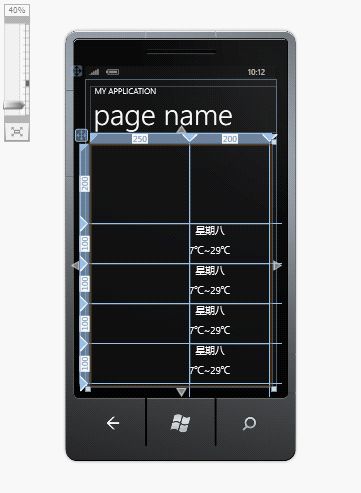
这样界面就这样吧。感觉也没啥好说的。
现在看WebClient。
在
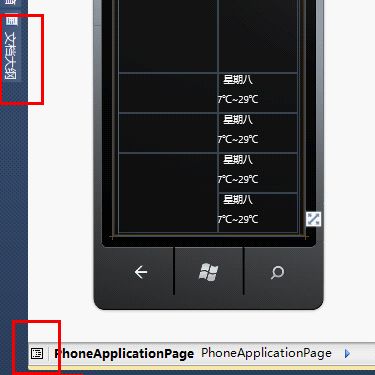
点击图中的右下角用红框选择的小按钮或者点击文档大纲。
选择PhoneApplicationPage。选择好了。随意找个地点击一下,就成了图中的显示样子。
然后选择属性。
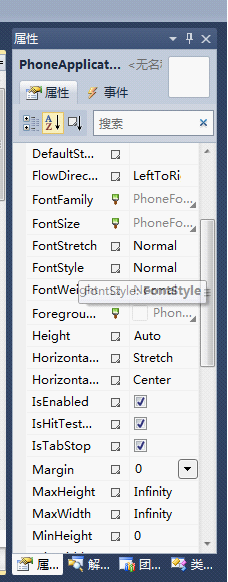
这里显示的是PhoneApplication的属性。如果不是。重新点击
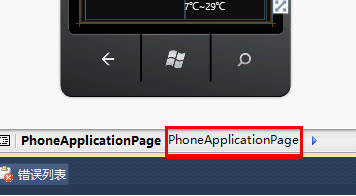
然后在属性页面选择事件:
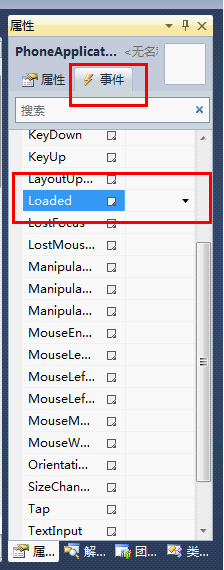
然后找到Loaded,在右边的框框双击,生成了一个PhoneApplicationPage_Loaded事件。编译器自动帮你导向了事件处理
在这个Loaded事件中,我打算用WebClient获取天气信息。并且显示到界面上。
获取天气,就要用到天气预报API。免费的API可以看我写的这个:http://blog.csdn.net/fengyun1989/article/details/7341166。我用的天气预报API是中央气象台的。主要是因为这个API能够获取到县城的天气信息。而且预报的信息很全。缺点就是我只收集到了大约10个省份的城市代码。
这节我们就获取北京的天气。用到的Url是:http://m.weather.com.cn/data/101010100.html
返回的数据相当的多(因为详细,json数据):
{"weatherinfo":{"city":"北京","city_en":"beijing","date_y":"2012年3月11日","date":"","week":"星期日","fchh":"11","cityid":"101010100","temp1":"6℃~-6℃","temp2":"9℃~-2℃","temp3":"13℃~0℃","temp4":"11℃~-1℃","temp5":"9℃~1℃","temp6":"10℃~3℃","tempF1":"42.8℉~21.2℉","tempF2":"48.2℉~28.4℉","tempF3":"55.4℉~32℉","tempF4":"51.8℉~30.2℉","tempF5":"48.2℉~33.8℉","tempF6":"50℉~37.4℉","weather1":"晴","weather2":"晴","weather3":"多云转晴","weather4":"晴转多云","weather5":"多云转阴","weather6":"阴","img1":"0","img2":"99","img3":"0","img4":"99","img5":"1","img6":"0","img7":"0","img8":"1","img9":"1","img10":"2","img11":"2","img12":"99","img_single":"0","img_title1":"晴","img_title2":"晴","img_title3":"晴","img_title4":"晴","img_title5":"多云","img_title6":"晴","img_title7":"晴","img_title8":"多云","img_title9":"多云","img_title10":"阴","img_title11":"阴","img_title12":"阴","img_title_single":"晴","wind1":"微风","wind2":"微风","wind3":"微风","wind4":"微风","wind5":"微风","wind6":"微风","fx1":"微风","fx2":"微风","fl1":"小于3级","fl2":"小于3级","fl3":"小于3级","fl4":"小于3级","fl5":"小于3级","fl6":"小于3级","index":"冷","index_d":"天气冷,建议着棉衣、皮夹克加羊毛衫等冬季服装。年老体弱者宜着厚棉衣或冬大衣。","index48":"凉","index48_d":"天气凉,建议着厚外套加毛衣等春秋服装。体弱者宜着大衣、呢外套。因昼夜温差较大,注意增减衣服。","index_uv":"中等","index48_uv":"中等","index_xc":"适宜","index_tr":"适宜","index_co":"较舒适","st1":"6","st2":"-4","st3":"8","st4":"0","st5":"13","st6":"2","index_cl":"较不宜","index_ls":"基本适宜","index_ag":"易发"}}
我们先新建一个类老保存需要的天气信息。在工程上右键。添加。类。命名为WeatherInfo.cs,点击添加。
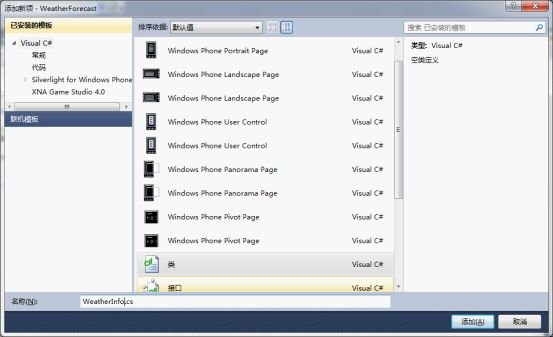
添加如下成员变量:
     public string city { get; set; }

        public string cityid { get; set; }

        public string date_y { get; set; }

        public string week { get; set; }

        public string temp1 { get; set; }

        public string temp2 { get; set; }

        public string temp3 { get; set; }

        public string temp4 { get; set; }

        public string temp5 { get; set; }

        public string weather1 { get; set; }

        public string weather2 { get; set; }

        public string weather3 { get; set; }

        public string weather4 { get; set; }

        public string weather5 { get; set; }

        public string wind1 { get; set; }

        public string info { get; set; }  //index48_d
PS:展示一个小技巧,添加成员变量快捷方式:prop + tab + tab.编译器就能自动完成,剩下的修改下类型和命名就行了,如图:
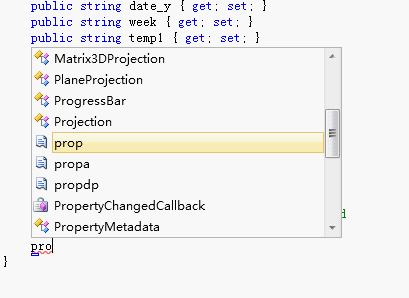
保存。现在回到MainPage.xaml.cs。
给PageLoad添加代码:
    WebClient wb = new WebClient();

            //添加下载完成后的处理事件

            wb.DownloadStringCompleted += new DownloadStringCompletedEventHandler(wb_DownloadStringCompleted);

            //开始异步下载

            wb.DownloadStringAsync(new Uri("http://m.weather.com.cn/data/101010100.html", UriKind.Absolute));
在这里敲wb.DownloadStringCompleted的时候,后面的+= ,然后是tab ,tab,编译器就能帮助你自动生成处理函数。
如下:
void wb_DownloadStringCompleted(object sender, DownloadStringCompletedEventArgs e)

        {

            throw new NotImplementedException();

        }
现在要在下载完成的事件里做json数据处理并且赋值给控件。
Json数据处理我用的是Jobject类,这个类使用起来很方便。其他的也做过尝试,但是由于要处理的数据的复杂性,使用起来相当麻烦。
要用到JObject这类要到http://json.codeplex.com/下载这个类的dll。下载最新版,完成后,解压,现在就添加DLL到工程里面。
具体操作如下:工程---右键---添加引用---浏览,找到刚才解压的目录,并且到Bin\WindowsPhone下---选择哪个dll文件---确定
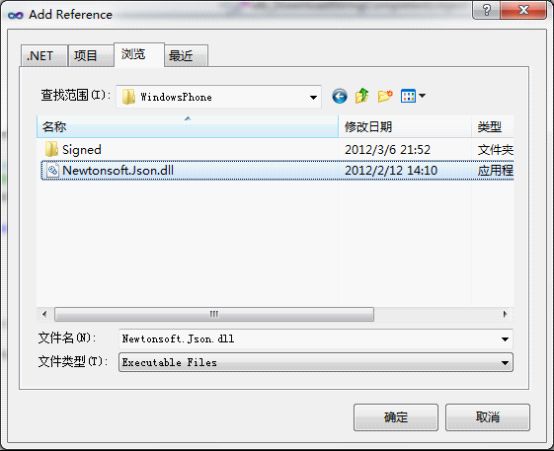
在MainPage.xaml.cs中引入命名空间
using Newtonsoft.Json;

using Newtonsoft.Json.Linq;
并且为MainPage类添加两个城员变量。
WeatherInfo weather = null;


        //定义星期属性,以便能得出后面的日期

        string[] weekMsg = { "星期一", "星期二", "星期三", "星期四", "星期五", "星期六", "星期日" };
然后给下载完成函数添加如下代码:
void wb_DownloadStringCompleted(object sender, DownloadStringCompletedEventArgs e)

        {

            if (e.Result.Length <= 0 || e.Error != null || e.Cancelled)

            {

                MessageBox.Show("获取天气预报失败!");

                return;

            }


            JObject json = JObject.Parse(e.Result);//用Jobject解析json数据

            weather = new WeatherInfo

            {

                city = (string)json["weatherinfo"]["city"],

                cityid = (string)json["weatherinfo"]["cityid"],

                date_y = (string)json["weatherinfo"]["date_y"],

                week = (string)json["weatherinfo"]["week"],

                info = (string)json["weatherinfo"]["index48_d"],

                wind1 = (string)json["weatherinfo"]["wind1"],

                temp1 = (string)json["weatherinfo"]["temp1"],

                temp2 = (string)json["weatherinfo"]["temp2"],

                temp3 = (string)json["weatherinfo"]["temp3"],

                temp4 = (string)json["weatherinfo"]["temp4"],

                temp5 = (string)json["weatherinfo"]["temp5"],

                weather1 = (string)json["weatherinfo"]["weather1"],

                weather2 = (string)json["weatherinfo"]["weather2"],

                weather3 = (string)json["weatherinfo"]["weather3"],

                weather4 = (string)json["weatherinfo"]["weather4"],

                weather5 = (string)json["weatherinfo"]["weather5"]

            };

            MessageBox.Show(weather.city);

        }
PS:天气信息很多。只获取5天预报,这里展示Json.net的简单应用,Json.NET还支持XML数据解析,XML,json数据相互转化等。具体参考JSON.NET的帮助文档。
点击运行。
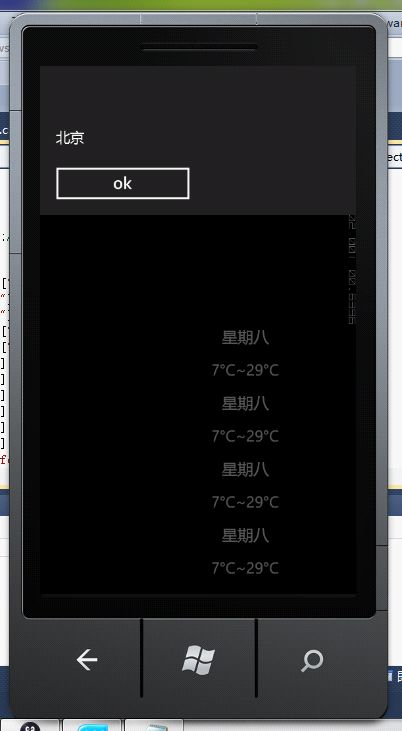
成功获取到了天气。现在添加一个函数来更新控件。另外添加一个函数来判断该天气匹配的图片的URI。
PS:这个图片问题。由于我对天气专有名词不熟悉,天气相关图片不熟悉。所以这个图片显示就做得马虎了。显示天气信息的图片也很少。如果显示有错,那多包涵。这里也提供一些关于天气的图片资源(如果不嫌麻烦就自己慢慢做):http://dl.dbank.com/c0ln2ja9u6
代码如下:
 /// <summary>

        /// 下载完成后的处理事件

        /// </summary>

        /// <param name="sender"></param>

        /// <param name="e"></param>

        void wb_DownloadStringCompleted(object sender, DownloadStringCompletedEventArgs e)

        {

            //判断是否下载成功

            if (e.Result.Length <= 0 || e.Error != null || e.Cancelled)

            {

                MessageBox.Show("获取天气预报失败!");

                return;

            }


            JObject json = JObject.Parse(e.Result);//用Jobject解析json数据

            weather = new WeatherInfo

            {

                city = (string)json["weatherinfo"]["city"],

                cityid = (string)json["weatherinfo"]["cityid"],

                date_y = (string)json["weatherinfo"]["date_y"],

                week = (string)json["weatherinfo"]["week"],

                info = (string)json["weatherinfo"]["index48_d"],

                wind1 = (string)json["weatherinfo"]["wind1"],

                temp1 = (string)json["weatherinfo"]["temp1"],

                temp2 = (string)json["weatherinfo"]["temp2"],

                temp3 = (string)json["weatherinfo"]["temp3"],

                temp4 = (string)json["weatherinfo"]["temp4"],

                temp5 = (string)json["weatherinfo"]["temp5"],

                weather1 = (string)json["weatherinfo"]["weather1"],

                weather2 = (string)json["weatherinfo"]["weather2"],

                weather3 = (string)json["weatherinfo"]["weather3"],

                weather4 = (string)json["weatherinfo"]["weather4"],

                weather5 = (string)json["weatherinfo"]["weather5"]

            };

            UpdateUI();

        }


        /// <summary>

        /// 更新UI信息

        /// </summary>

        void UpdateUI()

        {

            day1.Temp = weather.temp2;

            day2.Temp = weather.temp3;

            day3.Temp = weather.temp4;

            day4.Temp = weather.temp5;

            todaytemp.Text = weather.temp1;

            todayWhe.Text = weather.weather1 + Environment.NewLine + weather.wind1;

            todaydate.Text = weather.date_y + Environment.NewLine + weather.week;

            wtInfo.Text = weather.info;

            PageTitle.Text = weather.city;

            int i;

            for (i = 0; i < 7; i++)

            {

                if (weekMsg[i] == weather.week)

                    break;

            }

            day1.Weekday = weekMsg[(i + 1) % 7];

            day2.Weekday = weekMsg[(i + 2) % 7];

            day3.Weekday = weekMsg[(i + 3) % 7];

            day4.Weekday = weekMsg[(i + 4) % 7];

            day1.ImageUri = GetImgUri(weather.weather2);

            day2.ImageUri = GetImgUri(weather.weather3);

            day3.ImageUri = GetImgUri(weather.weather4);

            day4.ImageUri = GetImgUri(weather.weather5);

            todayImage.Source = new BitmapImage(new Uri(GetImgUri(weather.weather1), UriKind.Relative));

        }


        /// <summary>

        /// 返回天气图片的Uri。图片的Building属性为Resource

        /// </summary>

        /// <param name="weather"></param>

        /// <returns></returns>

        String GetImgUri(string weather)

        {

            string uri = "/WeatherForecast;component/Images/";

            if (weather == "晴")

            {

                return uri + "sunday.jpg";

            }

            else if (weather == "阴")

            {

                return uri + "overcast.jpg";

            }

            else if (weather == "雷阵雨")

            {

                return uri + "ThunderShower.jpg";

            }

            else if (weather.Contains("多云"))

            {

                return uri + "cloudy.jpg";

            }

            else if (weather.Contains("雨"))

            {

                return uri + "Rain.jpg";

            }

            else

            {

                return uri + "cloudy.jpg";

            }

        }
点击运行:
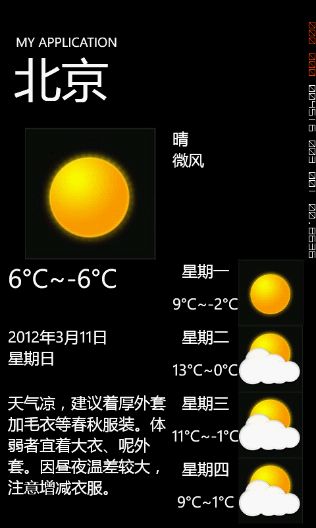
好了。这节就到这了。如果有任何问题,就留言吧。这节代码下载:http://dl.dbank.com/c0flztwms9