ElasticSearch 7.4学习记录(基础概念和基础操作)
若你之前从未了解过ES,本文将由浅入深的一步步带你理解ES,简单使用ES。作者本人就是此状态,通过学习和梳理,产出本文,已对ES有个全面的了解和想法,不仅将知识点梳理,也涉及到自己的理解,初次学习踩的坑都汇总如下。
1 了解ElasticSearch
对于第一次接触ES的读者,该章节将直观的带你体验ES的魅力。
1.1 为何使用ES
使用前
案例:需模糊查询带有 **华为** 的商品信息
使用MySQL的查询功能:
select * from 表名 where name like “%华为%”
模糊查询会导致索引失效,就会全表扫描,效率低
案例:需模糊查询带有 **华为手机** 的商品信息
使用MySQL的查询功能:
select * from 表名 where name like “%华为手机%”
只能找到 华为手机 这样的结果
无法找到 华为荣耀手机、华为耳机、 手机这样的结果,意思就是无法将华为+手机分开查询。这也是MySQL查询功能弱的缺点
使用后
输入 ”华为手机“
结果展示: 华为荣耀手机、华为耳机、 手机、华为手机,且查询效率高
上述案例旨在告诉读者,面对更复杂的业务场景和搜索需求,单纯的SQL查询远远不能满足,MySQL是存储数据的解决方案,ES则是面对海量数据执行搜索的解决方案。
现在简单了解一下ES是怎么做到的上述优点
1.1 倒排索引
-
在了解倒排索引概念之前,先看看正向索引
案例 :查找含有 明 这个字的诗句
| 数据库信息 | 是否匹配 |
|---|---|
| 锄禾日当午 | x |
| 忽如一夜春风来 | x |
| 窗前明月光 | √ |
结果:窗前明月光
缺点:得从第每首诗的第一行的第一个字找,这种正向操作的思想会导致查询比较慢
-
倒排索引
案例: 查找含有 是 这个字的诗句
内部操作:
ES内部会自动的将 窗前明月光这个数据进行分词
| 拆分单词 | 结果 |
|---|---|
| 窗前 | 窗前明月光 |
| 床 | 窗前明月光 |
| 前 | 窗前明月光 |
| 明月 | 窗前明月光 |
| 明 | 窗前明月光 |
| 月 | 窗前明月光 |
| 光 | 窗前明月光 |
找到关键字 明,得到对应的结果,效率很快的。我们习惯性将这种不直接查询的设计叫倒排索引
案例升级
此时需要在数据库中再存储一条数据”明月几时有“,ES会如何操作?
当然是自动拆分这句话
| 拆分单词 | 结果 |
|---|---|
| 窗前 | 窗前明月光 |
| 床 | 窗前明月光 |
| 前 | 窗前明月光 |
| 明月 | 窗前明月光;明月几时有 |
| 明 | 窗前明月光;明月几时有 |
| 月 | 窗前明月光;明月几时有 |
| 光 | 窗前明月光 |
| 几时 | 明月几时有 |
| 有 | 明月几时有 |
拆分的单词若已经有了,直接存储在后面就行;若拆分的单词是新的,则续上。
- 优化倒排索引
考虑一下这个情况,若拆分单词是 月 的结果有很多很多,岂不是这个表就很大,如何处理?
可以这样设计
| 拆分单词 | 结果(ID) |
|---|---|
| 窗前 | 《静夜思》 |
| 床 | 《静夜思》 |
| 前 | 《静夜思》 |
| 明月 | 《静夜思》;《水调歌头》 |
| 明 | 《静夜思》;《水调歌头》 |
| 月 | 《静夜思》;《水调歌头》 |
| 光 | 《静夜思》 |
| 几时 | 《水调歌头》 |
| 有 | 《水调歌头》 |
根据拆分单词找到诗词名称,再根据诗词名称去查对应的内容。这样一个表就拆成两个表,就不大了。此外,这里的诗词名称就是唯一标识,在ES引擎中用 ID 表示。
从这里我们才真正的进入ES引擎
- 我们的数据格式是Json,存在文档中
{
	"id":"1",
	"title":"华为折叠手机",
	"price":"120.00"
}
-----------------------------------------
{
	"id":"2",
	"title":"三星翻盖手机",
	"price":"40.00"
}
-----------------------------------------
{
	"id":"3",
	"title":"华为移动翻盖手机",
	"price":"90.00"
}
- 自动拆分得到表
| term | value |
|---|---|
| 华为 | 1,3 |
| 折叠 | 1 |
| 手 | 1,2,3 |
| 手机 | 1,2,3 |
| 三星 | 2 |
| 翻盖 | 2,3 |
| 移动 | 3 |
若term列数据很多,那直接从上往下一个个匹配也是会很慢的,因此ES引擎对词条term列做了优化。
在生成倒排索引(此表)后,词条会排序,形成一颗树形结构(又称为:字典树),提升词条的查询速度。
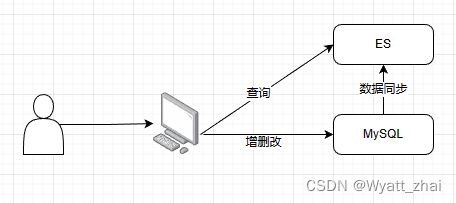
ES的定位:mysql的数据只要一更新,就将索引同步给ES,保证数据一致性
2 安装ES
2.1 环境
CentOS 7
elasticsearch-7.4.0-linux-x86_64.tar.gz
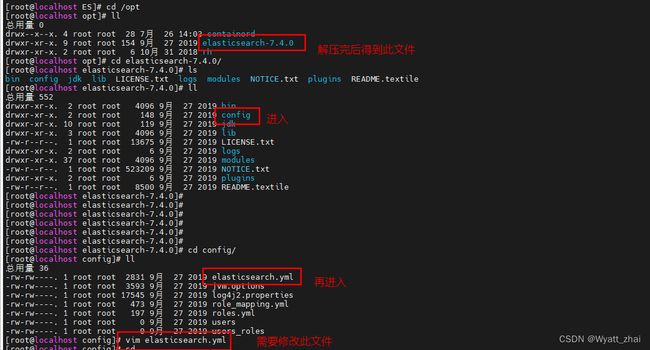
2.2 将安装包解压在opt目录下
2.3 解压
tar -zxvf elasticsearch-7.4.0-linux-x86_64.tar.gz -C /opt
2.3 修改elasticsearch.yml文件
cluster.name: my-application  //默认名称是elasticserach
node.name: node-1
network.host: 0.0.0.0  //保证在windows上可以访问安装在centos上的ES引擎
http.port: 9200
cluster.initial_master_nodes: ["node-1"]
2.4 启动报错
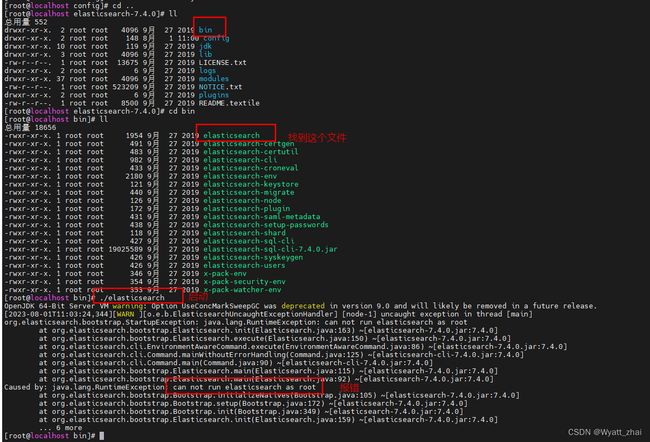
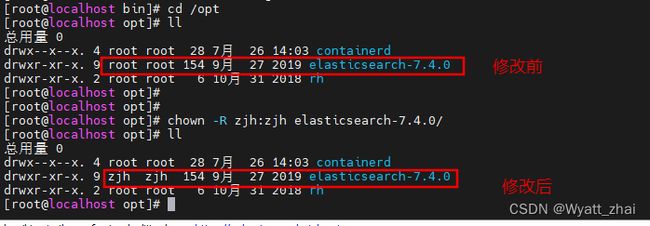
这是因为ES不推荐以root身份启动,而是推荐以用户身份启动
我们已经有用户zjh,只需要给其赋予启动权限就好
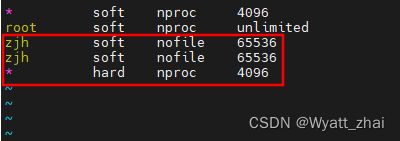
2.5 修改用户配置文件
vim /etc/security/limits.conf
添加此信息
zjh soft nofile 65536
zjh hard nofile 65536
vim /etc/security/limits.d/20-nproc.conf
添加此信息
zjh soft nofile 65536
zjh hard nofile 65536
*   hard nproc  4096
添加此信息
 vm.max_map_count=655360
sysctl -p
2.6 切换用户重启ES
启动前先暂时关闭防火墙

再启动

输入自己的虚拟机IP:9200

3 安装Kibana
Kibana版本必须和ES版本对应,避免出现不兼容的问题。
链接: Kibana下载
2.修改配置文件vim /opt/kibana-7.4.0-linux-x86_64/config/kibana.yml
# 添加如下内容
server.port: 5601
server.hosts: "0.0.0.0"
server.name: "kibana-itcast"
elasticsearch.hosts: ["http://127.0.0.1:9200"]
elasticsearch.requestTimeout: 99999
4 ES核心概念
本章节讲述如下几个概念:索引、映射、文档、倒排索引
这是一个mysql数据库处理数据的过程:创建表,将数据存储到对应字段(创建Movice表,Animal表结构)

这里我们也是创建表,不过在ES中不这样称呼,而是称之为建立索引。(创建Movice与Animal索引,并给索引Movice,索引Animla创建映射),然后存储数据,最后将相关字段进行分词。
5-8章节主要介绍在Kibana的可视化环境中,使用脚本进行相关操作,帮助熟悉ES
5 索引–基础操作
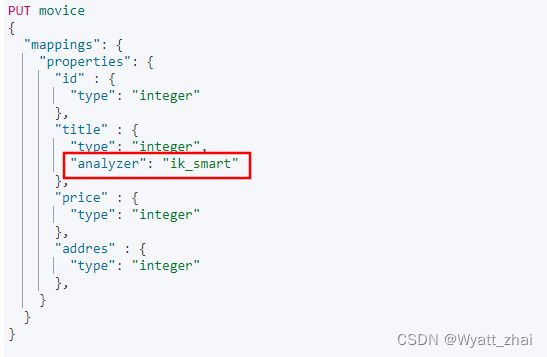
不能修改索引
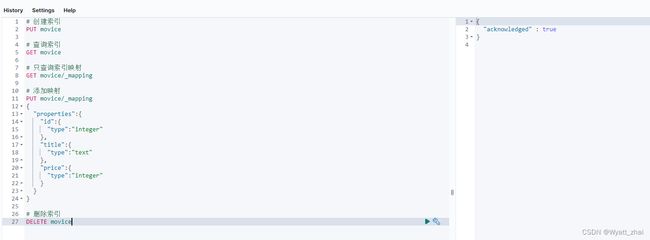
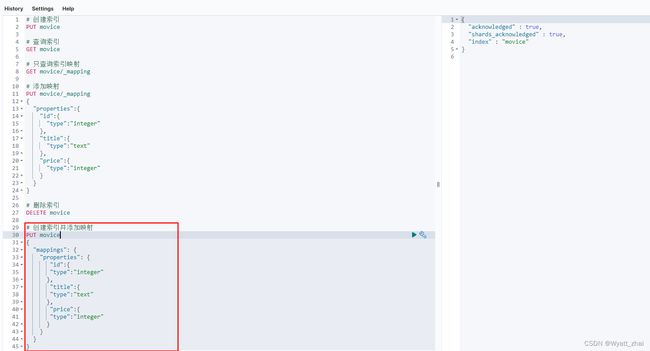
5.1 创建索引
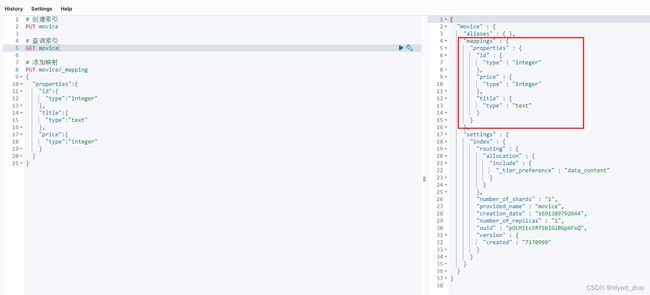
5.2 查询索引
5.3 添加映射
5.4 查询索引映射
5.5 删除索引
5.6 创建索引并添加映射
5.7 添加字段
6 文档–基础操作
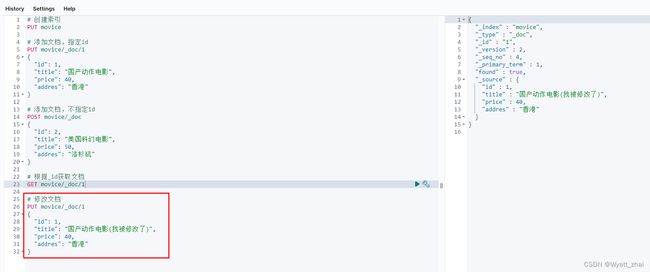
6.1 添加文档,指定id
6.2 添加文档,不指定id
6.3 修改文档
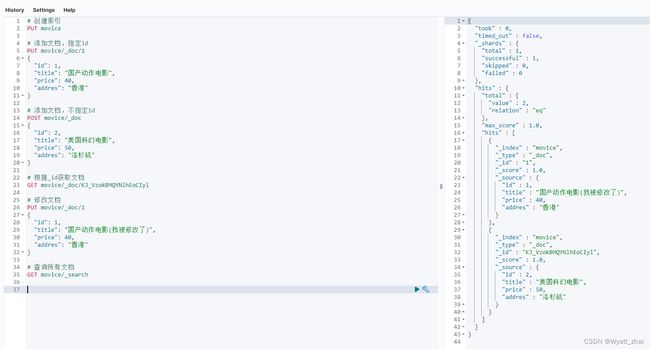
6.4 查询所有文档
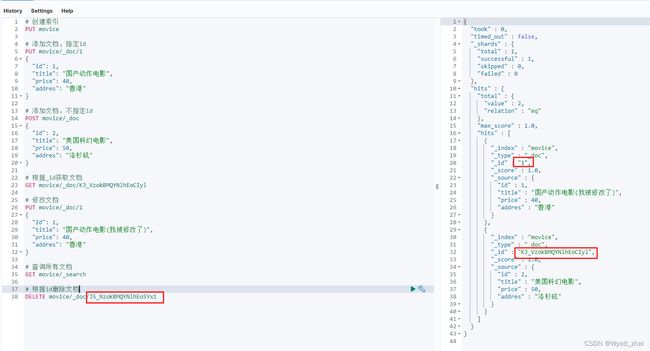
6.5 删除文档,根据id
7 分词器(analyze)

但是其对中文很不友好,使用ES的内置分词器,中文只会被分成一个一个字,中英文分别演示一下
中文彻底被拆分成了一个个字
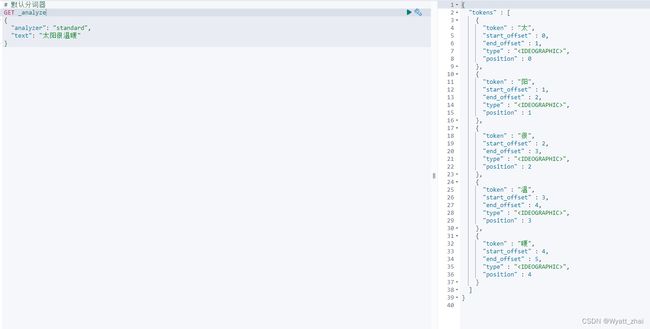
英文是按照单词拆分的,并不是按照字母拆分。

因此若想要更好的中文分词效果,需要安装其他的分词器(如IK分词器),这里不介绍了。
8 文档查询
8.1 term
term:查询的条件字符串和词条完全匹配
例:查询与“美”相关的title

需要注意的是,ES默认使用的standard分词器,因此仅支持单独的汉字匹配,例如这样

8.2 match
会先对查询的字符串进行分词,再去查询,得到并集
例:将“美国”按照standard的分词器进行拆分,得到“美” “国”,分别查询,求并集。

9 与springboot的整合
在springboot中,我们一般只操作文档。在kibana使用脚本建立索引。这一章节介绍一下如何使用代码操作ES中的文档
9.1 简单获取cilent对象
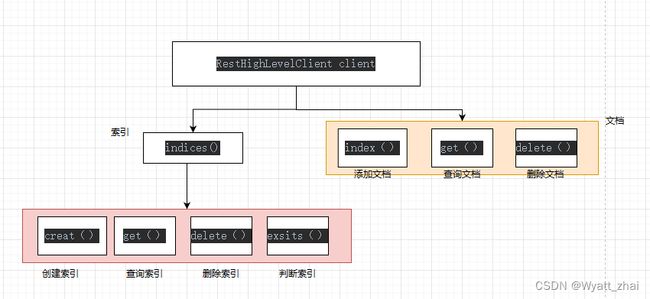
ES将相关的操作都封装成在RestHighLevelClient 中,因此我们需要获取其对象才能进行相关操作
创建一个springboot项目,导入依赖
        <dependency>
            <groupId>org.elasticsearch.clientgroupId>
            <artifactId>elasticsearch-rest-high-level-clientartifactId>
            <version>7.9.0version>
        dependency>

        <dependency>
            <groupId>org.elasticsearch.clientgroupId>
            <artifactId>elasticsearch-rest-clientartifactId>
            <version>7.9.0version>
        dependency>

        <dependency>
            <groupId>org.elasticsearchgroupId>
            <artifactId>elasticsearchartifactId>
            <version>7.9.0version>
        dependency>
测试 获取ES客户端对象
@SpringBootTest
class EsDemoApplicationTests {

	/**
	* HttpHost的三个参数
	* 	1. 192.168.xx.xx:5601 地址是Kibana的地址和端口号
	* 	2. 9002 是ES的端口
	* 	3. scheme:http
	*/
    @Test
    void test01() {
       RestHighLevelClient client = new RestHighLevelClient(RestClient.builder(
               new HttpHost("ipxxxx:5601",9002,"http")
       ));

        System.out.println(client);
    }

}
成功获取client对象

获取了client就可以操作ES的文档
9.2 使用依赖注入方式优化获取Client
可以发现,我们直接将HttpHost的三个参数写死了,项目中不这样建议。
- 创建elasticsearch.yml文件
elasticsearch:
  host: 192.168.67.18:5601
  port: 9200
- 创建配置类(获取Client)
@Configuration
// 获取elasticsearch.yml文件信息,自动将elasticsearch.yml文件中elasticsearch开头的字段和ESconfig 类中的字段匹配并赋值
@ConfigurationProperties(prefix = "elasticsearch")
public class ESconfig {

    private String host;
    private int port;


    public String getHost() {
        return host;
    }

    public void setHost(String host) {
        this.host = host;
    }

    public int getPort() {
        return port;
    }

    public void setPort(int port) {
        this.port = port;
    }

    @Bean
    public RestHighLevelClient client(){
        //1. 创建ES客户端对象
        RestHighLevelClient client = new RestHighLevelClient(RestClient.builder(
                new HttpHost(host, port, "http")));
        return client;
    }
}
- 测试
@SpringBootTest
class EsDemoApplicationTests {

    @Autowired
    private RestHighLevelClient client;

    @Test
    void test01() {
       /* RestHighLevelClient client = new RestHighLevelClient(RestClient.builder(
                new HttpHost("ipxxxx:5601",9002,"http")
        ));*/

        System.out.println(client);
    }


}
9.3 索引相关(了解)
9.3.1 创建索引
    /**
     * 创建索引
     */
    @Test
     void addIndex() throws IOException {
        //获取操作索引的对象
        IndicesClient indices = client.indices();

        //创建索引,获取返回值
        CreateIndexRequest createIndexRequest = new CreateIndexRequest("movice");

        //设置映射mappings
        String mapping = "{\n" +
                "      \"properties\" : {\n" +
                "        \"addres\" : {\n" +
                "          \"type\" : \"text\"\n" +
                "        },\n" +
                "        \"id\" : {\n" +
                "          \"type\" : \"integer\"\n" +
                "        },\n" +
                "        \"price\" : {\n" +
                "          \"type\" : \"integer\"\n" +
                "        },\n" +
                "        \"title\" : {\n" +
                "          \"type\" : \"text\"\n" +
                "        }\n" +
                "      }";
        createIndexRequest.mapping(mapping, XContentType.JSON);


        CreateIndexResponse response = indices.create(createIndexRequest, RequestOptions.DEFAULT);

        //根据返回值判断结构:成功了返回true
        System.out.println(response.isAcknowledged());
    }
9.3.2 查询索引
    /**
     * 查询索引
     */
    @Test
    void queryIndex() throws IOException {
        //获取操作索引的对象
        IndicesClient indices = client.indices();

        //根据索引名称查询
        GetIndexRequest getIndexRequest = new GetIndexRequest("movice");
        GetIndexResponse response = indices.get(getIndexRequest, RequestOptions.DEFAULT);

        //获取映射信息
        Map<String, MappingMetadata> mappings = response.getMappings();
        for (String key: mappings.keySet()){
            System.out.println(key + ":" + mappings.get(key).getSourceAsMap());

        }

    }
最后获得的结果是这一部分
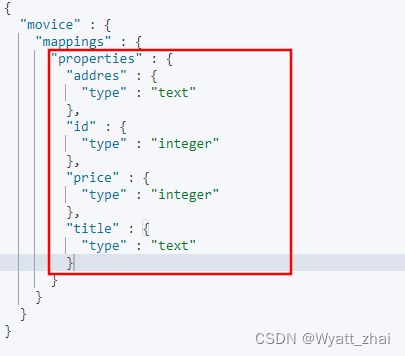
解释代码
key:索引名称
mappings.get(key):索引对象
mappings.get(key).getSourceAsMap():将数据转换为map集合
9.3.3 删除索引
    /**
     * 删除索引
     */
    @Test
    void deleteIndex() throws IOException {
        //获取操作索引的对象
        IndicesClient indices = client.indices();

        //根据索引名称删除
        DeleteIndexRequest request = new DeleteIndexRequest("movice");
        AcknowledgedResponse response = indices.delete(request, RequestOptions.DEFAULT);

        //成功返回true
        boolean acknowledged = response.isAcknowledged();
        System.out.println(acknowledged);


    }
9.3.4 判断索引是否存在
 /**
     * 判断索引是否存在
     */
    @Test
    void existsIndex() throws IOException {
        //获取操作索引的对象
        IndicesClient indices = client.indices();

        //根据索引名称删除
        GetIndexRequest request = new GetIndexRequest("movice");
        boolean exists = indices.exists(request, RequestOptions.DEFAULT);

        System.out.println(exists);


    }
9.4 文档相关(重点)
9.4.1 添加文档
但是一般我们不这样存入数据,不会一个个put,而是从数据库中拉取数据,封装成对象,存入文档
升级改造
- 创建索引的类(movice类)
public class movice {

    private Integer  id;
    private String title;
    private Integer price;
    private String address;

    public Integer getId() {
        return id;
    }

    public void setId(Integer id) {
        this.id = id;
    }

    public String getTitle() {
        return title;
    }

    public void setTitle(String title) {
        this.title = title;
    }

    public Integer getPrice() {
        return price;
    }

    public void setPrice(Integer price) {
        this.price = price;
    }

    public String getAddress() {
        return address;
    }

    public void setAddress(String address) {
        this.address = address;
    }

    @Override
    public String toString() {
        return "movice{" +
                "id=" + id +
                ", title='" + title + '\'' +
                ", price=" + price +
                ", address='" + address + '\'' +
                '}';
    }
}
- 使用类传入数据
 /**
     * 添加文档(升级改造):使用对象作为数据
     */
    @Test
    void addDoc2() throws IOException {
        movice movice = new movice();
        movice.setId(1); //此为索引ID
        movice.setTitle("国产动作电影(我被修改了)");
        movice.setPrice(40);
        movice.setAddress("香港");

        //将对象转换为json
        String data = JSON.toJSONString(movice);


        // 获取操作文档的对象:文档的ID设置为1
        IndexRequest request = new IndexRequest("movice").id("1").source(data,XContentType.JSON);

        IndexResponse response = client.index(request, RequestOptions.DEFAULT);

        //索引ID
        System.out.println(response.getId());

    }
9.4.2 修改文档
还是添加相关的操作,只不过若添加的时候,ID已经存在了,就会被修改。不存在就会创建新的
9.4.3 根据ID查询文档
    /**
     * 查询文档:根据ID查询
     */
    @Test
    void queryDoc2() throws IOException {

       //GetRequest getrequest = new GetRequest("movice"); //指定索引名称
        GetRequest getrequest = new GetRequest("1"); //指定索引ID

        GetResponse response = client.get(getrequest, RequestOptions.DEFAULT);

		//将对象的source部分数据以字符串的形式处理,前面是以map形式处理
        System.out.println(response.getSourceAsString());

    }
9.4.4 删除文档
 /**
     * 根据ID删除文档
     */
    @Test
    void deleteDoc2() throws IOException {

        DeleteRequest request = new DeleteRequest("1");

        DeleteResponse response = client.delete(request, RequestOptions.DEFAULT);

        //获取数据中的_id,注意不是_source中的id哦
        System.out.println(response.getId());

    }
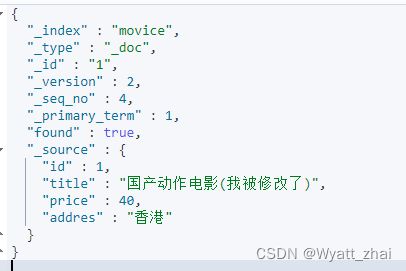
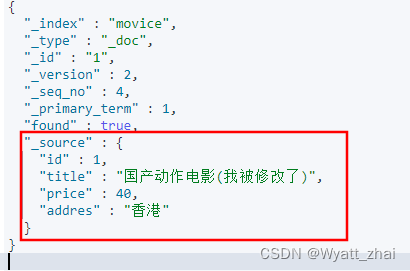
我们可能会疑惑,这个response到底是什么数据,这就是response全部数据,我们可以获取_id,_source,_index等等,但是直接
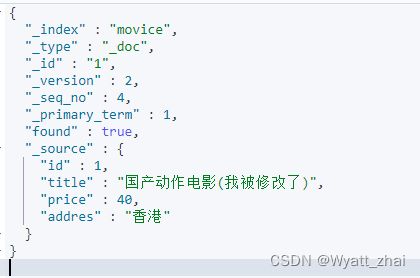
总结:其实可以发现,使用代码进行索引,文档的操作时候。一定要了解5-8章节的细节:如何指定ID查询,增删查操作返回的数据。然后再去看代码,一一对照。
在代码中
在下一篇文章将会介绍更高级的操作,熟悉企业开发。

