Python-OpenCV中的图像处理-几何变换
Python-OpenCV中的图像处理-几何变换
- 几何变换
-
- 图像缩放
- 图像平移
- 图像旋转
- 仿射变换
- 透视变换
几何变换
对图像进行各种几个变换,例如移动,旋转,仿射变换等。
图像缩放
- cv2.resize()
- cv2.INTER_AREA
- v2.INTER_CUBIC
- v2.INTER_LINEAR
res = cv2.resize(img, None, fx=2, fy=2, interpolation=cv2.INTER_CUBIC)
或
height, width = img.shape[:2]
res = cv2.resize(img, (2width, 2height), interpolation=cv2.INTER_CUBIC)
import numpy as np
import cv2

# 图像缩放
img = cv2.imread('./resource/image/1.jpg')

# 缩放 时推荐使用cv2.INTER_AREA
# 扩展 时推荐使用cv2.INTER_CUBIC(慢) 或 cv2.INTER_LINEAR(默认使用)
# 原图放大两倍
res = cv2.resize(img, None, fx=2, fy=2, interpolation=cv2.INTER_CUBIC)

# 或
#height, width = img.shape[:2]
#res = cv2.resize(img, (2*width, 2*height), interpolation=cv2.INTER_CUBIC)

while True:
    cv2.imshow('res', res)
    cv2.imshow('img', img)

    if cv2.waitKey(1)&0xFF == 27:
        break
cv2.destroyAllWindows()
图像平移
OpenCV提供了使用函数cv2.warpAffine()实现图像平移效果,该函数的语法为
- cv2.warpAffine(src, M, (cols, rows))
- src:输入的源图像
- M:变换矩阵,即平移矩阵,M = [[1, 0, tx], [0, 1, ty]] 其中,tx和ty分别代表在x和y方向上的平移距离。
- (cols, rows):输出图像的大小,即变换后的图像大小
平移就是将对象换一个位置。如果你要沿( x, y)方向移动,移动的距离
是( tx, ty),你可以以下面的方式构建移动矩阵:
M = [ 1 0 t x 0 1 t y ] M=\left[ \begin{matrix} 1&0&t_x\\ 0 &1 &t_y \end{matrix} \right] M=[1001txty]
import cv2
import numpy as np

img = cv2.imread('./resource/opencv/image/messi5.jpg')

# 获取图像的行和列
rows, cols = img.shape[:2]

# 定义平移矩阵,沿着y轴方向向下平移100个像素点
# M = np.float32([[1, 0, 0], [0, 1, 100]])

# 定义平移矩阵,沿着x轴方向向右平移50个像素点,沿着y轴方向向下平移100个像素点
M = np.float32([[1, 0, -50], [0 ,1, 100]])

# 执行平移操作
result = cv2.warpAffine(img, M, (cols, rows))

# 显示结果图像
cv2.imshow('result', result)
cv2.waitKey(0)

图像旋转
- cv2.getRotationMatrix2D()
对一个图像旋转角度 θ, 需要使用到下面形式的旋转矩阵:
M = [ c o s θ − s i n θ s i n θ c o s θ ] M=\left[ \begin{matrix} cosθ&-sinθ \\sinθ&cosθ \end{matrix} \right] M=[cosθsinθ−sinθcosθ]
import numpy as np
import cv2

# 图像旋转 缩放
img = cv2.imread('./resource/opencv/image/messi5.jpg', cv2.IMREAD_GRAYSCALE)
rows,cols = img.shape

# 这里的第一个参数为旋转中心,第二个为旋转角度,第三个为旋转后的缩放因子
# 可以通过设置旋转中心,缩放因子,以及窗口大小来防止旋转后超出边界的问题
M = cv2.getRotationMatrix2D((cols/2, rows/2), 45, 0.6)
print(M)

# 第三个参数是输出图像的尺寸中心
dst = cv2.warpAffine(img, M, (2*cols, 2*rows))
while (1):
    cv2.imshow('img', dst)
    if cv2.waitKey(1)&0xFF == 27:
        break
cv2.destroyAllWindows()

dst = cv2.warpAffine(img, M, (1cols, 1rows))

仿射变换
在仿射变换中,原图中所有的平行线在结果图像中同样平行。为了创建这个矩阵我们需要从原图像中找到三个点以及他们在输出图像中的位置。然后cv2.getAffineTransform 会创建一个 2x3 的矩阵,最后这个矩阵会被传给函数 cv2.warpAffine。
import numpy as np
import cv2
from matplotlib import pyplot as plt

# 仿射变换
img = cv2.imread('./resource/opencv/image/messi5.jpg', cv2.IMREAD_COLOR)
rows, cols, ch = img.shape
img = cv2.cvtColor(img, cv2.COLOR_BGR2RGBA)

pts1 = np.float32([[50,50],[200,50],[50,200]])
pts2 = np.float32([[10,100], [200,50], [100,250]])

# 行,列,通道数
M = cv2.getAffineTransform(pts1, pts2)
dts = cv2.warpAffine(img, M, (cols, rows))

plt.subplot(121), plt.imshow(img), plt.title('Input')
plt.subplot(122), plt.imshow(dts), plt.title('Output')
plt.show()

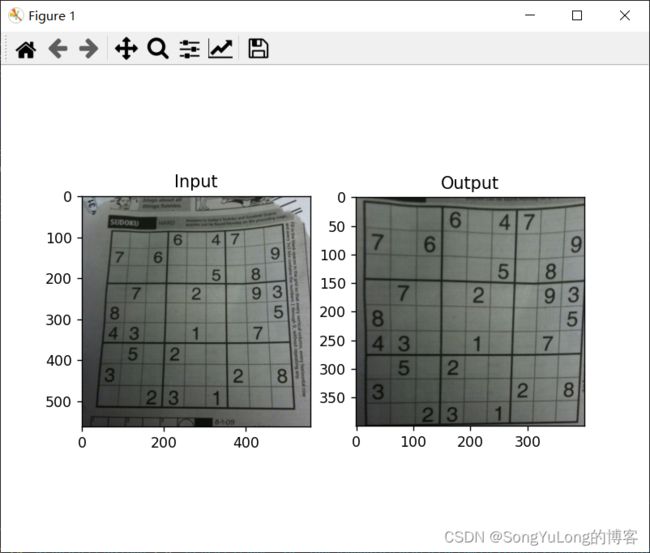
透视变换
对于视角变换,我们需要一个 3x3 变换矩阵。在变换前后直线还是直线。要构建这个变换矩阵,你需要在输入图像上找 4 个点,以及他们在输出图像上对应的位置。这四个点中的任意三个都不能共线。这个变换矩阵可以有函数cv2.getPerspectiveTransform() 构建。然后把这个矩阵传给函数cv2.warpPerspective()
import numpy as np
import cv2
from matplotlib import pyplot as plt

# 透视变换
img = cv2.imread('./resource/opencv/image/sudoku.png', cv2.IMREAD_COLOR)
rows,cols,ch = img.shape
img = cv2.cvtColor(img, cv2.COLOR_BGR2RGB)

pts1 = np.float32([[60,80],[368,65],[28,387],[389,390]])
pts2 = np.float32([[0,0],[300,0],[0,300],[300,300]])

M = cv2.getPerspectiveTransform(pts1, pts2)
dst = cv2.warpPerspective(img, M, (400, 400))

plt.subplot(121), plt.imshow(img), plt.title('Input')
plt.subplot(122), plt.imshow(dst), plt.title('Output')
plt.show()