KVM IO虚拟化
目录
1 I/O概述
2 PCIe
2.1 PCIe通信
2.2 PCIe Configuration Space
2.2.1 概述
2.2.2 枚举
2.2.3 Command & Status
2.2.4 BAR
2.3 MSI
3 I/O虚拟化(一)
3.1 Trap I/O 操作
3.1.1 PIO
3.1.2 MMIO
3.2 Emulate I/O
4 PCI Emulation
4.1 PCI设备初始化
4.2 PCI Configuration Space
4.3 PCI Bar
4.4 MSI-X
5 VirtIO
5.1 Virtio基础
5.2 VirtIO in Qemu
5.2.1 框架
5.2.2 virtio queue
5.3 vhost
5.3.1 目的
5.3.2 evnetfd
6 Passthrough
6.1 IOMMU
6.1.1 DMA Remapping
6.1.2 IOMMU Group
6.2 VFIO
6.2.1 Container/Group/Device
6.2.2 Config/Bar
6.2.3 Interrupt
6.2.4 DMA
1 I/O概述
I/O,input/output,参考下图,除内存之外,都可以认为是I/O设备,或者应该称作外设。
注: 在x86架构中,有两个地址空间,即I/O和memory,一个用in/out指令操作,一个用mov操作;在早期的计算机系统中,需要使用in/out操作的设备,应该就是I/O设备;当然,这些位于I/O地址空间的设备,后来都可以用memory指令进行操作,即MMIO,两者的界限就变得模糊了。
https://en.wikipedia.org/wiki/Intel_X99
Note: 我们也将存储栈称为I/O栈,但其实这种称呼是不准确的,因为网络也可以认为是一种I/O。
所以,IO虚拟化,其实就是这些外设的虚拟化。在了解如何进行IO虚拟化之前,我们需要先知道,这些设备是如何工作的。
2 PCIe
这是我们最常见的外设设备总线,部分图和内容参考自下课程
(PCIE) Peripheral Component Interconnect [Express] – Stephen Marz![]() https://marz.utk.edu/my-courses/cosc562/pcie/
https://marz.utk.edu/my-courses/cosc562/pcie/
2.1 PCIe通信
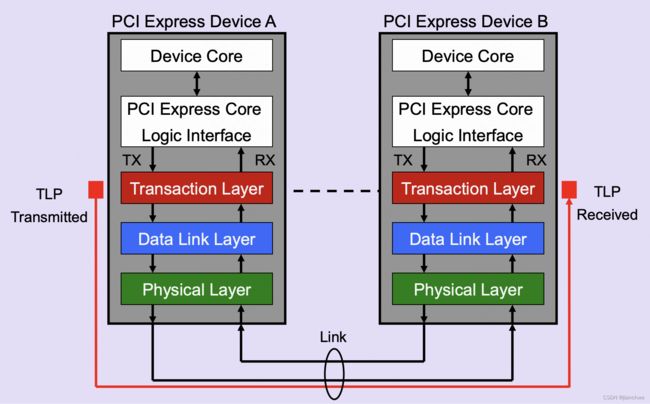
PCIe本质上,是一个CPU与外设之间的通信方式,正如其名称,Peripheral Component Interconnect Express,参考下图,引用自
PCI Express Basics Background.https://pcisig.com/sites/default/files/files/PCI_Express_Basics_Background.pdf#page=26
Down to the TLP: How PCI express devices talk (Part I) | xillybus.com 有很好的概括:
PCIe is more like a network, with each card connected to a network switch through a dedicated set of wires. Exactly like a local Ethernet network, each card has its own physical connection to the switch fabric. The similarity goes further: The communication takes the form of packets transmitted over these dedicated lines, with flow control, error detection and retransmissions.
Request are translated to one of four transaction types by the Transaction Layer:
- Memory Read or Memory Write. Used to transfer data from or to a memory mapped location. – The protocol also supports a locked memory read transaction variant
- I/O Read or I/O Write. Used to transfer data from or to an I/O location. – These transactions are restricted to supporting legacy endpoint devices
- Configuration Read or Configuration Write. Used to discover device capabilities, program features, and check status in the 4KB PCI Express configuration space.
- Messages. Handled like posted writes. Used for event signaling and general purpose messaging.
下图是Host和DMA通信过程示意,同样引用自以上连接:
我们看到,无论是Host去操作Endpont,还是Endpoint执行DMA,都需要经过Root Complex;参考https://en.wikipedia.org/wiki/Root_complex
A root complex device connects the CPU and memory subsystem to the PCI Express switch fabric composed of one or more PCIe or PCI devices
总结起来它需要完成两方面的功能:
- 将来自CPU的对某个地址的load/store指令操作,转换成Memory Read/Write Transaction Packet,这其中包括了从memory地址到PCIe通信地址的转化;
- 处理来自PCIe Endpoint的Memory Read/Write Transaction Packet包,并去对应的内存地址存取数据;
2.2 PCIe Configuration Space
2.2.1 概述
下图是一个Type 0的PCI Configuration Space,256 Bytes;而PCIe的则拓展到4K。
前256字节,即PCI compatible的部分,可以通过两种方式访问,即
- I/O port,即configuration address port CF8h - CFBh和 and configuration data port CFCh - CFFh,方法如下:
// put the address of the PCI chip register to be accessed in eax // CONFIG_ADDRESS is the following: // 0x80000000 | bus << 16 | device << 11 | function << 8 | offset // offset here is the offset in pci configuration space mov eax,80000064h // put the address port in dx mov dx,0CF8h //s end the PCI address port to the I/O space of the processor out dx,eax //put the data port in dx mov dx,0CFCh // put the data read from the device in eax in eax,dx - Memory mapped address;
PCIe Configuration space多出来的部分,则只能通过memory mapping的方式访问。I/O port的访问地址是固定的,memory mapping的地址是如何确定的呢?参考,https://www.mouser.com/pdfdocs/3010datasheet.pdf 3.3.2 PCI Express Enhanced Configuration Mechanism
The PCI Express Enhanced Configuration Mechanism utilizes a flat memory-mapped address space to access device configuration registers. This address space is reported by the system firmware to the operating system. There is a register, PCIEXBAR, that defines the base address for the 256 MB block of addresses below top of addressable memory (currently 8 GB) for the configuration space associated with all buses, devices and functions that are potentially a part of the PCI Express root complex hierarchy.
为什么是256M?
Each PCIe device has 4KB configuration registers, PCIe supports the same number of buses as PCI, i.e. 256 buses, 32 devices per bus, and 8 functions per device. Therefore, the total size of the required memory range is: 256 x 32 x 8 x 4KB; which is equal to 256MB
2.2.2 枚举
在得到了256M的PCI Configuration Space之后,需要做设备枚举,参考https://en.wikipedia.org/wiki/PCI_configuration_space具体方法为:
Bus enumeration is performed by attempting to access the PCI configuration space registers for each buses (即尝试读取PCI Configration Space的前4个字节,Device ID | Vender ID), devices and functions. If no response is received from the device's function #0, the bus master performs an abort and returns an all-bits-on value (FFFFFFFF in hexadecimal), which is an invalid VID/DID value, thus the BIOS or operating system can tell that the specified combination bus/device_number/function (B/D/F) is not present.
在Linux内核中,PCI的枚举并不是直接去扫描整个PCI Configration Space,而是由ACPI介入提供Bus Number;
参考连接:
ACPI Device Enumeration![]() https://www.reddit.com/r/osdev/comments/pz1f3m/acpi_device_enumeration/
https://www.reddit.com/r/osdev/comments/pz1f3m/acpi_device_enumeration/
ACPI is meant to enumerate devices which are not otherwise discoverable by other means. For instance on x86, most devices are on the PCI bus, which has a mechanism for discovery, and are therefore not listed in ACPI. This is true even if the device is soldered onto the motherboard. That said, the PCI controller itself is not immediately discoverable and needs to be described in ACPI to begin to enumerate PCI devices.
ACPI是用来枚举无法通过其他方式发现的设备,比如那些被焊接在主板上的设备;PCI Controller就是这样一种设备;而位于PCI Bus上设备,则可以通过PCI总线自己的机制发现。
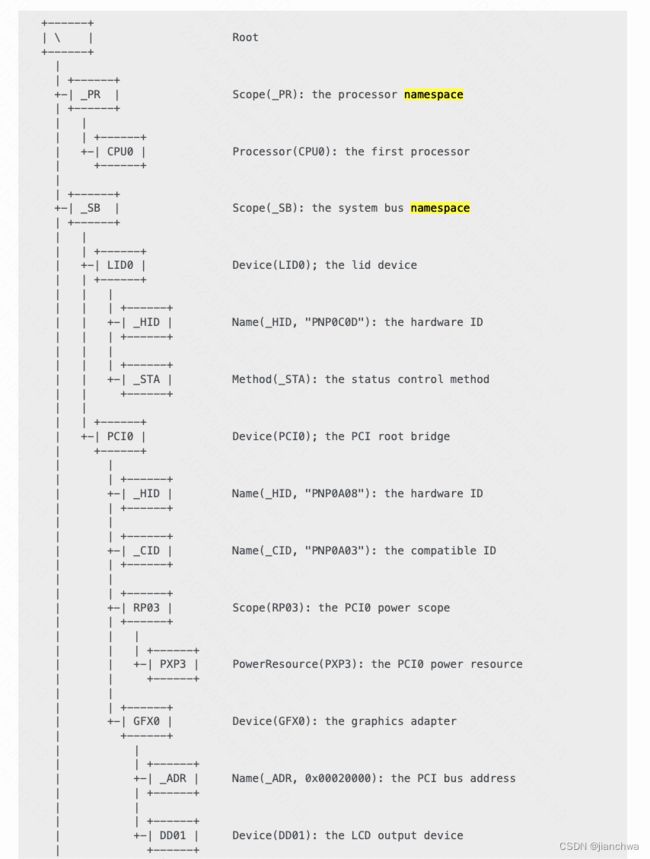
ACPI提供给系统的是一个树形结构,参考连接:ACPI Device Tree - Representation of ACPI Namespace — The Linux Kernel documentation![]() https://docs.kernel.org/firmware-guide/acpi/namespace.html
https://docs.kernel.org/firmware-guide/acpi/namespace.html
其中_CID为PNP0A03的就是PCI Controller; 同时,这个Namespace还可以提供PCI Bus的Bus Number,所以,就不需要整个遍历PCI Configration Space。
具体代码可以参考:
acpi_bus_init()
  -> acpi_bus_scan()
	-> acpi_bus_attach()
	  -> acpi_scan_attach_handler()
	     ---
		handler = acpi_scan_match_handler(hwid->id, &devid);
		if (handler) {
			device->handler = handler;
			ret = handler->attach(device, devid);
		}
		 ---

static const struct acpi_device_id root_device_ids[] = {
	{"PNP0A03", 0},
	{"", 0},
};

static struct acpi_scan_handler pci_root_handler = {
	.ids = root_device_ids,
	.attach = acpi_pci_root_add,
	.detach = acpi_pci_root_remove,
	.hotplug = {
		.enabled = true,
		.scan_dependent = acpi_pci_root_scan_dependent,
	},
};

acpi_pci_root_add()
  -> try_get_root_bridge_busnr(handle, &root->secondary) //METHOD_NAME__CRS
  -> pci_acpi_scan_root()
	-> acpi_pci_root_create()
	  -> pci_create_root_bus()
	  -> pci_scan_child_bus()


pci_scan_child_bus()
  -> pci_scan_child_bus_extend()
     ---
	// 32 devices per bus, 8 functions per device
	for (devfn = 0; devfn < 256; devfn += 8) {
		nr_devs = pci_scan_slot(bus, devfn);
		...
	}
	 ---
	 -> pci_scan_single_device()
	   -> pci_scan_device()
	     -> pci_bus_read_dev_vendor_id() // read the vender and device id from config space
	     -> pci_setup_device()
	       -> dev->dev.bus = &pci_bus_type;
		   -> dev_set_name(&dev->dev, "%04x:%02x:%02x.%d", pci_domain_nr(dev->bus),
		     		dev->bus->number, PCI_SLOT(dev->devfn),
		     		PCI_FUNC(dev->devfn));
       -> pci_device_add()
	   -> device_add()

device_add()
  -> bus_probe_device()
	-> device_initial_probe()
	  -> __device_attach()
	    -> bus_for_each_drv(dev->bus, NULL, &data,
					__device_attach_driver)
	      -> __device_attach_driver()
	        -> __device_attach_driver()
	          -> bus->match()
	            -> pci_bus_match()
	        -> driver_probe_device()
	          -> really_probe()
	            -> bus->probe()
	               pci_device_probe()
其中pci_bus_read_dev_vendor_id()用来读取vender id/device id来判断,这个槽位是否存在设备。之后,创建pci设备,注册进设备模型中,匹配驱动。
2.2.3 Command & Status
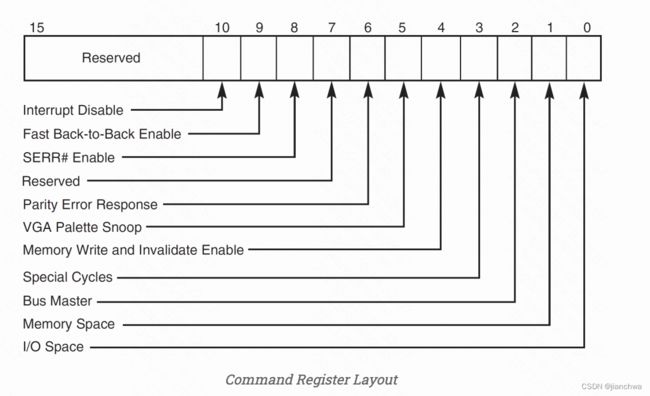
This is a read/write register, and it is per-device. If we use MMIO (which we will), we want to ensure Memory Space is 1 so that the PCI device can respond to MMIO reads/writes. We will not be using PIO, so the I/O Space bit should be set to 0.
Bus Mastering is only important if we need a particular PCI to write to RAM. This is usually necessary for MSI/MSI-X writes which uses a physical MMIO address to signal a message.
Make sure that you set the command register BEFORE loading or storing to the address assigned to the BARs! All devices should have bit 1 set, and all bridges should have bits 1 and 2 set. NOTE: The “info pci” command in QEMU will not display the addresses you store into the BARs until the command register is set to accept memory space requests (bit index 1).
参考nvme驱动代码:
nvme_reset_work()
  -> nvme_pci_enable()
	-> pci_enable_device_mem()
	  -> pci_enable_device_flags() //IORESOURCE_MEM
	    -> do_pci_enable_device()
	      -> pcibios_enable_device()
	         ---
			pci_read_config_word(dev, PCI_COMMAND, &cmd);
			old_cmd = cmd;

			for (i = 0; i < PCI_NUM_RESOURCES; i++) {
				if (!(mask & (1 << i)))
					continue;

				r = &dev->resource[i];

				if (r->flags & IORESOURCE_IO)
					cmd |= PCI_COMMAND_IO;
				if (r->flags & IORESOURCE_MEM)
					cmd |= PCI_COMMAND_MEMORY;
			}

			if (cmd != old_cmd) {
				pci_write_config_word(dev, PCI_COMMAND, cmd);
			}
			 ---
    -> pci_set_master()
	  -> __pci_set_master()
		---
			pci_read_config_word(dev, PCI_COMMAND, &old_cmd);
			if (enable)
				cmd = old_cmd | PCI_COMMAND_MASTER;
			else
				cmd = old_cmd & ~PCI_COMMAND_MASTER;
			if (cmd != old_cmd) {
				pci_write_config_word(dev, PCI_COMMAND, cmd);
			}
		 ---
2.2.4 BAR
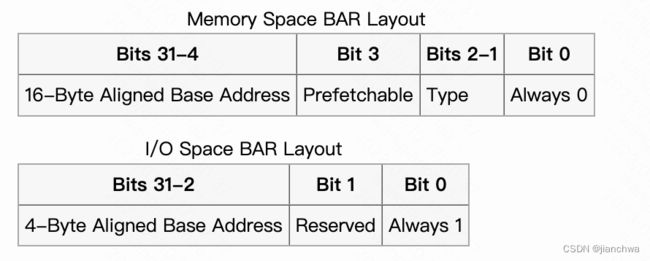
BAR,Base Address Register,用来建立Host和Device的沟通通道,IO port或者MMIO。
以MMIO为例,首先,我们需要确定设备需要的MMIO地址空间的大小,方法如下:
To determine the amount of address space needed by a PCI device, you must save the original value of the BAR, write a value of all 1's to the register, then read it back. The amount of memory can then be determined by masking the information bits, performing a bitwise NOT ('~' in C), and incrementing the value by 1. The original value of the BAR should then be restored. The BAR register is naturally aligned and as such you can only modify the bits that are set. For example, if a device utilizes 16 MB it will have BAR0 filled with 0xFF000000 (0x1000000 after decoding) and you can only modify the upper 8-bits.
简单说就是,写个全1到bar里,然后将读出来的值取反加1;
在确定所需的长度之后,需要设置一段地址进去,这个操作通常由BIOS完成,参考连接,PCI Subsystem - LinuxMIPShttps://www.linux-mips.org/wiki/PCI_Subsystem#BAR_assignment_in_Linux
On all IBM PC-compatible machines, BARs are assigned by the BIOS. Linux simply scans through the buses and records the BAR values.
参考seabios https://github.com/qemu/seabios.git 代码:
pci_setup()
  -> pci_bios_check_devices()
     ---
	 foreachpci(pci) {
        struct pci_bus *bus = &busses[pci_bdf_to_bus(pci->bdf)];
        for (i = 0; i < PCI_NUM_REGIONS; i++) {
			...
            pci_bios_get_bar(pci, i, &type, &size, &is64);
            if (size == 0)
                continue;
			// entry will be inserted into bus->r[type]
            entry = pci_region_create_entry(bus, pci, i, size, size, type, is64);
            if (!entry)
                return -1;

            if (is64)
                i++;
        }
    }
	 ---
  -> pci_bios_map_devices()
	 ---
    for (bus = 0; bus<=MaxPCIBus; bus++) {
        int type;
        for (type = 0; type < PCI_REGION_TYPE_COUNT; type++)
            pci_region_map_entries(busses, &busses[bus].r[type]);
    }
	 ---
	   -> pci_region_map_one_entry()
	     -> pci_set_io_region_addr()
			---
		    u32 ofs = pci_bar(pci, bar);
		    pci_config_writel(pci->bdf, ofs, addr);
		    if (is64)
		        pci_config_writel(pci->bdf, ofs + 4, addr >> 32);
			---
BIOS设置BAR的地址之后,操作系统在设备初始化的时候,会将相应的地址读出并保存起来,参考代码:
pci_scan_device()
  -> pci_setup_device()
	-> pci_read_bases(dev, 6, PCI_ROM_ADDRESS) //PCI_HEADER_TYPE_NORMAL
	  -> __pci_read_base()
	     ---
		mask = type ? PCI_ROM_ADDRESS_MASK : ~0;
		...
		pci_read_config_dword(dev, pos, &l);
		pci_write_config_dword(dev, pos, l | mask);
		pci_read_config_dword(dev, pos, &sz);
		pci_write_config_dword(dev, pos, l);
		...
		if (type == pci_bar_unknown) {
			res->flags = decode_bar(dev, l);
			res->flags |= IORESOURCE_SIZEALIGN;
			if (res->flags & IORESOURCE_IO) {
				l64 = l & PCI_BASE_ADDRESS_IO_MASK;
				sz64 = sz & PCI_BASE_ADDRESS_IO_MASK;
				mask64 = PCI_BASE_ADDRESS_IO_MASK & (u32)IO_SPACE_LIMIT;
			} else {
				l64 = l & PCI_BASE_ADDRESS_MEM_MASK;
				sz64 = sz & PCI_BASE_ADDRESS_MEM_MASK;
				mask64 = (u32)PCI_BASE_ADDRESS_MEM_MASK;
			}
		}
		 ---
以nvme驱动为例,这些resource的后续处理为:
nvme_probe()
  -> nvme_dev_map()
	-> pci_request_mem_regions()
	  -> pci_request_selected_regions()
	    -> __pci_request_region()
	      -> __request_mem_region()
	        -> __request_region(&iomem_resource, start, n, name, IORESOURCE_EXCLUSIVE)
  -> nvme_remap_bar()
	-> dev->bar = ioremap(pci_resource_start(pdev, 0), size)

这里映射的是bar 0
2.3 MSI
关于MSI,我在另一边关于中断的blog里做了详解,这里不再赘述,参考
Linux 中断处理![]() http://t.csdn.cn/5tS8c
http://t.csdn.cn/5tS8c
3 I/O虚拟化(一)
3.1 Trap I/O 操作
当前,CPU访问外设,通过PIO和MMIO两种方式,所以,要完成IO虚拟化,首先需要trap这两种操作;
3.1.1 PIO
通过trap对IO Port的IN/OUT指令操作来完成虚拟化;参考Intel SDM 3 24.6.4 I/O-BitmapAddresses ,
The VM-execution control fields include the 64-bit physical addresses of I/O bitmaps A and B (each of which are 4 KBytes in size). I/O bitmap A contains one bit for each I/O port in the range 0000H through 7FFFH; I/O bitmap B contains bits for ports in the range 8000H through FFFFH.
A logical processor uses these bitmaps if and only if the “use I/O bitmaps” control is 1. If the bitmaps are used, execution of an I/O instruction causes a VM exit if any bit in the I/O bitmaps corresponding to a port it accesses is 1.
不过现实情况是,KVM对所有的IO Port操作都无条件的VM-Exit,参考Intel SDM 24.6.2 Processor-Based VM-Execution Control
KVM的配置是:
setup_vmcs_config()
---
	min = CPU_BASED_HLT_EXITING |
#ifdef CONFIG_X86_64
	      CPU_BASED_CR8_LOAD_EXITING |
	      CPU_BASED_CR8_STORE_EXITING |
#endif
	      CPU_BASED_CR3_LOAD_EXITING |
	      CPU_BASED_CR3_STORE_EXITING |
	      CPU_BASED_UNCOND_IO_EXITING |
	      CPU_BASED_MOV_DR_EXITING |
	      CPU_BASED_USE_TSC_OFFSETING |
	      CPU_BASED_MWAIT_EXITING |
	      CPU_BASED_MONITOR_EXITING |
	      CPU_BASED_INVLPG_EXITING |
	      CPU_BASED_RDPMC_EXITING;

	opt = CPU_BASED_TPR_SHADOW |
	      CPU_BASED_USE_MSR_BITMAPS |
	      CPU_BASED_ACTIVATE_SECONDARY_CONTROLS;

---
CPU_BASED_UNCOND_IO_EXITING被设置了。
KVM对io exiting的处理流程,参考如下代码:
vcpu_run()
 -> vcpu_enter_guest()
  -> kvm_x86_ops->handle_exit()
	 vmx_handle_exit()
	   -> kvm_vmx_exit_handlers[exit_reason](vcpu)
         -> handle_io()
	        ---
			port = exit_qualification >> 16;
			size = (exit_qualification & 7) + 1;
			in = (exit_qualification & 8) != 0;

			return kvm_fast_pio(vcpu, size, port, in);
			---

kvm_fast_pio()
  -> kvm_fast_pio_in()
	 ---
	ret = emulator_pio_in_emulated(&vcpu->arch.emulate_ctxt, size, port,
				       &val, 1);
	...
	vcpu->arch.pio.linear_rip = kvm_get_linear_rip(vcpu);
	vcpu->arch.complete_userspace_io = complete_fast_pio_in;

	return 0;
	 ---
这里的complete_fast_pio_in,是用来后去io port操作的返回值的

emulator_pio_in_emulated()
  emulator_pio_in_out() // vcpu->arch.pio.count is zero now
     ---
	...
	if (!kernel_pio(vcpu, vcpu->arch.pio_data)) {
		vcpu->arch.pio.count = 0;
		return 1;
	}

	vcpu->run->exit_reason = KVM_EXIT_IO;
	vcpu->run->io.direction = in ? KVM_EXIT_IO_IN : KVM_EXIT_IO_OUT;
	vcpu->run->io.size = size;
	vcpu->run->io.data_offset = KVM_PIO_PAGE_OFFSET * PAGE_SIZE;
	vcpu->run->io.count = count;
	vcpu->run->io.port = port;
	 ---

vcpu->run是一块与qemu共享的内存,qemu会根据以上信息,进行下一步的处理;

vcpu_run()
---
	for (;;) {
		if (kvm_vcpu_running(vcpu)) {
			r = vcpu_enter_guest(vcpu);
		} else {
			r = vcpu_block(kvm, vcpu);
		}

		if (r <= 0)
			break;
		...
	}
---

handle_io()返回0,会导致vcpu_run()的循环退出,并最终导致vcpu返回用户态
在qemu vcpu thread从内核态返回用户态之后,处理流程如下:
qemu_kvm_cpu_thread_fn()
  -> kvm_cpu_exec()
	 ---
	  do {
		...
        run_ret = kvm_vcpu_ioctl(cpu, KVM_RUN, 0);
		...
        switch (run->exit_reason) {
        case KVM_EXIT_IO:
            kvm_handle_io(run->io.port,
                          (uint8_t *)run + run->io.data_offset,
                          run->io.direction,
                          run->io.size,
                          run->io.count);
            ret = 0;
            break;
			...
        }
    } while (ret == 0);
	 ---

kvm_handle_io()
  -> address_space_rw() // address_space_io
	-> mr = address_space_translate()
	-> io_mem_read/write()
	  -> memory_region_dispatch_read/write()
	    -> mr->op->read/write()
3.1.2 MMIO
具体MMIO的拦截方式,可以参考另一篇blog;
KVM内存虚拟化 MMIO小节![]() http://t.csdn.cn/wkRGS
http://t.csdn.cn/wkRGS
其处理流程与PIO相似,这里不再赘述
3.2 Emulate I/O
4 PCI Emulation
本小节,我们看下Qemu是如何模拟PCI总线机器设备的。
在此之前,我们先了解下Q35;参考如下连接:
A New Chipset For Qemu - Intel's Q35![]() https://www.linux-kvm.org/images/0/06/2012-forum-Q35.pdf
https://www.linux-kvm.org/images/0/06/2012-forum-Q35.pdf
- Intel chipset released September 2007
- North Bridge: MCH
- South Bridge: ICH9
对比古老的I440FX,Q35最重要的就是支持PCIe !
4.1 PCI设备初始化
下面我们看在Qemu,PCI设备的初始化流程;以下,以nvme为例。
首先,看下PCI设备相关的class和object;
DeviceClass
      |
PCIDeviceClass
      |
	 ...
But nvme_class_init() would overwrite PCIDeviceClass's some callback and fields

DeviceState
   |
PCIDevice
   |
NvmeCtrl

class's class_init and object's instance_init cannot be overwritten by
children
pci_device_class_init overwrite DeviceClass's .init & .exit
but it doesn't overwrite .realize

qdev_device_add()
---
    /* create device */
    dev = DEVICE(object_new(driver));
	...
    object_property_set_bool(OBJECT(dev), true, "realized", &err);
---

device_set_realized()
  -> device_realize()
	 ---
    DeviceClass *dc = DEVICE_GET_CLASS(dev);

    if (dc->init) {
        int rc = dc->init(dev);
		...
    }
	 ---
	 -> pci_qdev_init()
	    ---
    bus = PCI_BUS(qdev_get_parent_bus(qdev));
    pci_dev = do_pci_register_device(pci_dev, bus,
                                     object_get_typename(OBJECT(qdev)),
                                     pci_dev->devfn);
	...
    if (pc->init) {
        rc = pc->init(pci_dev);
        if (rc != 0) {
            do_pci_unregister_device(pci_dev);
            return rc;
        }
    }
		---
需要注意的是,在pci_qdev_init中,调用do_pci_register_device()之后,还调用了PCIDeviceClass的init函数;这个 函数在nvme_class_init()中,被重载成了nvme_init;
在nvme_init()中,它使用的部分参数来自property的解析,参考以下配置:
-drive file=nvm.img,if=none,id=nvm
-device nvme,serial=deadbeef,drive=nvm
property的解析参考
QEMU代码详解![]() http://t.csdn.cn/YTWMN另外,nvme_init()还注册了bar的处理函数,参考代码:
http://t.csdn.cn/YTWMN另外,nvme_init()还注册了bar的处理函数,参考代码:
nvme_init()
---
    memory_region_init_io(&n->iomem, OBJECT(n), &nvme_mmio_ops, n,
                          "nvme", n->reg_size);
    pci_register_bar(&n->parent_obj, 0,
        PCI_BASE_ADDRESS_SPACE_MEMORY | PCI_BASE_ADDRESS_MEM_TYPE_64,
        &n->iomem);
---

pci_register_bar()
---
    PCIIORegion *r;
	...
    r = &pci_dev->io_regions[region_num];
    r->addr = PCI_BAR_UNMAPPED;
    r->size = size;
    r->type = type;
    r->memory = NULL;
	...
    pci_dev->io_regions[region_num].memory = memory;
    pci_dev->io_regions[region_num].address_space
        = type & PCI_BASE_ADDRESS_SPACE_IO
        ? pci_dev->bus->address_space_io
        : pci_dev->bus->address_space_mem;
---

static const MemoryRegionOps nvme_mmio_ops = {
    .read = nvme_mmio_read,
    .write = nvme_mmio_write,
    .endianness = DEVICE_LITTLE_ENDIAN,
    .impl = {
        .min_access_size = 2,
        .max_access_size = 8,
    },
};
4.2 PCI Configuration Space
在本篇的2.2小节,我们应详细介绍过PCI Configuration Space,这里我们看下QEMU如果模拟其行为。
我们以支持PCIe的Q35为例,
首先是q35机器的初始化:
pc_q35_init()
---
    /* create pci host bus */
    q35_host = Q35_HOST_DEVICE(qdev_create(NULL, TYPE_Q35_HOST_DEVICE));
    object_property_add_child(qdev_get_machine(), "q35", OBJECT(q35_host), NULL);
	...
    /* pci */
    qdev_init_nofail(DEVICE(q35_host));
---

期间创建了pcihost
q35 host device instance_init callback
q35_host_initfn()
---
    Q35PCIHost *s = Q35_HOST_DEVICE(obj);
    PCIHostState *phb = PCI_HOST_BRIDGE(obj);

    memory_region_init_io(&phb->conf_mem, obj, &pci_host_conf_le_ops, phb,
                          "pci-conf-idx", 4);
    memory_region_init_io(&phb->data_mem, obj, &pci_host_data_le_ops, phb,
                          "pci-conf-data", 4);

    object_initialize(&s->mch, sizeof(s->mch), TYPE_MCH_PCI_DEVICE);
    object_property_add_child(OBJECT(s), "mch", OBJECT(&s->mch), NULL);
	....
---

q35_host_realize()
---
    PCIHostState *pci = PCI_HOST_BRIDGE(dev);
    Q35PCIHost *s = Q35_HOST_DEVICE(dev);
    SysBusDevice *sbd = SYS_BUS_DEVICE(dev);

	// 0xcf8 PCIE CONFIG_ADDRESS
    sysbus_add_io(sbd, MCH_HOST_BRIDGE_CONFIG_ADDR, &pci->conf_mem);
    sysbus_init_ioports(sbd, MCH_HOST_BRIDGE_CONFIG_ADDR, 4);

	// 0xcfc PCIE CONFIG_DATA
    sysbus_add_io(sbd, MCH_HOST_BRIDGE_CONFIG_DATA, &pci->data_mem);
    sysbus_init_ioports(sbd, MCH_HOST_BRIDGE_CONFIG_DATA, 4);

    if (pcie_host_init(PCIE_HOST_BRIDGE(s)) < 0) {
        error_setg(errp, "failed to initialize pcie host");
        return;
    }
    pci->bus = pci_bus_new(DEVICE(s), "pcie.0",
                           s->mch.pci_address_space, s->mch.address_space_io,
                           0, TYPE_PCIE_BUS);
    qdev_set_parent_bus(DEVICE(&s->mch), BUS(pci->bus));
    qdev_init_nofail(DEVICE(&s->mch));
---

// Write (bus | dev | func) to CONFIG_ADDRESS io port
pci_host_config_write()
{
    s->config_reg = val;
}

// Read from CONFIG_DATA io port
pci_host_data_read()
  -> pci_data_read(s->bus, s->config_reg | (addr & 3), len);
	---
	PCIDevice *pci_dev = pci_dev_find_by_addr(s, addr);
	...
	// If no device here, return all 'f'
    if (!pci_dev) {
        return ~0x0;
    }
    val = pci_host_config_read_common(pci_dev, config_addr,
                                      PCI_CONFIG_SPACE_SIZE, len);
	---

上面是用IO port访问pci configuration space;

mmio访问的方式,在MCH的代码中,参考

main() -> qemu_system_reset()

mch_reset()
  -> pci_set_quad(d->config + MCH_HOST_BRIDGE_PCIEXBAR, MCH_HOST_BRIDGE_PCIEXBAR_DEFAULT);
  -> mch_update()
	-> mch_update_pciexbar()
	   ---
    	pciexbar = pci_get_quad(pci_dev->config + MCH_HOST_BRIDGE_PCIEXBAR);
	    addr = pciexbar & addr_mask;
   		pcie_host_mmcfg_update(pehb, enable, addr, length);
	   ---
	   -> pcie_host_mmcfg_map()
	      ---
		      memory_region_init_io(&e->mmio, OBJECT(e), &pcie_mmcfg_ops, e,
                          "pcie-mmcfg", e->size);
		  ---

static const MemoryRegionOps pcie_mmcfg_ops = {
    .read = pcie_mmcfg_data_read,
    .write = pcie_mmcfg_data_write,
    .endianness = DEVICE_NATIVE_ENDIAN,
};

pcie_mmcfg_data_read()
---
	PCIDevice *pci_dev = pcie_dev_find_by_mmcfg_addr(s, mmcfg_addr);
	// If no such a device, return all 'f'
    if (!pci_dev) {
        return ~0x0;
    }
    addr = PCIE_MMCFG_CONFOFFSET(mmcfg_addr);
    limit = pci_config_size(pci_dev);
	...
    return pci_host_config_read_common(pci_dev, addr, limit, len);
---
4.3 PCI Bar
在nvme_init()中,只是初始化了bar所对应的MemoryRegion,真正把它注册进Qemu的MMIO address space,是在向Bar中写入地址的时候,参考代码:
pci_default_write_config()
---
    for (i = 0; i < l; val >>= 8, ++i) {
        uint8_t wmask = d->wmask[addr + i];
        uint8_t w1cmask = d->w1cmask[addr + i];
        assert(!(wmask & w1cmask));
        d->config[addr + i] = (d->config[addr + i] & ~wmask) | (val & wmask);
        d->config[addr + i] &= ~(val & w1cmask); /* W1C: Write 1 to Clear */
    }
    if (ranges_overlap(addr, l, PCI_BASE_ADDRESS_0, 24) ||
        ranges_overlap(addr, l, PCI_ROM_ADDRESS, 4) ||
        ranges_overlap(addr, l, PCI_ROM_ADDRESS1, 4) ||
        range_covers_byte(addr, l, PCI_COMMAND))
        pci_update_mappings(d);
---

pci_update_mappings()
---
 	for(i = 0; i < PCI_NUM_REGIONS; i++) {
        r = &d->io_regions[i];

        /* this region isn't registered */
        if (!r->size)
            continue;

        new_addr = pci_bar_address(d, i, r->type, r->size);

        /* This bar isn't changed */
        if (new_addr == r->addr)
            continue;

        /* now do the real mapping */
        if (r->addr != PCI_BAR_UNMAPPED) {
            memory_region_del_subregion(r->address_space, r->memory);
        }
        r->addr = new_addr;
        if (r->addr != PCI_BAR_UNMAPPED) {
            memory_region_add_subregion_overlap(r->address_space,
                                                r->addr, r->memory, 1);
        }
    }

---memory_region_add_subregion_overlap(),会通知到address_space_memory,参考以下连接:QEMU代码详解 3.2 Listeners![]() http://t.csdn.cn/YTWMN
http://t.csdn.cn/YTWMN
nvme的bar的在qemu端的处理代码,这里我们也大概看下:
nvme_mmio_write()
  -> nvme_process_db()
	 ---
        uint16_t new_tail = val & 0xffff;
		...
        qid = (addr - 0x1000) >> 3;
		...
        sq = n->sq[qid];
		...
        sq->tail = new_tail;
        timer_mod(sq->timer, qemu_clock_get_ns(QEMU_CLOCK_VIRTUAL) + 500);
	 ---

sq->timer的处理函数是nvme_process_sq(),使用它的目的应该是想对处理做异步化
nvme_process_sq()
---
    NvmeSQueue *sq = opaque;
    NvmeCtrl *n = sq->ctrl;
    NvmeCQueue *cq = n->cq[sq->cqid];

    uint16_t status;
    hwaddr addr;
    NvmeCmd cmd;
    NvmeRequest *req;

    while (!(nvme_sq_empty(sq) || QTAILQ_EMPTY(&sq->req_list))) {
        addr = sq->dma_addr + sq->head * n->sqe_size;
        pci_dma_read(&n->parent_obj, addr, (void *)&cmd, sizeof(cmd));
        nvme_inc_sq_head(sq);

        req = QTAILQ_FIRST(&sq->req_list);
        QTAILQ_REMOVE(&sq->req_list, req, entry);
        QTAILQ_INSERT_TAIL(&sq->out_req_list, req, entry);
        memset(&req->cqe, 0, sizeof(req->cqe));
        req->cqe.cid = cmd.cid;

        status = sq->sqid ? nvme_io_cmd(n, &cmd, req) : nvme_admin_cmd(n, &cmd, req);
        if (status != NVME_NO_COMPLETE) {
            req->status = status;
            nvme_enqueue_req_completion(cq, req);
        }
    }
---

nvme_io_cmd()
  -> nvme_rw()
	-> dma_bdrv_read/write()
BAR size的确定是通过向其中写入全1,然后取反加1,那么,QEMU的PCI的模拟代码是怎么做的?
pci_register_bar()
---
    wmask = ~(size - 1);
	...
    if (!(r->type & PCI_BASE_ADDRESS_SPACE_IO) &&
        r->type & PCI_BASE_ADDRESS_MEM_TYPE_64) {
        pci_set_quad(pci_dev->wmask + addr, wmask);
        pci_set_quad(pci_dev->cmask + addr, ~0ULL);
    } else {
        pci_set_long(pci_dev->wmask + addr, wmask & 0xffffffff);
        pci_set_long(pci_dev->cmask + addr, 0xffffffff);
    }
---

pci_default_write_config()
---
    for (i = 0; i < l; val >>= 8, ++i) {
        uint8_t wmask = d->wmask[addr + i];
        uint8_t w1cmask = d->w1cmask[addr + i];
        assert(!(wmask & w1cmask));
        d->config[addr + i] = (d->config[addr + i] & ~wmask) | (val & wmask);
        d->config[addr + i] &= ~(val & w1cmask); /* W1C: Write 1 to Clear */
    }
---

对于BAR,w1cmask的值为0
4.4 MSI-X
因为参考的是nvme的实现,所以,这里我们主要看下MSI-X的实现;MSI-X可以参照Linux 中断处理 1.3 MSI![]() http://t.csdn.cn/WwWJK
http://t.csdn.cn/WwWJK
MSI-X在PCIE Capability list中保存的是MSI-X table和PBA的BAR的index和BAR指向内存内的偏移;
PCIE驱动需要通过Capability list获取该设备的MSI-X的Table和PBA的对应的BAR;在QEMU端,对应的代码为:
msix_init_exclusive_bar()
---
#define MSIX_EXCLUSIVE_BAR_SIZE 4096
#define MSIX_EXCLUSIVE_BAR_TABLE_OFFSET 0
#define MSIX_EXCLUSIVE_BAR_PBA_OFFSET (MSIX_EXCLUSIVE_BAR_SIZE / 2)
#define MSIX_EXCLUSIVE_CAP_OFFSET 0
	...
    name = g_strdup_printf("%s-msix", dev->name);
    memory_region_init(&dev->msix_exclusive_bar, OBJECT(dev), name, MSIX_EXCLUSIVE_BAR_SIZE);
    g_free(name);

    ret = msix_init(dev, nentries, &dev->msix_exclusive_bar, bar_nr,
                    MSIX_EXCLUSIVE_BAR_TABLE_OFFSET, &dev->msix_exclusive_bar,
                    bar_nr, MSIX_EXCLUSIVE_BAR_PBA_OFFSET,
                    MSIX_EXCLUSIVE_CAP_OFFSET);
	...
    pci_register_bar(dev, bar_nr, PCI_BASE_ADDRESS_SPACE_MEMORY,
                     &dev->msix_exclusive_bar)
---

msix_init()
---
    cap = pci_add_capability(dev, PCI_CAP_ID_MSIX, cap_pos, MSIX_CAP_LENGTH);
	...
    dev->msix_cap = cap;
    config = dev->config + cap;
	...
    pci_set_long(config + PCI_MSIX_TABLE, table_offset | table_bar_nr);
    pci_set_long(config + PCI_MSIX_PBA, pba_offset | pba_bar_nr);
	...
    dev->msix_table = g_malloc0(table_size);
    dev->msix_pba = g_malloc0(pba_size);
	...
    memory_region_init_io(&dev->msix_table_mmio, OBJECT(dev), &msix_table_mmio_ops, dev,
                          "msix-table", table_size);
    memory_region_add_subregion(table_bar, table_offset, &dev->msix_table_mmio);
    memory_region_init_io(&dev->msix_pba_mmio, OBJECT(dev), &msix_pba_mmio_ops, dev,
                          "msix-pba", pba_size);
    memory_region_add_subregion(pba_bar, pba_offset, &dev->msix_pba_mmio);
---
这个BAR的size是4K,其中MSI-X Table和PBA各一半。
MSI-X的中断在设备端的发出,是通过以下函数:
nvme_isr_notify()
---
    if (cq->irq_enabled) {
        if (msix_enabled(&(n->parent_obj))) {
            msix_notify(&(n->parent_obj), cq->vector);
        } else {
            pci_irq_pulse(&n->parent_obj);
        }
    }
---

msix_notify()
---
    if (msix_is_masked(dev, vector)) {
        msix_set_pending(dev, vector);
        return;
    }

    msg = msix_get_message(dev, vector);

    stl_le_phys(&address_space_memory, msg.address, msg.data);
---

msix_get_message()
---
    uint8_t *table_entry = dev->msix_table + vector * PCI_MSIX_ENTRY_SIZE;
    MSIMessage msg;

    msg.address = pci_get_quad(table_entry + PCI_MSIX_ENTRY_LOWER_ADDR);
    msg.data = pci_get_long(table_entry + PCI_MSIX_ENTRY_DATA);
    return msg;
---
上面的代码的vector并不是x86 cpu的irq vector,这个信息保存在message.data中;此处的cq->vector,是在创建Completion queue时传入,参考Host端nvme驱动代码,cq->vector其实就是qid:
nvme_create_queue()
---
	if (!polled)
		vector = dev->num_vecs == 1 ? 0 : qid;
	else
		vector = -1;

	result = adapter_alloc_cq(dev, qid, nvmeq, vector);
---

adapter_alloc_cq()
---
	memset(&c, 0, sizeof(c));
	c.create_cq.opcode = nvme_admin_create_cq;
	c.create_cq.prp1 = cpu_to_le64(nvmeq->cq_dma_addr);
	c.create_cq.cqid = cpu_to_le16(qid);
	c.create_cq.qsize = cpu_to_le16(nvmeq->q_depth - 1);
	c.create_cq.cq_flags = cpu_to_le16(flags);
	if (vector != -1)
		c.create_cq.irq_vector = cpu_to_le16(vector);
	else
		c.create_cq.irq_vector = 0;

	return nvme_submit_sync_cmd(dev->ctrl.admin_q, &c, NULL, 0);
---
在msix_notify()中, 它使用了
stl_le_phys(&address_space_memory, msg.address, msg.data)MSI的address实际上对应的是local APIC的一个地址,我们看下QEMU是如何模拟这部分的。
pc_cpus_init()
---
    /* map APIC MMIO area if CPU has APIC */
    if (cpu && cpu->apic_state) {
        /* XXX: what if the base changes? */
        sysbus_mmio_map_overlap(SYS_BUS_DEVICE(icc_bridge), 0,
                                APIC_DEFAULT_ADDRESS, 0x1000);
    }
---

#define APIC_DEFAULT_ADDRESS 0xfee00000


TYPE_APIC_COMMON

apic_common_realize()
---
    APICCommonClass *info;
	...
    info = APIC_COMMON_GET_CLASS(s);
    info->realize(dev, errp);
    if (!mmio_registered) {
        ICCBus *b = ICC_BUS(qdev_get_parent_bus(dev));
        memory_region_add_subregion(b->apic_address_space, 0, &s->io_memory);
        mmio_registered = true;
    }
---

apic_address_space()和sysbus之间的关系建立,不是本小节的重点;

static const TypeInfo kvm_apic_info = {
    .name = "kvm-apic",
    .parent = TYPE_APIC_COMMON,
    .instance_size = sizeof(APICCommonState),
    .class_init = kvm_apic_class_init,
};


kvm_apic_realize()
---
    memory_region_init_io(&s->io_memory, NULL, &kvm_apic_io_ops, s, "kvm-apic-msi",
                          APIC_SPACE_SIZE);
---

kvm_apic_mem_write()
  -> kvm_irqchip_send_msi()
	 ---
    if (s->direct_msi) {
        msi.address_lo = (uint32_t)msg.address;
        msi.address_hi = msg.address >> 32;
        msi.data = le32_to_cpu(msg.data);
        msi.flags = 0;
        memset(msi.pad, 0, sizeof(msi.pad));

        return kvm_vm_ioctl(s, KVM_SIGNAL_MSI, &msi);
    }
	 ---


另外 direct_msi的设置,在kvm_init(),
kvm_init()
---
#ifdef KVM_CAP_IRQ_ROUTING
    s->direct_msi = (kvm_check_extension(s, KVM_CAP_SIGNAL_MSI) > 0);
#endif
---
内核的处理为:
kvm_vm_ioctl_check_extension_generic()
---
	switch (arg) {
	...
#ifdef CONFIG_HAVE_KVM_MSI
	case KVM_CAP_SIGNAL_MSI:
#endif
#ifdef CONFIG_HAVE_KVM_IRQFD
	case KVM_CAP_IRQFD:
	case KVM_CAP_IRQFD_RESAMPLE:
#endif
	...
		return 1;
---


msi消息会被转发到内核;选择vcpu的过程,也是在内核里完成的;
kvm_vm_ioctl()
  -> kvm_send_userspace_msi() // case KVM_SIGNAL_MSI
    -> kvm_set_msi()
	  -> kvm_set_msi_irq()
	     ---
		irq->dest_id = (e->msi.address_lo & MSI_ADDR_DEST_ID_MASK) >> MSI_ADDR_DEST_ID_SHIFT;
		if (kvm->arch.x2apic_format)
			irq->dest_id |= MSI_ADDR_EXT_DEST_ID(e->msi.address_hi);
		irq->vector = (e->msi.data & MSI_DATA_VECTOR_MASK) >> MSI_DATA_VECTOR_SHIFT;
		...
		 ---
	 -> kvm_irq_delivery_to_apic()
5 VirtIO
5.1 Virtio基础
参考连接
Virtio: An I/O virtualization framework for Linux![]() https://www.cs.cmu.edu/~412/lectures/Virtio_2015-10-14.pdf初步了解VirtioIO;
https://www.cs.cmu.edu/~412/lectures/Virtio_2015-10-14.pdf初步了解VirtioIO;
Virtio是用于实现GuestOS和VMM之间的半虚拟化设备的通信接口标准,其中包括了数据格式和操作方式;
具体的实现方式,连接Virtqueues and virtio ring: How the data travelsThis post continues where the "Virtio devices and drivers overview" leaves off. After we have explained the scenario in the previous post, we are reaching the main point: how does the data travel from the virtio-device to the driver and back? https://www.redhat.com/en/blog/virtqueues-and-virtio-ring-how-data-travels中做了非常详细的说明;我们看下virtioqueue的核心数据结构和工作方式:
struct virtq_desc {
        le64 addr;
        le32 len;
        le16 flags;
        le16 next;
};

struct virtq_avail {
        le16 flags;
        le16 idx;
        le16 ring[ /* Queue Size */ ];
};

struct virtq_used {
        le16 flags;
        le16 idx;
        struct virtq_used_elem ring[ /* Queue Size */];
};

struct virtq_used_elem {
        /* Index of start of used descriptor chain. */
        le32 id;
        /* Total length of the descriptor chain which was used (written to) */
        le32 len;
};- 以下,我们把Guest OS的virtio的driver端简称driver,把VMM的设备模拟软件称为device
- virtq_vail、virtq_used和virtq_desc[]所占用的内存,均由Driver提供,Device通过地址转换得到其可以访问的地址;
- virtq_avail的idx代表下一个空闲的slot,只能由Driver更新,virtq_avail.ring[]中小于idx的slot中,就是可以给Device端消费的virtq_desc;virtq_desc中包含的是给Device操作的内存;
- virtq_used的idx代表下一个空闲的slot,只能由Device更新,virtq_used.ring[]中小于idx的slot中,就是可以给Driver消费的virtq_used_elem,virtq_used_elem.idx代表完成的操作所对应的virtq_desc;
如上,virtio其实只是规范了GuestOS和VMM之间的通信的语法,但是真正的通道的建立不同的平台实现方式不同;接下来,我们看下QEMU + KVM + Linux上的实现。
除了virtqueue的layout和操作方式,virtio spec还规定了virtio-pci以及virtio-net、virtio-blk等各种设备类型的细节,参考连接Virtual I/O Device (VIRTIO) Version 1.1![]() https://docs.oasis-open.org/virtio/virtio/v1.1/csprd01/virtio-v1.1-csprd01.pdf
https://docs.oasis-open.org/virtio/virtio/v1.1/csprd01/virtio-v1.1-csprd01.pdf
5.2 VirtIO in Qemu
5.2.1 框架
Qemu中VirtIO的的主要Object和Class如下:
上图中,竖线代表继承,横线代表包含;
- Frontend,virtio在QEMU中以一个PCI设备的形式呈现,Frontend部分负责与QEMU PCI子系统对接;
- BUS,用于对接Frontend和Backend;VirtIODevice的操作,会调用到VirtIOBusState的回调;QEMU使用PCI实现了一套VirtIOBusState的回调
- Backend,设备后端具体实现;
接下来,我们还是以VirtIOBlkPCI为例,看下Virtio的具体初始化过程;初始化过程分为两条线,即:
- object_new()线,用于初始化数据结构,主要是从上parent到child调用class_init和instance_init回调;参考代码:
首先是TYPE_VIRTIO_BLK_PCI,先看下class初始化; TYPE_VIRTIO_PCI virtio_pci_init() --- PCIDeviceClass *k = PCI_DEVICE_CLASS(klass); k->init = virtio_pci_init; --- 这里主要是重载了PCIDeviceClass.init回调,为realize线做准备 TYPE_VIRTIO_BLK_PCI virtio_blk_pci_class_init() --- VirtioPCIClass *k = VIRTIO_PCI_CLASS(klass); PCIDeviceClass *pcidev_k = PCI_DEVICE_CLASS(klass); set_bit(DEVICE_CATEGORY_STORAGE, dc->categories); dc->props = virtio_blk_pci_properties; k->init = virtio_blk_pci_init; pcidev_k->vendor_id = PCI_VENDOR_ID_REDHAT_QUMRANET; pcidev_k->device_id = PCI_DEVICE_ID_VIRTIO_BLOCK; pcidev_k->revision = VIRTIO_PCI_ABI_VERSION; pcidev_k->class_id = PCI_CLASS_STORAGE_SCSI; --- 这里主要是设置了一些PCI Config相关的信息,同时重载了VirtioPCIClass线 然后进入TYPE_VIRTIO_BLK_PCI的instance初始化: virtio_blk_pci_instance_init() --- VirtIOBlkPCI *dev = VIRTIO_BLK_PCI(obj); object_initialize(&dev->vdev, sizeof(dev->vdev), TYPE_VIRTIO_BLK); --- VirtIOBlkPCI.vdev是VirtIOBlock,这里就是进入了Virtio-blk的后端,即TYPE_VIRTIO_BLK; 先看下class的初始化, TYPE_VIRTIO_BLK的parent TYPE_VIRTIO_DEVICE, virtio_device_class_init --- dc->realize = virtio_device_realize; dc->unrealize = virtio_device_unrealize; dc->bus_type = TYPE_VIRTIO_BUS; --- 这里也是在为realize线做准备,然后是TYPE_VIRTIO_BLK本身, virtio_blk_class_init() --- VirtioDeviceClass *vdc = VIRTIO_DEVICE_CLASS(klass); dc->props = virtio_blk_properties; set_bit(DEVICE_CATEGORY_STORAGE, dc->categories); vdc->realize = virtio_blk_device_realize; vdc->unrealize = virtio_blk_device_unrealize; vdc->get_config = virtio_blk_update_config; vdc->set_config = virtio_blk_set_config; vdc->get_features = virtio_blk_get_features; vdc->set_status = virtio_blk_set_status; vdc->reset = virtio_blk_reset; --- 这里主要是初始化了VrtioDeviceClass的回调 -
set realize线,用于开启设备,主要调用realize()回调;但是,在QEMU pci子系统中,在PCIDeviceClass这一层,被转换成了init函数;参考函数:
首先是TYPE_VIRTIO_BLK_PCI的parent TYPE_VIRTIO_PCI的
class_init回调重载的PCIDeviceClass.init回调,

virtio_pci_init()
---
    VirtioPCIClass *k = VIRTIO_PCI_GET_CLASS(pci_dev);
    virtio_pci_bus_new(&dev->bus, sizeof(dev->bus), dev);
    if (k->init != NULL) {
        return k->init(dev);
    }
---
这里调用了VritioPCIClass.init回调,该回调由virtio_blk_pci_class_init设置
virtio_blk_pci_init()
---
    DeviceState *vdev = DEVICE(&dev->vdev);
	...
    qdev_set_parent_bus(vdev, BUS(&vpci_dev->bus));
    if (qdev_init(vdev) < 0) {
        return -1;
    }
---
在这里,将realize线转换到了TYPE_VIRTIO_BLK,它的parent TYPE_VIRTIO_DEVICE
重载的realize回调如下:

virtio_device_realize() //virtio_device_class_init
---
    VirtioDeviceClass *vdc = VIRTIO_DEVICE_GET_CLASS(dev);
    if (vdc->realize != NULL) {
        vdc->realize(dev, &err);
		...
    }
    virtio_bus_device_plugged(vdev);
---

在这里,将回调函数转换到了VirtioDeviceClass的回调,
同时调用了virtio_bus_device_plugged
virtio_device_realize()很好的体现了QEMU中PCI和Virtio的关系,
- PCI子系统通过VritioDeviceClass的回调进入后端,另外一个例子还可以参考get_config回调,
VirtioDeviceClass的回调的重载由virtio_blk_class_init()完成;virtio_pci_config_read() -> virtio_config_readb() --- VirtioDeviceClass *k = VIRTIO_DEVICE_GET_CLASS(vdev); ... k->get_config(vdev, vdev->config); --- - Virtio 后端则通过virtio-bus调用PCI前端的功能,参考
virtio_blk_req_complete()
  -> virtio_notify()
	-> virtio_notify_vector()
	   ---
	    VirtioBusClass *k = VIRTIO_BUS_GET_CLASS(qbus);

	    if (k->notify) {
    	    k->notify(qbus->parent, vector);
   		 }
	   ---
	   -> virtio_pci_notify()
	     -> msix_notify()
5.2.2 virtio queue
virtio的queue是在QEMU中设置和工作的?
首先看下virtio-pci设备的realize,
virtio_device_realize()
  -> virtio_bus_device_plugged(vdev);
    -> virtio_pci_device_plugged()
    ---
        VirtIOPCIProxy *proxy = VIRTIO_PCI(d);
	    ...
        proxy->pci_dev.config_write = virtio_write_config;
	    ...
        memory_region_init_io(&proxy->bar, OBJECT(proxy), &virtio_pci_config_ops,
                          proxy, "virtio-pci", size);
        pci_register_bar(&proxy->pci_dev, 0, PCI_BASE_ADDRESS_SPACE_IO,
                &proxy->bar);
    ---
其ioport操作函数中包含了三条与virtio queue有关的命令,
virtio_pci_config_write()
  -> virtio_ioport_write()
	---
	 case VIRTIO_PCI_QUEUE_PFN:
        pa = (hwaddr)val << VIRTIO_PCI_QUEUE_ADDR_SHIFT;
        if (pa == 0) {
            virtio_pci_stop_ioeventfd(proxy);
            virtio_reset(vdev);
            msix_unuse_all_vectors(&proxy->pci_dev);
        }
        else
            virtio_queue_set_addr(vdev, vdev->queue_sel, pa);
        break;
    case VIRTIO_PCI_QUEUE_SEL:
        if (val < VIRTIO_PCI_QUEUE_MAX)
            vdev->queue_sel = val;
        break;
    case VIRTIO_PCI_QUEUE_NOTIFY:
        if (val < VIRTIO_PCI_QUEUE_MAX) {
            virtio_queue_notify(vdev, val);
        }
        break;

	---
virtio的地址来自Guest OS的物理地址,QEMU如何访问这个地址呢?参考代码:
void virtio_queue_set_addr(VirtIODevice *vdev, int n, hwaddr addr)
{
    vdev->vq[n].pa = addr;
    virtqueue_init(&vdev->vq[n]);
}

在设置地址时,并没有对队列地址进行特殊处理;
地址的转换,是在之后对队列进行访问时,

uint32_t lduw_phys(AddressSpace *as, hwaddr addr)
{
	return lduw_phys_internal(as, addr, DEVICE_NATIVE_ENDIAN);
}


static inline uint16_t vring_avail_ring(VirtQueue *vq, int i)
{
    hwaddr pa;
    pa = vq->vring.avail + offsetof(VRingAvail, ring[i]);
    return lduw_phys(&address_space_memory, pa);
}

static uint16_t vring_used_idx(VirtQueue *vq)
{
    hwaddr pa;
    pa = vq->vring.used + offsetof(VRingUsed, idx);
    return lduw_phys(&address_space_memory, pa);
}

static inline uint16_t vring_desc_next(hwaddr desc_pa, int i)
{
    hwaddr pa;
    pa = desc_pa + sizeof(VRingDesc) * i + offsetof(VRingDesc, next);
    return lduw_phys(&address_space_memory, pa);
}
在Guest OS端的virtioqueue的初始化代码,如下:
setup_vq() //drivers/virtio/virtio_pci_legacy.c
---
	/* Select the queue we're interested in */
	iowrite16(index, vp_dev->ioaddr + VIRTIO_PCI_QUEUE_SEL);

	/* Check if queue is either not available or already active. */
	num = ioread16(vp_dev->ioaddr + VIRTIO_PCI_QUEUE_NUM);
	...
	/* create the vring */
	vq = vring_create_virtqueue(index, num,
				    VIRTIO_PCI_VRING_ALIGN, &vp_dev->vdev,
				    true, false, ctx,
				    vp_notify, callback, name);
	...
	/* activate the queue */
	iowrite32(virtqueue_get_desc_addr(vq) >> VIRTIO_PCI_QUEUE_ADDR_SHIFT,
		  vp_dev->ioaddr + VIRTIO_PCI_QUEUE_PFN);
	...
---
当Guest OS更新完virtioqueue之后,需要notify backend,或者说QEMU端,也就是VIRTIO_PCI_QUEUE_NOTIFY;参考代码:
virtio_queue_notify()
  -> virtio_queue_notify_vq()
	---
	    if (vq->vring.desc) {
       		VirtIODevice *vdev = vq->vdev;
        	vq->handle_output(vdev, vq);
    	}
	---

virtio_blk_handle_output()
  -> virtio_blk_handle_request()
在Guest OS端的代码为:
virtqueue_notify()
  -> vq->notify()
    -> vp_notify()
	   ---
		iowrite16(vq->index, (void __iomem *)vq->priv);
	   ---

vq->priv的设置在
setup_vq()
---
    vq->priv = (void __force *)vp_dev->ioaddr + VIRTIO_PCI_QUEUE_NOTIFY;
---
5.3 vhost
5.3.1 目的
为什么需要引入vhost ?可参考链接:
Deep dive into Virtio-networking and vhost-netIn this post we will explain the vhost-net architecture described in the solution overview (link), to make it clear how everything works together from a technical point of view. This is part of the series of blogs that introduces you to the realm of virtio-networking which brings together the world of virtualization and the world of networking. https://www.redhat.com/en/blog/deep-dive-virtio-networking-and-vhost-net
原virtio方案有以下问题:
- After the virtio driver sends an Available Buffer Notification, the vCPU stops running and control is returned to the hypervisor causing an expensive context switch.
- QEMU additional tasks/threads synchronization mechanisms.
- The syscall and the data copy for each packet to actually send or receive it via tap (no batching).
- The ioctl to send the available buffer notification (vCPU interruption).
- We also need to add another syscall to resume vCPU execution, with all the associated mapping switching, etc.
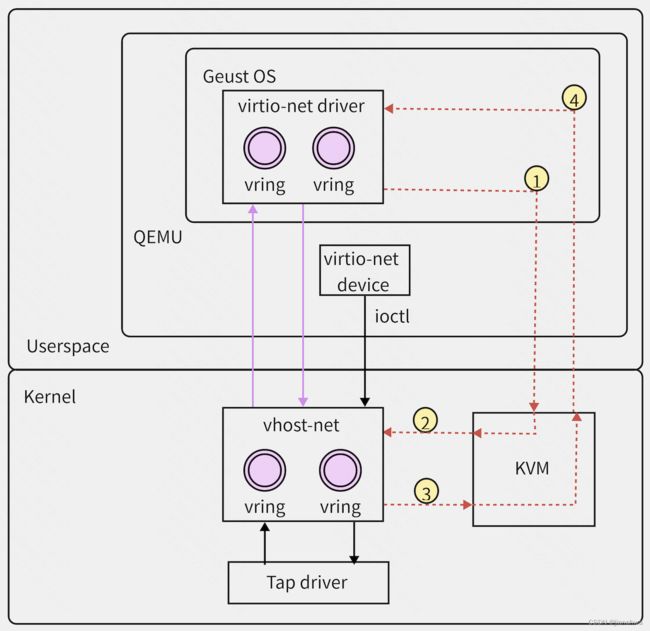
vhost方案将virtio的主要工作负载offload到内核态,如下:
要实现vhost的offload,主要有两件事要做:
- 建立起vhost与kvm之间的沟通机制,这个我们在下一小节中详解
- vhost必须可以向QEMU那样访问vring及其其中的desc对应Guest OS传入的buffer
vhost可以访问Guest OS的buffer,需要借助VHOST_SET_MEM_TABLE ioctl,建立起一个guest physical address和qemu userspace addr的mapping,参考代码:
vhost_dev_ioctl() //VHOST_SET_MEM_TABLE
  -> vhost_set_memory()
	-> vhost_new_umem_range()


vhost_copy_to/from_user()
---
		ret = translate_desc(vq, (u64)(uintptr_t)to, size, vq->iotlb_iov,
				     ARRAY_SIZE(vq->iotlb_iov),
				     VHOST_ACCESS_WO);
		if (ret < 0)
			goto out;
		iov_iter_init(&t, WRITE, vq->iotlb_iov, ret, size);
		ret = copy_to_iter(from, size, &t);
		if (ret == size)
			ret = 0;
---
5.3.2 evnetfd
eventfd是一种事件通知机制,它有专门的系统调用,支持poll操作,代码在fs/eventfd.c,比较简单,这里不做深入。
vhost机制中,kvm和vhost之间的通信是通过eventfd建立起来的,它有两个方向:
- irqfd,用于vhost向kvm发送中断;QEMU通过KVM_IRQFD创建一个可以发送中断的eventfd,然后通过VHOST_SET_VRING_CALL将该eventfd告诉vhost;
- ioeventfd,用于kvm拦截pio/mmio write,然后通知vhost;QEMU通过KVM_IOEVENTFD将eventfd和pio/mmio的address space联系起来,然后通过VHOST_SET_VRING_KICK将该eventfd告诉vhost;
ioeventfd,用于Guest OS通知vhost;QEMU virtio可以给一段pio/mmio mr指定eventfd,参考如下代码:
virtio_ioport_write()
---
    case VIRTIO_PCI_STATUS:
        if (!(val & VIRTIO_CONFIG_S_DRIVER_OK)) {
            virtio_pci_stop_ioeventfd(proxy);
        }

        virtio_set_status(vdev, val & 0xFF);

        if (val & VIRTIO_CONFIG_S_DRIVER_OK) {
            virtio_pci_start_ioeventfd(proxy);
        }
---
  -> virtio_pci_set_host_notifier_internal()
	-> memory_region_add_eventfd()

address_space_update_topology()
  -> address_space_update_ioeventfds()
	-> address_space_add_del_ioeventfds()
	  -> kvm_memory_listener/kvm_io_listener.eventfd_add()
	     kvm_mem_ioeventfd_add/kvm_io_ioeventfd_add()
	     -> kvm_set_ioeventfd_mmio/pio()
	       -> kvm_vm_ioctl(kvm_state, KVM_IOEVENTFD, &iofd)

kvm_vm_ioctl() //KVM_IOEVENTFD
  -> kvm_ioeventfd()
	-> kvm_assign_ioeventfd()
	  -> kvm_assign_ioeventfd_idx()
	     ---
			kvm_iodevice_init(&p->dev, &ioeventfd_ops);

			ret = kvm_io_bus_register_dev(kvm, bus_idx, p->addr, p->length,
					      &p->dev);
		 ---

static const struct kvm_io_device_ops ioeventfd_ops = {
	.write      = ioeventfd_write,
	.destructor = ioeventfd_destructor,
};

kernel_pio()/vcpu_mmio_write()
  -> kvm_io_bus_write()
	-> __kvm_io_bus_write()
	  -> kvm_iodevice_write()
	     ioeventfd_write()
	       -> eventfd_signal()
从代码中可以看到,这个过程并没有避免vm-exit,只是避免了内核态和用户态的两次转换;
当Guest OS的virtio driver写对应的mmio/pio之后,会调用对应的eventfd的singal操作;
vhost对这个eventfd做了以下处理:
vhost_dev_init()
  -> vhost_poll_init(&vq->poll, vq->handle_kick, EPOLLIN, dev)
	 ---
		init_waitqueue_func_entry(&poll->wait, vhost_poll_wakeup);
		init_poll_funcptr(&poll->table, vhost_poll_func);
	 ---

vhost_vring_ioctl() VHOST_SET_VRING_KICK
---
	case VHOST_SET_VRING_KICK:
		eventfp = f.fd == -1 ? NULL : eventfd_fget(f.fd);
		if (IS_ERR(eventfp)) {
			r = PTR_ERR(eventfp);
			break;
		}
		if (eventfp != vq->kick) {
			pollstop = (filep = vq->kick) != NULL;
			pollstart = (vq->kick = eventfp) != NULL;
			             ^^^^^^^^^^^^^^^^^^
		}
	...
	if (pollstart && vq->handle_kick)
		r = vhost_poll_start(&vq->poll, vq->kick);
---
  -> vfs_poll()
	 -> eventfd_poll()
	   -> poll_wait()
	     -> vhost_poll_func()
	       -> add_wait_queue(wqh, &poll->wait)

eventfd_signal()
  -> wake_up_locked_poll()
	 -> vhost_poll_wakeup()
	   -> vhost_poll_queue()
	     -> vhost_work_queue(poll->dev, &poll->work);
		    ---
			llist_add(&work->node, &dev->work_list);
			wake_up_process(dev->worker);
			---
所以,这个ioeventfd被signal之后,最终会唤醒vhost_worker,这个是vhost的处理线程。
注:vhost_poll_wakeup()并没有主动把wait_queue_entry从wait_queue_head中删除;这个删除并不是wake_up的默认流程,具体可以参考autoremove_wake_function()
irqfd也是一个eventfd,vhost用它来给kvm注入中断,代码参考:
kvm_irqchip_add_irqfd_notifier()
  -> kvm_irqchip_assign_irqfd()
	-> kvm_vm_ioctl(s, KVM_IRQFD, &irqfd)

kvm_vm_ioctl() //KVM_IRQFD
  -> kvm_irqfd()
	-> kvm_irqfd_assign()
	  -> kvm_irqfd_assign()
	     ---
		/*
		 * Install our own custom wake-up handling so we are notified via
		 * a callback whenever someone signals the underlying eventfd
		 */
		init_waitqueue_func_entry(&irqfd->wait, irqfd_wakeup);
		init_poll_funcptr(&irqfd->pt, irqfd_ptable_queue_proc);
		 ---

vhost_vring_ioctl() VHOST_SET_VRING_CALL
---
	case VHOST_SET_VRING_CALL:
		if (copy_from_user(&f, argp, sizeof f)) {
			r = -EFAULT;
			break;
		}
		ctx = f.fd == -1 ? NULL : eventfd_ctx_fdget(f.fd);
		if (IS_ERR(ctx)) {
			r = PTR_ERR(ctx);
			break;
		}
		swap(ctx, vq->call_ctx);
---

vhost_signal()
---
	if (vq->call_ctx && vhost_notify(dev, vq))
		eventfd_signal(vq->call_ctx, 1);
---
  -> wake_up_locked_poll()
	-> irqfd_wakeup()
	  -> kvm_arch_set_irq_inatomic()
	    -> kvm_irq_delivery_to_apic_fast()
6 Passthrough
也称Direct Device Assignment,对比之前的Full-Virtualization和Para-Virtualization,这是性能最好的一种,实现设备的高效直通需要硬件支持,以下内容,参考了连接I/O Virtualization with Hardware Support![]() https://compas.cs.stonybrook.edu/~nhonarmand/courses/sp17/cse506/slides/hw_io_virtualization.pdf
https://compas.cs.stonybrook.edu/~nhonarmand/courses/sp17/cse506/slides/hw_io_virtualization.pdf
其中为实现设备直通技术提供了很好的大纲;
- IOMMU allows for security and isolation;安全性和隔离性是虚拟化最重要的两个准则,Guest OS的任何行为都不能影响在同一个Host上的其他Guest;设备直通给了Guest OS直接访问设备的能力,它可以任意编写驱动,IOMMU可以限制Guest OS的设备驱动的权限;
- SRIOV allows for scalability
另外还有实现直通的软件空间VFIO;本节,我们将依次研究。
6.1 IOMMU
IO MMU由Intel的VT-d技术提供(或者其他厂商的虚拟化拓展技术),包括了两个方面:
- DMA Remapping (DMAR)
- Interrupt Remapping (IR)
其中IR在IO直通这里并不是为了提高性能,主要是为了隔离性和安全性;参考链接:Re: What's the usage model (purpose) of interrupt remapping in IOMMU? — Linux KVMLinux KVM: Re: What's the usage model (purpose) of interrupt remapping in IOMMU?![]() https://www.spinics.net/lists/kvm/msg62976.html
https://www.spinics.net/lists/kvm/msg62976.html
The hypervisor being able to direct interrupts to a target CPU also allows it the ability to filter interrupts and prevent the device from signaling spurious or malicious interrupts.
DMA Remapping的目的也基本类似,参考接下来两个小节。
在VFIO的文档中,也提到了IOMMU提供的安全性保障,VFIO - “Virtual Function I/O” — The Linux Kernel documentation![]() https://www.kernel.org/doc/html/next/driver-api/vfio.html
https://www.kernel.org/doc/html/next/driver-api/vfio.html
Many modern systems now provide DMA and interrupt remapping facilities to help ensure I/O devices behave within the boundaries they’ve been allotted.
6.1.1 DMA Remapping
Intel® Virtualization Technology for Directed I/O![]() https://cdrdv2-public.intel.com/671081/vt-directed-io-spec.pdfIOMMU在系统中的位置,
https://cdrdv2-public.intel.com/671081/vt-directed-io-spec.pdfIOMMU在系统中的位置,
它可以实现类似MMU的功能,参考手册:
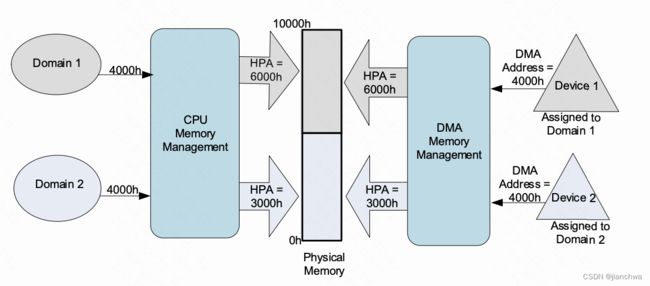
在虚拟化领域,IOMMU可以让设备直接DMA到GPA,进而可以让Guest OS直接给设备提交IO,这是实现Device Passthrough的基础,如下图
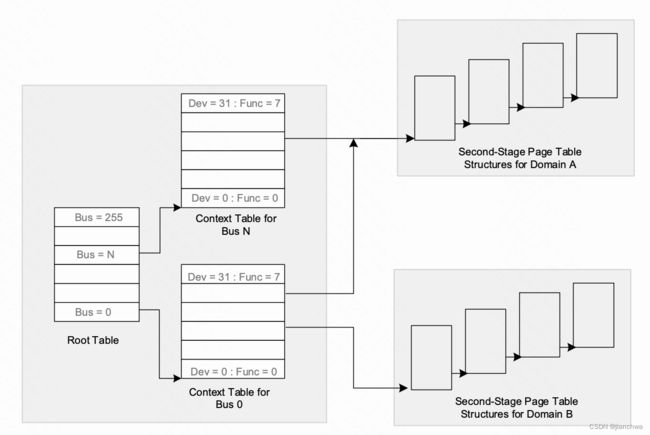
另外,IOMMU还有一个Requester ID的概念, PCIe设备的每个transaction都带有一个tag,即Requester ID,它格式如下:
IOMMU使用这个requester ID来区分不同的IOV地址空间,参考下图:
传统的PCI总线因为是并行总线,并没有transaction的概念,于是也没有这个tag。
6.1.2 IOMMU Group
本小节主要参考,参考连接IOMMU Groups, inside and out![]() https://vfio.blogspot.com/2014/08/iommu-groups-inside-and-out.html类似MMU,IOMMU可实现IO地址空间的隔离;进程实现地址空间的基本单位是进程,IOMMU的基本单位则是IOMMU Groups;PCI设备会被划分到不同的IOMMU Groups,其划分的依据有两个,Requester ID和ACS。Requester ID在上一小节,已经解释过。
https://vfio.blogspot.com/2014/08/iommu-groups-inside-and-out.html类似MMU,IOMMU可实现IO地址空间的隔离;进程实现地址空间的基本单位是进程,IOMMU的基本单位则是IOMMU Groups;PCI设备会被划分到不同的IOMMU Groups,其划分的依据有两个,Requester ID和ACS。Requester ID在上一小节,已经解释过。
另一个影响IOMMU Group划分的因素是ACS(PCIe Access Control Service),它用来控制peer to peer,设想如下场景: 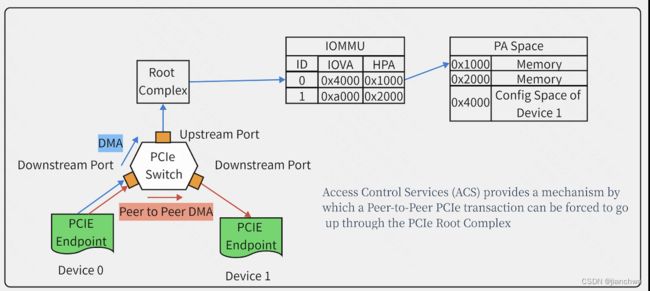
如上图中,两个Endpoint可以通过Peer to Peer DMA,transations可以通过两个downstream port直接转发,绕过了Root Complex以及IOMMU,如此就会直接访问Device 1的Config Space;ACS可以控制从Device 0直接Peer to Peer到Device 1的操作;但是,ACS在系统和设备中支持的并不完全;例如上图中,由于ACS的缺失,导致无法阻止Device 0和Device 1之间直接P2P转发,会强制把Device 0和Device 1放到一个IOMMU Group里。
针对ACS的限制,下面的连接中提供了解决方案:virtualization - Isolate single device into separate IOMMU group for PCI passthrough? - Super Userhttps://superuser.com/questions/1350451/isolate-single-device-into-separate-iommu-group-for-pci-passthrough
查看iommu group的划分结果,可以查看/sys/kernel/iommu_groups,如果为空,需要先打开iommu功能,在Kernel command line中加入'intel_iommu=on'
另外,PCIe相关代码中,还有一个DMA Alias的概念,来源可参考连接:[Qemu-devel] [for-4.2 PATCH 0/2] PCI DMA alias support — sourcehut listshttps://lists.sr.ht/~philmd/qemu/%3C156418830210.10856.17740359763468342629.stgit%40gimli.home%3E
PCIe requester IDs are used by modern IOMMUs to differentiate devices in order to provide a unique IOVA address space per device. These requester IDs are composed of the bus/device/function (BDF) of the requesting device. Conventional PCI pre-dates this concept and is simply a shared parallel bus where transactions are claimed by decoding target ranges rather than the packetized, point-to-point mechanisms of PCI-express. In order to interface conventional PCI to PCIe, the PCIe-to-PCI bridge creates and accepts packetized transactions on behalf of all downstream devices, using one of two potential forms of a requester ID relating to the bridge itself or its subordinate bus. All downstream devices are therefore aliased by the bridge's requester ID and it's not possible for the IOMMU to create unique IOVA spaces for devices downstream of such buses.
总结起来就是DMA alias的出现是因为PCI to PCIe Bridge。
相关函数在pci_device_group()其中考虑了ACS和DMA Alias... (不想写了,贴函数了)
6.2 VFIO
VFIO - “Virtual Function I/O” — The Linux Kernel documentation![]() https://www.kernel.org/doc/html/next/driver-api/vfio.html其中对VFIO有明确的定义:
https://www.kernel.org/doc/html/next/driver-api/vfio.html其中对VFIO有明确的定义:
The VFIO driver is an IOMMU/device agnostic framework for exposing direct device access to userspace, in a secure, IOMMU protected environment. In other words, this allows safe, non-privileged, userspace drivers.
同时,链接中也给了使用VFIO最简单例子。
其中最先一步是,将设备unbind,即
# echo 0000:06:0d.0 > /sys/bus/pci/devices/0000:06:0d.0/driver/unbind
unbind做的就是卸载驱动,参考代码:
unbind_store()
  -> device_release_driver()
	-> device_release_driver_internal()
	  -> __device_release_driver()
	    ---
		if (dev->bus && dev->bus->remove)
			dev->bus->remove(dev);
		else if (drv->remove)
			drv->remove(dev);
		---
	    -> pci_device_remove()
	      -> nvme_remove()
但是此时设备还在。
6.2.1 Container/Group/Device
Container的作用引用链接VFIO - "Virtual Function I/O"![]() https://www.kernel.org/doc/Documentation/vfio.txt
https://www.kernel.org/doc/Documentation/vfio.txt
While the group is the minimum granularity that must be used to ensure secure user access, it's not necessarily the preferred granularity. In IOMMUs which make use of page tables, it may be possible to share a set of page tables between different groups, reducing the overhead both to the platform (reduced TLB thrashing, reduced duplicate page tables), and to the user (programming only a single set of translations). For this reason, VFIO makes use of a container class, which may hold one or more groups. A container is created by simply opening the /dev/vfio/vfio character device.
参考代码:
/dev/vfio/vfio

static struct miscdevice vfio_dev = {
	.minor = VFIO_MINOR,
	.name = "vfio",
	.fops = &vfio_fops,
	.nodename = "vfio/vfio",
	.mode = S_IRUGO | S_IWUGO,
};

vfio_fops_open()只创建一个vfio_container结构

struct vfio_container {
	struct kref			kref;
	struct list_head		group_list;
	struct rw_semaphore		group_lock;
	struct vfio_iommu_driver	*iommu_driver;
	void				*iommu_data;
	bool				noiommu;
};
vfio_container中包括两部分,一个是group list,一个是iommu_driver,
比较常见的是

vfio_iommu_driver_ops_type1 //vfio-iommu-Type1
VFIO的Group和Device的创建在同一个时机;在我们把原来的PCI设备unbind之后,我们需要将其attach到vfio-pci driver里,即
$ lspci -n -s 0000:06:0d.0
06:0d.0 0401: 1102:0002 (rev 08)
# echo 0000:06:0d.0 > /sys/bus/pci/devices/0000:06:0d.0/driver/unbind
# echo 1102 0002 > /sys/bus/pci/drivers/vfio-pci/new_id
其对应的代码操作为:
new_id_store()
  -> pci_add_dynid()
	 ---
	dynid = kzalloc(sizeof(*dynid), GFP_KERNEL);
	...
	dynid->id.vendor = vendor;
	dynid->id.device = device;
	...
	spin_lock(&drv->dynids.lock);
	list_add_tail(&dynid->node, &drv->dynids.list);
	spin_unlock(&drv->dynids.lock);

	return driver_attach(&drv->driver);
	 ---

pci_bus_match()
  -> pci_match_device()
	 ---
	list_for_each_entry(dynid, &drv->dynids.list, node) {
		if (pci_match_one_device(&dynid->id, dev)) {
			found_id = &dynid->id;
			break;
		}
	}
	 ---

static struct pci_driver vfio_pci_driver = {
	.name		= "vfio-pci",
	.id_table	= NULL, /* only dynamic ids */
	.probe		= vfio_pci_probe,
	.remove		= vfio_pci_remove,
	.err_handler	= &vfio_err_handlers,
};
在执行到vfio_pci_probe之后,分别进入group和device的创建过程;
vfio_pci_probe()
  -> vfio_add_group_dev()
	-> vfio_create_group()
	   ---
		minor = vfio_alloc_group_minor(group);
		...
		dev = device_create(vfio.class, NULL,
				    MKDEV(MAJOR(vfio.group_devt), minor),
				    group, "%s%d", group->noiommu ? "noiommu-" : "",
				    iommu_group_id(iommu_group));
		...
		group->minor = minor;
		group->dev = dev;

		list_add(&group->vfio_next, &vfio.group_list);

		mutex_unlock(&vfio.group_lock);
	   ---

字符设备的初始化过程在
vfio_init()
---
	/* /dev/vfio/$GROUP */
	vfio.class = class_create(THIS_MODULE, "vfio");
	...
	vfio.class->devnode = vfio_devnode;

	ret = alloc_chrdev_region(&vfio.group_devt, 0, MINORMASK, "vfio");
	...
	cdev_init(&vfio.group_cdev, &vfio_group_fops);
	ret = cdev_add(&vfio.group_cdev, vfio.group_devt, MINORMASK);
---
这里在/dev/vfio/下创建了一个vfio group字符设备,比如:/dev/vfio/26;其fops为vfio_group_fops;
vfio_device的创建的过程如下:
vfio_pci_probe()
  -> vfio_add_group_dev()
	-> vfio_group_create_device()
	   ---
		device->dev = dev; // pci_device
		device->group = group; // vfio_group
		device->ops = ops; //vfio_pci_ops
		device->device_data = device_data; //vfio_pci_device
		dev_set_drvdata(dev, device);
		...
		mutex_lock(&group->device_lock);
		list_add(&device->group_next, &group->device_list);
		mutex_unlock(&group->device_lock);
	   ---
这些vfio_device需要通过vfio_group的ioctl VFIO_GROUP_GET_DEVICE_ID获得文件描述符,例如:
/* Get a file descriptor for the device */
device = ioctl(group, VFIO_GROUP_GET_DEVICE_FD, "0000:06:0d.0");
对应的内核代码:
vfio_group_fops_unl_ioctl()
  -> vfio_group_get_device_fd()
	 ---
	struct vfio_device *device;
	...
	device = vfio_device_get_from_name(group, buf);
	...
	ret = device->ops->open(device->device_data);
	...
	ret = get_unused_fd_flags(O_CLOEXEC);
	...
	filep = anon_inode_getfile("[vfio-device]", &vfio_device_fops,
				   device, O_RDWR);
	...
	fd_install(ret, filep);
	 ---
通过这里获得的fd,用户态就可以操作之前被unbind的pci设备的;通过读写该fd的不同的offset,可以访问该pci设备的不同的io空间,参考代码:
vfio_device_fops_read()
  -> device->ops->read() //vfio_device.ops
	-> vfio_pci_read()
	  -> vfio_pci_rw()
	     ---
	unsigned int index = VFIO_PCI_OFFSET_TO_INDEX(*ppos);
	struct vfio_pci_device *vdev = device_data;
	...
	switch (index) {
	case VFIO_PCI_CONFIG_REGION_INDEX:
		return vfio_pci_config_rw(vdev, buf, count, ppos, iswrite);

	case VFIO_PCI_ROM_REGION_INDEX:
		if (iswrite)
			return -EINVAL;
		return vfio_pci_bar_rw(vdev, buf, count, ppos, false);

	case VFIO_PCI_BAR0_REGION_INDEX ... VFIO_PCI_BAR5_REGION_INDEX:
		return vfio_pci_bar_rw(vdev, buf, count, ppos, iswrite);

	case VFIO_PCI_VGA_REGION_INDEX:
		return vfio_pci_vga_rw(vdev, buf, count, ppos, iswrite);
	default:
		index -= VFIO_PCI_NUM_REGIONS;
		return vdev->region[index].ops->rw(vdev, buf,
						   count, ppos, iswrite);
	}
		 ---
6.2.2 Config/Bar
本小节,我们详细看下如何使用VFIO如何让Guest OS访问到PCI设备的Config空间和Bar;
首先看下Config Space;参考代码:
vfio_pci_read()
  -> vfio_pci_rw()
    -> vfio_pci_config_rw()
	  -> vfio_config_do_rw()
---
	cap_id = vdev->pci_config_map[*ppos];

	if (cap_id == PCI_CAP_ID_INVALID) {
		perm = &unassigned_perms;
		cap_start = *ppos;
	} else if (cap_id == PCI_CAP_ID_INVALID_VIRT) {
		perm = &virt_perms;
		cap_start = *ppos;
	} else {
		if (*ppos >= PCI_CFG_SPACE_SIZE) {
			perm = &ecap_perms[cap_id];
			cap_start = vfio_find_cap_start(vdev, *ppos);
		} else {
			perm = &cap_perms[cap_id];
			...
			if (cap_id > PCI_CAP_ID_BASIC)
				cap_start = vfio_find_cap_start(vdev, *ppos);
		}
	}
	...
	if (iswrite) {
		if (!perm->writefn)
			return ret;

		if (copy_from_user(&val, buf, count))
			return -EFAULT;

		ret = perm->writefn(vdev, *ppos, count, perm, offset, val);
	} else {
		if (perm->readfn) {
			ret = perm->readfn(vdev, *ppos, count,
					   perm, offset, &val);
			if (ret < 0)
				return ret;
		}

		if (copy_to_user(buf, &val, count))
			return -EFAULT;
	}

---
这里根据读写的config space的偏移获得一个perm_bits结构;那么对于标准的Config Space空间,它对应的perm_bits是哪个?
vfio_config_init()
---
	vdev->pci_config_map = map;
	vdev->vconfig = vconfig;

	memset(map, PCI_CAP_ID_BASIC, PCI_STD_HEADER_SIZEOF);
	memset(map + PCI_STD_HEADER_SIZEOF, PCI_CAP_ID_INVALID,
	       pdev->cfg_size - PCI_STD_HEADER_SIZEOF);
---

It shoud use cap_perms[]

But init_pci_cap_basic_perm() overwrite cap_perms' default value

vfio_pci_init_perm_bits()
  -> ret = init_pci_cap_basic_perm(&cap_perms[PCI_CAP_ID_BASIC]);
	---
	perm->readfn = vfio_basic_config_read;
	perm->writefn = vfio_basic_config_write;

	/* Virtualized for SR-IOV functions, which just have FFFF */
	p_setw(perm, PCI_VENDOR_ID, (u16)ALL_VIRT, NO_WRITE);
	p_setw(perm, PCI_DEVICE_ID, (u16)ALL_VIRT, NO_WRITE);

	/*
	 * Virtualize INTx disable, we use it internally for interrupt
	 * control and can emulate it for non-PCI 2.3 devices.
	 */
	p_setw(perm, PCI_COMMAND, PCI_COMMAND_INTX_DISABLE, (u16)ALL_WRITE);

	/* Virtualize capability list, we might want to skip/disable */
	p_setw(perm, PCI_STATUS, PCI_STATUS_CAP_LIST, NO_WRITE);

    ....

	/* Virtualize all bars, can't touch the real ones */
	p_setd(perm, PCI_BASE_ADDRESS_0, ALL_VIRT, ALL_WRITE);
	p_setd(perm, PCI_BASE_ADDRESS_1, ALL_VIRT, ALL_WRITE);
	p_setd(perm, PCI_BASE_ADDRESS_2, ALL_VIRT, ALL_WRITE);
	p_setd(perm, PCI_BASE_ADDRESS_3, ALL_VIRT, ALL_WRITE);
	p_setd(perm, PCI_BASE_ADDRESS_4, ALL_VIRT, ALL_WRITE);
	p_setd(perm, PCI_BASE_ADDRESS_5, ALL_VIRT, ALL_WRITE);
	p_setd(perm, PCI_ROM_ADDRESS, ALL_VIRT, ALL_WRITE);

---

vfio_basic_config_write()
  -> vfio_default_config_write()
---
	memcpy(&write, perm->write + offset, count);

	if (!write)
		return count; /* drop, no writable bits */

	memcpy(&virt, perm->virt + offset, count);

	/* Virtualized and writable bits go to vconfig */
	if (write & virt) {
		__le32 virt_val = 0;

		memcpy(&virt_val, vdev->vconfig + pos, count);

		virt_val &= ~(write & virt);
		virt_val |= (val & (write & virt));

		memcpy(vdev->vconfig + pos, &virt_val, count);
	}

	/* Non-virtualzed and writable bits go to hardware */
	if (write & ~virt) {
		struct pci_dev *pdev = vdev->pdev;
		__le32 phys_val = 0;
		int ret;

		ret = vfio_user_config_read(pdev, pos, &phys_val, count);
		if (ret)
			return ret;

		phys_val &= ~(write & ~virt);
		phys_val |= (val & (write & ~virt));

		ret = vfio_user_config_write(pdev, pos, phys_val, count);
		if (ret)
			return ret;
	}
---
对于已经attatch到vfio-pci的设备来说,我们是可以操作Config space的command的,也就是可以重启设备;而Bar是被虚拟化的,无法操作。(记住这里)
下面我们看下QEMU如何让GuestOS操作这个PCI设备;在QEMU中,vfio-pci是一类特殊的pci设备,参考代码:
static const TypeInfo vfio_pci_dev_info = {
    .name = "vfio-pci",
    .parent = TYPE_PCI_DEVICE,
    .instance_size = sizeof(VFIODevice),
    .class_init = vfio_pci_dev_class_init,
};

vfio_initfn()
  -> vfio_get_group() //open /dev/vfio/groupid and connect it to container
  -> vfio_get_device()
	 ---
    ret = ioctl(group->fd, VFIO_GROUP_GET_DEVICE_FD, name);
   	...
	vdev->fd = ret;
    vdev->group = group;
    QLIST_INSERT_HEAD(&group->device_list, vdev, next);
	...
    for (i = VFIO_PCI_BAR0_REGION_INDEX; i < VFIO_PCI_ROM_REGION_INDEX; i++) {
        reg_info.index = i;

        ret = ioctl(vdev->fd, VFIO_DEVICE_GET_REGION_INFO, ®_info);
      	...
        vdev->bars[i].flags = reg_info.flags;
        vdev->bars[i].size = reg_info.size;
        vdev->bars[i].fd_offset = reg_info.offset;
        vdev->bars[i].fd = vdev->fd;
        vdev->bars[i].nr = i;
        QLIST_INIT(&vdev->bars[i].quirks);
    }
    // 获取Bar所对应的设备寄存器在vfio_device fd的偏移
       ^^^^^^^^^^^^^^^^^^^^^^^^^^^^^^^^^^^^^^^^^^

    reg_info.index = VFIO_PCI_CONFIG_REGION_INDEX;

    ret = ioctl(vdev->fd, VFIO_DEVICE_GET_REGION_INFO, ®_info);
	...
    vdev->config_size = reg_info.size;
	...
    vdev->config_offset = reg_info.offset;
	 ---
   -> vfio_map_bars()
	  -> vfio_map_bar()
	     ---
	    /* A "slow" read/write mapping underlies all BARs */
   		 memory_region_init_io(&bar->mem, OBJECT(vdev), &vfio_bar_ops,
        	                  bar, name, size);
	    pci_register_bar(&vdev->pdev, nr, type, &bar->mem);
		...
	    strncat(name, " mmap", sizeof(name) - strlen(name) - 1);
   		if (vfio_mmap_bar(vdev, bar, &bar->mem,
        	              &bar->mmap_mem, &bar->mmap, size, 0, name)) {
    	    error_report("%s unsupported. Performance may be slow", name);
  		}
		 ---
对于每一个bar,都会有两种操作模式:
- IO,也就是memory_region_init_io对应的vfio_bar_ops,对着个地址的操作会引起vm-exit,并最终由QEMU来处理,最终vfio_bar_read/write会通过pread/write操作vfio_device对应的偏移;
- mmap,这个就是直通模式,也就是Guest OS可以直接操作设备的Bar对应的设备内部的寄存器,而不用引起vm-exit;如何做到,我们深入看下vfio_mmap_bar()
参考代码:
vfio_mmap_bar()
---
  if (VFIO_ALLOW_MMAP && size && bar->flags & VFIO_REGION_INFO_FLAG_MMAP) {
	  	...
        *map = mmap(NULL, size, prot, MAP_SHARED,
                    bar->fd, bar->fd_offset + offset);
		...
        memory_region_init_ram_ptr(submem, OBJECT(vdev), name, size, *map);
    }
	...
    memory_region_add_subregion(mem, offset, submem);
---
针对vfio_device的fd的mmap操作,在内核中对应的代码为:
vfio_pci_mmap()
---
	vma->vm_private_data = vdev;
	vma->vm_page_prot = pgprot_noncached(vma->vm_page_prot);
	vma->vm_pgoff = (pci_resource_start(pdev, index) >> PAGE_SHIFT) + pgoff;

	return remap_pfn_range(vma, vma->vm_start, vma->vm_pgoff,
			       req_len, vma->vm_page_prot);

---
内核将该PCI设备的对应的Bar在Host端的物理地址mmap到这块地址上,然后,QEMU将这块地址memory_region_init_ram_ptr();
参考内存虚拟化的"1 Memory Slot" 和 "6.2 Trap MMIO"KVM 内存虚拟化![]() http://t.csdn.cn/JGKZv
http://t.csdn.cn/JGKZv
ram类的memory region会被注册到kvm中称为Memory slot;当首次访问发生vm-exit后,会为之建立对应的页表(SPT或者TDT);
参考之前"2.2.4 BAR"和"4.3 PCI Bar"小节,在Guest OS启动的时候,对应的bar获得物理地址,即GPA,此时对设备的Config Space Bar的写操作并不会被更新进设备,而是在内核被执行虚拟化了,参考之前的内容;然后对QEMU使能对应的BAR,其GPA和在vfio_pci_mmap()或者的HVA便被注册进KVM;当Guest OS首次访问该GPA,发生vm-exit,之后建立GPA->HPA mapping;然后Guest OS就可以直接访问设备的Bar里设备寄存器了。
6.2.3 Interrupt
最近比较忙,这部分只是梳理出了中断的转发流程,代码参考:
vfio_pci_write_config()
  -> vfio_enable_msi()
     ---
    for (i = 0; i < vdev->nr_vectors; i++) {
        VFIOMSIVector *vector = &vdev->msi_vectors[i];

        vector->vdev = vdev;
        vector->use = true;

        if (event_notifier_init(&vector->interrupt, 0)) {
            error_report("vfio: Error: event_notifier_init failed");
        }

        vector->msg = msi_get_message(&vdev->pdev, i);

        /*
         * Attempt to enable route through KVM irqchip,
         * default to userspace handling if unavailable.
         */
        vector->virq = VFIO_ALLOW_KVM_MSI ?
                       kvm_irqchip_add_msi_route(kvm_state, vector->msg) : -1;
        if (vector->virq < 0 ||
            kvm_irqchip_add_irqfd_notifier(kvm_state, &vector->interrupt,
                                           NULL, vector->virq) < 0) {
            qemu_set_fd_handler(event_notifier_get_fd(&vector->interrupt),
                                vfio_msi_interrupt, NULL, vector);
        }
    }
     ---
  -> vfio_enable_vectors()
	 -> ioctl(vdev->fd, VFIO_DEVICE_SET_IRQS, irq_set)


vfio_pci_ioctl() // VFIO_DEVICE_SET_IRQS
  -> vfio_pci_set_irqs_ioctl()
    -> vfio_pci_set_msi_trigger()
	  -> vfio_msi_enable()
	    -> pci_alloc_irq_vectors()
	  -> vfio_msi_set_block()
	    -> vfio_msi_set_vector_signal()
	       ---
			irq = pci_irq_vector(pdev, vector);
			...
			trigger = eventfd_ctx_fdget(fd);
			...
			ret = request_irq(irq, vfio_msihandler, 0,
					  vdev->ctx[vector].name, trigger);
		   ---

static irqreturn_t vfio_msihandler(int irq, void *arg)
{
	struct eventfd_ctx *trigger = arg;

	eventfd_signal(trigger, 1);
	return IRQ_HANDLED;
}
设备发生中断后,其中断处理代码通过基于eventfd的irqfd机制转发给GuestOS
IR的部分 To be continued
6.2.4 DMA
(To be continued)

