zabbix源码安装
- 安装mariadb(mysql)
// 执行安装命令
# yum -y install mariadb mariadb-server mariadb-devel

// 启动服务
# systemctl start mariadb

// 设置为开机启动
# systemctl enable mariadb

// 修改root登录密码
# mysql_secure_installation
Enter current password for root (enter for none): [回车]
Set root password? [Y/n] y
New password:
Re-enter new password:
Remove anonymous users? [Y/n] y
Disallow root login remotely? [Y/n] n
Remove test database and access to it? [Y/n] y
Reload privilege tables now? [Y/n] y

// 测试登陆
# mysql -uroot -ppassword

// 设置root访问权限
# mysql -uroot -ppassword
MariaDB [(none)]> grant all privileges on *.* to 'root'@'%' identified by 'qwe123' with grant option;
MariaDB [(none)]> flush privileges;
MariaDB [(none)]> exit;
- 安装依赖库
// 以下二选一
// 最小
# yum -y install gcc net-snmp-devel libxml2-devel libcurl-devel  libevent libevent-devel
// 完全
# yum -y install gcc net-snmp-devel net-snmp net-snmp-utils libxml2 libxml2-devel libcurl libcurl-devel libevent libevent-devel
- 下载源码,并配置安装
下载地址:
https://www.zabbix.com/download
https://downloads.sourceforge.net/project/zabbix/ZABBIX%20Latest%20Stable/3.4.4/zabbix-3.4.4.tar.gz
上传zabbix-3.4.4.tar.gz到/home目录下
# cd /home
# tar -zxf zabbix-3.4.4.tar.gz
# cd zabbix-3.4.4
# ./configure --prefix=/usr/local/zabbix --enable-server --enable-agent --enable-java --with-mysql --enable-ipv6 --with-net-snmp --with-libcurl --with-libxml2
# make && make install
- 初始化数据
# mysql -uroot -ppassword
MariaDB [none]> create database if not exists zabbix default character set utf8 collate utf8_general_ci;
MariaDB [none]> use zabbix;
MariaDB [zabbix]> source /home/zabbix-3.4.4/database/mysql/schema.sql;
MariaDB [zabbix]> source /home/zabbix-3.4.4/database/mysql/images.sql;
MariaDB [zabbix]> source /home/zabbix-3.4.4/database/mysql/data.sql;
- 安装fping
zabbix 3之后把ping更换为fping了,所以需要安装fping
# wget http://www.fping.org/dist/fping-4.0.tar.gz
# tar -zxvf fping-4.0.tar.gz
# cd fping-4.0
# ./configure --prefix=/usr/local/fping
# make && make install
- 配置
// server配置
# cd /usr/local/zabbix/
# vi ./etc/zabbix_server.conf
DBHost=localhost
DBName=zabbix
DBUser=root
DBPassword=password
AllowRoot=1
FpingLocation=/usr/local/fping/sbin/fping

// agent配置
# vi ./etc/zabbix_agentd.conf
Server=0.0.0.0/0
Hostname=Zabbix server #注释掉
AllowRoot=1
- 启动服务
# /usr/local/zabbix/sbin/zabbix_server
# /usr/local/zabbix/sbin/zabbix_agent
- 配置前端环境
// 安装apache+php
# yum -y install httpd httpd-devel php php-mysql php-common php-gd php-mbstring php-mcrypt php-devel php-xml php-bcmath

// 复制前端代码到站点下
# cp -r /home/zabbix-3.4.4/frontends/php /var/www/html/zabbix

// 关闭防火墙
# systemctl stop firewalld
# setenforce 0
# vi /etc/selinux/config
SELINUX=disabled

// 修改php配置
# vi /etc/php.ini
memory_limit=128M
post_max_size=16M
upload_max_filesize=20M
max_execution_time=300
max_input_time=300
date.timezone=Asia/Shanghai

// 重启站点
# systemctl restart httpd
访问站点按提示进行配置即可
http://localhost/zabbix
zabbix配置Java Gateway
查看是否已经安装了zabbix_java
/usr/local/zabbix/sbin/zabbix_java/start.sh 是否存在如未安装,则进入zabbix的源码目录,进行zabbix_java的安装
# cd /home/zabbix-3.4.4
# ./configure --prefix=/usr/local/zabbix --enable-java
# make && make install
- 修改zabbix_server的配置文件
# vi /usr/local/zabbix/etc/zabbix_server.conf
JavaGateway=localhost
JavaGatewayPort=10052
StartJavaPollers=5
然后重启zabbix_server
- 启动zabbix_java
# /usr/local/zabbix/sbin/zabbix_java/startup.sh
zabbix配置mysql监控
- 编辑脚本文件/usr/local/zabbix/etc/zabbix_agentd.conf.d/chk_mysql.sh
# vi /usr/local/zabbix/etc/zabbix_agentd.conf.d/chk_mysql.sh
#!/bin/bash

# 用户名
MYSQL_USER='root'

# 密码
MYSQL_PWD='asd123'

# 主机地址/IP
MYSQL_HOST='localhost'

# 端口
MYSQL_PORT='3306'

# 数据连接
MYSQL_CONN="/usr/bin/mysqladmin -u${MYSQL_USER} -p${MYSQL_PWD} -h${MYSQL_HOST} -P${MYSQL_PORT}"

# 参数是否正确
if [ $# -ne "1" ];then
    echo "arg error!"
fi

# 获取数据
case $1 in
    Uptime)
        result=`${MYSQL_CONN} status|cut -f2 -d":"|cut -f1 -d"T"`
        echo $result
        ;;
    Com_update)
        result=`${MYSQL_CONN} extended-status |grep -w "Com_update"|cut -d"|" -f3`
        echo $result
        ;;
    Slow_queries)
        result=`${MYSQL_CONN} status |cut -f5 -d":"|cut -f1 -d"O"`
        echo $result
        ;;
    Com_select)
        result=`${MYSQL_CONN} extended-status |grep -w "Com_select"|cut -d"|" -f3`
        echo $result
                ;;
    Com_rollback)
        result=`${MYSQL_CONN} extended-status |grep -w "Com_rollback"|cut -d"|" -f3`
    Questions)
        result=`${MYSQL_CONN} status|cut -f4 -d":"|cut -f1 -d"S"`
                echo $result
                ;;
    Com_insert)
        result=`${MYSQL_CONN} extended-status |grep -w "Com_insert"|cut -d"|" -f3`
                echo $result
                ;;
    Com_delete)
        result=`${MYSQL_CONN} extended-status |grep -w "Com_delete"|cut -d"|" -f3`
                echo $result
                ;;
    Com_commit)
        result=`${MYSQL_CONN} extended-status |grep -w "Com_commit"|cut -d"|" -f3`
                echo $result
                ;;
    Bytes_sent)
        result=`${MYSQL_CONN} extended-status |grep -w "Bytes_sent" |cut -d"|" -f3`
                echo $result
                ;;
    Bytes_received)
        result=`${MYSQL_CONN} extended-status |grep -w "Bytes_received" |cut -d"|" -f3`
                echo $result
                ;;
    Com_begin)
        result=`${MYSQL_CONN} extended-status |grep -w "Com_begin"|cut -d"|" -f3`
                echo $result
                ;;
        *)
        result=`${MYSQL_CONN} extended-status |grep -w "$1" |cut -d"|" -f3`
                echo $result
                ;;
esac
- 编辑配置文件/usr/local/zabbix/etc/zabbix_agentd.conf.d/zabbix_mysql.conf
# vi /usr/local/zabbix/etc/zabbix_agentd.conf.d/zabbix_mysql.conf
#Mysql版本
UserParameter=mysql.version,mysql -V
# 获取mysql性能指标,这个是上面定义好的脚本
UserParameter=mysql.status[*],/usr/local/zabbix/etc/zabbix_agentd.conf.d/chk_mysql.sh $1
# 获取mysql运行状态
UserParameter=mysql.ping,mysqladmin -uroot -pqwe123 -P3306 -hlocalhost  ping | grep -c alive
- 编辑zabbix_agentd的配置文件,加入zabbix_mysql.conf配置
# vi /usr/local/zabbix/etc/zabbix_agentd.conf
// 去掉#
Include=/usr/local/zabbix/etc/zabbix_agentd.conf.d/*.conf
- 重启zabbix_agent
- 测试是否成功
# /usr/local/zabbix/bin/zabbix_get -s 127.0.0.1 -p 10050 -I 172.16.1.162 -k mysql.version
附录: windows下的脚本
mysql_ping.vbs
Set objFS =CreateObject("Scripting.FileSystemObject")
Set objArgs = WScript.Arguments
str1 = getCommandOutput("mysqladmin -uroot -pqwe123 ping")

If Instr(str1,"alive") > 0Then
WScript.Echo 1
Else
WScript.Echo 0
End If

Function getCommandOutput(theCommand)

Dim objShell, objCmdExec
Set objShell =CreateObject("WScript.Shell")
Set objCmdExec = objshell.exec(thecommand)
getCommandOutput =objCmdExec.StdOut.ReadAll
end Function
mysql_status.vbs
Set objFS = CreateObject("Scripting.FileSystemObject")
Set objArgs = WScript.Arguments
str1 = getCommandOutput("mysqladmin -uroot -pqwe123 extended-status")
Arg = objArgs(0)
str2 = Split(str1,"|")

For i = LBound(str2) to UBound(str2)

If Trim(str2(i)) = Arg Then
WScript.Echo TRIM(str2(i+1))
Exit For
End If
next


Function getCommandOutput(theCommand)

Dim objShell, objCmdExec
Set objShell =CreateObject("WScript.Shell")
Set objCmdExec = objshell.exec(thecommand)
getCommandOutput =objCmdExec.StdOut.ReadAll

end Function
zabbix配置tomcat监控
- 启用tomcat的jmx
- windows下,在catalina.bat 头部增加
set JAVA_OPTS=%JAVA_OPTS% -Dcom.sun.management.jmxremote -Dcom.sun.management.jmxremote.port=8999 -Dcom.sun.management.jmxremote.authenticate=false -Dcom.sun.management.jmxremote.ssl=false
- linux下,在catalina.sh中,CATALINA_OUT前增加
CATALINA_OPTS="$CATALINA_OPTS -Dcom.sun.management.jmxremote -Dcom.sun.management.jmxremote.port=8888 -Dcom.sun.management.jmxremote.ssl=false -Dcom.sun.management.jmxremote.authenticate=false -Djava.rmi.server.hostname=192.168.2.207"
- 下载catalina-jmx-remote.jar到tomcat/lib下
- 修改tomcat的server.xml文件,加入以下代码
- 启动tomcat
- 确认zabbix_server启用了Java Gateway,参考上面
- 在zabbix的控制台添加主机JMX接口
172.16.1.162:12345
linux snmp配置
- 确认snmp代理是否已安装
# rpm -q net-snmp
- 如果未安装,安装snmp
# yum install net-snmp net-snmp-devel net-snmp-utils
- 修改配置 /etc/snmp/snmpd.conf
com2sec notConfigUser  default       public

#view mib2   included  .iso.org.dod.internet.mgmt.mib-2 fc
view mib2   included  .iso.org.dod.internet.mgmt.mib-2 fc

#access  notConfigGroup ""      any       noauth    exact  systemview none none
access  notConfigGroup ""      any       noauth    exact  mib2 none none
- 启动并设置为自启动
systemctl start snmpd
systemctl enable snmpd
zabbix自动发现各网卡MAC地址
-
在zabbix控制台,找到模版
Template Module Interfaces SNMPv2
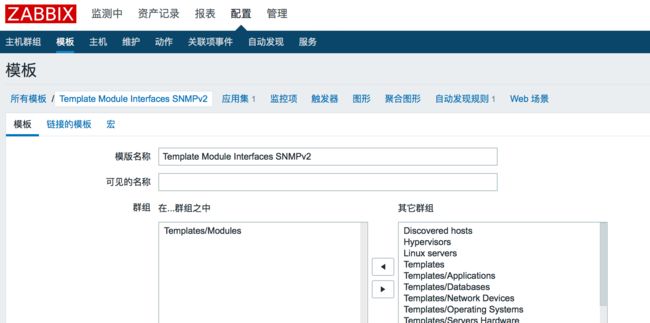 Template Module Interfaces SNMPv2
 -
选择
自动发现规则
 自动发现规则
 -
选择
Network Interfaces Discovery
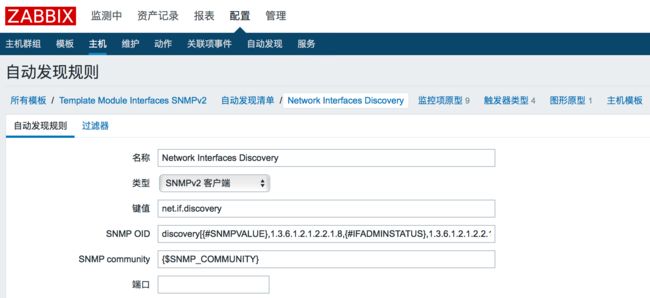 Network Interfaces Discovery
 -
选择
监控项原型
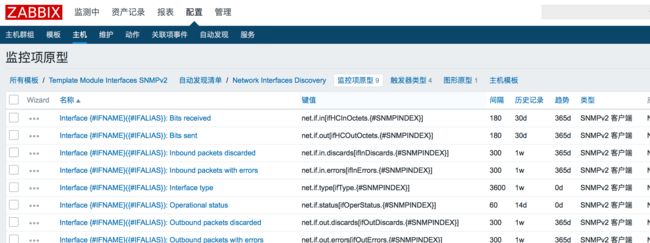 监控项原型
监控项原型 -
点击按钮
创建监控项原型
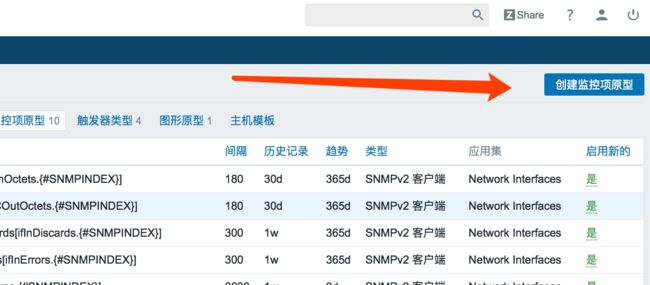 创建监控项原型
- 按下图填入
相应的内容
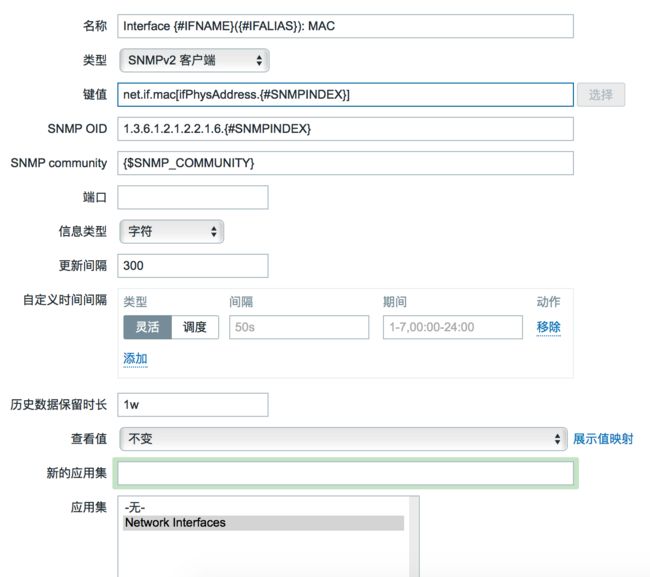 MAC监控项原型
zabbix配置ngnix监控
- 启用nginx status
// 下载nginx源码,再用以下命令编译安装
# ./configure --with-http_stub_status_module
# make && make install

// 修改/usr/local/nginx/conf/nginx.conf,增加以下location
location /ngx_status {
    stub_status on;
    access_log off;
}
- 启动且访问nginx。
http://127.0.0.1/ngx_status
Active connections: 3
server accepts handled requests
 3 3 1
Reading: 0 Writing: 1 Waiting: 2
- 编写服务端获取nginx信息的脚本文件ngx_status.sh
#!/bin/bash

HOST="192.168.2.207"
PORT="81"

# 检测nginx进程是否存在
function ping {
    /sbin/pidof nginx | wc -l
}
# 检测nginx性能
function active {
    /usr/bin/curl "http://$HOST:$PORT/ngx_status/" 2>/dev/null| grep 'Active' | awk '{print $NF}'
}
function reading {
    /usr/bin/curl "http://$HOST:$PORT/ngx_status/" 2>/dev/null| grep 'Reading' | awk '{print $2}'
}
function writing {
    /usr/bin/curl "http://$HOST:$PORT/ngx_status/" 2>/dev/null| grep 'Writing' | awk '{print $4}'
}
function waiting {
    /usr/bin/curl "http://$HOST:$PORT/ngx_status/" 2>/dev/null| grep 'Waiting' | awk '{print $6}'
}
function accepts {
    /usr/bin/curl "http://$HOST:$PORT/ngx_status/" 2>/dev/null| awk NR==3 | awk '{print $1}'
}
function handled {
    /usr/bin/curl "http://$HOST:$PORT/ngx_status/" 2>/dev/null| awk NR==3 | awk '{print $2}'
}
function requests {
    /usr/bin/curl "http://$HOST:$PORT/ngx_status/" 2>/dev/null| awk NR==3 | awk '{print $3}'
}
# 执行function
$1
- 测试使用
zabbix_get -s localhost -k 'nginx.status[ping]'
- 配置监控项
zabbix_proxy安装和配置
- 安装mariadb(mysql)
// 执行安装命令
# yum -y install mariadb mariadb-server mariadb-devel

// 启动服务
# systemctl start mariadb

// 设置为开机启动
# systemctl enable mariadb

// 修改root登录密码
# mysql_secure_installation
Enter current password for root (enter for none): [回车]
Set root password? [Y/n] y
New password:
Re-enter new password:
Remove anonymous users? [Y/n] y
Disallow root login remotely? [Y/n] n
Remove test database and access to it? [Y/n] y
Reload privilege tables now? [Y/n] y

// 测试登陆
# mysql -uroot -ppassword

// 设置root访问权限
# mysql -uroot -ppassword
MariaDB [(none)]> grant all privileges on *.* to 'root'@'%' identified by 'qwe123' with grant option;
MariaDB [(none)]> flush privileges;
MariaDB [(none)]> exit;
- 安装依赖库
# yum -y install gcc net-snmp-devel libssh2-devel
- 下载源码,并配置安装
下载地址:
https://www.zabbix.com/download
https://downloads.sourceforge.net/project/zabbix/ZABBIX%20Latest%20Stable/3.4.4/zabbix-3.4.4.tar.gz
上传zabbix-3.4.4.tar.gz到/home目录下
# cd /home
# tar -zxf zabbix-3.4.4.tar.gz
# cd zabbix-3.4.4
# ./configure --prefix=/usr/local/zabbix --enable-proxy --with-net-snmp --with-mysql --with-ssh2
# make && make install
- 初始化数据
# mysql -uroot -ppassword
MariaDB [none]> create database if not exists zabbix_proxy default character set utf8 collate utf8_general_ci;
MariaDB [none]> use zabbix_proxy;
MariaDB [zabbix]> source /home/zabbix-3.4.4/database/mysql/schema.sql;
- 安装fping
zabbix 3之后把ping更换为fping了,所以需要安装fping
# wget http://www.fping.org/dist/fping-4.0.tar.gz
# tar -zxvf fping-4.0.tar.gz
# cd fping-4.0
# ./configure --prefix=/usr/local/fping
# make && make install
- 配置
// server配置
# cd /usr/local/zabbix/
# vi ./etc/zabbix_proxy.conf
ProxyMode=0
Server=192.168.31.199(zabbix server)
Hostname=proxy01
DBHost=localhost
DBName=zabbix_proxy
DBUser=root
DBPassword=password
AllowRoot=1
FpingLocation=/usr/local/fping/sbin/fping
- 关闭防火墙
# systemctl stop firewalld
# setenforce 0
# vi /etc/selinux/config
SELINUX=disabled
- 启动服务
# /usr/local/zabbix/sbin/zabbix_proxy
- 在zabbix控制台
创建agent代理程序
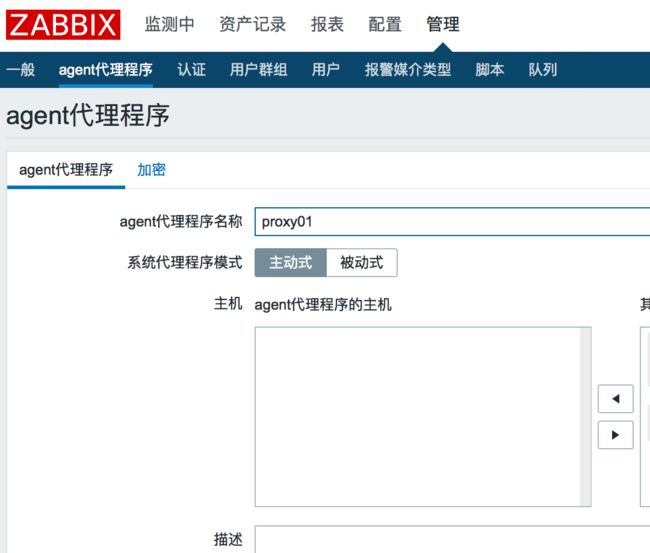 创建agent代理程序