Spring使用RESTful风格实现 增,删,改,查 加注解
什么是RESTful
在SpringMVC中使用ReStFul风格
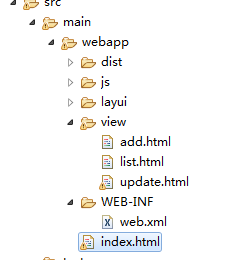
首先看一下结构层面,根据自己的结构进行修改

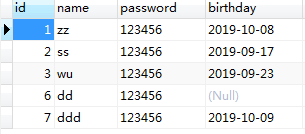
SQL数据库

User实体类`
	private String name;
	private String password;
	/*
	 * pattern : 能解析的日期模板
	 * 因为页面layui发出的日期格式是yyyy-MM-dd的字符串
	 * 需要使用该注解 将这个类型的字符串解析为日期对象,并注入
	 * User的该属性中
	 */
	@DateTimeFormat(pattern="yyyy-MM-dd")
	private Date birthday;
//提供setxxx和getxxx 方法   toString方法
同一个json用于返回前端一个提交状态
private int code; //状态码
	private String msg;//返回的信息
	private Object data; //返回的对象数据
	//提供setxxx和getxxx 方法   toString方法
pom.xml依赖
<project xmlns="http://maven.apache.org/POM/4.0.0" xmlns:xsi="http://www.w3.org/2001/XMLSchema-instance"
	xsi:schemaLocation="http://maven.apache.org/POM/4.0.0 http://maven.apache.org/xsd/maven-4.0.0.xsd">
	<modelVersion>4.0.0</modelVersion>
	<groupId>com.zhiyou100</groupId>
	<artifactId>RESTful</artifactId>
	<version>0.0.1-SNAPSHOT</version>
	<packaging>war</packaging>
	<dependencies>

		<!-- spring /springmvc -->
		<dependency>
			<groupId>org.springframework</groupId>
			<artifactId>spring-core</artifactId>
			<version>4.1.9.RELEASE</version>
		</dependency>
		<dependency>
			<groupId>org.springframework</groupId>
			<artifactId>spring-context</artifactId>
			<version>4.1.9.RELEASE</version>
		</dependency>
		<dependency>
			<groupId>org.springframework</groupId>
			<artifactId>spring-webmvc</artifactId>
			<version>4.1.9.RELEASE</version>
		</dependency>
		<dependency>
			<groupId>org.springframework</groupId>
			<artifactId>spring-web</artifactId>
			<version>4.1.9.RELEASE</version>
		</dependency>
		<dependency>
			<groupId>org.springframework</groupId>
			<artifactId>spring-beans</artifactId>
			<version>4.1.9.RELEASE</version>
		</dependency>
		<dependency>
			<groupId>org.springframework</groupId>
			<artifactId>spring-aop</artifactId>
			<version>4.1.9.RELEASE</version>
		</dependency>
		<!-- spring-jdbc-事务 -->
		<dependency>
			<groupId>org.springframework</groupId>
			<artifactId>spring-orm</artifactId>
			<version>3.2.4.RELEASE</version>
		</dependency>
		<dependency>
			<groupId>org.springframework</groupId>
			<artifactId>spring-jdbc</artifactId>
			<version>4.1.9.RELEASE</version>
		</dependency>
		<dependency>
			<groupId>org.springframework</groupId>
			<artifactId>spring-tx</artifactId>
			<version>4.1.9.RELEASE</version>
		</dependency>
		<!-- aspectj -->
		<dependency>
			<groupId>org.aspectj</groupId>
			<artifactId>aspectjrt</artifactId>
			<version>1.7.4</version>
		</dependency>
		<dependency>
			<groupId>org.aspectj</groupId>
			<artifactId>aspectjweaver</artifactId>
			<version>1.7.4</version>
		</dependency>

		<!-- jdbc driver -->
		<dependency>
			<groupId>mysql</groupId>
			<artifactId>mysql-connector-java</artifactId>
			<version>5.1.30</version>
			<scope>runtime</scope>
		</dependency>
		<!-- MyBatis -->
		<dependency>
			<groupId>org.mybatis</groupId>
			<artifactId>mybatis</artifactId>
			<version>3.2.8</version>
		</dependency>
		<!-- MyBatis+Spring -->
		<dependency>
			<groupId>org.mybatis</groupId>
			<artifactId>mybatis-spring</artifactId>
			<version>1.3.0</version>
		</dependency>


		<!-- dbcp -->
		<dependency>
			<groupId>org.apache.commons</groupId>
			<artifactId>commons-dbcp2</artifactId>
			<version>2.1.1</version>
		</dependency>
		<!-- jackson -->
		<dependency>
			<groupId>com.fasterxml.jackson.core</groupId>
			<artifactId>jackson-core</artifactId>
			<version>2.2.3</version>
		</dependency>
		<dependency>
			<groupId>com.fasterxml.jackson.core</groupId>
			<artifactId>jackson-databind</artifactId>
			<version>2.2.3</version>
		</dependency>
		<dependency>
			<groupId>com.fasterxml.jackson.core</groupId>
			<artifactId>jackson-annotations</artifactId>
			<version>2.2.3</version>
		</dependency>

		<!-- log4j -->
		<dependency>
			<groupId>log4j</groupId>
			<artifactId>log4j</artifactId>
			<version>1.2.17</version>
		</dependency>
		<!-- json 对象 互转 -->
		<dependency>
			<groupId>com.alibaba</groupId>
			<artifactId>fastjson</artifactId>
			<version>1.2.56</version>
		</dependency>
	</dependencies>
	<build>
		<plugins>
			<plugin>
				<groupId>org.apache.maven.plugins</groupId>
				<artifactId>maven-compiler-plugin</artifactId>
				<version>3.6.1</version>
				<configuration>
					<source>1.8</source>
					<target>1.8</target>
				</configuration>
			</plugin>
			<plugin>
				<groupId>org.apache.tomcat.maven</groupId>
				<artifactId>tomcat8-maven-plugin</artifactId>
				<version>3.0-r1655215</version>
				<configuration>
					<!-- <path>/</path> -->
					<server>tomcat8</server>
					<port>8080</port>
					<encoding>UTF-8</encoding>
				</configuration>
			</plugin>
		</plugins>

	</build>
	<modules>
		<module>?</module>
	</modules>
</project>
applicationCont.xml 和 springmvc.xml
<?xml version="1.0" encoding="UTF-8"?>
<beans xmlns="http://www.springframework.org/schema/beans"
    xmlns:xsi="http://www.w3.org/2001/XMLSchema-instance"
    xmlns:mvc="http://www.springframework.org/schema/mvc"
    xmlns:context="http://www.springframework.org/schema/context"
    xmlns:aop="http://www.springframework.org/schema/aop"
    xmlns:tx="http://www.springframework.org/schema/tx"
    xsi:schemaLocation="
   			http://www.springframework.org/schema/tx
       		http://www.springframework.org/schema/tx/spring-tx.xsd
    		http://www.springframework.org/schema/beans
    		http://www.springframework.org/schema/beans/spring-beans.xsd
    		http://www.springframework.org/schema/mvc
        	http://www.springframework.org/schema/mvc/spring-mvc.xsd
        	http://www.springframework.org/schema/context
       		http://www.springframework.org/schema/context/spring-context.xsd
       		http://www.springframework.org/schema/aop
       		http://www.springframework.org/schema/aop/spring-aop.xsd">

  	<!-- 加载properties文件 -->
  	<context:property-placeholder location="classpath:jdbc.properties"/>


  	<!-- 开启注解扫描
  		为了防止重复扫描,Spring不扫描Controller
  	-->
    <context:component-scan base-package="com.zhiyou100" >
    	<!-- 排除扫描 -->
    	<context:exclude-filter type="annotation"
    		expression="org.springframework.stereotype.Controller"/>
    </context:component-scan>


    <!-- 4.创建DBCP的对象 -->
    <bean id="dataSource" class="org.apache.commons.dbcp2.BasicDataSource">
    	<!-- 3.1 给数据库属性赋值 -->
    	<property name="driverClassName" value="${jdbc.driver}" />
    	<property name="url" value="${jdbc.url}" />
    	<property name="username" value="${jdbc.name}" />
    	<property name="password" value="${jdbc.password}" />
    </bean>

    <!-- 5.创建切面类对象 : 事务管理器 -->
  	<bean id="transactionManager" class="org.springframework.jdbc.datasource.DataSourceTransactionManager">
  		<!-- 需要注入数据源, -->
  		<property name="dataSource" ref="dataSource"></property>
  	</bean>

  	<!-- 注解开发需要的事务配置 -->
    <tx:annotation-driven transaction-manager="transactionManager"/>

    <!-- 创建SqlSessionFactory -->
    <bean id="sqlSessionFactory" class="org.mybatis.spring.SqlSessionFactoryBean" >
    	<!-- 加载Mybatis的配置文件 -->
    	<property name="configLocation" value="classpath:mybatis-config.xml" />
    	<!-- 注入数据源 -->
    	<property name="dataSource" ref="dataSource"></property>
    </bean>

    <!-- Spring容器通过扫描mapper文件的位置,生成Mapper的代理对象  -->
    <bean class="org.mybatis.spring.mapper.MapperScannerConfigurer">
    	<!-- 注入SqlSessionFactory
    		值是String类型的 bean的名字,所以用value
    	-->
    	<property name="sqlSessionFactoryBeanName" value="sqlSessionFactory" />
    	<!-- mapper文件的位置 -->
    	<property name="basePackage" value="com.zhiyou100.mapper"></property>
    </bean>

</beans>
--------------------------------------
springmvc.xml
    <?xml version="1.0" encoding="UTF-8"?>
<beans xmlns="http://www.springframework.org/schema/beans"
	xmlns:xsi="http://www.w3.org/2001/XMLSchema-instance" xmlns:mvc="http://www.springframework.org/schema/mvc"
	xmlns:context="http://www.springframework.org/schema/context"
	xsi:schemaLocation="
    		http://www.springframework.org/schema/beans
    		http://www.springframework.org/schema/beans/spring-beans.xsd
    		http://www.springframework.org/schema/mvc
        	http://www.springframework.org/schema/mvc/spring-mvc.xsd
        	http://www.springframework.org/schema/context
       		http://www.springframework.org/schema/context/spring-context.xsd">

	<!-- 1 : 配置适用于 注解开发的适配器和映射器 -->
	<mvc:annotation-driven>
		<mvc:message-converters register-defaults="true">
			<bean class="org.springframework.http.converter.StringHttpMessageConverter">
				<property name="supportedMediaTypes">
					<list>
						<value>application/json;charset=utf-8</value>
						<value>text/html;charset=utf-8</value>
						<!-- application 可以在任意 form 表单里面 enctype 属性默认找到 -->
						<value>application/x-www-form-urlencoded</value>
					</list>
				</property>
			</bean>
			<bean
				class="org.springframework.http.converter.json.MappingJackson2HttpMessageConverter"></bean>
		</mvc:message-converters>

	</mvc:annotation-driven>
	<!-- 2: 开启扫描,使注解生效 扫描到哪一个有注解的包 -->
	<context:component-scan base-package="com.zhiyou100.controller">
		<!-- 只扫描Controller -->
		<context:include-filter type="annotation"
			expression="org.springframework.stereotype.Controller" />
	</context:component-scan>

	<!-- 静态资源映射 -->
	<mvc:resources location="/dist/" mapping="/dist/**"></mvc:resources>
	<mvc:resources location="/layui/" mapping="/layui/**"></mvc:resources>
	<mvc:resources location="/js/" mapping="/js/**"></mvc:resources>
	<mvc:resources location="/view/" mapping="/view/**"></mvc:resources>
	<mvc:resources location="/" mapping="/index.html"></mvc:resources>

</beans>
jdbc.properties的配置文件
######### jdbc 的配置文件,用于被MyBatis的全局配置文件加载 #########
### properties文件是 键=值 的形式
# jdbc的驱动
jdbc.driver=com.mysql.jdbc.Driver
# jdbc的连接路径
jdbc.url=jdbc:mysql://localhost:3306/day19
# jdbc的用户名
jdbc.name=root
# jdbc的密码
jdbc.password=123456
myatis-config.xml 文件
<?xml version="1.0" encoding="UTF-8" ?>
<!DOCTYPE configuration
PUBLIC "-//mybatis.org//DTD Config 3.0//EN"
"http://mybatis.org/dtd/mybatis-3-config.dtd">
<configuration>

	<!-- jdbc.properties文件,交给Spring加载 -->

	<typeAliases>
		<package name="com.zhiyou100.model"/>
	</typeAliases>

	<!-- 数据源交给Spring去托管 -->
	<!-- Mapper加载交给Spring托管 -->
</configuration>
web.xml
<?xml version="1.0" encoding="UTF-8"?>
<web-app xmlns:xsi="http://www.w3.org/2001/XMLSchema-instance" xmlns="http://java.sun.com/xml/ns/javaee" xsi:schemaLocation="http://java.sun.com/xml/ns/javaee http://java.sun.com/xml/ns/javaee/web-app_2_5.xsd" id="WebApp_ID" version="2.5">
  <welcome-file-list>
    <welcome-file>index.html</welcome-file>
    <welcome-file>index.jsp</welcome-file>
  </welcome-file-list>
<!-- =========================== Spring配置 ============================== -->
  <!-- 监听器 -->
  <listener>
  	<listener-class>org.springframework.web.context.ContextLoaderListener</listener-class>
  </listener>
  <!-- 参数:指定applicationContext的位置 -->
  <context-param>
  	<param-name>contextConfigLocation</param-name>
  	<param-value>classpath:applicationContext.xml</param-value>
  </context-param>

<!-- =========================== SpringMVC配置 ============================== -->
  <servlet>
 	 <servlet-name>dispatcherServlet</servlet-name>
 	 <servlet-class>org.springframework.web.servlet.DispatcherServlet</servlet-class>
 	 <init-param>
 	 	<param-name>contextConfigLocation</param-name>
 	 	<param-value>classpath:springmvc.xml</param-value>
 	 </init-param>
  </servlet>
  <servlet-mapping>
  	<servlet-name>dispatcherServlet</servlet-name>
  	<url-pattern>/*
后台代码
- Controller层
import java.util.List;

import org.springframework.beans.factory.annotation.Autowired;
import org.springframework.stereotype.Controller;
import org.springframework.web.bind.annotation.PathVariable;
import org.springframework.web.bind.annotation.RequestBody;
import org.springframework.web.bind.annotation.RequestMapping;
import org.springframework.web.bind.annotation.RequestMethod;
import org.springframework.web.bind.annotation.ResponseBody;
import com.zhiyou100.model.User;
import com.zhiyou100.service.LoginService;
import com.zhiyou100.service.UserService;
import com.zhiyou100.util.ResultObject;
@Controller
public class RestController {

	@Autowired
	LoginService loginService;

	@Autowired
	UserService userService;
	/**
	 * @param username
	 * @param password
	 * @return
	 * 登录
	 */
		/*
		 * @ResponseBody:
		 * 用于将Controller的方法返回的对象,通过适当的HttpMessageConverter转换为指定格式后,
		 * 写入到Response对象的body数据区
		 */
	@RequestMapping(value="/user/login",method=RequestMethod.POST)
	@ResponseBody
	public ResultObject login(String username,String password) {
		User user = loginService.findUserByLogin(username, password);
		System.out.println("登录 : "+user);
		if(user != null) {
			return new ResultObject(200,"成功",null);
		}
		return new ResultObject(404,"失败",null);
	}
	//查询所有数据
	@RequestMapping(value="/user/list",method=RequestMethod.GET)
	@ResponseBody //
	public ResultObject list() {
		List<User> users = userService.findAll(null);
		System.out.println("查询全部 : "+users);
		if(users == null || users.size()==0){
			return new ResultObject(404,"失败",null);
		}
		return new ResultObject(200,"成功",users);
	}
	/**
	 * @return
	 * 执行添加  /user    post
	 * 前端请求方式 post,参数是表单提交形式
	 * 后台Controller 参数User 可以直接封装成功
	 */
	@RequestMapping(value="/user",method=RequestMethod.POST)
	@ResponseBody
	public ResultObject add(User user) {
		System.out.println("Controller add 接收的user: "+user);

		boolean result = userService.addUser(user);
		if(result){
			System.out.println("添加结果 : "+result);
			return new ResultObject(200,"成功",null);
		}
		return new ResultObject(404,"失败",null);
	}
	/**
	 *
	 * 通过 @PathVariable 可以将URL中占位符参数{xxx}绑定到处理器类的方法形参中@PathVariable(“xxx“)
	 *
	 */
	@RequestMapping(value="/user/{id}",method=RequestMethod.DELETE)
	@ResponseBody
	public ResultObject delete(@PathVariable("id") int id) {
		System.out.println("Controller delete 接收的id: "+id);
		userService.deleteUserById(id);
		return new ResultObject(200,"成功",null);
	}
	/**
	 * @param id
	 * @return
	 * 更新回显  /user/{id}   get
	 */
	@RequestMapping(value="/user/{id}",method=RequestMethod.GET)
	@ResponseBody
	public ResultObject find(@PathVariable("id") int id) {
		System.out.println("Controller find 接收的id: "+id);

		User user = userService.findUserById(id);
		return new ResultObject(200,"成功",user);
	}

	/**
	 *  更新
	 *  /user  put
	 *  参数 前端发送的json数据,想要直接封装到对应的user对象,需要解析
	 *  @RequestBody 将页面的json解析为对应的javabean
	 */
	@RequestMapping(value="/user",method=RequestMethod.PUT)
	@ResponseBody
	public ResultObject update(@RequestBody User user) {
		System.out.println("Controller update 接收的user: "+user);
		userService.updateUser(user);
		return new ResultObject(200,"成功",user);
	}
}
service层:这里就不写service接口啦
import java.util.HashMap;
import java.util.Map;

import org.springframework.beans.factory.annotation.Autowired;
import org.springframework.stereotype.Service;

import com.zhiyou100.mapper.LoginMapper;
import com.zhiyou100.model.User;
 //页面登录
@Service
public class LoginServiceImpl implements LoginService{
	@Autowired
	private LoginMapper mapper;
	@Override
	public User findUserByLogin(String username, String password) {
		Map<String,String> map = new HashMap<>();
		map.put("username", username);
		map.put("password", password);
		// 调用数据访问层查询
		User user = mapper.findUserByLogin(map);
		return user;
	}
	@Override
	public User findUserByUsername(String username) {
		return mapper.findUserByUsername(username);
	}
}
import java.util.List;
import java.util.Map;

import org.springframework.beans.factory.annotation.Autowired;
import org.springframework.stereotype.Service;

import com.zhiyou100.mapper.UserMapper;
import com.zhiyou100.model.User;
@Service
public class UserServiceImpl implements UserService{
	@Autowired
	private UserMapper mapper;
	@Override
	public List<User> findAll(Map<String, Object> map) {
		return mapper.findAll(map);
	}
	@Override
	public boolean addUser(User user) {
		int rowNum = mapper.addUser(user);
		if(rowNum >0) {
			// 插入成功
			return true;
		}
		if(user.getBirthday() == null || user.getName() == "" || user.getPassword()=="") {
			return false;
		}
		return false;
	}
	@Override
	public int count(Map<String, Object> map) {
		return mapper.count(map);
	}
	@Override
	public User findUserById(int id) {
		return mapper.findUserById(id);
	}
	@Override
	public List<Integer> findAllIds() {
		return mapper.findAllIds();
	}
	@Override
	public void deleteUserById(int id) {
		mapper.deleteUserById(id);
	}
	@Override
	public void updateUser(User user) {
		mapper.updateUser(user);
	}
}
Mapper层
import java.util.Map;
import com.zhiyou100.model.User;
public interface LoginMapper {
	User findUserByLogin(Map<String, String> map);
	//User findUserByUsername(String username);
}
LoginMapper.xml文件
<?xml version="1.0" encoding="UTF-8" ?>
<!DOCTYPE mapper
PUBLIC "-//mybatis.org//DTD Mapper 3.0//EN"
"http://mybatis.org/dtd/mybatis-3-mapper.dtd">

<!--
namespace : 类路径
	与此映射文件关联的接口文件路径
 -->
<mapper namespace="com.zhiyou100.mapper.LoginMapper">

	<select id="findUserByLogin" parameterType="Map" resultType="User">
		SELECT * FROM USERS WHERE name = #{username} AND password = #{password}
	</select>

	<select id="findUserByUsername" parameterType="String" resultType="User">
		SELECT * FROM USERS WHERE name = #{username}
	</select>

</mapper>
UserMapper.java
import java.util.List;
import java.util.Map;
import com.zhiyou100.model.User;
public interface UserMapper {
	List<User> findAll(Map<String, Object> map);
	int addUser(User user);
	int count(Map<String, Object> map);
	User findUserById(int id);
	List<Integer> findAllIds();
	void deleteUserById(int id);
	void updateUser(User user);
}
UserMapper.xml
<!DOCTYPE mapper
PUBLIC "-//mybatis.org//DTD Mapper 3.0//EN"
"http://mybatis.org/dtd/mybatis-3-mapper.dtd">
<mapper namespace="com.zhiyou100.mapper.UserMapper">
<select id="findAll" parameterType="Map" resultType="User">
SELECT * FROM USERS
/*
name like '%${keyword}%'//这是做的分页sql语句
*/
<select id="findUserById" parameterType="int" resultType="User">
SELECT * FROM USERS WHERE id = #{id}
</select>
<insert id="addUser" parameterType="User">
INSERT INTO USERS (name,password,birthday,salt) VALUES
(#{name},#{password},#{birthday},#{salt})
</insert>
<select id="findAllIds" resultType="int">
select id from users
</select>
<delete id="deleteUserById" parameterType="int">
delete from users where id = #{id}
</delete>
<update id="updateUser" parameterType="User">
update users set name = #{name},password = #{password},
birthday = #{birthday} where id = #{id}
</update>
</mapper>
前端页面根据自己定义,
- 使用ajax异步请求需要添加 jquery.js 的jar包
<body>

    <div class="container">

      <form action="#" method="post" class="form-signin">
        <h2 class="form-signin-heading">Please sign in</h2>
        <label for="inputEmail" class="sr-only">Email address</label>
        <input type="text" name="username" id="inputUsername" class="form-control" placeholder="用户名" required autofocus>
        <label for="inputPassword" class="sr-only">Password</label>
        <input type="password" name="password" id="inputPassword" class="form-control" placeholder="密码" required>
        <div class="checkbox">
          <label>
          <input type="checkbox" value="remember-me"> Rememberme
          </label>
        </div>
        <button onclick="return loginFun();" class="btn btn-lg btn-primary btn-block" type="submit" onc>Sign in</button>
      </form>
    </div>
     <script src="assets/js/ie10-viewport-bug-workaround.js"></script>
    <script type="text/javascript" src="../js/jquery.js"></script>
<script type="text/javascript">
	function loginFun() {
		// 获取用户密码
		var name = $("#inputUsername").val();
		var pwd  = $("#inputPassword").val();
		// 发送请求
		$.ajax({
			url:"/RESTful/user/login",
			data:{"username":name,"password":pwd},
			type:"POST",
            async:true,
			success:function(data){
				if(data.code == 200){
					alert("成功");
					window.location.href = "/RESTful/view/list.html";
				}else{
					alert("用户名/密码错误");
				}
			}
		});
		return false;
	}
</script>
list.html页面
<body>
<div class="col-md-8" style="margin-left: 200px;margin-top: 100px;font-size: 20px">
添加用户<a href="../view/add.html" class="glyphicon glyphicon-plus"></a>
<table class="table table-bordered">
<tr>
<td>编号</td>
<td>用户名</td>
<td>密码</td>
<td>生日</td>
<td>操作</td>
</tr>
</table>
</div>
<script type="text/javascript" src="../js/jquery.js"></script>
<script type="text/javascript">
/**
* 页面加载
*/
$(document).ready(function(){
$.ajax({
url:"/RESTful/user/list",
type:"GET",
success:function(data){
if(data.code == 200){
for(var i=0;i<data.data.length;i++){
var timeNum = data.data[i].birthday
var timeObj = new Date(timeNum);
var day = timeObj.getDate();
var month = timeObj.getMonth()+1;
var year = timeObj.getFullYear();
var birTime = year+"-"+month+"-"+day;
$("tr:last").after(""+
""+data.data[i].id+" "+
""+data.data[i].name+" "+
""+data.data[i].password+" "+
""+birTime+" "+
"+data.data[i].id+")\" class=\"glyphicon glyphicon-trash\" href=\"#\">|"+
"+data.data[i].id+")\" class=\"glyphicon glyphicon-pencil\" href=\"#\"> "+
" ");
}
}
}
});
});
</script>
<script type="text/javascript">
function del(id){
alert(id);
$.ajax({
url:"/RESTful/user/"+id, // /user/39
type:"DELETE",
success:function(data){
if(data.code == 200){
alert("删除成功");
window.location.href="/RESTful/view/list.html";
}
}
});
}
</script>
<script type="text/javascript">
function toUpdate(id){
document.cookie="userId="+id;
window.location.href="/RESTful/view/update.html";
}
</script>
</body>
add.html添加页面
<body>
<div class="col-md-3" style="margin-left: 200px;margin-top: 100px;font-size: 20px">
	<form id="formId" action="#">
	<table class="table table-bordered">
		<tr>
			<td>用户名</td>
			<td>
				<input type="text" name="name" >
			</td>
		</tr>
		<tr>
			<td>密码</td>
			<td>
				<input type="text" name="password" >
			</td>
		</tr>
		<tr>
			<td>生日</td>
			<td>
				 <div class="layui-inline">
     			 	<div class="layui-input-inline">
       				 	<input type="text" name="birthday" class="layui-input" id="test1" placeholder="yyyy-MM-dd">
      				</div>
   				</div>
			</td>
		</tr>
	</table>
	<input onclick="return addFun();" type="submit" value="添加">
	</form>
<script src="../layui/layui.js" type="text/javascript"></script>
<script type="text/javascript" src="../js/jquery.js"></script>
<script type="text/javascript">
/*
 * 点击 添加按钮,触发事件
   1.获得表单中的数据
   1.1 校验
   2.发送请求,携带数据
   3.成功后重新回到首页
 */
function addFun(){
	// 获得表单数据 ->表单序列化
	var obj = $("#formId").serialize();
	$.ajax({
		url:"/RESTful/user",
		data:obj,
		type:"POST",
		success:function(msg){
			if(msg.code == 200){
				alert("添加成功");
				window.location.href="/RESTful/view/list.html";
			}else{
				alert("添加失败");
			}
		}
	});
	return false;
}
</script>
<script>
//一般直接写在一个js文件中
layui.use('laydate', function(){
  var laydate = layui.laydate;
//常规用法
  laydate.render({
    elem: '#test1'
  });
});
</script>
</body>
update.html更新页面
<script type="text/javascript" src="../js/mydate.js"></script>
<script type="text/javascript" src="../js/jquery.js"></script>
<script type="text/javascript">
/**
 * 页面加载,从cookie中获得id,
 * ajax发送请求,查,页面填充
 */
$(document).ready(function(){
	// 获得cookie,JavaScript获得cookie是全部的cookie
	var cookies = document.cookie.split("; ");
	var kv = cookies[0].split("=");
	var id = kv[1];

	$.ajax({
		url:"/RESTful2/user/"+id,
		type:"GET",
		success:function(data){
			if(data.code == 200){
				$("input[name='name']").val(data.data.name);
				$("input[name='id']").val(data.data.id);
				$("input[name='password']").val(data.data.password);
				$("input[name='birthday']").val(data.data.birthday);
			}
		}
	});
});
</script>
<body>
<div class="col-md-3" style="margin-left: 200px;margin-top: 100px;font-size: 20px">
	<form action="#">
	<table class="table table-bordered">
		<tr>
			<td>用户名</td>
			<td>
				<input type="hidden" name="id" value="">
				<input type="text" name="name" value="">
			</td>
		</tr>
		<tr>
			<td>密码</td>
			<td>
				<input type="text" name="password" value="">
			</td>
		</tr>
		<tr>
			<td>生日</td>
			<td>
				 <div class="layui-inline">
     			 	<div class="layui-input-inline">
       				 	<input type="text" name="birthday" value="" class="layui-input" id="test1" placeholder="yyyy-MM-dd">
      				</div>
   				</div>
			</td>
		</tr>
	</table>
	<input type="submit" value="更新" onclick="return updFun();">
	</form>
<script src="../layui/layui.js" type="text/javascript"></script>
<script type="text/javascript">
	 /*
	 * 因为PUT 请求 到后台Controller想要将数据封装成对象有两种方式
	   1. 前台ajax还继续使用post请求方式,但是在data中写{_method:"PUT","id":"","name":"",..}
		  后台Controller继续使用method=method=RequestMethod.PUT 接收即可
		  但是需要在web.xml中加入一些配置
		  https://blog.csdn.net/liuyuanjiang109/article/details/78972644#commentBox
	   2. 另一种方法简单一点.
	      	就是前台继续使用PUT方式提交,但是data数据 必须是json格式
	                        后台需要封装的对象必须使用@RequestBody 解析
	   --------------------------------------------
	   PS : 不管以上哪种方式,data都应该是json格式数据,所有使用序列化生成的格式不好用,需要手动拼接
	 */
function updFun(){
	// 获得表单数据
	var name = $("input[name='name']").val();
	var id = $("input[name='id']").val();
	var password = $("input[name='password']").val();
	var birthday = $("input[name='birthday']").val();
	var jsonObj = {"id":id,"name":name,"password":password,"birthday":birthday};
	var jsonStr = JSON.stringify(jsonObj);
	$.ajax({
		url:"/RESTful2/user",
		type:"PUT",
		contentType:"application/json;charset=utf-8",
		data:jsonStr,
		success:function(data){
			if(data.code == 200){
				alert("更新成功");
				window.location.href="/RESTful2/view/list.html";
			}
		}
	});
	return false;
}
</script>
<script>
//一般直接写在一个js文件中
layui.use('laydate', function(){
  var laydate = layui.laydate;
//常规用法
  laydate.render({
    elem: '#test1'
  });
});
</script>
</body>
- 谢谢观看,如果觉得好,赞一下哦,里面那里写的不好,在下方评论,多多指点哦.

