Node.js使用科大讯飞web API实现人脸对比
目录
1.先吧需要的模块引入进来 这里我发送http请求使用的是requset模块
2.对请求进行签名
3.请求参数
4.发送请求
附上完整代码吧
最近无事研究了一下人脸对比,白嫖了一下科大讯飞的人脸对比API,但是文档里只有java和python的demo并没有node的demo,而我又只是个小前端 只会写写node,所以只能自己研究咯
先根据文档所说做好准备工作,注册科大讯飞开发者,获取服务接口认证信息
科大讯飞的API很好获取 先去注册账户再实名认证就可以得到免费的API,每天500次,调试学习够用了
按照文档一步一步来,
1.先吧需要的模块引入进来 这里我发送http请求使用的是requset模块
封装一个方法读取图片base64编码
// 引入服务端http/https请求模块
const request = require("request");
// hmac-sha256算法要使用的模块
const crypto = require("crypto");
// nodejs路径模块
const path = require("path");
// nodejs自带文件读写模块
const fs = require("fs");

// 图片转base64
function parse(file) {
  // 获取原始文件地址
  let filePath = path.resolve(file);
  // 读取文件数据
  let data = fs.readFileSync(filePath);
  // 获取图片base64编码
  data = Buffer.from(data).toString("base64");
  return data;
}这里重要说一下hmac-sha256算法查了好多资料最后还是使用了node自带的crypto模块
其他的加密出来多多少少有点差异
2.对请求进行签名
在调用业务接口时,请求方需要对请求进行签名,服务端通过签名来校验请求的合法性。 通过在请求地址后面加上鉴权相关参数的方式,参数具体如下:
https://api.xf-yun.com/v1/private/s67c9c78c?authorization=YXBpX2tleT0iYXBpa2V5WFhYWFhYWFhYWFhYWFhYWFhYWFhYWFhYWFgiLCBhbGdvcml0aG09ImhtYWMtc2hhMjU2IiwgaGVhZGVycz0iaG9zdCBkYXRlIHJlcXVlc3QtbGluZSIsIHNpZ25hdHVyZT0iSk5od3prMWtLYjUwdUVGbEUxS2xCbk83K09NTjNZUk5LZVFsYzVMYVltTT0i&host=api.xf-yun.com&date=Fri%2C+17+Jul+2020+06%3A26%3A58+GMT代码如下
注意:signature原始字段由 host,date,request-line三个参数按照格式拼接成,
拼接的格式为(\n为换行符,’:’后面有一个空格)
// 1)获取接口密钥APIKey 和 APISecret。
const apiKey = "xxxxxxxxxxxxxxxxxxxx";
const apiSecret = "xxxxxxxxxxxxxxxxxxxxxx";
const appId = "xxxxxxx";

// 2)参数authorization base64编码前(authorization_origin)的格式如下。
// api_key="$api_key",algorithm="hmac-sha256",headers="host date request-line",signature="$signature"

// 3)signature的原始字段(signature_origin)规则如下。 host: $host\ndate: $date\n$request-line
const date = new Date().toGMTString(); // 获取GMT时间
const signature_origin = `host: api.xf-yun.com\ndate: ${date}\nPOST /v1/private/s67c9c78c HTTP/1.1`;

// 4)使用hmac-sha256算法结合apiSecret对signature_origin签名,获得签名后的摘要signature_sha。
// signature_sha=hmac-sha256(signature_origin,$apiSecret)
const hmac = crypto.createHmac("sha256", apiSecret);
hmac.update(signature_origin);
const signature_sha = hmac.digest("bytes");

// 5)使用base64编码对signature_sha进行编码获得最终的signature。
const signature = signature_sha.toString("base64");

// 6)根据以上信息拼接authorization base64编码前(authorization_origin)的字符串,示例如下。
const authorization_base64 = `api_key=${apiKey},algorithm="hmac-sha256",headers="host date request-line",signature="${signature}"`;

// 7)最后再对authorization_origin进行base64编码获得最终的authorization参数。
let authorization = new Buffer.from(authorization_base64).toString("base64");

console.log("authorization", authorization);
最终输出结果
YXBpX2tleT0iYXBpa2V5WFhYWFhYWFhYWFhYWFhYWFhYWFhYWFhYWFgiLCBhbGdvcml0aG09ImhtYWMtc2hhMjU2IiwgaGVhZGVycz0iaG9zdCBkYXRlIHJlcXVlc3QtbGluZSIsIHNpZ25hdHVyZT0iSk5od3prMWtLYjUwdUVGbEUxS2xCbk83K09NTjNZUk5LZVFsYzVMYVltTT0i3.请求参数
注意,请求体http request body必须是json字符串
获取图片base64编码
// 请求体body
let body = {
  header: {
    // 这里使用上方从科大讯飞控制台获取的APPID
    app_id: appId,
    status: 3,
  },
  parameter: {
    s67c9c78c: {
      service_kind: "face_compare",
      face_compare_result: {
        encoding: "utf8",
        compress: "raw",
        format: "json",
      },
    },
  },
  payload: {
    input1: {
      encoding: "jpg",
      status: 3,
        // 图片地址自行替换
      image: parse("public/upload/20221121/A717A672AB4B90AD.jpg"),
    },
    input2: {
      encoding: "jpg",
      status: 3,
        // 图片地址自行替换
      image: parse("public/upload/20221121/A717A672AB4B90AD.jpg"),
    },
  },
};
4.发送请求
// 发送请求
request(
  {
    url: `https://api.xf-yun.com/v1/private/s67c9c78c?authorization=${authorization}&host=api.xf-yun.com&date=${date}`,
    method: "POST",
    headers: {
      "content-type": "application/json",
    },
    // http request body转JSON字符串
    body: JSON.stringify(body),
  },
  (err, res, body) => {
    if (err) {
      return console.log(err);
    }
    // body返回的是json字符串需要转为json对象
    let text = JSON.parse(body).payload.face_compare_result.text;
    let result = new Buffer.from(text, "base64").toString();
    console.log(result);
    if (result.score > 0.67) {
      console.log("是同一个人");
    } else {
      console.log("好像不是同一个人");
    }
  }
);
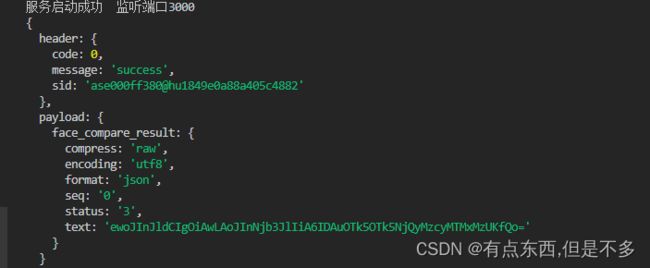
最后看下请求结果
text字段base64解码示例
{
	"ret" : 0,
	"score" : 0.99618607759475708
}
text字段参数说明:
| 参数名 | 类型 | 描述 | 备注 |
|---|---|---|---|
| ret | int | 内部服务返回值 | ret=0表示请求成功,否则请参考错误码表 |
| score | float | 人脸相似度 | 最小值:0 最大值:1。 建议高于0.67认为是同一个人。 建议使用仅包含一张人脸的照片进行比对,若照片中含有多张人脸,引擎会选择其中人脸置信度最高的人脸进行比较,可能会影响比对结果。 |
附上完整代码吧
// 引入服务端http/https请求模块
const request = require("request");
const crypto = require("crypto");
const path = require("path");
const fs = require("fs");

// 图片转base64
function parse(file) {
  // 获取原始文件地址
  let filePath = path.resolve(file);
  // 读取文件数据
  let data = fs.readFileSync(filePath);
  // 获取图片base64编码
  data = Buffer.from(data).toString("base64");
  return data;
}

// 1)获取接口密钥APIKey 和 APISecret。
const apiKey = "xxxxxxxxxxxxxxxxxxx";
const apiSecret = "xxxxxxxxxxxxxxxxxx";
const appId = "xxxxxxx";

// 2)参数authorization base64编码前(authorization_origin)的格式如下。
// api_key="$api_key",algorithm="hmac-sha256",headers="host date request-line",signature="$signature"

// 3)signature的原始字段(signature_origin)规则如下。 host: $host\ndate: $date\n$request-line
const date = new Date().toGMTString(); // 获取GMT时间
const signature_origin = `host: api.xf-yun.com\ndate: ${date}\nPOST /v1/private/s67c9c78c HTTP/1.1`;

// 4)使用hmac-sha256算法结合apiSecret对signature_origin签名,获得签名后的摘要signature_sha。
// signature_sha=hmac-sha256(signature_origin,$apiSecret)
const hmac = crypto.createHmac("sha256", apiSecret);
hmac.update(signature_origin);
const signature_sha = hmac.digest("bytes");

// 5)使用base64编码对signature_sha进行编码获得最终的signature。
const signature = signature_sha.toString("base64");

// 6)根据以上信息拼接authorization base64编码前(authorization_origin)的字符串,示例如下。
const authorization_base64 = `api_key=${apiKey},algorithm="hmac-sha256",headers="host date request-line",signature="${signature}"`;

// 7)最后再对authorization_origin进行base64编码获得最终的authorization参数。
let authorization = new Buffer.from(authorization_base64).toString("base64");

console.log("authorization", authorization);

// 请求体body
let body = {
  header: {
    app_id: appId,
    status: 3,
  },
  parameter: {
    s67c9c78c: {
      service_kind: "face_compare",
      face_compare_result: {
        encoding: "utf8",
        compress: "raw",
        format: "json",
      },
    },
  },
  payload: {
    input1: {
      encoding: "jpg",
      status: 3,
      image: parse("public/upload/20221121/A717A672AB4B90AD.jpg"),
    },
    input2: {
      encoding: "jpg",
      status: 3,
      image: parse("public/upload/20221121/A717A672AB4B90AD.jpg"),
    },
  },
};
// 发送请求
request(
  {
    url: `https://api.xf-yun.com/v1/private/s67c9c78c?authorization=${authorization}&host=api.xf-yun.com&date=${date}`,
    method: "POST",
    headers: {
      "content-type": "application/json",
    },
    // http request body转JSON字符串
    body: JSON.stringify(body),
  },
  (err, res, body) => {
    if (err) {
      return console.log(err);
    }
    let text = JSON.parse(body).payload.face_compare_result.text;
    let result = new Buffer.from(text, "base64").toString();
    console.log(result);
    if (result.score > 0.67) {
      console.log("是同一个人");
    } else {
      console.log("好像不是同一个人");
    }
  }
);
demo示例到此结束,本文只是写了一个小demo并没有封装成人脸对比的接口,如果需要的话自行封装一下,
转载请注明出处,谢谢

