3. 爬取自己CSDN博客列表(自动方式)(分页查询)(网站反爬虫策略,需要在代码中添加合适的请求头User-Agent,否则response返回空)
文章目录
- 步骤
-
- 打开谷歌浏览器
- 输入网址
- 按F12进入调试界面
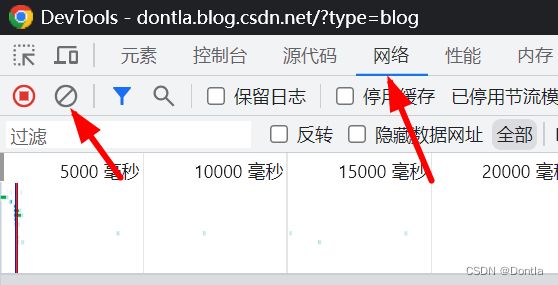
- 点击网络,清除历史消息
- 按F5刷新页面
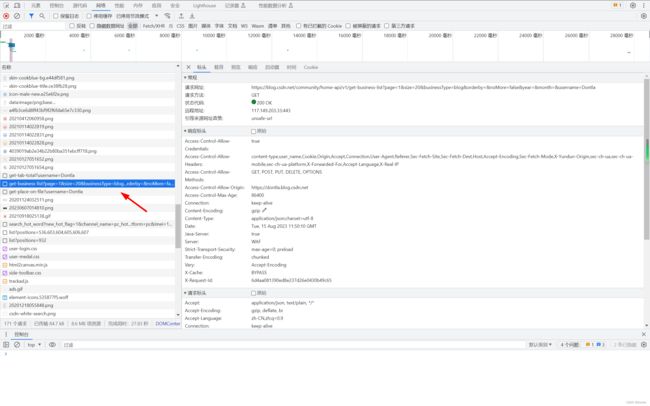
- 找到接口(community/home-api/v1/get-business-list)
-
- 接口解读
- 撰写代码获取博客列表
-
- 先明确返回信息格式
-
- json字段解读
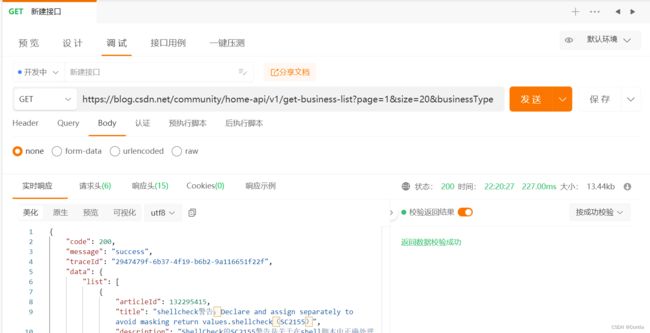
- Apipost测试接口
- 编写python代码(注意有反爬虫策略,需要设置请求头)(成功)
1. 如何爬取自己的CSDN博客文章列表(获取列表)(博客列表)(手动+python代码方式)
2. 获取自己CSDN文章列表并按质量分由小到大排序(文章质量分、博客质量分、博文质量分)(阿里云API认证)
步骤
打开谷歌浏览器
输入网址
https://dontla.blog.csdn.net/?type=blog
按F12进入调试界面
点击网络,清除历史消息
按F5刷新页面
找到接口(community/home-api/v1/get-business-list)
https://blog.csdn.net/community/home-api/v1/get-business-list?page=1&size=20&businessType=blog&orderby=&noMore=false&year=&month=&username=Dontla
接口解读
https://blog.csdn.net/community/home-api/v1/get-business-list?page=1&size=20&businessType=blog&orderby=&noMore=false&year=&month=&username=Dontla
https://blog.csdn.net/community/home-api/v1/get-business-list?page=1&size=20&businessType=blog&orderby=&noMore=false&year=&month=&username=Dontla
这是一个HTTP GET请求的接口,用于获取CSDN博客网站上的业务列表信息。具体来说,它是用于获取某个用户的博客文章列表。让我们逐个分析URL中的参数:
-
page=1:这个参数表示请求的页面编号,设为1意味着请求第一页的数据。
-
size=20:这个参数表示每页显示的记录数。这里,每页显示20条记录。
-
businessType=blog:这个参数指定了业务类型,此处为"blog",所以它应该是用来获取博客文章的。
-
orderby=:这个参数应该是用来指定排序方式的,但在这个请求中并没有具体值,可能默认为某种排序方式,如按发布时间降序等。
-
noMore=false:这个参数可能是用来判断是否还有更多的记录可以获取。如果设置为false,表示可能还有更多的记录。
-
year= & month=:这两个参数可能是用来筛选特定年份和月份的博客文章,但在这个请求中并没有具体值,因此可能会返回所有时间段的文章。
-
username=Dontla:这个参数指定了用户名,意味着这个请求可能用来获取名为"Dontla"的用户的博客文章列表。
撰写代码获取博客列表
先明确返回信息格式
我们将https://blog.csdn.net/community/home-api/v1/get-business-list?page=1&size=1&businessType=blog&orderby=&noMore=false&year=&month=&username=Dontla拷贝到浏览器url栏打开:
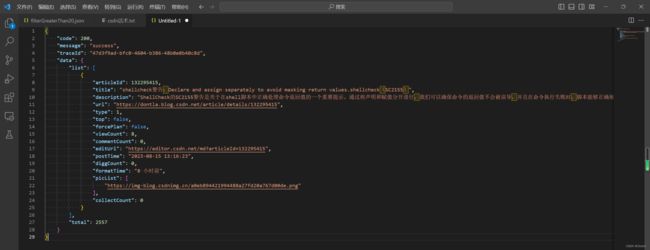
全选拷贝,将文字粘贴到编辑器并格式化:
{“code”:200,“message”:“success”,“traceId”:“47d3f9ad-bfc0-4604-b386-48b0e0b40c8d”,“data”:{“list”:[{“articleId”:132295415,“title”:“shellcheck警告:Declare and assign separately to avoid masking return values.shellcheck(SC2155)”,“description”:“ShellCheck的SC2155警告是关于在shell脚本中正确处理命令返回值的一个重要提示。通过将声明和赋值分开进行,我们可以确保命令的返回值不会被误导,并且在命令执行失败时,脚本能够正确地捕获并处理错误。”,“url”:“https://dontla.blog.csdn.net/article/details/132295415”,“type”:1,“top”:false,“forcePlan”:false,“viewCount”:8,“commentCount”:0,“editUrl”:“https://editor.csdn.net/md?articleId=132295415”,“postTime”:“2023-08-15 13:16:23”,“diggCount”:0,“formatTime”:“8 小时前”,“picList”:[“https://img-blog.csdnimg.cn/a0eb894421994488a27fd20a767d00de.png”],“collectCount”:0}],“total”:2557}}
{
    "code": 200,
    "message": "success",
    "traceId": "47d3f9ad-bfc0-4604-b386-48b0e0b40c8d",
    "data": {
        "list": [
            {
                "articleId": 132295415,
                "title": "shellcheck警告:Declare and assign separately to avoid masking return values.shellcheck(SC2155)",
                "description": "ShellCheck的SC2155警告是关于在shell脚本中正确处理命令返回值的一个重要提示。通过将声明和赋值分开进行,我们可以确保命令的返回值不会被误导,并且在命令执行失败时,脚本能够正确地捕获并处理错误。",
                "url": "https://dontla.blog.csdn.net/article/details/132295415",
                "type": 1,
                "top": false,
                "forcePlan": false,
                "viewCount": 8,
                "commentCount": 0,
                "editUrl": "https://editor.csdn.net/md?articleId=132295415",
                "postTime": "2023-08-15 13:16:23",
                "diggCount": 0,
                "formatTime": "8 小时前",
                "picList": [
                    "https://img-blog.csdnimg.cn/a0eb894421994488a27fd20a767d00de.png"
                ],
                "collectCount": 0
            }
        ],
        "total": 2557
    }
}
目前已知的是:原创对应type值为1,转载对应为2。
json字段解读
这是一个JSON格式的HTTP响应,用于传输具体的数据信息。以下是对每个字段的解读:
-
code: 这是HTTP响应状态码,200通常表示请求成功。
-
message: 这是响应的描述信息,"success"表示请求处理成功。
-
traceId: 这可能是此次请求的唯一标识符,用于追踪和调试。
-
data: 这是实际返回的数据对象,包含以下字段:
- list: 这是一个数组,包含请求的业务列表。由于在请求中指定了
size=1,所以此处只有一个对象。该对象包含以下属性:- articleId: 文章的唯一标识符。
- title: 文章的标题。
- description: 文章的描述。
- url: 文章的网址链接。
- type: 文章的类型,具体代表什么需要参考API文档或者询问API提供者。
- top: 是否置顶,false表示未置顶。
- forcePlan: 不清楚这个字段的具体含义,可能需要参考API文档或者询问API提供者。
- viewCount: 文章的浏览次数。
- commentCount: 文章的评论数量。
- editUrl: 编辑文章的链接。
- postTime: 文章的发布时间。
- diggCount: 文章的点赞数。
- formatTime: 格式化后的发布时间。
- picList: 文章中的图片列表。
- collectCount: 文章的收藏数量。
- total: 在满足请求条件(如用户名、业务类型等)的情况下,总的记录数量。
- list: 这是一个数组,包含请求的业务列表。由于在请求中指定了
综上,这个JSON响应表示成功获取了用户"Dontla"的博客文章列表(因为设置了size=1,所以只返回了一个结果)。该用户共有2557篇博客文章,最新的一篇文章的标题、描述、链接、类型、浏览次数、评论数量、编辑链接、发布时间、点赞数、图片列表和收藏数量都在响应中给出。
点赞为什么是digg?
digg"这个词在网络社区中经常被用来表示“点赞”或者“投票”。这个词的来源是一家名为Digg的美国新闻网站,用户可以对他们喜欢的文章进行“digg”,也就是投票,最受欢迎的文章会被推送到首页。因此,"digg"在很多网站和应用中都被用作代表用户点赞或者投票的动作。
Apipost测试接口
GET https://blog.csdn.net/community/home-api/v1/get-business-list?page=1&size=1&businessType=blog&orderby=&noMore=false&year=&month=&username=Dontla
(Apipost接口元数据)
{
    "parent_id": "0",
    "project_id": "-1",
    "target_id": "fdb84824-e558-48f1-9456-219ea5e9950e",
    "target_type": "api",
    "name": "新建接口",
    "sort": 1,
    "version": 0,
    "mark": "developing",
    "create_dtime": 1692028800,
    "update_dtime": 1692109242,
    "update_day": 1692028800000,
    "status": 1,
    "modifier_id": "-1",
    "method": "GET",
    "mock": "{}",
    "mock_url": "/community/home-api/v1/get-business-list",
    "url": "https://blog.csdn.net/community/home-api/v1/get-business-list?page=1&size=20&businessType=blog&orderby=&noMore=false&year=&month=&username=Dontla",
    "request": {
        "url": "https://blog.csdn.net/community/home-api/v1/get-business-list?page=1&size=20&businessType=blog&orderby=&noMore=false&year=&month=&username=Dontla",
        "description": "",
        "auth": {
            "type": "noauth",
            "kv": {
                "key": "",
                "value": ""
            },
            "bearer": {
                "key": ""
            },
            "basic": {
                "username": "",
                "password": ""
            },
            "digest": {
                "username": "",
                "password": "",
                "realm": "",
                "nonce": "",
                "algorithm": "",
                "qop": "",
                "nc": "",
                "cnonce": "",
                "opaque": ""
            },
            "hawk": {
                "authId": "",
                "authKey": "",
                "algorithm": "",
                "user": "",
                "nonce": "",
                "extraData": "",
                "app": "",
                "delegation": "",
                "timestamp": "",
                "includePayloadHash": -1
            },
            "awsv4": {
                "accessKey": "",
                "secretKey": "",
                "region": "",
                "service": "",
                "sessionToken": "",
                "addAuthDataToQuery": -1
            },
            "ntlm": {
                "username": "",
                "password": "",
                "domain": "",
                "workstation": "",
                "disableRetryRequest": 1
            },
            "edgegrid": {
                "accessToken": "",
                "clientToken": "",
                "clientSecret": "",
                "nonce": "",
                "timestamp": "",
                "baseURi": "",
                "headersToSign": ""
            },
            "oauth1": {
                "consumerKey": "",
                "consumerSecret": "",
                "signatureMethod": "",
                "addEmptyParamsToSign": -1,
                "includeBodyHash": -1,
                "addParamsToHeader": -1,
                "realm": "",
                "version": "1.0",
                "nonce": "",
                "timestamp": "",
                "verifier": "",
                "callback": "",
                "tokenSecret": "",
                "token": ""
            }
        },
        "body": {
            "mode": "none",
            "parameter": [],
            "raw": "",
            "raw_para": [],
            "raw_schema": {
                "type": "object"
            }
        },
        "event": {
            "pre_script": "",
            "test": ""
        },
        "header": {
            "parameter": []
        },
        "query": {
            "parameter": [
                {
                    "description": "",
                    "is_checked": 1,
                    "key": "page",
                    "type": "Text",
                    "not_null": 1,
                    "field_type": "String",
                    "value": "1"
                },
                {
                    "description": "",
                    "is_checked": 1,
                    "key": "size",
                    "type": "Text",
                    "not_null": 1,
                    "field_type": "String",
                    "value": "20"
                },
                {
                    "description": "",
                    "is_checked": 1,
                    "key": "businessType",
                    "type": "Text",
                    "not_null": 1,
                    "field_type": "String",
                    "value": "blog"
                },
                {
                    "description": "",
                    "is_checked": 1,
                    "key": "orderby",
                    "type": "Text",
                    "not_null": 1,
                    "field_type": "String",
                    "value": ""
                },
                {
                    "description": "",
                    "is_checked": 1,
                    "key": "noMore",
                    "type": "Text",
                    "not_null": 1,
                    "field_type": "String",
                    "value": "false"
                },
                {
                    "description": "",
                    "is_checked": 1,
                    "key": "year",
                    "type": "Text",
                    "not_null": 1,
                    "field_type": "String",
                    "value": ""
                },
                {
                    "description": "",
                    "is_checked": 1,
                    "key": "month",
                    "type": "Text",
                    "not_null": 1,
                    "field_type": "String",
                    "value": ""
                },
                {
                    "description": "",
                    "is_checked": 1,
                    "key": "username",
                    "type": "Text",
                    "not_null": 1,
                    "field_type": "String",
                    "value": "Dontla"
                }
            ]
        },
        "cookie": {
            "parameter": []
        },
        "resful": {
            "parameter": []
        }
    },
    "response": {
        "success": {
            "raw": "",
            "parameter": [],
            "expect": {
                "name": "成功",
                "isDefault": 1,
                "code": 200,
                "contentType": "json",
                "verifyType": "schema",
                "mock": "",
                "schema": {}
            }
        },
        "error": {
            "raw": "",
            "parameter": [],
            "expect": {
                "name": "失败",
                "isDefault": -1,
                "code": 404,
                "contentType": "json",
                "verifyType": "schema",
                "mock": "",
                "schema": {}
            }
        }
    },
    "is_first_match": 1,
    "ai_expect": {
        "list": [],
        "none_math_expect_id": "error"
    },
    "enable_ai_expect": -1,
    "enable_server_mock": -1,
    "is_example": -1,
    "is_locked": -1,
    "is_check_result": 1,
    "check_result_expectId": "",
    "is_changed": -1,
    "is_saved": -1
}
编写python代码(注意有反爬虫策略,需要设置请求头)(成功)
网站反爬虫策略:一些网站会通过识别请求头(User-Agent)来判断是否为机器人行为。解决方法是添加合适的请求头:
headers = {
    "User-Agent": "Mozilla/5.0 (Windows NT 10.0; Win64; x64) AppleWebKit/537.36 (KHTML, like Gecko) Chrome/89.0.4389.82 Safari/537.36"
}
response = requests.get(url, headers=headers)
完整代码:
import requests
import json

# 定义变量存储所有文章信息
articles = []

# 设置初始分页
page = 1

# 设置每页查询数量
page_size = 50

while True:
    # 构建请求url
    url = f"https://blog.csdn.net/community/home-api/v1/get-business-list?page={page}&size={page_size}&businessType=blog&orderby=&noMore=false&year=&month=&username=Dontla"

    # 发送GET请求
    # response = requests.get(url)
    # 防止反爬虫策略
    headers = {
        "User-Agent": "Mozilla/5.0 (Windows NT 10.0; Win64; x64) AppleWebKit/537.36 (KHTML, like Gecko) Chrome/89.0.4389.82 Safari/537.36"
    }
    response = requests.get(url, headers=headers)

    # 如果请求成功
    if response.status_code == 200:

        # print(f'response.content: {response.content}')
        # print(f'response.text: {response.text}')


        # 检查响应是否为空
        if response.text:
            # 解析JSON响应
            try:
                data = response.json()
            except json.JSONDecodeError:
                print(f"Error parsing JSON: {response.text}")
                break

            # 遍历每个文章
            for article in data['data']['list']:
                print(f"page: {page}, {article['url']}")
                # 获取并保存需要的信息
                articles.append({
                    'title': article['title'],
                    'url': article['url'],
                    'type': article['type'],
                    'postTime': article['postTime']
                })

            # 判断是否还有更多文章,如果没有则结束循环
            if len(data['data']['list']) < page_size:
                break

            # 增加分页数以获取下一页的文章
            page += 1
        else:
            print("Response is empty")
            break
    else:
        print(f"Error: {response.status_code}")
        break

# 将结果保存为json文件
with open('articles.json', 'w') as f:
    json.dump(articles, f, ensure_ascii = False, indent = 4)
注意,最大单次查询上限为100,我一开始把每页查询数量page_size设置成200,发现不行,后来设置成100以下就ok了,为了保证速度,我就设置成100:
这是代码运行结果:
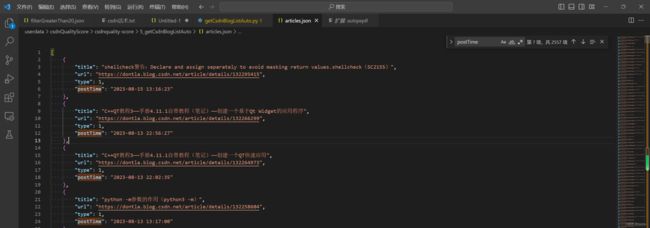
这是生成的j’son文件:
总共2557个元素,跟我的博文数量相符:
