CSS入门学习笔记(案例+详解)
CSS入门学习笔记
-
- 一、CSS简介
-
- 1、什么是CSS?
- 2、为什么使用CSS?
- 3、CSS的作用
- 二、CSS语法
-
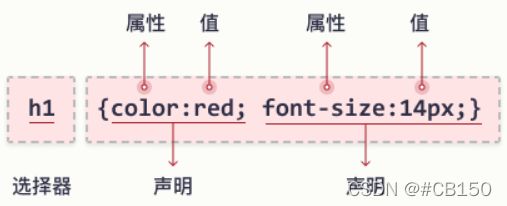
- 1、CSS基础语法
- 2、CSS注释语法
- 3、CSS应用方法
- 三、CSS选择器
-
- 1、元素选择器
- 2、类选择器
- 3、ID选择器
- 4、组合选择器
- 5、后代选择器
- 6、子元素选择器
- 7、兄弟选择器
- 8、全局选择器
- 9、伪类选择器
- 10、选择器优先级
- 四、CSS常用属性
-
- 1、字体属性
- 2、文本属性
- 3、列表属性
- 4、表格属性
- 5、背景属性
- 6、对齐方式
- 7、盒子模型
- 五、CSS定位
-
- 1、`static`定位
- 2、`fixed` 定位
- 3、`relative` 定位
- 4、`absolute` 定位
- 5、`sticky` 定位
- 6、重叠的元素
- 六、CSS浮动
-
- 1、什么是 CSS Float(浮动)?
- 2、元素怎样浮动
- 3、彼此相邻的浮动元素
- 4、清除浮动 - 使用 clear
- 七、CSS网页布局
-
- 1、网页布局
- 2、头部区域
- 3、菜单导航区域
- 4、内容区域
- 5、底部区域
- 6、响应式网页布局
一、CSS简介
1、什么是CSS?
- CSS 指的是层叠样式表 (Cascading Style Sheets)
- CSS 描述了如何在屏幕、纸张或其他媒体上显示 HTML 元素
2、为什么使用CSS?
- 层叠样式复用,便于后期维护和修改
- 可控制内容与样式的布局,让页面更精美
3、CSS的作用
- 对网页的布局、颜色、背景、宽度、高度、字体进行控制
- 用于布局和定位,设置页面的外观样式,让页面更精美
二、CSS语法
1、CSS基础语法
<head>
	<style>
		选择器{
			属性名:属性值;
			属性名:属性值;
		}
	style>
head>
- 实例:所有
元素都将居中对齐,并带有红色文本颜色:
color是属性,red是属性值text-align是属性,center是属性值p是 CSS 中的选择器(它指向要设置样式的 HTML 元素:)
2、CSS注释语法
CSS注释:
/* 注释内容 */
- 实例:
/* body定义 */
body{ text-align:center; margin:0 auto;}
- CSS注释:对代码进行解释说明,便于后期维护和修改
3、CSS应用方法
- 内嵌样式:
在页面头部通过style标签定义,对当前页面中所有符合样式选择器的标签都起作用
doctype html>
<html lang="en">
<head>
	<meta charset="UTF-8">
	<title>CSS语法title>
	<style>
	p{
	   font-size:12px;    /*字号*/
	   color:blue;        /*文字颜色*/
	   font-weight:bold;  /*加粗*/
	}
	style>
head>
<body>
	<p>天使投资指早期投资,尤其指个人早期投资。p>
	<p>VC,Venture Capital,所谓风险投资、创业投资,是相对靠前的非公开市场股权投资。p>
	<p>PE, Private Equity,所谓私募资本、非公开市场资本,既是私募股权投资的统称,又特指相对靠后的股权投资。p>
body>
html>
- 行内样式:
在HTML标签内定义style属性,只对设置style属性的标签起作用
DOCTYPE HTML>
<html>

<head>
    <meta charset="UTF-8">
    <title>行内样式title>
head>

<body>

    <p style="font-size:12px;color:blue;font-weight:bold;">
        天使投资指早期投资,尤其指个人早期投资。
    p>

    <p>VC,Venture Capital,所谓风险投资、创业投资,是相对靠前的非公开市场股权投资。p>
body>

html>
- 外部样式
单独定义一个.CSS文件,然后在页面中使用link标签或@import指令导入html文件里面 - 使用
link标签链接外部样式
"stylesheet" href="CSS文件路径" type="text/css" />
- 使用
@import 指令导入外部样式
三、CSS选择器
1、元素选择器
- 使用HTML标签作为选择器的名称,也称为标签选择器
doctype html>
<html lang="en">

<head>
  <meta charset="UTF-8">
  <title>Documenttitle>
  <style type="text/css">
    p {
      font-size: 16px;
      color: red;
    }

    h1 {
      font-size: 20px;
      color: blue;
    }
  style>
head>

<body>
  <h1>标题h1>
  <p>正文的段落p>
body>

html>
2、类选择器
- 使用自定义的名称,以
.号作为前缀,通过HTML标签的class属性调用类选择器
DOCTYPE html>
<html lang="en">

<head>
    <meta charset="UTF-8">
    <meta name="viewport" content="width=device-width, initial-scale=1.0">
    <title>Documenttitle>
    <style>
        .big {
            font-size: 40px;
        }
        .color {
            color: blue;
        }
    style>
head>

<body>
    <p class="big">HTMLp>
    <p>超文本标记语言p>
    <p class="big color">CSSp>
    <p>层叠样式表p>
body>

html>
- 类选择器名称不能以
数字开头 - 调用时不能添加
.号 - 同时调用多个类选择器时,以
空格分隔
3、ID选择器
- 使用自定义名称,以
#作为前缀,通过HTML标签的id属性进行名称匹配
doctype html>
<html lang="en">

<head>
  <meta charset="UTF-8">
  <title>id选择器title>
  <style type="text/css">
    #center {
      text-align: center;
    }
    #left {
      text-align: left;
    }
  style>
head>

<body>
  <div id="center">
    <p>前端技术构成p>
  div>
  <div id="left">
    <p>前端技术构成p>
  div>
body>

html>
4、组合选择器
- 将多个具有相同样式的选择器放在一起声明,使用逗号隔开
- 注意:使用
空格时不区分父子还是后代,使用CSS3中新增的>时必须是父子关系
doctype html>
<html lang="en">
<head>
	<meta charset="UTF-8" />
	<title>派生选择器title>
	<style type="text/css">
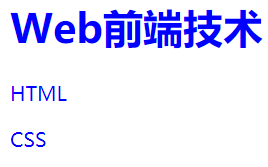
	h1,p {
		color: blue;
	}
	style>
head>
<body>
	<h1>Web前端技术h1>
	<p>HTMLp>
	<p>CSSp>
body>
html>
5、后代选择器
- 在某个选择器内部再设置选择器,通过空格隔开
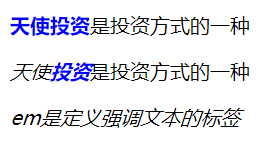
- 下面为实例,当p和strong嵌套使用时起样式效果
doctype html>
<html lang="en">

<head>
	<meta charset="UTF-8">
	<title>后代选择器title>
	<style>
		p strong {
			color: blue;
		}
	style>
head>

<body>

	<p><strong>天使投资strong>是投资方式的一种p>

	<p><em>天使<strong>投资strong>em>是投资方式的一种p>
	<em>em是定义强调文本的标签em>

body>

html>
6、子元素选择器
- 注意:使用CSS3中新增的
>时必须是父子关系 - 下面为实例,
p的直接子元素strong被设置
doctype html>
<html lang="en">

<head>
    <meta charset="UTF-8">
    <title>子元素选择器title>
    <style>
        /*子元素选择器:p的直接子元素strong被设置*/
        p>strong {
            color: blue;
        }
    style>
head>

<body>

    <p><strong>天使投资strong>是投资方式的一种p>

    <p><em>天使<strong>投资strong>em>是投资方式的一种p>
body>

html>
7、兄弟选择器
- 元素1+元素2
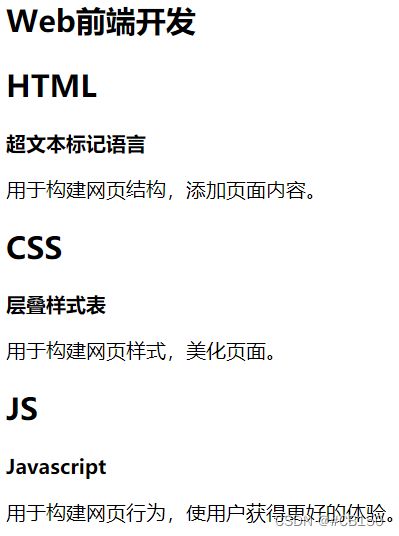
- 下面为实例,当
h2和p标签一起使用时 起样式效果
doctype html>
<html lang="en">

<head>
    <meta charset="UTF-8">
    <title>Documenttitle>
    <style>
        h2+p {
            font-weight: bold;
        }
    style>
head>

<body>
    <article>
        <h1>Web前端开发h1>
        <h2>HTMLh2>

        <p>超文本标记语言p>
        <p>用于构建网页结构,添加页面内容。p>
        <h2>CSSh2>
        <p>层叠样式表p>
        <p>用于构建网页样式,美化页面。p>
        <h2>JSh2>
        <p>Javascriptp>

        <p> 用于构建网页行为,使用户获得更好的体验。p>
    article>
body>

html>
8、全局选择器
- 当以
*作为选择器,对全局标签都起样式效果
doctype html>
<html lang="en">
<head>
	<meta charset="UTF-8" />
	<title>Documenttitle>
	<style type="text/css">
	* {
		color:dodgerblue
	}
	style>
head>
<body>
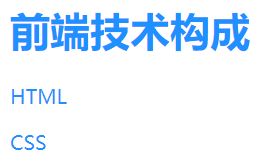
	<h1>前端技术构成h1>
	<p>HTMLp>
	<p>CSSp>
body>
html>
9、伪类选择器
- 根据不同的状态显示不同的样式,常用于标签
| 状态 | 说明 |
|---|---|
:link |
选择所有未访问的链接 |
:visited |
选择所有已访问的链接 |
:hover |
把鼠标放在链接上的状态 |
:active |
选择正在活动链接 |
DOCTYPE html>
<html lang="en">
<head>
	<meta charset="UTF-8">
	<title>伪类选择器title>
	<style>
		a:link,a:visited{
			color:#d82727;
			font-size: 13px;
			text-decoration: none;
		}
		a:hover,a:active{
			color:#ff7300;
			text-decoration: underline;
		}
		/*普通的标签也可以使用伪类选择器*/
		p:hover{
			color:red;
		}
		p:active{
			color:blue;
		}
	style>
head>
<body>
	<a href="伪类选择器.html">伪类选择器.htmla>
	<p>CSS从入门到精通!p>
body>
html>
10、选择器优先级
1、行内样式 > ID选择器 > 类选择器 > 标签选择器
2、同一优先级时,后加载的会覆盖先加载的同名样式,所以离的越近
越优先
3、可以用 !important 定义最高优先级
DOCTYPE html PUBLIC "-//W3C//DTD HTML 4.01 Transitional//EN" "http://www.w3.org/TR/html4/loose.dtd">
<html>
<head>
<meta http-equiv="Content-Type" content="text/html; charset=UTF-8">
<title>Insert title heretitle>
<style type="text/css">
    .p1{
        color:blue;/*1没加important 显示为红色   */
    }

    .p2{
        color:blue;
        color:red!important;/*2加上了important属性优先级高 显示为红色   */
    }
style>

head>
<body>
<p class="p1">1没加importantp>
<p class="p2">2加了important属性p>
body>
html>
四、CSS常用属性
1、字体属性
| 属性 | 作用 |
|---|---|
font-size |
设置文本的大小 |
font-weight |
设置文本的粗细 |
font-family |
设置文本的字体 |
font-style |
指定文本的字体样式 |
font |
在一个声明中设置所有的字体属性 |
DOCTYPE html>
<html lang="en">
<head>
	<meta charset="UTF-8">
	<title>Documenttitle>
	<style>
		div{
			font-size: 30px;
		}
		p{
			/*font-size: 20px;*/
			font-size: 80%;
		}
		.hello{
			font-size: 2em;
		}
		body{
			font-size: 62.5%;
		}
		ul li{
			/*font-size: 30px;
			font-weight: bold;
			font-family: 华文行楷,宋体,黑体;
			font-style: italic;*/
			font: italic bold 30px 微软雅黑;
		}
	style>
head>
<body>
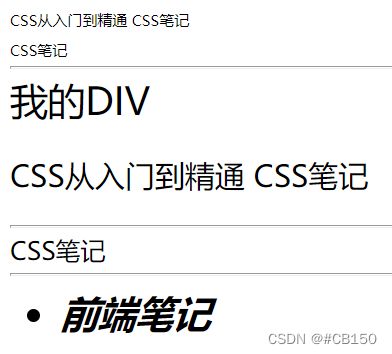
	<p>
		CSS从入门到精通
		<span>CSS笔记span>
	p>
	<span>CSS笔记span>
	<hr>

	<div>
		我的DIV
		<p>
			CSS从入门到精通
			<span>CSS笔记span>
		p>
	div>
	<hr>

	<span class="hello">CSS笔记span>
	<hr>

	<ul>
		<li>
			前端笔记
		li>
	ul>
body>
html>
2、文本属性
| 属性 | 作用 |
|---|---|
color |
设置文本颜色 |
direction |
设置文本方向 |
letter-spacing |
设置字符间距 |
line-height |
设置行高 |
text-align |
对齐元素中的文本 |
text-decoration |
向文本添加修饰 |
text-indent |
缩进元素中文本的首行 |
white-space |
设置元素中空白的处理方式 |
word-spacing |
设置字间距 |
DOCTYPE html>
<html lang="en">
<head>
	<meta charset="UTF-8">
	<title>Documenttitle>
	<style>
		p{
			color: red;
			/*background-color: #ccc;*/
			/*background-color: rgba(0,255,0,0.5);*/
			background-color: rgba(197, 15, 234, 0.5);
			line-height: 50px;
			text-align: center;
		}
		img{
			vertical-align: middle;
		}
		div{
			text-indent: 30px;
		}
		span{
			font-size: 30px;
			text-decoration: underline;
			text-transform: capitalize;
			letter-spacing: 10px;
			world-spacing:;
		}
		h3{
			width: 300px;
			height: 200px;
			background-color:#ccc;
			white-space: nowrap;
			overflow:hidden;
		}
	style>
head>
<body>
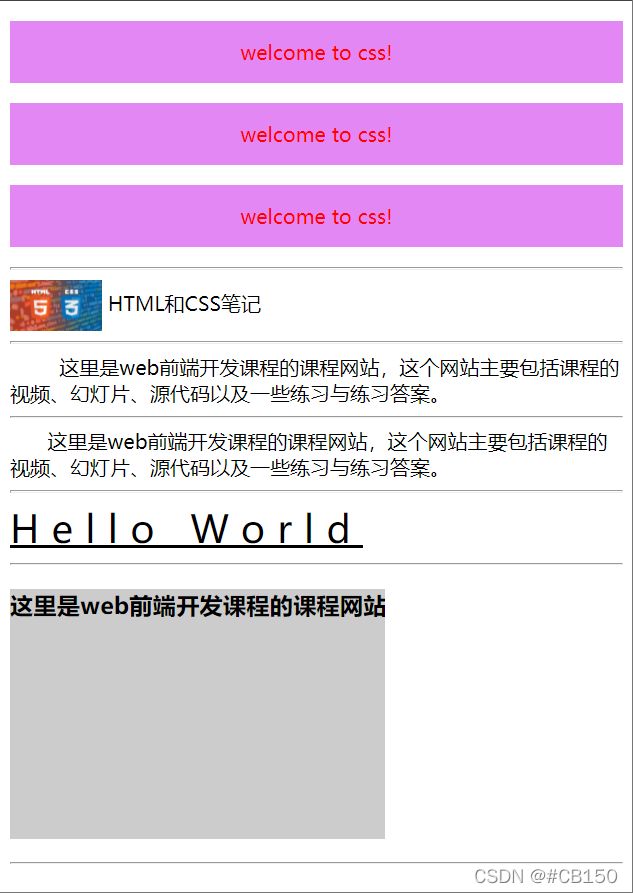
	<p>welcome to css!p>
	<p>welcome to css!p>
	<p>welcome to css!p>
	<hr>

	<img src="css.png" alt="" width="15%">
	HTML和CSS笔记
	<hr>


	<div>  这里是web前端开发课程的课程网站,这个网站主要包括课程的视频、幻灯片、源代码以及一些练习与练习答案。div>
	<hr>
	<div>这里是web前端开发课程的课程网站,这个网站主要包括课程的视频、幻灯片、源代码以及一些练习与练习答案。div>
	<hr>

	<span>hello worldspan>
	<hr>

	<h3>这里是web前端开发课程的课程网站,这个网站主要包括课程的视频、幻灯片、源代码以及一些练习与练习答案。h3>
	<hr>
body>
html>
3、列表属性
| 属性 | 作用 |
|---|---|
list-style-type |
设置列表项标志的类型 |
list-style-image |
将图像设置为列表项标志 |
list-style-position |
设置列表中列表项标志的位置 |
list-style |
简写 |
doctype html>
<html lang="en">
<head>
  <meta charset="UTF-8" />
  <title>Documenttitle>
<style type="text/css">
	#othernews {
		text-align:left;
		font-size:14px;
		line-height:1.5em;
		list-style-image:url(images/bullet1.gif);
	}
	a:link {
		color: #09f;/*浅蓝*/
		text-decoration: none;
	}
	a:visited {
		text-decoration: none;
		color: #930;/*红*/
	}
	a:hover {
		text-decoration: underline;
		color: #03c;/*深蓝*/
	}
	a:active {
		text-decoration: none;
		color: #03c;/*深蓝*/
	}
style>
head>

<body>
	<div id = "othernews">
	相关阅读:
	<ul>
	  <li><a href="#" >迪拜华商财富缩水 瞻望前景信心犹豫a>li>
	  <li><a href="#" >全球华商总资产恢复增至3.9万亿美元a>li>
	  <li><a href="#" >华商基金胡宇权:行业不平衡将带来投资机会a>li>
	ul>
	div>
body>
html>
4、表格属性
- border-collapse 属性设置表格的边框是否被折叠成一个单一的边框或隔开
- Width和height属性定义表格的宽度和高度
- text-align属性设置水平对齐方式,向左,右,或中心
DOCTYPE html>
<html lang="en">

<head>
    <meta charset="UTF-8">
    <title>Documenttitle>
    <style>
        body {
            font: 14px/2em "宋体";
        }

        table {
            width: 300px;
            margin: 0 auto;
            /*表格在article里面居中*/
            border-collapse: collapse;
            /*表格边框重合*/
            font-size: 12px;
            border: 1px solid;
        }

        caption {
            letter-spacing: 3px;
            /*表格标题字符间距*/
        }

        tbody tr:nth-child(odd) {

            /*表格主体的奇数行背景为浅蓝色*/
            background-color: lightblue;
        }

        td,
        th {
            /* border: 1px solid; */
            text-align: center;
        }
    style>
head>

<body>
    <table>

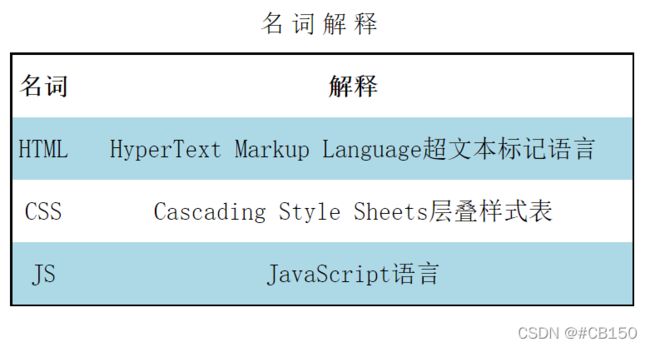
        <caption>名词解释caption>
        <thead>


            <tr>

                <th> 名词 th>
                <th> 解释 th>
            tr>
        thead>
        <tbody>

            <tr>

                <td>HTMLtd>
                <td>HyperText Markup Language超文本标记语言td>

            tr>
            <tr>

                <td>CSStd>
                <td>Cascading Style Sheets层叠样式表td>
            tr>
            <tr>

                <td>JStd>
                <td>JavaScript语言td>
            tr>
        tbody>
    table>

body>

html>
5、背景属性
| 属性 | 作用 |
|---|---|
background |
简写 |
background-attachment |
背景图像是否固定或者随着页面的其余部分滚动 |
background-color |
设置元素的背景颜色 |
background-image |
把图像设置为背景 |
background-position |
设置背景图像的起始位置 |
background-repeat |
设置背景图像是否及如何重复 |
- index.css文件
body{
	background-color: #E0E0E0;
}
h1{
	background-color: #33CC66;
}
p{
	background-color: #FFFFFF;
}
- html文件
<!DOCTYPE>
<html>
    <head>
    	<meta charset="utf-8">
        <title>CSS学习title>
        <link rel="stylesheet" type="text/css" href="index.css">
    head>
    <body>
        <h1>Web前端开发h1>
        <p>段落背景为白色p>
        <p>段落背景为白色p>
        <p>段落背景为白色p>
    body>
html>
6、对齐方式
1、text-align——文本对齐
- 规定元素中的文本的水平对齐方式
| 属性值 | 描述 |
|---|---|
left |
默认值,文本排列到左边 |
right |
文本排列到右边 |
center |
文本排列到中间 |
justify |
文本两端对齐 |
| 实例: |
DOCTYPE html>
<html>
<head>
<meta charset="utf-8">
<title>CSStitle>
<style>
.center {
    text-align: center;
    border: 3px solid green;
}
style>
head>
<body>

<h2>文本居中对齐h2>

<div class="center">
  <p>文本居中对齐。p>
div>

body>
DOCTYPE html>
<html>
<head>
<meta charset="utf-8">
<title>CSStitle>
<style>
.center {
    margin: auto;
    width: 60%;
    border: 3px solid #73AD21;
    padding: 10px;
}
style>
head>
<body>

<h2>元素居中对齐h2>
<p>水平居中块级元素 (如 div), 可以使用 margin: auto;p>

<div class="center">
  <p><b>注意: b>使用 margin:auto 无法兼容 IE8, 除非 !DOCTYPE 已经声明。p>
div>

body>
html>
DOCTYPE html>
<html>
<head>
<style>
.right {
    position: absolute;
    right: 0px;
    width: 300px;
    border: 3px solid #73AD21;
    padding: 10px;
}
style>
head>
<body>

<h2>右对齐h2>
<p>以下实例演示了如何使用 position 来实现右对齐:p>

<div class="right">
  <p>菜鸟教程 -- 学的不仅是技术,更是梦想!!p>
div>

body>
html>
DOCTYPE html>
<html>
<head>
<meta charset="utf-8">
<title>CSStitle>
<style>
.right {
    float: right;
    width: 300px;
    border: 3px solid #73AD21;
    padding: 10px;
}
style>
head>
<body>

<h2>右对齐h2>
<p>以下实例演示了使用 float 属性来实现右对齐:p>

<div class="right">
  <p>我老爹在小时候给我的一些人生建议,我现在还记忆深刻。p>
div>

body>
html>
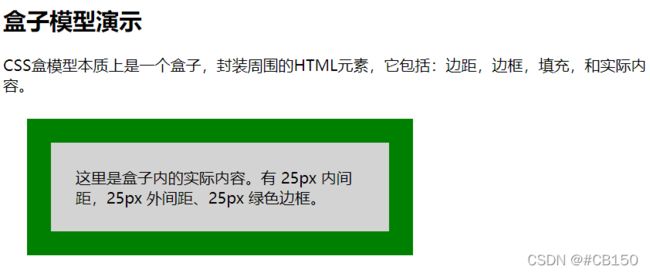
7、盒子模型
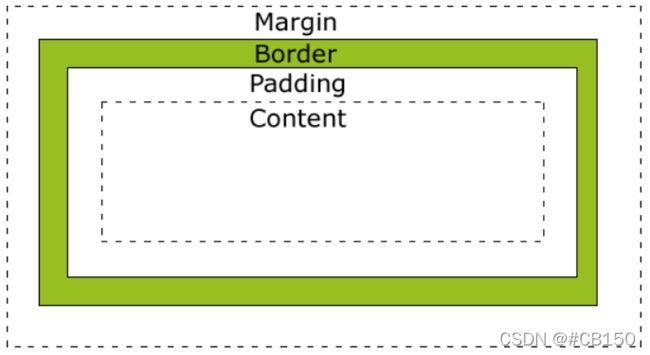
盒子模型是网页布局的基础,将页面中所有元素都看作是一个盒子,盒子都包含以下几个属性:
- width 宽度
- height 高度
- border 边框——围绕在内边距和内容外的边框
- padding 内边距——清除内容周围的区域,内边距是透明的
- margin 外边距——清除边框外的区域,外边距是透明的
- content 内容——盒子的内容,显示文本和图像
DOCTYPE html>
<html>
<head>
<meta charset="utf-8">
<title>CSS入门title>
<style>
div {
    background-color: lightgrey;
    width: 300px;
    border: 25px solid green;
    padding: 25px;
    margin: 25px;
}
style>
head>
<body>

<h2>盒子模型演示h2>

<p>CSS盒模型本质上是一个盒子,封装周围的HTML元素,它包括:边距,边框,填充,和实际内容。p>

<div>这里是盒子内的实际内容。有 25px 内间距,25px 外间距、25px 绿色边框。div>

body>
html>
五、CSS定位
position 属性指定了元素的定位类型。
position 属性的五个值:
- static
- relative
- fixed
- absolute
- sticky
元素可以使用的顶部,底部,左侧和右侧属性定位。然而,这些属性无法工作,除非是先设定position属性。他们也有不同的工作方式,这取决于定位方法。
1、static定位
- HTML 元素的默认值,即没有定位,遵循正常的文档流对象
- 静态定位的元素不会受到 top, bottom, left, right影响
DOCTYPE html>
<html>
<head>
<meta charset="utf-8">
<title>titletitle>
<style>
div.static {
    position: static;
    border: 3px solid #73AD21;
}
style>
head>
<body>

<h2>position: static;h2>

<p>使用 position: static; 定位的元素,无特殊定位,遵循正常的文档流对象:p>

<div class="static">
该元素使用了 position: static;
div>
2、fixed 定位
- 元素的位置相对于浏览器窗口是固定位置
- 即使窗口是滚动的它也不会移动:
DOCTYPE html>
<html>
<head>
<meta charset="utf-8">
<title>titletitle>
<style>
p.pos_fixed
{
	position:fixed;
	top:30px;
	right:5px;
}
style>
head>
<body>

<p class="pos_fixed">Some more textp>
<p><b>注意:b> IE7 和 IE8 支持只有一个 !DOCTYPE 指定固定值.p>
<p>Some textp><p>Some textp><p>Some textp><p>Some textp><p>Some textp><p>Some textp><p>Some textp><p>Some textp><p>Some textp><p>Some textp><p>Some textp><p>Some textp><p>Some textp><p>Some textp><p>Some textp><p>Some textp>
body>
html>

注意: Fixed 定位在 IE7 和 IE8 下需要描述 !DOCTYPE 才能支持。
Fixed定位使元素的位置与文档流无关,因此不占据空间。
Fixed定位的元素和其他元素重叠。
3、relative 定位
- 相对定位元素的定位是相对其正常位置
DOCTYPE html>
<html>
<head>
<meta charset="utf-8">
<title>css教程title>
<style>
h2.pos_left
{
	position:relative;
	left:-20px;
}

h2.pos_right
{
	position:relative;
	left:20px;
}
style>
head>

<body>
<h2>这是位于正常位置的标题h2>
<h2 class="pos_left">这个标题相对于其正常位置向左移动h2>
<h2 class="pos_right">这个标题相对于其正常位置向右移动h2>
<p>相对定位会按照元素的原始位置对该元素进行移动。p>
<p>样式 "left:-20px" 从元素的原始左侧位置减去 20 像素。p>
<p>样式 "left:20px" 向元素的原始左侧位置增加 20 像素。p>
body>

html>
- 移动相对定位元素,但它原本所占的空间不会改变。
DOCTYPE html>
<html>
<head>
<meta charset="utf-8">
<title>css教程title>
<style>
h2.pos_top
{
	position:relative;
	top:-50px;
}
style>
head>

<body>
<h2>这是一个没有定位的标题h2>
<h2 class="pos_top">这个标题是根据其正常位置向上移动h2>
<p><b>注意:b> 即使相对定位元素的内容是移动,预留空间的元素仍保存在正常流动。p>
body>

html>
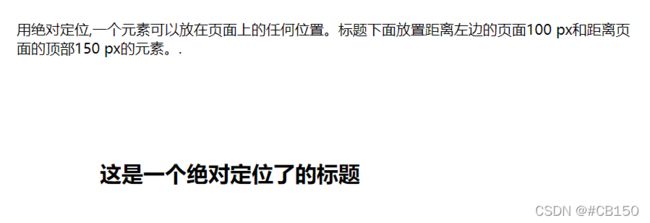
4、absolute 定位
- 绝对定位的元素的位置相对于最近的已定位父元素,如果元素没有已定位的父元素,那么它的位置相对于:
DOCTYPE html>
<html>
<head>
<meta charset="utf-8">
<title>css教程title>
<style>
h2
{
	position:absolute;
	left:100px;
	top:150px;
}
style>
head>

<body>
<h2>这是一个绝对定位了的标题h2>
<p>用绝对定位,一个元素可以放在页面上的任何位置。标题下面放置距离左边的页面100 px和距离页面的顶部150 px的元素。.p>
body>

html>
5、sticky 定位
- sticky 英文字面意思是粘,粘贴,所以可以把它称之为粘性定位
- position: sticky; 基于用户的滚动位置来定位
- 粘性定位的元素是依赖于用户的滚动,在 position:relative 与 position:fixed 定位之间切换
- 它的行为就像 position:relative; 而当页面滚动超出目标区域时,它的表现就像 position:fixed;,它会固定在目标位置
- 元素定位表现为在跨越特定阈值前为相对定位,之后为固定定位
- 这个特定阈值指的是 top, right, bottom 或 left 之一,换言之,指定 top, right, bottom 或 left 四个阈值其中之一,才可使粘性定位生效。否则其行为与相对定位相同
DOCTYPE html>
<html>
<head>
<meta charset="utf-8">
<title>CSS教程title>
<style>
div.sticky {
  position: -webkit-sticky;
  position: sticky;
  top: 0;
  padding: 5px;
  background-color: #cae8ca;
  border: 2px solid #4CAF50;
}
style>
head>
<body>

<p>尝试滚动页面。p>
<p>注意: IE/Edge 15 及更早 IE 版本不支持 sticky 属性。p>

<div class="sticky">我是粘性定位!div>

<div style="padding-bottom:2000px">
  <p>滚动我p>
  <p>来回滚动我p>
  <p>滚动我p>
  <p>来回滚动我p>
  <p>滚动我p>
  <p>来回滚动我p>
div>

body>
html>
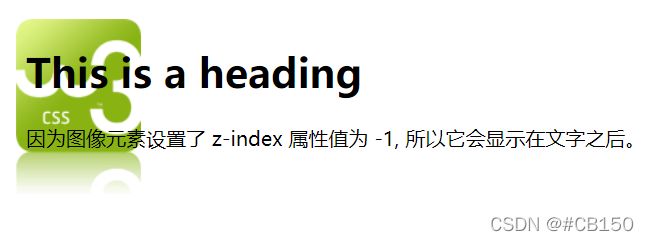
6、重叠的元素
- 元素的定位与文档流无关,所以它们可以覆盖页面上的其它元素
- z-index属性指定了一个元素的堆叠顺序(哪个元素应该放在前面,或后面)
- 一个元素可以有正数或负数的堆叠顺序:
DOCTYPE html>
<html>
<head>
<meta charset="utf-8">
<title>CSS教程title>
<style>
img
{
	position:absolute;
	left:0px;
	top:0px;
	z-index:-1;
}
style>
head>

<body>
<h1>This is a headingh1>
<img src="w3css.gif" width="100" height="140" />
<p>因为图像元素设置了 z-index 属性值为 -1, 所以它会显示在文字之后。p>
body>
html>
六、CSS浮动
1、什么是 CSS Float(浮动)?
- CSS 的 Float(浮动),会使元素向左或向右移动,其周围的元素也会重新排列
- Float(浮动),往往是用于图像,但它在布局时一样非常有用
2、元素怎样浮动
元素的水平方向浮动,意味着元素只能左右移动而不能上下移动。
一个浮动元素会尽量向左或向右移动,直到它的外边缘碰到包含框或另一个浮动框的边框为止。
浮动元素之后的元素将围绕它。
浮动元素之前的元素将不会受到影响。
如果图像是右浮动,下面的文本流将环绕在它左边:
DOCTYPE html>
<html>
<head>
<meta charset="utf-8">
<title>CSS教程title>
<style>
img
{
	float:right;
}
style>
head>

<body>
<p>在下面的段落中,我们添加了一个 <b>float:rightb> 的图片。导致图片将会浮动在段落的右边。p>
<p>
<img src="logocss.gif" width="95" height="84" />
这是一些文本。这是一些文本。这是一些文本。
这是一些文本。这是一些文本。这是一些文本。
这是一些文本。这是一些文本。这是一些文本。
这是一些文本。这是一些文本。这是一些文本。
这是一些文本。这是一些文本。这是一些文本。
这是一些文本。这是一些文本。这是一些文本。
这是一些文本。这是一些文本。这是一些文本。
这是一些文本。这是一些文本。这是一些文本。
这是一些文本。这是一些文本。这是一些文本。
这是一些文本。这是一些文本。这是一些文本。
p>
body>

html>
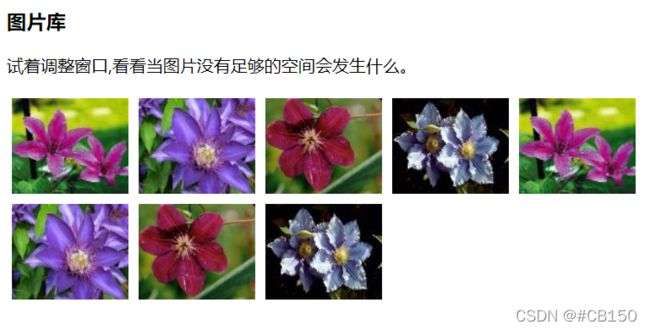
3、彼此相邻的浮动元素
如果你把几个浮动的元素放到一起,如果有空间的话,它们将彼此相邻。
在这里,我们对图片廊使用 float 属性:
DOCTYPE html>
<html>
<head>
<meta charset="utf-8">
<title>CSS教程title>
<style>
.thumbnail
{
float:left;
width:110px;
height:90px;
margin:5px;
}
style>
head>
<body>
<h3>图片库h3>
<p>试着调整窗口,看看当图片没有足够的空间会发生什么。p>
<img class="thumbnail" src="/images/klematis_small.jpg" width="107" height="90">
<img class="thumbnail" src="/images/klematis2_small.jpg" width="107" height="80">
<img class="thumbnail" src="/images/klematis3_small.jpg" width="116" height="90">
<img class="thumbnail" src="/images/klematis4_small.jpg" width="120" height="90">
body>
html>
4、清除浮动 - 使用 clear
元素浮动之后,周围的元素会重新排列,为了避免这种情况,使用 clear 属性。
clear 属性指定元素两侧不能出现浮动元素。
使用 clear 属性往文本中添加图片廊:
DOCTYPE html>
<html>
<head>
<meta charset="utf-8">
<title>CSS教程title>
<style>
.thumbnail
{
	float:left;
	width:110px;
	height:90px;
	margin:5px;
}
.text_line
{
	clear:both;
	margin-bottom:2px;
}
style>
head>

<body>
<h3>图片库h3>
<p>试着调整窗口,看看当图片没有足够的空间会发生什么。.p>
<img class="thumbnail" src="/images/klematis_small.jpg" width="107" height="90">
<img class="thumbnail" src="/images/klematis2_small.jpg" width="107" height="80">
<img class="thumbnail" src="/images/klematis3_small.jpg" width="116" height="90">
<img class="thumbnail" src="/images/klematis4_small.jpg" width="120" height="90">
<h3 class="text_line">第二行h3>
<img class="thumbnail" src="/images/klematis_small.jpg" width="107" height="90">
<img class="thumbnail" src="/images/klematis2_small.jpg" width="107" height="80">
<img class="thumbnail" src="/images/klematis3_small.jpg" width="116" height="90">
<img class="thumbnail" src="/images/klematis4_small.jpg" width="120" height="90">
body>
html>
七、CSS网页布局
1、网页布局
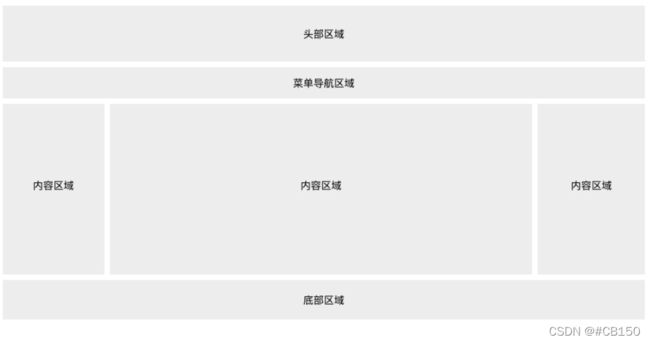
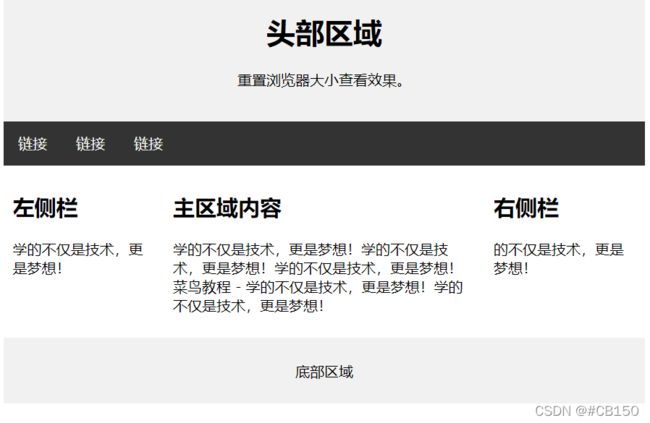
- 网页布局有很多种方式,一般分为以下几个部分:头部区域、菜单导航区域、内容区域、底部区域。
2、头部区域
- 头部区域位于整个网页的顶部,一般用于设置网页的标题或者网页的 logo:
DOCTYPE html>
<html>
<head>
<meta charset="utf-8">
<title>CSS 网页布局 title>
<meta name="viewport" content="width=device-width, initial-scale=1">
<style>
body {
  margin: 0;
}

/* 头部样式 */
.header {
  background-color: #f1f1f1;
  padding: 20px;
  text-align: center;
}
style>
head>
<body>

<div class="header">
  <h1>头部区域h1>
div>

body>
html>
3、菜单导航区域
- 菜单导航条包含了一些链接,可以引导用户浏览其他页面:
DOCTYPE html>
<html>
<head>
<meta charset="utf-8">
<title>CSS 网页布局 title>
<meta name="viewport" content="width=device-width, initial-scale=1">
<style>
* {
  box-sizing: border-box;
}

body {
  margin: 0;
}

/* 头部样式 */
.header {
  background-color: #f1f1f1;
  padding: 20px;
  text-align: center;
}

/* 导航条 */
.topnav {
  overflow: hidden;
  background-color: #333;
}

/* 导航链接 */
.topnav a {
  float: left;
  display: block;
  color: #f2f2f2;
  text-align: center;
  padding: 14px 16px;
  text-decoration: none;
}

/* 链接 - 修改颜色 */
.topnav a:hover {
  background-color: #ddd;
  color: black;
}
style>
head>
<body>

<div class="header">
  <h1>头部区域h1>
div>

<div class="topnav">
  <a href="#">链接a>
  <a href="#">链接a>
  <a href="#">链接a>
div>

body>
html>
4、内容区域
我们将创建一个 3 列布局,在小的屏幕上将会变成 1 列布局(响应式):
DOCTYPE html>
<html>
<head>
<meta charset="utf-8">
<title>CSS 网页布局 title>
<meta name="viewport" content="width=device-width, initial-scale=1">
<style>
* {
  box-sizing: border-box;
}

body {
  margin: 0;
}

/* 头部样式 */
.header {
  background-color: #f1f1f1;
  padding: 20px;
  text-align: center;
}

/* 导航条 */
.topnav {
  overflow: hidden;
  background-color: #333;
}

/* 导航链接 */
.topnav a {
  float: left;
  display: block;
  color: #f2f2f2;
  text-align: center;
  padding: 14px 16px;
  text-decoration: none;
}

/* 链接 - 修改颜色 */
.topnav a:hover {
  background-color: #ddd;
  color: black;
}

/* 创建三个相等的列 */
.column {
  float: left;
  width: 33.33%;
}

/* 列后清除浮动 */
.row:after {
  content: "";
  display: table;
  clear: both;
}

/* 响应式布局 - 小于 600 px 时改为上下布局 */
@media screen and (max-width: 600px) {
  .column {
    width: 100%;
  }
}
style>
head>
<body>

<div class="header">
  <h1>头部区域h1>
  <p>重置浏览器大小查看效果。p>
div>

<div class="topnav">
  <a href="#">链接a>
  <a href="#">链接a>
  <a href="#">链接a>
div>

<div class="row">
  <div class="column">
    <h2>第一列h2>
    <p>学的不仅是技术,更是梦想!学的不仅是技术,更是梦想!学的不仅是技术,更是梦想!学的不仅是技术,更是梦想!p>
  div>

  <div class="column">
    <h2>第二列h2>
    <p>学的不仅是技术,更是梦想!学的不仅是技术,更是梦想!学的不仅是技术,更是梦想!学的不仅是技术,更是梦想!div>

  <div class="column">
    <h2>第三列h2>
    <p>学的不仅是技术,更是梦想!学的不仅是技术,更是梦想!学的不仅是技术,更是梦想!学的不仅是技术,更是梦想!div>
div>

body>
html>
5、底部区域
- 底部区域在网页的最下方,一般包含版权信息和联系方式等
DOCTYPE html>
<html>
<head>
<meta charset="utf-8">
<title>CSS 网页布局 title>
<meta name="viewport" content="width=device-width, initial-scale=1">
<style>
* {
  box-sizing: border-box;
}

body {
  margin: 0;
}

/* 头部样式 */
.header {
  background-color: #f1f1f1;
  padding: 20px;
  text-align: center;
}

/* 导航条 */
.topnav {
  overflow: hidden;
  background-color: #333;
}

/* 导航链接 */
.topnav a {
  float: left;
  display: block;
  color: #f2f2f2;
  text-align: center;
  padding: 14px 16px;
  text-decoration: none;
}

/* 链接 - 修改颜色 */
.topnav a:hover {
  background-color: #ddd;
  color: black;
}

/* 创建三个相等的列 */
.column {
  float: left;
  padding: 10px;
}

/* 左右两侧宽度 */
.column.side {
  width: 25%;
}

/* 中间区域宽度 */
.column.middle {
  width: 50%;
}

/* 列后面清除浮动 */
.row:after {
  content: "";
  display: table;
  clear: both;
}

/* 响应式布局 - 宽度小于600px时设置上下布局 */
@media screen and (max-width: 600px) {
  .column.side, .column.middle {
    width: 100%;
  }
}

/* 底部样式 */
.footer {
  background-color: #f1f1f1;
  padding: 10px;
  text-align: center;
}
style>
head>
<body>

<div class="header">
  <h1>头部区域h1>
  <p>重置浏览器大小查看效果。p>
div>

<div class="topnav">
  <a href="#">链接a>
  <a href="#">链接a>
  <a href="#">链接a>
div>

<div class="row">
  <div class="column side">
    <h2>左侧栏h2>
    <p>学的不仅是技术,更是梦想!p>
  div>

  <div class="column middle">
    <h2>主区域内容h2>
    <p>学的不仅是技术,更是梦想!学的不仅是技术,更是梦想!学的不仅是技术,更是梦想!菜鸟教程 - 学的不仅是技术,更是梦想!学的不仅是技术,更是梦想!p>
  div>

  <div class="column side">
    <h2>右侧栏h2>
    <p>的不仅是技术,更是梦想!p>
  div>
div>

<div class="footer">
  <p>底部区域p>
div>

body>
html>
6、响应式网页布局
通过以上等学习我们来创建一个响应式等页面,页面的布局会根据屏幕的大小来调整:
DOCTYPE html>
<html>
<head>
<meta charset="utf-8">
<title>CSS 网页布局title>
<style>
* {
  box-sizing: border-box;
}

body {
  font-family: Arial;
  padding: 10px;
  background: #f1f1f1;
}

/* 头部标题 */
.header {
  padding: 30px;
  text-align: center;
  background: white;
}

.header h1 {
  font-size: 50px;
}

/* 导航条 */
.topnav {
  overflow: hidden;
  background-color: #333;
}

/* 导航条链接 */
.topnav a {
  float: left;
  display: block;
  color: #f2f2f2;
  text-align: center;
  padding: 14px 16px;
  text-decoration: none;
}

/* 链接颜色修改 */
.topnav a:hover {
  background-color: #ddd;
  color: black;
}

/* 创建两列 */
/* Left column */
.leftcolumn {
  float: left;
  width: 75%;
}

/* 右侧栏 */
.rightcolumn {
  float: left;
  width: 25%;
  background-color: #f1f1f1;
  padding-left: 20px;
}

/* 图像部分 */
.fakeimg {
  background-color: #aaa;
  width: 100%;
  padding: 20px;
}

/* 文章卡片效果 */
.card {
  background-color: white;
  padding: 20px;
  margin-top: 20px;
}

/* 列后面清除浮动 */
.row:after {
  content: "";
  display: table;
  clear: both;
}

/* 底部 */
.footer {
  padding: 20px;
  text-align: center;
  background: #ddd;
  margin-top: 20px;
}

/* 响应式布局 - 屏幕尺寸小于 800px 时,两列布局改为上下布局 */
@media screen and (max-width: 800px) {
  .leftcolumn, .rightcolumn {
    width: 100%;
    padding: 0;
  }
}

/* 响应式布局 -屏幕尺寸小于 400px 时,导航等布局改为上下布局 */
@media screen and (max-width: 400px) {
  .topnav a {
    float: none;
    width: 100%;
  }
}
style>
head>
<body>

<div class="header">
  <h1>我的网页h1>
  <p>重置浏览器大小查看效果。p>
div>

<div class="topnav">
  <a href="#">链接a>
  <a href="#">链接a>
  <a href="#">链接a>
  <a href="#" style="float:right">链接a>
div>

<div class="row">
  <div class="leftcolumn">
    <div class="card">
      <h2>文章标题h2>
      <h5>2019 年 4 月 17日h5>
      <div class="fakeimg" style="height:200px;">图片div>
      <p>一些文本...p>
      <p>学的不仅是技术,更是梦想!学的不仅是技术,更是梦想!学的不仅是技术,更是梦想!学的不仅是技术,更是梦想! p>
    div>
    <div class="card">
      <h2>文章标题h2>
      <h5>2019 年 4 月 17日h5>
      <div class="fakeimg" style="height:200px;">图片div>
      <p>一些文本...p>
      <p>学的不仅是技术,更是梦想!学的不仅是技术,更是梦想!学的不仅是技术,更是梦想!学的不仅是技术,更是梦想!p>
    div>
  div>
  <div class="rightcolumn">
    <div class="card">
      <h2>关于我h2>
      <div class="fakeimg" style="height:100px;">图片div>
      <p>关于我的一些信息..p>
    div>
    <div class="card">
      <h3>热门文章h3>
      <div class="fakeimg"><p>图片p>div>
      <div class="fakeimg"><p>图片p>div>
      <div class="fakeimg"><p>图片p>div>
    div>
    <div class="card">
      <h3>关注我h3>
      <p>一些文本...p>
    div>
  div>
div>

<div class="footer">
  <h2>底部区域h2>
div>

body>
html>

