【Taro开发】-全局自定义导航栏适配AtMessage位置及相关问题(十四)
Taro小程序开发
系列文章的所有文章的目录
【Taro开发】-初始化项目(一)
【Taro开发】-路由传参及页面事件调用(二)
【Taro开发】-taro-ui(三)
【Taro开发】-带token网络请求封装(四)
【Taro开发】-自定义导航栏NavBar(五)
【Taro开发】-formData图片上传组件(六)
【Taro开发】-封装Form表单组件和表单检验(七)
【Taro开发】-tabs标签页及子组件的下拉刷新(八)
【Taro开发】-简易的checkBoxGroup组件(九)
【Taro开发】-页面生成二维码及保存到本地(十)
【Taro开发】-宣传海报,实现canvas实现圆角画布/图片拼接二维码并保存(十一)
【Taro开发】-分享给好友/朋友圈(十二)
【Taro开发】-小程序自动打包上传并生成预览二维码(十三)
【Taro开发】-全局自定义导航栏适配AtMessage位置及相关问题(十四)
【Taro开发】-文字展开收起组件(十五)
文章目录
- Taro小程序开发
- 前言
- 1.全局navBar
-
- 1.1全局开启自定义
- 1.2 定义页面基础组件
- 1.3 页面使用
- 2.获取状态栏和navBar的高度并在js中修改scss变量
-
- 2.1全局变量
- 2.2 获取高度并在js中修改scss变量
- 3.滚动穿透
- 4.Taro.atMessage多处使用,返回上一页后失效
前言
基于Taro的微信小程序开发,主要组件库为Taro-ui
由于安卓机的标题居左显示,需使用前期自定义navBar,实现全局自定义navBar,需解决其引发的系列问题如下:
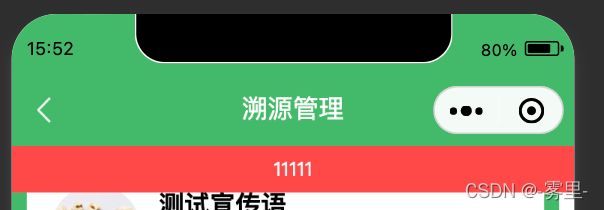
1.由于开启了navigationStyle: “custom”,fixed时top:0是从状态栏(时间栏)开始渲染的,需获取状态栏和navBar的高度。
2.可能影响:滚动穿透,modal对话框之类打开时,可能发生遮罩层下的内容还能滚动
⚠️注意:navigationStyle: custom 对 web-view 组件无效
提示:以下是本篇文章正文内容,下面案例可供参考
1.全局navBar
1.1全局开启自定义
//app.config.js
window:{
	...
	navigationStyle: "custom"
}
因此在页面只需设置navigationStyle和标题的情况下,无需page.config.js
1.2 定义页面基础组件
只在页面使用,提供message和modal,后续可通过Taro的api直接调用,即每个页面不用重复引入。
通过title判断是否需要自定义navBar
//BasePageCom.jsx
import { Component } from "react";
import { View, Text, Image, ScrollView } from "@tarojs/components";
import { AtMessage, AtToast } from "taro-ui";
import Taro, { getCurrentInstance } from "@tarojs/taro";
import { NavBar } from "@/components/";
import "./index.scss";

class BasePageCom extends Component {
  constructor() {
    super();
  }

  render() {
    const {
      navBackground,
      navColor,
      extClass,
      navBack,
      title,
      onBack,
      iconTheme,
      renderCenter
    } = this.props;
    return (
      <View {...this.props} >
        <AtMessage />
        <AtToast />
        {this.props?.title && (
          <NavBar
            extClass={extClass}
            background={navBackground}
            color={navColor}
            title={renderCenter ? undefined : title}
            back={navBack}
            iconTheme={iconTheme}
            onBack={() => {
              onBack ? onBack() : Taro.navigateBack();
            }}
            renderCenter={renderCenter && renderCenter()}
          />
        )}
        {this.props.children}
      </View>
    );
  }
}
BasePageCom.defaultProps = {
  extClass: "navBar",
  navBack: true,
  navColor: "#000",
  navBackground: "#fff",
  iconTheme: "black"
};
export default BasePageCom;
1.3 页面使用
//render
	<BasePageCom
        className="index"
        //以下为navBar设置
        title="区块链溯源"//标题居中
        navBackground="rgba(0,0,0,0)"//背景透明
        navColor="#1C1F26"//字体颜色
        navBack={false}//是否需要返回键
        iconTheme="white"//图标主题,white/black
        onBack={() => {}}//返回事件,在navBack为真时生效
        renderCenter={() => {//自定义标题
          return (
            <View>
            </View>
          );
        }}
      >
      ...
    </BasePageCom>
2.获取状态栏和navBar的高度并在js中修改scss变量
2.1全局变量
//globalData.js
const globalData = {
  isLogin: false,
  user: {
  }
}

export function set(key, val) {
  globalData[key] = val
}

export function get(key) {
  return globalData[key]
}
2.2 获取高度并在js中修改scss变量
//BasePageCom.jsx
import { set as setGlobalData, get as getGlobalData } from "@/utils/globalData";
import "./index.scss";

 this.state = {
      navTop: 0,//当前组件需配合使用state,可能出现第一次使用首页提示top位置不对,其他地方使用全局变量即可
      navBar: []

 };

  componentDidMount() {
    if (!getGlobalData("navTop")) this.props.title && this.getPosition();
    else this.setState({ navTop: getGlobalData("navTop") });
  }

  componentDidUpdate(prevProps, prevState) {
    if (
      JSON.stringify(prevState.navBar) !== JSON.stringify(this.state.navBar)
    ) {
      setGlobalData("navTop", this.state.navBar[0]?.height);
      this.setState({ navTop: this.state.navBar[0]?.height });
    }
  }

 getPosition() {
    Taro.createSelectorQuery()
      .select(".navBar")
      .boundingClientRect()
      .exec(res => {
        res[0]
          ? this.setState({ navBar: res })
          : setTimeout(() => {
              this.getPosition();
            }, 500);
      });
  }
//render中
   return (
   <View
        {...this.props}
        style={{
          "--traceNavTop": this.state.navTop,
          ...this.props.style
        }}
    >
    <AtMessage />
    ...
    </View>
   )
//index.scss
.at-message{
  top:var(--traceNavTop);
  z-index: 10000 !important;
}
.at-message--hidden{
  display: none;//解决隐藏时遮挡自定义navbar,返回事件不触发
}
使用BasePageCom组件的页面在其css文件中可直接使用var(–traceNavTop)
3.滚动穿透
	<BasePageCom
        ...
        style={
          modalShow
            ? { height: "100vh", overflow: "hidden" }
            : {}
        }
   	/>
其他方法:使用catchMove
//BasePageCom组件
return(
	<View
        {...this.props}
        style={{
          "--traceNavTop": this.state.navTop,
          ...this.props.style
        }}
        catchMove={this.props.catchMove}
      >
      ...
      </View>
)

BasePageCom.defaultProps = {
  ...
  catchMove: false
};
在需要使用的页面
 <BasePageCom
        ...
        catchMove={shareShow || codeShow }
      >
4.Taro.atMessage多处使用,返回上一页后失效
由于多个页面使用,而该组件内部在componentWillUnmount时会把监听去除,导致在当前页面返回上一页时,即当前页面卸载时,同时监听失效,所以无法再次调用Taro.atMessage。(componentDidShow生命周期再次绑定事件疑似触发不到,在taro-ui的github/issus中有相关记载)
复制tao-ui自定义组件Mesage:
import { View } from "@tarojs/components";
import Taro from "@tarojs/taro";
import classNames from "classnames";
import PropTypes from "prop-types";
import React from "react";
export default class AtMessage extends React.Component {
  constructor(props) {
    super(props);
    this.state = {
      _isOpened: false,
      _message: "",
      _type: "info",
      _duration: 3000
    };
    this._timer = null;
  }
  bindMessageListener() {
    Taro.eventCenter.on("atMessage", (options = {}) => {
      const { message, type, duration } = options;
      const newState = {
        _isOpened: true,
        _message: message,
        _type: type,
        _duration: duration || this.state._duration
      };
      this.setState(newState, () => {
        clearTimeout(this._timer);
        this._timer = setTimeout(() => {
          this.setState({
            _isOpened: false
          });
        }, this.state._duration);
      });
    });
    // 绑定函数
    Taro.atMessage = Taro.eventCenter.trigger.bind(
      Taro.eventCenter,
      "atMessage"
    );
  }
  componentDidShow() {
    this.bindMessageListener();
  }
  componentDidMount() {
    this.bindMessageListener();
  }
  // componentDidHide() {
  //   console.log("componentDidHide");
  //   Taro.eventCenter.off("atMessage");
  // }
  // componentWillUnmount() {
  //   Taro.eventCenter.off("atMessage");
  // }
  render() {
    const { className, customStyle } = this.props;
    const { _message, _isOpened, _type } = this.state;
    const rootCls = classNames(
      {
        "at-message": true,
        "at-message--show": _isOpened,
        "at-message--hidden": !_isOpened
      },
      `at-message--${_type}`,
      className
    );
    return React.createElement(
      View,
      { className: rootCls, style: customStyle },
      _message
    );
  }
}
AtMessage.defaultProps = {
  customStyle: "",
  className: ""
};
AtMessage.propTypes = {
  customStyle: PropTypes.oneOfType([PropTypes.object, PropTypes.string]),
  className: PropTypes.oneOfType([PropTypes.array, PropTypes.string])
};
//# sourceMappingURL=index.js.map
//app.js
  componentWillUnmount() {
    Taro.eventCenter.off("atMessage");
  }
//BasePageCom中
//替换