【Python】用Python绘制折线图(插值法平滑曲线)
目录
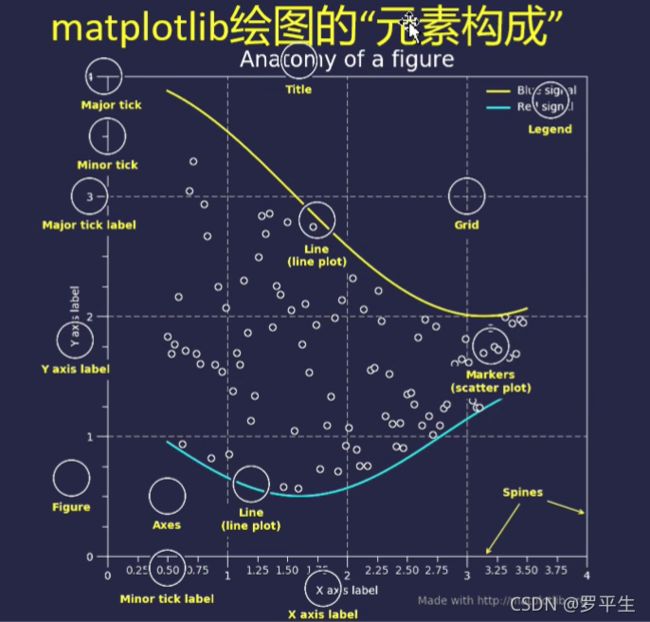
利用绘制图表:matplotlib官网
1. 小试牛刀——柱状图
1.1 matplotlib库默认英文字体
2. 折线图绘制
2.1 读取exal方法
2.1.1 数据处理常用库:pandas
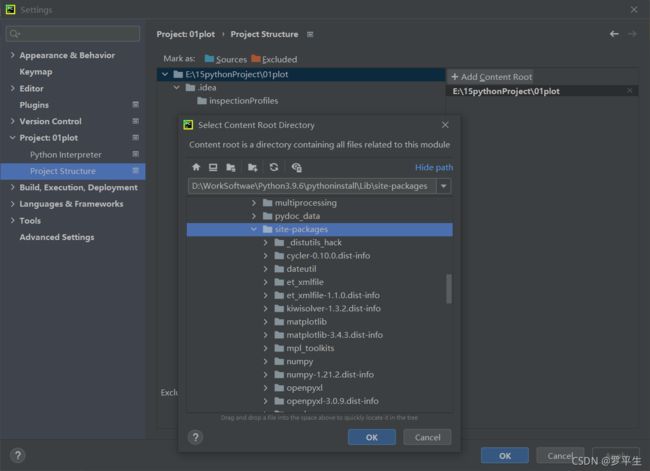
2.1.2 找到pandas在pathon安装的位置Lib->site-package
2.2 提取列表数组
3. 论文图片的类型和格式
4. Python绘制折线图坐标无法显示负号
5. 绘制曲线
6. 绘制插值拟合曲线
6.1 interpld曲线方法
6.2 splprep曲线方法
7. 完整程序
利用绘制图表:matplotlib官网
1. 小试牛刀——柱状图
基本方法:matplotlib.pyplot.bar()
基本参数:bar(x,y)
其他参数:颜色color 宽度width 透明度alpha
其他方法:图例legend() 横轴定义xlable() 纵轴定义ylable() 图标题title() 刻度方法xlim(), ylim()
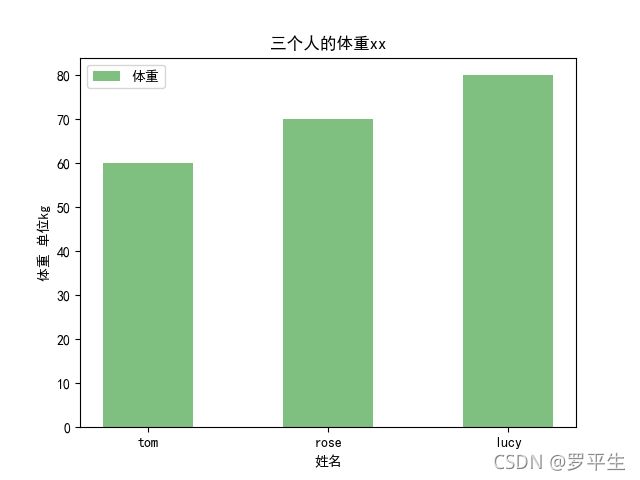
import matplotlib.pyplot as plt #绘图
import pandas as pd #读取exal文件
plt.rcParams['font.sans-serif']=['SimHei'] #添加黑体作为绘图字体
name = ['tom', 'rose', 'lucy']#变量name装了一个列表
weight = [60, 70, 80]#具有位置属性和数值属性
plt.bar(name, weight, label='体重', color='green', alpha=0.5, width=0.5)   #从库里面调用方法+图例+颜色+透明度+宽度
plt.xlabel('姓名')
plt.ylabel('体重 单位kg')
plt.title('三个人的体重xx')
plt.legend()
plt.savefig('柱状图.png', dip=500)
plt.show()  #显示方法
1.1 matplotlib库默认英文字体
添加黑体(‘SimHei’)为绘图字体用以在图表中显示。
代码:
plt.rcParams['font.sans-serif']=['SimHei']2. 折线图绘制
2.1 读取exal方法
2.1.1 数据处理常用库:pandas
用pandas读取excel文件的常用方法:read_excel() 参数是文件名
2.1.2 找到pandas在pathon安装的位置Lib->site-package
import matplotlib.pyplot as plt #绘图
import pandas as pd #读取exal文件
Data = pd.read_excel('E:\PythonData/LandingData.xlsx')#exal文件路径,注意不要数字开头
print(Data)#打印数据
注意文件路径开头不要是数字,不然报错
E:\PythonData/LandingData.xlsx
2.2 提取列表数组
#获取各通道温度数据
飞行高度 = Data.飞行高度
温度1 = Data.温度1
温度2 = Data.温度2
温度3 = Data.温度3
温度4 = Data.温度4
温度5 = Data.温度5
温度6 = Data.温度6
温度7 = Data.温度7
温度8 = Data.温度8
温度9 = Data.温度9
温度10 = Data.温度10
温度11 = Data.温度11
3. 论文图片的类型和格式
plt.savefig('折线图.png', dip=500)位图(放大后有马赛克):.jpg .tif .psd .bmp .png
矢量图(放大也很清晰):.wmf .emf .epd .cdx
事物摄影使用位图,
.png格式是非可拓展文件类型;.pdf是可拓展文件格式,pdf是矢量图。
4. Python绘制折线图坐标无法显示负号
添加如下代码即可:
import matplotlib
matplotlib.rcParams['axes.unicode_minus']=False
本例程代码如下所示:
plt.rcParams['axes.unicode_minus']=False5. 绘制曲线
引入库
from scipy import interpolate绘制一个图片,并确定图片位置:
fig = plt.figure(figsize=(10, 8))
ax1 = fig.add_subplot(1, 3, 1)
将曲线在图片中绘制,并加入图例:
plt.plot(Data.飞行高度, Data.温度1, label='温度1', linewidth=0.75)   #从库里面调用方法+图例
plt.plot(Data.飞行高度, Data.温度2, label='温度2', linewidth=0.75)   #从库里面调用方法+图例
plt.plot(Data.飞行高度, Data.温度3, label='温度3', linewidth=0.75)   #从库里面调用方法+图例
plt.plot(Data.飞行高度, Data.温度4, label='温度4', linewidth=0.75)   #从库里面调用方法+图例
plt.plot(Data.飞行高度, Data.温度5, label='温度5', linewidth=0.75)   #从库里面调用方法+图例
plt.plot(Data.飞行高度, Data.温度6, label='温度6', linewidth=0.75)   #从库里面调用方法+图例
plt.plot(Data.飞行高度, Data.温度7, label='温度7', linewidth=0.75)   #从库里面调用方法+图例
plt.plot(Data.飞行高度, Data.温度8, label='温度8', linewidth=0.75)   #从库里面调用方法+图例
plt.plot(Data.飞行高度, Data.温度9, label='温度9', linewidth=0.75)   #从库里面调用方法+图例
plt.plot(Data.飞行高度, Data.温度10, label='温度10', linewidth=0.75)   #从库里面调用方法+图例
plt.plot(Data.飞行高度, Data.温度11, label='温度11', linewidth=0.75)   #从库里面调用方法+图例

plt.xlabel('飞行高度,单位m', fontsize=18)
plt.gca().invert_xaxis() #x轴反向
plt.ylabel('当前温度,单位℃', fontsize=18)
plt.title('原始数据点线绘图', fontsize=18)
plt.legend(loc='upper right')
6. 绘制插值拟合曲线
6.1 interpld曲线方法
# interpld
def spline1(x, y, point):
    f = interpolate.interp1d(x, y, kind="cubic")  #曲线绘制方法1
    X = np.linspace(飞行高度.min(), 飞行高度.max(), num=point, endpoint=True)
    Y = f(X)
    return X, Y
6.2 splprep曲线方法
def spline3(x, y, point, deg):
    tck, u = interpolate.splprep([x, y], k=deg, s=300) #曲线绘制方法2
    u = np.linspace(0, 1, num=point, endpoint=True) #显示范围比例
    spline = interpolate.splev(u, tck)
    return spline[0], spline[1]
这里注意deg参数:
Degree of the spline. Cubic splines are recommended. Even values of k should be avoided especially with a small s-value. 1 <= deg <= 5, default is 3.
scipy.interpolate.splprep — SciPy v1.7.1 Manual
7. 完整程序
看完上面的介绍,你还可以将下面的程序直接粘贴复制到你的电脑中运行一下,用实际操作来加深对绘图命令的学习:
# 导入相关库
import matplotlib.pyplot as plt #绘图
import pandas as pd #读取exal文件
import numpy as np
plt.rcParams['axes.unicode_minus']=False #轴坐标负数符号显示
plt.rcParams['font.sans-serif']=['SimHei'] #添加黑体作为绘图字体
Data = pd.read_excel('E:\PythonData/LandingData1.xlsx') #打开exal文件,注意文件路径,文件夹名称不要用数字开头
from scipy import interpolate
#获取各通道温度数据
飞行高度 = Data.飞行高度
温度1 = Data.温度1
温度2 = Data.温度2
温度3 = Data.温度3
温度4 = Data.温度4
温度5 = Data.温度5
温度6 = Data.温度6
温度7 = Data.温度7
温度8 = Data.温度8
温度9 = Data.温度9
温度10 = Data.温度10
温度11 = Data.温度11

fig = plt.figure(figsize=(10, 8))
ax1 = fig.add_subplot(1, 3, 1)

plt.plot(Data.飞行高度, Data.温度1, label='温度1', linewidth=0.75)   #从库里面调用方法+图例
plt.plot(Data.飞行高度, Data.温度2, label='温度2', linewidth=0.75)   #从库里面调用方法+图例
plt.plot(Data.飞行高度, Data.温度3, label='温度3', linewidth=0.75)   #从库里面调用方法+图例
plt.plot(Data.飞行高度, Data.温度4, label='温度4', linewidth=0.75)   #从库里面调用方法+图例
plt.plot(Data.飞行高度, Data.温度5, label='温度5', linewidth=0.75)   #从库里面调用方法+图例
plt.plot(Data.飞行高度, Data.温度6, label='温度6', linewidth=0.75)   #从库里面调用方法+图例
plt.plot(Data.飞行高度, Data.温度7, label='温度7', linewidth=0.75)   #从库里面调用方法+图例
plt.plot(Data.飞行高度, Data.温度8, label='温度8', linewidth=0.75)   #从库里面调用方法+图例
plt.plot(Data.飞行高度, Data.温度9, label='温度9', linewidth=0.75)   #从库里面调用方法+图例
plt.plot(Data.飞行高度, Data.温度10, label='温度10', linewidth=0.75)   #从库里面调用方法+图例
plt.plot(Data.飞行高度, Data.温度11, label='温度11', linewidth=0.75)   #从库里面调用方法+图例

plt.xlabel('飞行高度,单位m', fontsize=18)
plt.gca().invert_xaxis() #x轴反向
plt.ylabel('当前温度,单位℃', fontsize=18)
plt.title('原始数据点线绘图', fontsize=18)
plt.legend(loc='upper right')

# interpld
def spline1(x, y, point):
    f = interpolate.interp1d(x, y, kind="cubic")  #曲线绘制方法1
    X = np.linspace(飞行高度.min(), 飞行高度.max(), num=point, endpoint=True)
    Y = f(X)
    return X, Y

#splprep
def spline3(x, y, point, deg):
    tck, u = interpolate.splprep([x, y], k=deg, s=300) #曲线绘制方法2
    u = np.linspace(0, 1, num=point, endpoint=True) #显示范围比例
    spline = interpolate.splev(u, tck)
    return spline[0], spline[1]

m1, n1 = spline1(飞行高度, 温度1, 50000)
m2, n2 = spline1(飞行高度, 温度2, 50000)
m3, n3 = spline1(飞行高度, 温度3, 50000)
m4, n4 = spline1(飞行高度, 温度4, 50000)
m5, n5 = spline1(飞行高度, 温度5, 50000)
m6, n6 = spline1(飞行高度, 温度6, 50000)
m7, n7 = spline1(飞行高度, 温度7, 50000)
m8, n8 = spline1(飞行高度, 温度8, 50000)
m9, n9 = spline1(飞行高度, 温度9, 50000)
m10, n10 = spline1(飞行高度, 温度10, 50000)
m11, n11 = spline1(飞行高度, 温度11, 50000)

ax2 = fig.add_subplot(1, 3, 2)

plt.plot(m1, n1, label="温度1")
plt.plot(m2, n2, label="温度2")
plt.plot(m3, n3, label="温度3")
plt.plot(m4, n4, label="温度4")
plt.plot(m5, n5, label="温度5")
plt.plot(m6, n6, label="温度6")
plt.plot(m7, n7, label="温度7")
plt.plot(m8, n8, label="温度8")
plt.plot(m9, n9, label="温度9")
plt.plot(m10, n10, label="温度10")
plt.plot(m11, n11, label="温度11")

plt.xlabel('飞行高度,单位m', fontsize=18)
plt.gca().invert_xaxis() #x轴反向
plt.ylabel('当前温度,单位℃', fontsize=18)
plt.title('interpld插值绘图', fontsize=18)
plt.legend(loc='upper right')

ax3 = fig.add_subplot(1, 3, 3)

a1, b1 = spline3(飞行高度, 温度1, 50000, 3)
a2, b2 = spline3(飞行高度, 温度2, 50000, 3)
a3, b3 = spline3(飞行高度, 温度3, 50000, 3)
a4, b4 = spline3(飞行高度, 温度4, 50000, 3)
a5, b5 = spline3(飞行高度, 温度5, 50000, 3)
a6, b6 = spline3(飞行高度, 温度6, 50000, 3)
a7, b7 = spline3(飞行高度, 温度7, 50000, 3)
a8, b8 = spline3(飞行高度, 温度8, 50000, 3)
a9, b9 = spline3(飞行高度, 温度9, 50000, 3)
a10, b10 = spline3(飞行高度, 温度10, 50000, 3)
a11, b11 = spline3(飞行高度, 温度11, 50000, 3)

plt.plot(a1, b1, label="温度1")
plt.plot(a2, b2, label="温度2")
plt.plot(a3, b3, label="温度3")
plt.plot(a4, b4, label="温度4")
plt.plot(a5, b5, label="温度5")
plt.plot(a6, b6, label="温度6")
plt.plot(a7, b7, label="温度7")
plt.plot(a8, b8, label="温度8")
plt.plot(a9, b9, label="温度9")
plt.plot(a10, b10, label="温度10")
plt.plot(a11, b11, label="温度11")

plt.xlabel('飞行高度,单位m', fontsize=18)
plt.gca().invert_xaxis() #x轴反向
plt.ylabel('当前温度,单位℃', fontsize=18)
plt.title('splprep插值绘图', fontsize=18)
plt.legend(loc='upper right')

plt.savefig('折线图.png', dip=500)
plt.show()  #显示方法


