SpringMVC学习总结(七)@RequestBody/RequestEntity/@ResponseBody/SpringMVC处理Json和Ajax/ResponseEntity/文件上传和下载
HttpMessageConverter,报文信息转换器,将请求报文转换为Java对象,或将Java对象转换为响应报文
HttpMessageConverter提供了两个注解和两个类型:@RequestBody,@ResponseBody,RequestEntity,ResponseEntity
一、获取请求信息
(一)@RequestBody注解
@RequestBody可以获取请求体,需要在控制器方法设置一个形参,使用@RequestBody进行标识,当前请求的请求体就会为当前注解所标识的形参赋值。
案例:
index.html:
DOCTYPE html>
<html lang="en" xmlns:th="http://www.thymeleaf.org">
<head>
    <meta charset="UTF-8">
    <title>首页title>
head>
<body>
<h1>首页h1>
<form th:action="@{/testRequestBody}" method="post">
    用户名:<input type="text" name="username"><br>
    密码:<input type="password" name="password"><br>
    <input type="submit">
form>
body>
html>
controller:
import org.springframework.stereotype.Controller;
import org.springframework.web.bind.annotation.RequestBody;
import org.springframework.web.bind.annotation.RequestMapping;

@Controller
public class MyController {
	//访问首页
    @RequestMapping("/")
    public String toIndex(){
        return "index";
    }

    @RequestMapping("/testRequestBody")
    public String testRequestBody(@RequestBody String requestBody){
        System.out.println("请求体信息:"+requestBody);
        return "target";
    }
}
启动Tomcat:


IDEA输出:
![]()
(二)RequestEntity类
RequestEntity是封装请求报文的一种类型,它可以获取完整报文信息。需要在控制器方法的形参中设置该类型的形参,当前请求的请求报文就会赋值给该形参,可以通过getHeaders()获取请求头信息,通过getBody()获取请求体信息。
案例:
index.html:
DOCTYPE html>
<html lang="en" xmlns:th="http://www.thymeleaf.org">
<head>
    <meta charset="UTF-8">
    <title>首页title>
head>
<body>
<h1>首页h1>
<form th:action="@{/testRequestEntity}" method="post">
    用户名:<input type="text" name="username"><br>
    密码:<input type="password" name="password"><br>
    <input type="submit">
form>
body>
html>
controller:
import org.springframework.http.RequestEntity;
import org.springframework.stereotype.Controller;
import org.springframework.web.bind.annotation.RequestMapping;

@Controller
public class MyController {
	//访问首页
    @RequestMapping("/")
    public String toIndex(){
        return "index";
    }

    @RequestMapping("/testRequestEntity")
    public String testRequestBody(RequestEntity<String> requestEntity){
        System.out.println("请求头信息:"+requestEntity.getHeaders());
        System.out.println("请求体信息:"+requestEntity.getBody());
        return "target";
    }
}

![]()
二、向浏览器响应数据
(一)通过HttpServletResponse响应浏览器数据
案例:
index.html:
DOCTYPE html>
<html lang="en" xmlns:th="http://www.thymeleaf.org">
<head>
    <meta charset="UTF-8">
    <title>首页title>
head>
<body>
<h1>首页h1>
<a th:href="@{/testResponse}">通过ServletAPI响应数据到浏览器a>
body>
html>
controller:
import org.springframework.stereotype.Controller;
import org.springframework.web.bind.annotation.RequestMapping;
import javax.servlet.http.HttpServletResponse;
import java.io.IOException;

@Controller
public class MyController {
	//访问首页
    @RequestMapping("/")
    public String toIndex(){
        return "index";
    }

    @RequestMapping("/testResponse")
    public void testResponse(HttpServletResponse response) throws IOException {
    	response.setContentType("text/html; charset=UTF-8");
        //不需要跳转到任何页面,所以返回值void
        response.getWriter().print("hello response!");
    }
}


当然,ServletAPI可以做到的我们SpringMVC也都能更好地做到(不推荐上面这个方法):
(二)通过@ResponseBody响应浏览器数据
@ResponseBody用于标识一个控制器方法,可以将该方法的返回值直接作为响应报文的响应体响应到浏览器。
案例:
index.html:
DOCTYPE html>
<html lang="en" xmlns:th="http://www.thymeleaf.org">
<head>
    <meta charset="UTF-8">
    <title>首页title>
head>
<body>
<h1>首页h1>
<a th:href="@{/testResponseBody}">通过@ResponseBody响应数据到浏览器a>
body>
html>
controller:
import org.springframework.stereotype.Controller;
import org.springframework.web.bind.annotation.RequestMapping;
import org.springframework.web.bind.annotation.ResponseBody;

@Controller
public class MyController {
	//访问首页
    @RequestMapping("/")
    public String toIndex(){
        return "index";
    }

    @RequestMapping("/testResponseBody")
    @ResponseBody
    public String testResponseBody(){
        //此时的返回值不再是视图名称,而是响应到浏览器的数据
        return "hello response!";
    }
}


(三)处理响应乱码问题
1.方式一
在控制器方法的@RequestMapping里加上produces属性值,例如:
@RequestMapping(value = "/testResponseBody",produces = "application/json;charset=utf-8")//解决响应乱码问题
@ResponseBody
public String testResponseBody(){
    return "你好";
}
但是这个方式只在当前控制器方法生效。
2.方式二
在springmvc的配置文件中配置如下:
    <mvc:annotation-driven>
        <mvc:message-converters>

            <bean class="org.springframework.http.converter.StringHttpMessageConverter">
                <property name="defaultCharset" value="UTF-8" />
                <property name="supportedMediaTypes">
                    <list>
                        <value>text/htmlvalue>
                        <value>application/jsonvalue>
                    list>
                property>
            bean>
        mvc:message-converters>
    mvc:annotation-driven>
(四)SpringMVC处理Json
假如我们想响应一个Java对象到浏览器,能不能实现呢?
假设有一个User类:
public class User {
    private Integer id;
    private String name;
    private Integer age;
    private String sex;

    public User() {
    }

    public User(Integer id, String name, Integer age, String sex) {
        this.id = id;
        this.name = name;
        this.age = age;
        this.sex = sex;
    }

    public Integer getId() {
        return id;
    }

    public void setId(Integer id) {
        this.id = id;
    }

    public String getName() {
        return name;
    }

    public void setName(String name) {
        this.name = name;
    }

    public Integer getAge() {
        return age;
    }

    public void setAge(Integer age) {
        this.age = age;
    }

    public String getSex() {
        return sex;
    }

    public void setSex(String sex) {
        this.sex = sex;
    }

}
index.html:
DOCTYPE html>
<html lang="en" xmlns:th="http://www.thymeleaf.org">
<head>
    <meta charset="UTF-8">
    <title>首页title>
head>
<body>
<h1>首页h1>
<a th:href="@{/testResponseBody}">通过@ResponseBody响应User对象到浏览器a>
body>
html>
controller:
import com.fox.mvc.bean.User;
import org.springframework.stereotype.Controller;
import org.springframework.web.bind.annotation.RequestMapping;
import org.springframework.web.bind.annotation.ResponseBody;

@Controller
public class MyController {
    //访问首页
    @RequestMapping("/")
    public String toIndex(){
        return "index";
    }

    @RequestMapping("/testResponseBody")
    @ResponseBody
    public User testResponseBody(){
        //此时的返回值不再是视图名称,而是响应到浏览器的数据
        return new User(12,"小明",20,"男");
    }
}


我们发现会报错,这是因为浏览器不认识Java对象,且浏览器能接收到服务器的数据只有字符串类型。
因此我们可以考虑将Java对象转换为Json格式的字符串。
@ResponseBody处理Json的步骤:
1. 导入jackson的依赖
<dependency>
    <groupId>com.fasterxml.jackson.coregroupId>
    <artifactId>jackson-databindartifactId>
    <version>2.12.1version>
dependency>
2. 在SpringMVC的核心配置文件中开启mvc的注解驱动,此时在HandlerAdaptor中会自动装配一个消息转换器:MappingJackson2HttpMessageConverter,可以将响应到浏览器的Java对象转换为Json格式的字符串
<mvc:annotation-driven />
3. 在处理器方法上使用@ResponseBody注解进行标识
4. 将Java对象直接作为控制器方法的返回值返回,就会自动转换为Json格式的字符串
import com.fox.mvc.bean.User;
import org.springframework.stereotype.Controller;
import org.springframework.web.bind.annotation.RequestMapping;
import org.springframework.web.bind.annotation.ResponseBody;


@Controller
public class MyController {
    //访问首页
    @RequestMapping("/")
    public String toIndex(){
        return "index";
    }

    @RequestMapping("/testResponseBody")
    @ResponseBody
    public User testResponseBody(){
        //此时的返回值不再是视图名称,而是响应到浏览器的数据
        return new User(12,"小明",20,"男");
    }
}
再次运行:

(五)SpringMVC处理ajax
ajax回顾
案例:
User类:
public class User {
    private Integer id;
    private String name;
    private Integer age;
    private String sex;

    public User() {
    }

    public User(Integer id, String name, Integer age, String sex) {
        this.id = id;
        this.name = name;
        this.age = age;
        this.sex = sex;
    }

    public Integer getId() {
        return id;
    }

    public void setId(Integer id) {
        this.id = id;
    }

    public String getName() {
        return name;
    }

    public void setName(String name) {
        this.name = name;
    }

    public Integer getAge() {
        return age;
    }

    public void setAge(Integer age) {
        this.age = age;
    }

    public String getSex() {
        return sex;
    }

    public void setSex(String sex) {
        this.sex = sex;
    }

}
index.html:
DOCTYPE html>
<html lang="en" xmlns:th="http://www.thymeleaf.org">
<head>
    <meta charset="UTF-8">
    <title>首页title>

    <script type="text/javascript" th:src="@{/static/js/jquery-3.4.1.js}">script>
    <script type="text/javascript">
        $(function () {
            $("#area01").click(function () {
                $.ajax({
                    url:$("#area01").attr("href"),
                    data:"username=mike&password=123456",
                    type:"POST",
                    success:function(msg){//这个参数msg是由服务器返回,并根据dataType参数进行处理后的数据
						//由于dataType是json,因此msg是json对象
                        $("#div01").html("编号:"+msg.id+",姓名:"+msg.name+",年龄:"+msg.age+",性别:"+msg.sex);
                    },
                    dataType:"json"
                });
                //阻止超链接的默认跳转行为
                return false;
            });
        });
    script>
head>
<body>
<h1>首页h1>
<a id="area01" th:href="@{/testAjax}">测试ajax请求a>
<div id="div01">div>
body>
html>
controller:
import com.fox.mvc.bean.User;
import org.springframework.stereotype.Controller;
import org.springframework.web.bind.annotation.RequestMapping;
import org.springframework.web.bind.annotation.ResponseBody;

@Controller
public class MyController {
    //访问首页
    @RequestMapping("/")
    public String toIndex(){
        return "index";
    }

    @RequestMapping("/testAjax")
    @ResponseBody
    public User testAjax(String username,String password){
        System.out.println("username:"+username+",password:"+password);
        //此时的返回值不再是视图名称,而是响应到浏览器的数据
        return new User(12,"小明",20,"男");
    }
}


页面不会跳转,局部刷新。
IDEA输出:
![]()
(六)@RestController注解
@RestController注解是springMVC提供的一个复合注解,标识在控制器的类上,就相当于为类添加了@Controller注解,并且为其中的每个方法都添加了@ResponseBody注解。
(七)ResponseEntity类
ResponseEntity用于控制器方法的返回值类型,该控制器方法的返回值就是响应到浏览器的响应报文。案例见下文。
三、文件下载与文件上传
回顾:JavaWeb阶段用Servlet实现文件下载与文件上传
(一)文件下载
- 文件下载:从服务器端下载文件到浏览器端(底层是文件复制)
案例:使用ResponseEntity类实现下载文件的功能
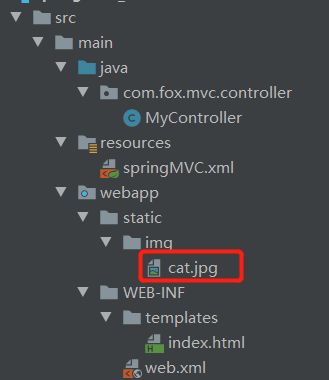
首先在我们工程下放一张图片cat.jpg用于下载:
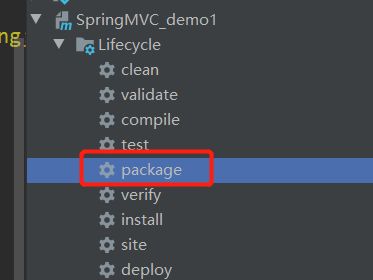
每次添加了新的静态资源记得在IDEA右边Maven那里找到当前项目,双击package重新打包:
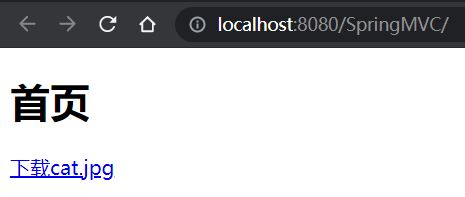
index.html:
DOCTYPE html>
<html lang="en" xmlns:th="http://www.thymeleaf.org">
<head>
    <meta charset="UTF-8">
    <title>首页title>
head>
<body>
<h1>首页h1>
<a th:href="@{/testDownload}">下载cat.jpga>
body>
html>
controller:
import org.springframework.http.HttpHeaders;
import org.springframework.http.HttpStatus;
import org.springframework.http.ResponseEntity;
import org.springframework.stereotype.Controller;
import org.springframework.util.MultiValueMap;
import org.springframework.web.bind.annotation.RequestMapping;
import javax.servlet.ServletContext;
import javax.servlet.http.HttpSession;
import java.io.FileInputStream;
import java.io.IOException;
import java.io.InputStream;


@Controller
public class MyController {
    //访问首页
    @RequestMapping("/")
    public String toIndex(){
        return "index";
    }

	//下载文件
    @RequestMapping("/testDownload")
    public ResponseEntity<byte[]> testResponseEntity(HttpSession session) throws IOException {
        //获取要下载的文件名
        String fileName="cat.jpg";
        //获取ServletContext对象
        ServletContext servletContext = session.getServletContext();
        //获取服务器中文件的真实路径
        String realPath = servletContext.getRealPath("/static/img/"+fileName);
        //创建输入流(用于读取要下载的目标文件)
        InputStream is = new FileInputStream(realPath);
        //创建字节数组 。is.available()返回当前输入流对应的文件的所有字节数
        byte[] bytes = new byte[is.available()];
        //将流读到字节数组中
        is.read(bytes);
        //创建HttpHeaders对象设置响应头信息
        MultiValueMap<String, String> headers = new HttpHeaders();
        //设置要下载方式以及下载文件的名字(除了文件名其余都是固定代码)
        headers.add("Content-Disposition", "attachment;filename="+fileName);
        //设置响应状态码
        HttpStatus statusCode = HttpStatus.OK;
        //创建ResponseEntity对象,构造方法需要传入要下载文件的字节数组、响应头和响应状态码
        ResponseEntity<byte[]> responseEntity = new ResponseEntity<>(bytes, headers, statusCode);
        //关闭输入流
        is.close();
        //返回这个对象就是响应到浏览器的响应报文
        return responseEntity;
    }
}
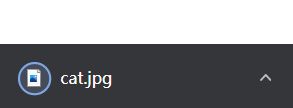
谷歌浏览器左下角就会开始下载:
(二)文件上传
- 文件上传:从浏览器端上传文件到服务器端(底层是文件复制)
- 文件上传要求form表单的请求方式必须为post,并且添加属性
enctype="multipart/form-data" - SpringMVC会将上传的文件封装到MultipartFile对象中,通过此对象可以获取文件相关信息,并使用该对象的方法实现文件上传。
案例:
要想完整实现文件上传,我们需要用到commons-fileupload.jar包,pom.xml中添加依赖:
<dependency>
    <groupId>commons-fileuploadgroupId>
    <artifactId>commons-fileuploadartifactId>
    <version>1.3.1version>
dependency>
在SpringMVC的配置文件中添加配置:
<bean id="multipartResolver" class="org.springframework.web.multipart.commons.CommonsMultipartResolver">bean>
index.html:
DOCTYPE html>
<html lang="en" xmlns:th="http://www.thymeleaf.org">
<head>
    <meta charset="UTF-8">
    <title>首页title>
head>
<body>
    <h1>首页h1>

    <form th:action="@{/testUpload}" method="post" enctype="multipart/form-data">
        头像:<input type="file" name="photo"><br>
        <input type="submit" value="上传">
    form>
body>
html>
controller:
import org.springframework.stereotype.Controller;
import org.springframework.web.bind.annotation.RequestMapping;
import org.springframework.web.bind.annotation.ResponseBody;
import org.springframework.web.multipart.MultipartFile;
import javax.servlet.ServletContext;
import javax.servlet.http.HttpSession;
import java.io.File;
import java.io.IOException;
@Controller
public class MyController {
//访问首页
@RequestMapping(value = "/")
public String toIndex(){
return "index";
}
//上传文件
@RequestMapping(value = "/testUpload")
@ResponseBody
//将我们表单中上传的文件自动封装到MultipartFile对象中,前提必须配置了文件上传解析器
public String testUpload(MultipartFile photo, HttpSession session) throws IOException {
//获取上传的文件的文件名
String fileName = photo.getOriginalFilename();
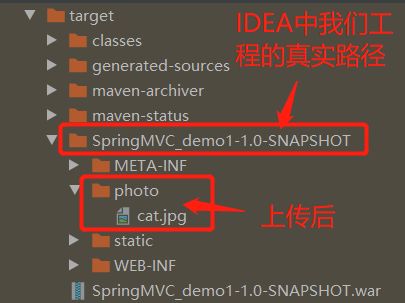
//假如我们想将浏览器上传过来的文件统一存在工程路径下的photo目录里,
//通过ServletContext获取服务器中photo目录的路径
ServletContext servletContext = session.getServletContext();
String savePath = servletContext.getRealPath("photo");
//判断photoPath所对应路径是否存在
File file = new File(savePath);
if(!file.exists()){
//不存在就创建
file.mkdir();
}
//最终保存的路径应该是:接收文件的目录+文件分隔符+文件名
String finalPath=savePath+File.separator+fileName;
//上传文件(transferTo()底层其实也是封装的先读再写)
photo.transferTo(new File(finalPath));
return "上传成功!";
}
}


文件上传的重名问题
如果我们多次上传同一文件名的文件,会发现服务器中先前接收到上传的同名文件不见了,其实是同名文件内容被覆盖了,显然这不是我们想要的结果。
那么我们就可以通过每次给上传的文件设置一个随机生成的文件名,这样就不会重复了:
import org.springframework.stereotype.Controller;
import org.springframework.web.bind.annotation.RequestMapping;
import org.springframework.web.bind.annotation.ResponseBody;
import org.springframework.web.multipart.MultipartFile;
import javax.servlet.ServletContext;
import javax.servlet.http.HttpSession;
import java.io.File;
import java.io.IOException;
import java.util.UUID;

@Controller
public class MyController {
    //访问首页
    @RequestMapping(value = "/")
    public String toIndex(){
        return "index";
    }

    @RequestMapping(value = "/testUpload")
    @ResponseBody
    //将我们表单中上传的文件自动封装到MultipartFile对象中,前提必须配置了文件上传解析器
    public String testUpload(MultipartFile photo, HttpSession session) throws IOException {
        //获取上传的文件的文件名
        String fileName = photo.getOriginalFilename();
        //获取上传的文件的后缀名
        String suffixName = fileName.substring(fileName.lastIndexOf("."));
        //用工具类UUID生成随机文件名
        String uuid = UUID.randomUUID().toString();
        //将uuid和后缀名拼接后的结果作为最终的文件名
        fileName = uuid + suffixName;
        //假如我们想将浏览器上传过来的文件统一存在工程路径下的photo目录里,
        //通过ServletContext获取服务器中photo目录的路径
        ServletContext servletContext = session.getServletContext();
        String savePath = servletContext.getRealPath("photo");
        //判断photoPath所对应路径是否存在
        File file = new File(savePath);
        if(!file.exists()){
            //不存在就创建
            file.mkdir();
        }
        //最终保存的路径应该是:接收文件的目录+文件分隔符+文件名
        String finalPath=savePath+File.separator+fileName;
        //上传文件
        photo.transferTo(new File(finalPath));
        return "上传成功!";
    }
}
