微服务架构入门(2)—— Spring Boot + Spring Cloud Consul + Spring Cloud Gateway 实战
题目:
- 掌握Consul分布式配置的主要功能及其开发方法
- 掌握Spring Cloud Gateway作为API网关的基本功能及开发方法(高级功能如限流等之后再学习)
- 结合微服务架构入门(1),实现生产者、消费者场景
- 要求生产者、消费者的应用配置可以无需重启应用动态刷新、更改
- 要求能从分布式配置KV存储中获取数据
- 要求通过API网关访问后端的消费者服务,后端的消费者服务再访问生产者服务
- API网关、消费者服务与生产者服务都要注册到Consul并且需要多实例,至少2个
提供可用的学习材料:
Spring Cloud Consul
- https://docs.spring.io/spring-cloud-consul/docs/2.2.4.RELEASE/reference/html/#spring-cloud-consul-config
- https://docs.spring.io/spring-cloud-consul/docs/2.2.4.RELEASE/reference/html/appendix.html
Spring Cloud Gateway
- https://docs.spring.io/spring-cloud-gateway/docs/2.2.5.RELEASE/reference/html/
- https://github.com/spring-cloud/spring-cloud-gateway/tree/master/spring-cloud-gateway-sample
- https://github.com/spring-cloud-samples/spring-cloud-gateway-sample
- https://www.baeldung.com/spring-cloud-gateway
- https://cloud.spring.io/spring-cloud-gateway/reference/html/
- https://www.jianshu.com/p/1c942a8abe18 “Spring Cloud Gateway-快速开始”
- https://www.cnblogs.com/bluersw/p/11610707.html “Spring Cloud Gateaway注册到服务器中心(Consul)”
- https://zhuanlan.zhihu.com/p/66844525 “微服务网关实战——Spring Cloud Gateway”
Spring Cloud Consul + Spring Cloud Gateway
- https://blog.csdn.net/xiaxuepiaopiao/article/details/90513093 “新手入门——Consul、Spring Cloud Gateway构造微服务平台”
- https://piotrminkowski.com/2019/11/06/microservices-with-spring-boot-spring-cloud-gateway-and-consul-cluster/#:~:text=The%20Spring%20Cloud%20Consul%20project%20provides%20integration%20for,enable%20and%20configure%20common%20patterns%20within%20microservice-based%20environments
实际实践时借鉴的材料:
- https://www.cnblogs.com/linjiqin/p/9718223.html “Spring Cloud Consul 使用——配置中心”
- https://www.cnblogs.com/wushengwuxi/p/11585567.html “Spring Cloud + Consul服务注册中心 + gateway网关”
- https://www.jianshu.com/p/1c942a8abe18 “Spring Cloud Gateway - 快速开始”
- https://mp.weixin.qq.com/s?__biz=MzA4MDEwNTI1NA==&mid=2459058167&idx=1&sn=29818b90789a948a23624cad6be95d3c&chksm=88cfc5bebfb84ca87f09b78a8919024c105ae184816e516f2963f0ed1f3ec854041ddb78fd15&mpshare=1&scene=1&srcid=&sharer_sharetime=1589760619146&sharer_shareid=0e36bf7f77393a86035a39120ff6a930&exportkey=AZGwXJV9DwH7fM3/MVOBxL8=&pass_ticket=/7j/nQBClywUFhaofCcOxw4uQxU4rHvUTcSaLztFY6hBRVPyk2c9L8SNGpyUxNYo#rd "微服务系列之Consul配置中心"
由于目前对于微服务框架仍处于学习阶段,为了思维的连贯性,下面的实践项目就在微服务架构入门(1)的项目基础上再做修改增加。
上一篇博文:“微服务架构入门(1)—— Spring Cloud(Consul) + Spring Boot 实训小项目”
https://blog.csdn.net/sinat_38579121/article/details/111175833
一、启动consul,打开consul web-ui:"localhost:8500"
二、Consul分布式配置
要求:
- 要求生产者、消费者的应用配置可以无需重启应用动态刷新、更改
- 要求能从分布式配置KV存储中获取数据
Consul分布式配置:
Consul提供了用于存储配置和其他元数据的键/值存储。Spring Cloud Consul Config是Config Server和Client的替代方案。在特殊的“引导”阶段,配置被加载到Spring环境中。默认情况下,配置存储在/config文件夹中。根据应用程序的名称和模拟Spring Cloud Config顺序解析属性的活动配置文件,创建多个PropertySource实例。
1、POM文件添加依赖
在微服务架构入门(1)项目的基础上增加,实现consul作配置中心的功能。
	org.springframework.cloud
	spring-cloud-starter-consul-config
完整的POM文件
	4.0.0

		org.springframework.boot
		spring-boot-starter-parent
		2.1.11.RELEASE


	com.example
	producer
	0.0.1-SNAPSHOT
	producer
	Demo project for Spring Boot


		1.8
		 Greenwich.SR4


			org.springframework.boot
			spring-boot-starter-actuator


			org.springframework.boot
			spring-boot-starter-web


			org.springframework.cloud
			spring-cloud-starter-consul-discovery


			org.springframework.cloud
			spring-cloud-starter-consul-config


			org.springframework.boot
			spring-boot-starter-test
			test


				org.springframework.cloud
				spring-cloud-dependencies
				${spring-cloud.version}
				pom
				import


				org.springframework.boot
				spring-boot-maven-plugin


			spring-milestones
			Spring Milestones
			https://repo.spring.io/milestone
注意!!!这里有个深坑!如果跑项目跑不通,首先要检查Spring Cloud 和 Spring Boot 的版本。Spring Cloud 和 Spring Boot 的版本有一定的对应关系,版本太高或太低都容易出现不兼容问题跑不通项目,往往这种跑不通的时候Bug又不好解决,气死了气死了。
网上有很多整理好的两者匹配版本,很容易检索到。可以多尝试几种版本匹配,
这里我的项目中,Spring Boot版本为2.1.11.RELEASE,Spring Cloud版本为Greenwich.SR4,项目可以正常跑通。
2、 添加 bootstrap.yml 配置文件
server:
  port: 8511 # 端口
spring:
  application:
    name: producer1 # 应用名称
  profiles:
    active: dev # 指定环境,默认加载 default 环境
  cloud:
    consul:
      host: localhost
      port: 8500
      discovery:
        serviceName: service-producer    # 注册到consul的服务名称
      config:
        enabled: true #false禁用Consul配置,默认true
        # 设置配置的基本文件夹,默认值 config 可以理解为配置文件所在的最外层文件夹
        format: YAML    # 表示consul上面文件的格式 有四种 YAML PROPERTIES KEY-VALUE FILES
        #data-key: configuration    #表示consul上面的KEY值(或者说文件的名字) 默认是data
        data-key: data    #表示consul上面的KEY值(或者说文件的名字) 默认是data
        #prefix设置配置值的基本文件夹
        #defaultContext设置所有应用程序使用的文件夹名称
        #profileSeparator设置用于使用配置文件在属性源中分隔配置文件名称的分隔符的值
配置 spring cloud consul
profileSeparator:在属性源中分隔配置文件名称的分隔符的值,默认是逗号",",可以在后面consul 配置 Key/Value时看到。
3、配置consul key/value
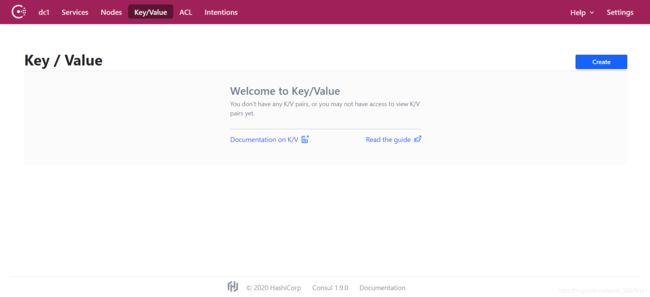
点击“create”
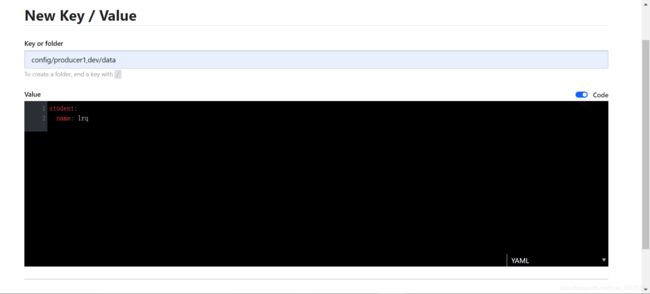
添加key和value
这里key 直接填“config/producer1,dev/data”了,这样直接同时创建文件夹和key。也可以先创建文件夹,再在文件夹里面创建key。
注意:
a、默认情况下,consul配置默认存储在/config文件夹中b、与bootstrap.yml配置文件要相对应
- produce1对应bootstrap.yml中的"spring.application.name"值
- dev对应bootstrap.yml中的"spring.profiles.active"值
- 逗号","对应bootstrap.yml中的"profileSeparator"值
- data对应bootstrap.yml中的"data-key"值
c、value用的是yml格式的配置,冒号后面有一个空格。
4、StudentConfig类——配置Java类
package com.example.producer.config;

import org.springframework.boot.context.properties.ConfigurationProperties;

@ConfigurationProperties(prefix = "student")
public class StudentConfig {
    private String name;

    public String getName() {
        return name;
    }

    public void setName(String name) {
        this.name = name;
    }

    @Override
    public String toString() {
        return "StudentConfig{" + "name='" + name + '}';
    }
}
将配置项写成java类内的成员变量
5、StudentController——配置测试类/接口类
package com.example.producer.controller;

import org.springframework.beans.factory.annotation.Autowired;
import org.springframework.web.bind.annotation.RequestMapping;
import org.springframework.web.bind.annotation.RestController;

import com.example.producer.config.StudentConfig;

@RestController
@RequestMapping("/student")
public class StudentController {

    @Autowired
    private StudentConfig studentConfig;

    @RequestMapping("/myname")
    public String testHello() {
        return studentConfig.getName();
    }

    @RequestMapping("/config")
    public String testConfig() {
        System.out.println(studentConfig.toString());
        return studentConfig.toString();
    }

}
6、程序入口类:添加注解@EnableConfigurationProperties
package com.example.producer;

import org.springframework.boot.SpringApplication;
import org.springframework.boot.autoconfigure.SpringBootApplication;
import org.springframework.boot.context.properties.EnableConfigurationProperties;
import org.springframework.cloud.client.discovery.EnableDiscoveryClient;
import com.example.producer.config.StudentConfig;

@EnableDiscoveryClient
@EnableConfigurationProperties({StudentConfig.class})
@SpringBootApplication
public class ProducerApplication {

	public static void main(String[] args) {
		SpringApplication.run(ProducerApplication.class, args);
	}
}
注意:属性配置类的class需要添加到springboot的属性配置注解里面,如上:@EnableConfigurationProperties({StudentConfig.class})
7、运行程序测试
首先确保已经运行consul
现在consul中的K/V为
然后,http://localhost:8511/student/myname
正确返回consul中存储的name值,可以证明能从分布式配置KV存储中获取数据
接着来验证“应用配置可以无需重启应用动态刷新、更改”。
项目现在还处于运行状态,无需重启项目,修改consul中的value,name值改为 osh
http://localhost:8511/student/myname
证明应用配置可以无需重启应用动态刷新、更改。
至此,consul作为配置中心的主要功能就完成了。
三、Spring Cloud Gateway作API网关
要求:
- 要求通过API网关访问后端的消费者服务,后端的消费者服务再访问生产者服务
- API网关、消费者服务与生产者服务都要注册到Consul并且需要多实例,至少2个
准备工作:构建2个生产者服务
将上一步中的producer项目复制一份,文件夹名称改为producer2(为了区分)
将bootstrap.yml中的端口号改为 8512
准备工作:构建2个消费者服务
用上一篇博文“微服务架构入门(1)”中的消费者项目即可
第一个消费者项目:consumer
bootstrap.yml
server:
  port: 8521 # 端口
spring:
  application:
    name: consumer1 # 应用名称
  profiles:
    active: dev # 指定环境,默认加载 default 环境
  cloud:
    consul:
      host: localhost
      port: 8500
      discovery:
        serviceName: spring-cloud-consul-consumer    # 注册到consul的服务名称
      config:
        enabled: true #false禁用Consul配置,默认true
        # 设置配置的基本文件夹,默认值 config 可以理解为配置文件所在的最外层文件夹
        format: YAML    # 表示consul上面文件的格式 有四种 YAML PROPERTIES KEY-VALUE FILES
        #data-key: configuration    #表示consul上面的KEY值(或者说文件的名字) 默认是data
        data-key: data    #表示consul上面的KEY值(或者说文件的名字) 默认是data
        #prefix设置配置值的基本文件夹
        #defaultContext设置所有应用程序使用的文件夹名称
        #profileSeparator设置用于使用配置文件在属性源中分隔配置文件名称的分隔符的值
第二个消费者项目:consumer2
bootstrap.yml
server:
  port: 8522 # 端口
spring:
  application:
    name: consumer2 # 应用名称
  profiles:
    active: dev # 指定环境,默认加载 default 环境
  cloud:
    consul:
      host: localhost
      port: 8500
      discovery:
        serviceName: spring-cloud-consul-consumer    # 注册到consul的服务名称
      config:
        enabled: true #false禁用Consul配置,默认true
        # 设置配置的基本文件夹,默认值 config 可以理解为配置文件所在的最外层文件夹
        format: YAML    # 表示consul上面文件的格式 有四种 YAML PROPERTIES KEY-VALUE FILES
        #data-key: configuration    #表示consul上面的KEY值(或者说文件的名字) 默认是data
        data-key: data    #表示consul上面的KEY值(或者说文件的名字) 默认是data
        #prefix设置配置值的基本文件夹
        #defaultContext设置所有应用程序使用的文件夹名称
        #profileSeparator设置用于使用配置文件在属性源中分隔配置文件名称的分隔符的值
接下来, 创建API网关项目:spring-cloud-gateway
1、POM依赖:添加 spring cloud gateway 网关 依赖
	4.0.0

		org.springframework.boot
		spring-boot-starter-parent
		2.0.4.RELEASE


	com.example
	spring-cloud-gateway
	0.0.1-SNAPSHOT
	spring-cloud-gateway
	Demo project for Spring Boot


		1.8
		Finchley.RELEASE


			org.springframework.boot
			spring-boot-starter-actuator


			org.springframework.cloud
			spring-cloud-starter-consul-discovery


			org.springframework.cloud
			spring-cloud-starter-consul-config


			org.springframework.boot
			spring-boot-starter-test
			test


			org.springframework.cloud
			spring-cloud-starter-gateway


				org.springframework.cloud
				spring-cloud-dependencies
				${spring-cloud.version}
				pom
				import


				org.springframework.boot
				spring-boot-maven-plugin


			spring-milestones
			Spring Milestones
			https://repo.spring.io/milestone
!注意!:Spring Cloud Gateway 不使用 Web 作为服务器,而是 使用 WebFlux 作为服务器.Gateway项目千万不要依赖 starter-web!
2、配置文件application.yml
server:
  port: 8531
spring:
  application:
    name: gateway1
  cloud:
    consul:
      enabled: true
      host: localhost
      port: 8500
      discovery:
        register: true
        serviceName: gateway
    # 路由网关配置
    gateway:
      # 配置路由规则
      routes:
       # 采用自定义路由 ID(有固定用法,不同的 id 有不同的功能,详见:https://cloud.spring.io/spring-cloud-gateway/2.0.x/single/spring-cloud-gateway.html#gateway-route-filters)
      - id: data-service1
        # uri: 目标服务地址 采用 LoadBalanceClient 方式请求,以 lb:// 开头,后面的是注册在 注册中心 上的服务名
        uri: lb://spring-cloud-consul-consumer
        # Predicate 路由条件 主要作用是匹配用户的请求,有很多种用法
        predicates:
          - Path=/data-service1/**
        # 过滤规则
        filters:
          - StripPrefix=1
gateway配置 参考博文链接:
- https://blog.csdn.net/lizhiqiang1217/article/details/90575231?ops_request_misc=&request_id=&biz_id=102&utm_term=spring%2520cloud%2520gateway&utm_medium=distribute.pc_search_result.none-task-blog-2~all~sobaiduweb~default-7-90575231.nonecase
- https://www.jianshu.com/p/1c942a8abe18
- id为 data-service1 的路由,该路由的目标服务为 注册在consul注册中心的 名为 spring-cloud-consul-consumer 的服务。匹配的用户请求路径前缀类似 /data-service1/**
- 另外,这里可以配置多条路由,这里只配置一条路由来完成简单的功能实现。
3、启动类GatewayServiceApplication
package com.example.springcloudgateway;

import org.springframework.boot.SpringApplication;
import org.springframework.boot.autoconfigure.SpringBootApplication;

@SpringBootApplication
public class SpringCloudGatewayApplication {

	public static void main(String[] args) {
		SpringApplication.run(SpringCloudGatewayApplication.class, args);
	}

}
这样,网关项目spring-cloud-gateway就创建好了。
再复制一份,修改项目文件夹名称为 spring-cloud-gateway2,修改 配置文件application.yml 端口号为8532(实际还是同一个服务,只是端口号不同,是同一个服务的两个实例)。
我们这里只是为了在consul上注册两个API网关项目,所以配置文件其他内容可以先不用管,用第一个API网关项目测试。在实际的项目中,每个网关中都会配置好不同的路由网关配置。我们这里就只是为了简单的完成功能测试,后续还可以丰满项目。
至此,2个消费者,2个生产者,2个API网关都已完成。
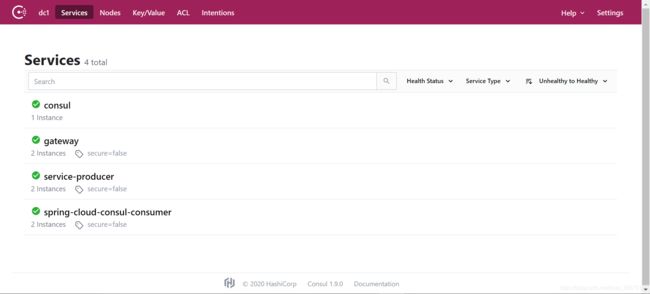
将6个实例全部启动。consul上可以看到全部注册完成,gateway/service-producer/spring-cloud-consul-consumer 三个服务各2个实例,全部成功注册。
浏览器请求 http://localhost:8531/data-service1/call
8531 是 gateway项目 第一个实例的端口号
/data-service1/** 是在 gateway 中配置的路由条件路径
/call 是 消费者consumer 项目中的接口请求映射路径
consumer项目中的call()方法,完成调用service-producer服务中多个实例的负载均衡,并有输出。
@RequestMapping("/call")
    public String call() {
        ServiceInstance serviceInstance = loadBalancer.choose("service-producer");
        System.out.println("服务地址:" + serviceInstance.getUri());
        System.out.println("服务名称:" + serviceInstance.getServiceId());

        //RestTemplate
        String callServiceResult = new RestTemplate().getForObject(serviceInstance.getUri().toString() + "/hello", String.class);
        System.out.println(callServiceResult);
        return callServiceResult;
    }
consumer项目的控制台输出
再浏览器多次请求 http://localhost:8531/data-service1/call
返回值:按照返回两次hello consul,返回两次 hello consul two的规律。
因为消费者实例和生产者实例的4个端口都是可用的,都可以接收请求,所以这里api网关路由到两个消费者实例 与 每个消费者负载均衡的调用生产者实例 都是以轮询的方式完成的。
这里请求规律应该如下:
- api网关——consumer——producer
- api网关——consumer2——producer
- api网关——consumer1——producer2
- api网关——conusmer2——producer2
- api网关——consumer——producer
..............
从consumer和consumer2的控制台输出,可以观察出请求规律。
至此,完成Spring Cloud Gateway作为API网关的基本功能的实现。


