Vue3 知识大总结(二)组件化基础
| 前端 Vue3 框架 | 地址 |
|---|---|
| (一)基础语法 | https://blog.csdn.net/weixin_42771853/article/details/129956268 |
| (二)组件化基础 | https://blog.csdn.net/weixin_42771853/article/details/129957080 |
| (三)Composition API | https://blog.csdn.net/weixin_42771853/article/details/129957511 |
| (四)Vue3 全家桶 router、vuex、pinia、axios | https://blog.csdn.net/weixin_42771853/article/details/129957595 |
目录
- 一、组件化开发思想
-
- 1. 注册全局组件
- 2. 注册局部组件
- 二、Vue 脚手架
-
- 1. Vue CLI 安装和使用
-
- 1.1 安装
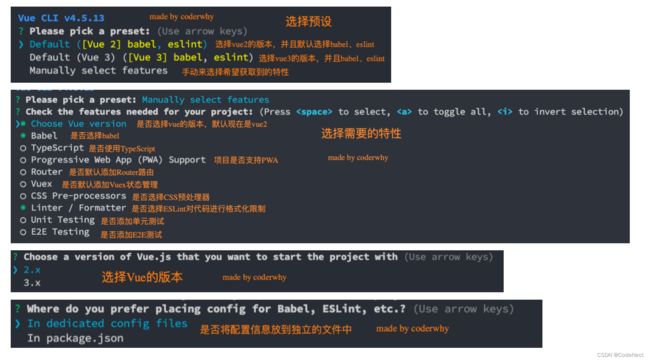
- 1.2 vue create 项目的过程
- 2. Vue 项目目录结构
- 3. vue 初步使用
- 4. 知识补充
-
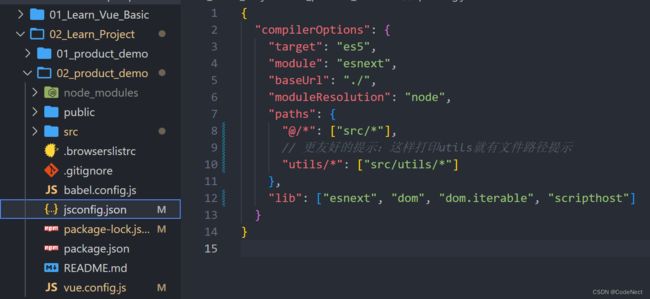
- 4.1 jsconfig 文件的作用
- 4.2 vue 不同版本的作用
- 4.3 css 的 scoped 作用域
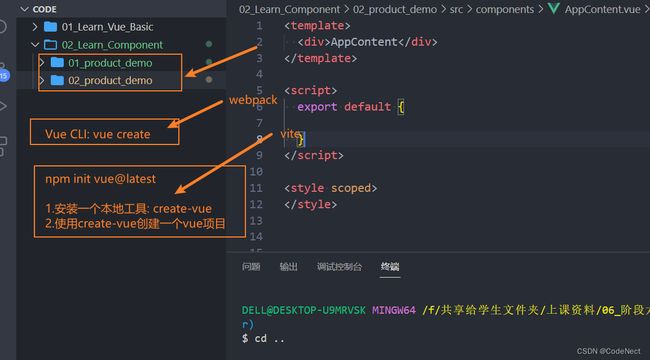
- 4.4 npm init vue@latest创建项目
- 三、组件间的通信
-
- 1. 组件的嵌套关系
- 2. 父传子 - props(重要)
-
- 2.1 基本用法
- 2.2 更多细节
- 2.3 非 prop 的 attribute
- 2.4 禁用Attribute继承和多根节点
- 3. 子传父 - $emit(重要)
- 4. 阶段案例练习 - TabControl的封装
- 四、组件的插槽 Slot
-
- 1. 认识 Slot 的作用
- 2. Slot 的基本使用和默认值(重要)
- 3. Slot 的具名插槽(重要)
-
- 3.1 动态插槽名(了解)
- 4. 作用域插槽
-
- 4.1 渲染作用域
- 4.2 作用域插槽使用
- 五、非父子组件的通信
-
- 1. Provide / Inject
-
- 1.1 函数写法
- 1.2 数据的响应式
- 2. 事件总线 hy-event-store
-
- 2.1 取消事件
- 六、组件化-额外知识补充
-
- 1. 组件的生命周期(重要)
- 2. refs引入元素/组件(重要)
- 3. 动态组件的使用
- 4. keep-alive
-
- 4.1 keep-alive 属性
- 4.2 缓存组件的生命周期
- 5. 异步组件的使用
-
- 5.1 webpack 分包处理
- 5.2 Vue 中实现异步组件
- 6. 组件的 v-model
-
- 6.1 绑定多个自定义名称属性
- 7. 混入 Mixin
-
- 7.1 Mixin 的基本使用
- 7.2 全局混入 Mixin
一、组件化开发思想
组件化是Vue、React、Angular的核心思想:
- 前面我们的createApp函数传入了一个对象App,这个对象其实本质上就是一个组件,也是我们应用程序的根组件
- 组件化提供了一种抽象,让我们可以开发出一个个独立可复用的小组件来构造我们的应用
- 任何的应用都会被抽象成一颗组件树
1. 注册全局组件
- 全局组件:在任何其他的组件中都可以使用的组件
- 通过component方法传入组件名称、组件对象即可注册一个全局组件了
<div id="app">
	<HomeNav></HomeNav>
	<home-nav></home-nav>

	<product-item></product-item>
	<product-item></product-item>
	<product-item></product-item>
</div>

<template id="nav">
	<h2>我是应用程序的导航</h2>
</template>

<template id="product">
	<div class="product">
		<h2>{{title}}</h2>
		<p>商品描述, 限时折扣, 赶紧抢购</p>
		<p>价格: {{price}}</p>
		<button @click="favarItem">收藏</button>
	</div>
</template>

<script src="../lib/vue.js"></script>
<script>
	// 1.创建app
	const app = Vue.createApp({
		// data: option api
		data() {
			return {}
		},
	})
	// 2.注册全局组件
	app.component("product-item", {
		template: "#product",
		data() {
			return {
				title: "我是商品Item",
				price: 9.9
			}
		},
		methods: {
			favarItem() {
				console.log("收藏了当前的item")
			}
		}
	})

	app.component("HomeNav", {
		template: "#nav"
	})

	// 3.挂载app
	app.mount("#app")
</script>
2. 注册局部组件
- 局部组件:只有在注册的组件中才能使用的组件(常用)
- 通过components属性选项来进行注册
<div id="app">
	<home-nav></home-nav>
	<product-item></product-item>
	<product-item></product-item>
	<product-item></product-item>
</div>

<template id="product">
	<div class="product">
		<h2>{{title}}</h2>
		<p>商品描述, 限时折扣, 赶紧抢购</p>
		<p>价格: {{price}}</p>
		<button>收藏</button>
	</div>
</template>

<template id="nav">
	<div>-------------------- nav start ---------------</div>
	<h1>我是home-nav的组件</h1>
	<product-item></product-item>
	// 在此组件中加components属性才可使用
	<div>-------------------- nav end ---------------</div>
</template>

<script src="../lib/vue.js"></script>
<script>
	const ProductItem = {
		template: "#product",
		data() {
			return {
				title: "我是product的title",
				price: 9.9
			}
		}
	}

	// 1.创建局部组件
	const app = Vue.createApp({
		// components: option api
		components: {
			ProductItem,
			HomeNav: {
				template: "#nav",
				components: {
					ProductItem
				}
			}
		},
		// data: option api
		data() {
			return {
				message: "Hello Vue"
			}
		}
	})

	// 2.挂载app
	app.mount("#app")
</script>
二、Vue 脚手架
在真实开发中,我们可以通过一个后缀名为 .vue 的single-file components (单文件组件) 来解决,并且可以使用 webpack或者vite或者rollup等构建工具来对其进行处理
想要使用这一的SFC的.vue文件,比较常见的是两种方式:
- 方式一:使用Vue CLI来创建项目,项目会默认帮助我们配置好所有的配置选项,可以在其中直接使用.vue文件
- 方式二:自己使用webpack或rollup或vite这类打包工具,对其进行打包处理
1. Vue CLI 安装和使用
Vue的脚手架就是Vue CLI:
- CLI是Command-Line Interface, 翻译为命令行界面
- 我们可以通过CLI选择项目的配置和创建出我们的项目
- Vue CLI已经内置了webpack相关的配置,我们不需要从零来配置
1.1 安装
- 安装Vue CLI:
npm install @vue/cli -g - 升级Vue CLI:
npm update @vue/cli -g
1.2 vue create 项目的过程
- 通过Vue的命令来创建项目:
Vue create 项目的名称
2. Vue 项目目录结构
node_modules:  安装的所有依赖包

public: public目录存放的是一些公用文件
   ---favicon.ico  图标
   ---index.html   打包webpack时所需要的的HTML 模板

src: 存放vue项目的源代码
   --assets: 资源文件,比如存放css,图片等资源
   --components: 组件文件夹
   --APP.vue   根组件
   --main.js  项目的入口文件

.browserslistrc:  设置目标浏览器,进行浏览器适配

.gitignore:  git的忽略文件

babel.config.js:  babel的配置

jsconfig.json:  给vscode进行读取,vscode在读取到其中的内容时,给我们代码更加友好的提示

package-lock.json:   项目包的锁定文件,npm install 可以通过package-lock文件来检测lock中包的版本是否和package.json中一致 ---一致,会优先查找缓存,不一致,就会重新构建依赖关系

package.json:  npm配置文件,记录这你项目的名称,版本号,项目描述,也记录项目所依赖的其他库的信息和依赖库的版本号

README.md:  项目说明(描述)

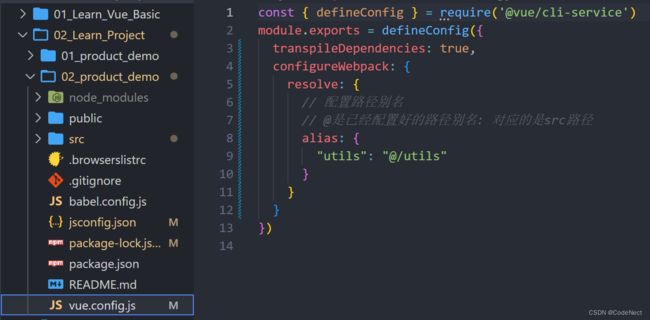
vue.config.js:  vue 的配置文件
3. vue 初步使用
- main.js
import { createApp } from "vue";
import App from "./components/App.vue";
// import ProductItem from "./components/ProductItem.vue";

const app = createApp(App);

// 全局注册
// app.component("product-item", ProductItem);

app.mount("#app");
- App.vue
<template>
	<h2>{{ title }}</h2>
	<h2>当前计数:{{ counter }}</h2>
	<button @click="decrement">-</button>
	<button @click="increment">+</button>
	<product-item></product-item>
</template>

<script>
// 局部注册
import ProductItem from "./ProductItem.vue"

export default {
	components: {
		ProductItem,
	},
	data() {
		return {
			title: "我还是标题",
			counter: 0,
		};
	},
	methods: {
		decrement() {
			this.counter--;
		},
		increment() {
			this.counter++;
		},
	},
}
</script>

<style>
	h2 {
		color: red;
	}
</style>
- ProductItem.vue
<template>
	<div class="product">
		<h2>我是商品</h2>
		<div>商品图片</div>
		<div>
			商品价格: <span>¥{{ price }}</span>
		</div>
	</div>
</template>

<script>
export default {
	data() {
		return {
			price: 9.9,
			count: 0,
		};
	},
}
</script>

<style></style>
4. 知识补充
4.1 jsconfig 文件的作用
给vscode进行读取,vscode在读取到其中的内容时,给我们代码更加友好的提示
4.2 vue 不同版本的作用
- runtime版本:没有对模板的编译,需要自己写对应的render函数(返回h函数)或者setup返回一个函数,函数的返回值是h函数
- 没有将模板转成vnode节点这一过程
- runtime+comiple 版本:可以将template模板通过compile转换成对应的vnode节点
4.3 css 的 scoped 作用域
每个vue文件中的css:
此时对title的样式只对此vue文件中的.title适用,其他vue文件中不适用
4.4 npm init vue@latest创建项目
- vite打包:
npm init vue@latest
三、组件间的通信
1. 组件的嵌套关系
对组件进行拆分,拆分成一个个功能的小组件:
-
上面的嵌套逻辑如下,它们存在如下关系:
- App组件是Header、Main、Footer组件的父组件
- Main组件是Banner、ProductList组件的父组件
-
在开发过程中,我们会经常遇到需要组件之间相互进行通信:
- 父组件传递给子组件:通过props属性
- 子组件传递给父组件:通过$emit触发事件
2. 父传子 - props(重要)
2.1 基本用法
父子组件之间通信,比如父组件有一些数据,需要子组件来进行展示:
Props有两种常见的用法:
- 方式一:字符串数组,数组中的字符串就是attribute的名称
- 只能说明传入的attribute的名称,并不能对其进行任何形式的限制
- 方式二:对象类型,可以在指定attribute名称的同时,传入更多内容
- 指定传入的attribute的类型
type- 指定类型的最好在父组件传值时使用
:age="18"
- 指定类型的最好在父组件传值时使用
- 指定传入的attribute是否是必传的
required - 指定没有传入时,attribute的默认值
default
- 指定传入的attribute的类型
2.2 更多细节
-
type 的类型
- String
- Number
- Boolean
- Array
- Object
- Date
- Function
- Symbol
-
Prop 的大小写命名
- 使用 DOM 中的模板时,camelCase (驼峰命名法) 的 prop 名需要使用其等价的 kebab-case (短横线分隔命名) 命名
// App.vue
<template>
	<!-- 1.展示why的个人信息 -->
	<!-- 如果当前的属性是一个非prop的attribute, 那么该属性会默认添加到子组件的根元素上 -->
	<show-info name="why" :age="18" :height="1.88"
address="广州市" abc="cba" class="active" />

	<!-- 2.展示kobe的个人信息 -->
	<show-info name="kobe" :age="30" :height="1.87" />

	<!-- 3.展示默认的个人信息 -->
	<show-info :age="100" show-message="哈哈哈哈"/>
</template>

<script>
import ShowInfo from './ShowInfo.vue'

export default {
	components: {
		ShowInfo
	}
}
</script>

<style scoped>
</style>
// ShowInfo.vue
<template>
	<div class="infos">
		<h2 :class="$attrs.class">姓名: {{ name }}</h2>
		<h2>年龄: {{ age }}</h2>
		<h2>身高: {{ height }}</h2>
		<h2>Message: {{ showMessage }}</h2>
	</div>

	<div class="others" v-bind="$attrs"></div>
</template>

<script>
export default {
	// inheritAttrs: false,
	// 作用: 接收父组件传递过来的属性
	// 1.props数组语法
	// 弊端: 1> 不能对类型进行验证 2.没有默认值的
	// props: ["name", "age", "height"]

	// 2.props对象语法(必须掌握)
	props: {
		name: {
			type: String,
			default: "我是默认name"
		},
		age: {
			type: Number,
			required: true,
			default: 0
		},
		height: {
			type: Number,
			default: 2
		},
		// 重要的原则: 对象类型写默认值时, 需要编写default的函数, 函数返回默认值
		friend: {
			type: Object,
			default() {
				return { name: "james" }
			}
		},
		hobbies: {
			type: Array,
			default: () => ["篮球", "rap", "唱跳"]
		},
		showMessage: {
			type: String,
			default: "我是showMessage"
		}
	}
}
</script>

<style scoped>
</style>
2.3 非 prop 的 attribute
- 当我们传递给一个组件某个属性,但是该属性并没有定义对应的props或者emits时,就称之为 非Prop的Attribute
- 当组件有单个根节点时,非Prop的Attribute将自动添加到根节点的Attribute中
2.4 禁用Attribute继承和多根节点
- 如果我们不希望组件的根元素继承attribute,可以在组件中设置
inheritAttrs: false - 多个根节点的attribute如果没有显示的绑定,那么会报警告,我们必须手动的指定要绑定到哪一个属性上
v-bind="$attrs"、:class="$attrs.address"
3. 子传父 - $emit(重要)
当子组件有一些事件发生的时候,比如在组件中发生了点击,父组件需要切换内容; 子组件有一些内容想要传递给父组件:
- 首先,我们需要在子组件中定义好在某些情况下触发的事件名称,之后通过this.$emit的方式发出去事件
- 其次,在父组件中以v-on的方式传入要监听的事件名称,并且绑定到对应的方法中
- 最后,在子组件中发生某个事件的时候,根据事件名称触发对应的事件
// AddCounter.vue
<template>
	<div class="add">
		<button @click="btnClick(1)">+1</button>
		<button @click="btnClick(5)">+5</button>
		<button @click="btnClick(10)">+10</button>
	</div>
</template>

<script>
export default {
	// 1.emits数组语法
	emits: ["add"],
	// 2.emmits对象语法(了解)
	// emits: {
	//   add: function(count) {
	//     if (count <= 10) {
	//       return true
	//     }
	//     return false
	//   }
	// },

	methods: {
		btnClick(count) {
			// 让子组件发出去一个自定义事件
			// 第一个参数自定义的事件名称
			// 第二个参数是传递的参数
			this.$emit("add", 100)
		}
	}
}
</script>

<style scoped>
</style>
<template>
	<div class="app">
		<h2>当前计数: {{ counter }}</h2>
		<!-- 1.自定义add-counter, 并且监听内部的add事件 -->
		<add-counter @add="addBtnClick"></add-counter>

		<!-- 2.自定义sub-counter, 并且监听内部的sub事件 -->
		<sub-counter @sub="subBtnClick"></sub-counter>
	</div>
</template>

<script>
import AddCounter from './AddCounter.vue'
import SubCounter from './SubCounter.vue'

export default {
	components: {
		AddCounter,
		SubCounter
	},
	data() {
		return {
			counter: 0
		}
	},
	methods: {
		addBtnClick(count) {
			this.counter += count
		},
		subBtnClick(count) {
			this.counter -= count
		}
	}
}
</script>

<style scoped>
</style>
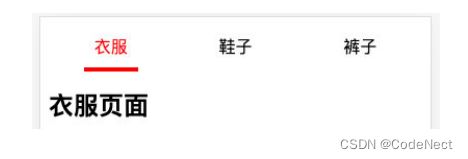
4. 阶段案例练习 - TabControl的封装
四、组件的插槽 Slot
1. 认识 Slot 的作用
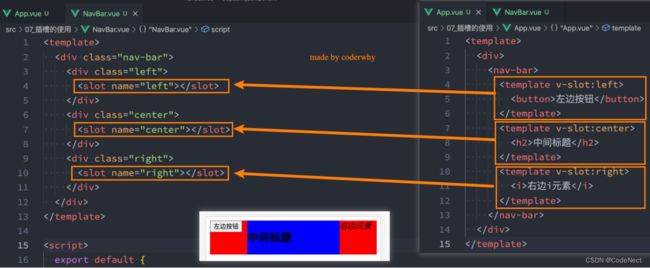
假如我们定制一个通用的导航组件 - NavBar
- 这个组件分成三块区域:左边-中间-右边,每块区域的内容是不固定
- 左边区域可能显示一个菜单图标,也可能显示一个返回按钮,可能什么都不显示
- 中间区域可能显示一个搜索框,也可能是一个列表,也可能是一个标题,等等
- 右边可能是一个文字,也可能是一个图标,也可能什么都不显示
定义插槽slot:
- 插槽的使用过程其实是抽取共性、预留不同
- 我们会将共同的元素、内容依然在组件内进行封装
- 同时会将不同的元素使用slot作为占位,让外部决定到底显示什么样的元素
2. Slot 的基本使用和默认值(重要)
// App.vue
<template>
	<div class="app">
		<!-- 1.内容是button -->
		<show-message>
			<button>我是按钮元素</button>
		</show-message>

		<!-- 2.内容是超链接 -->
		<show-message>
			<a href="#">百度一下</a>
		</show-message>

		<!-- 3.内容是一张图片 -->
		<show-message>
			<img src="@/img/kobe02.png" alt="">
		</show-message>

		<!-- 4.内容没有传递 -->
		<show-message></show-message>
	</div>
</template>

<script>
import ShowMessage from './ShowMessage.vue'

export default {
	components: {
		ShowMessage
	}
}
</script>

<style scoped>
</style>
// ShowMessage.vue
<template>
	<h2>哈哈哈哈哈</h2>
	<div class="content">
		<slot>
			<p>我是默认内容, 哈哈哈</p>
		</slot>
	</div>
</template>

<script>
export default {}
</script>

<style scoped>
</style>
3. Slot 的具名插槽(重要)
当有多个插槽时,默认情况下每个插槽都会获取到我们插入的内容来显示。希望达到的效果是插槽对应的显示,这个时候我们就可以使用 具名插槽:
- 具名插槽顾名思义就是给插槽起一个名字, 元素有一个特殊的 attribute:name
- 一个不带 name 的slot,会带有隐含的名字 default
3.1 动态插槽名(了解)
可以通过 v-slot:[dynamicSlotName]方式动态绑定一个名称
// App.vue
<template>
	<nav-bar>
		<template v-slot:left>
			<button>{{ leftText }}</button>
		</template>
		// 语法糖写法
		<template #center>
			<span>内容</span>
		</template>
		<template #right>
			<a href="#">登录</a>
		</template>
	</nav-bar>

	<!-- nav-bar只给一个插槽传入数据 -->
	<nav-bar>
		<template v-slot:[position]>
			<a href="#">注册</a>
		</template>
	</nav-bar>
	<button @click=" position = 'left' ">左边</button>
	<button @click=" position = 'center' ">中间</button>
	<button @click=" position = 'right' ">右边</button>
</template>

<script>
import NavBar from './NavBar.vue'

export default {
	components: {
		NavBar
	},
	data() {
		return {
			position: "center",
			leftText: "返回"
		}
	}
}
</script>

<style scoped>
</style>
// NavBar.vue
<template>
	<div class="nav-bar">
		<div class="left">
			<slot name="left">left</slot>
		</div>
		<div class="center">
			<slot name="center">center</slot>
		</div>
		<div class="right">
			<slot name="right">right</slot>
		</div>
	</div>

	<div class="other">
		<slot name="default"></slot>
	</div>
</template>

<script>
export default {}
</script>

<style scoped>
	.nav-bar {
		display: flex;
		height: 44px;
		line-height: 44px;
		text-align: center;
	}

	.left {
		width: 80px;
		background-color: orange;
	}

	.center {
		flex: 1;
		background-color: skyblue;
	}

	.right {
		width: 80px;
		background-color: aquamarine;
	}
</style>
4. 作用域插槽
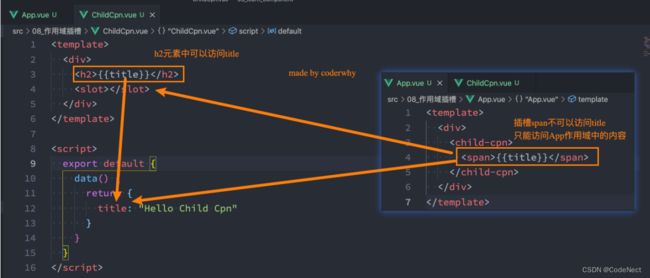
4.1 渲染作用域
在Vue中有渲染作用域的概念:
- 父级模板里的所有内容都是在父级作用域中编译的
- 子模板里的所有内容都是在子作用域中编译的
4.2 作用域插槽使用
- 核心:希望父组件可以访问到slot传入的子组件的内容
阶段案例练习改进版:
// TabControl.vue
<template>
	<div class="tab-control">
		<template v-for="(item, index) in titles" :key="item">
			<div class="tab-control-item"
			:class="{ active: index === currentIndex }"
			@click="itemClick(index)">
				// 选项列表中的内容形式span希望可以在外部更改为其他形式(如button),故引入slot插槽
				// 将子组件的内容item、abc通过slot传至父组件
				<slot :item="item" abc="cba">
					<span>{{ item }}</span>
				</slot>
			</div>
		</template>
	</div>
</template>

<script>
	export default {
		props: {
			titles: {
				type: Array,
				default: () => [],
			},
		},
		data() {
			return {
				currentIndex: 0,
			};
		},
		emits: ["tabItemClick"],
		methods: {
			itemClick(index) {
				this.currentIndex = index;
				this.$emit("tabItemClick", index);
			},
		},
	};
</script>

<style scoped>
	.tab-control {
		display: flex;
		height: 44px;
		line-height: 44px;
		text-align: center;
	}

	.tab-control-item {
		flex: 1;
	}

	.tab-control-item.active {
		color: red;
		font-weight: 700;
	}

	.tab-control-item.active span {
		border-bottom: 3px solid red;
		padding: 8px;
	}
</style>
// App.vue
<template>
	<div class="app">
		<!-- 1.tab-control -->
		<tab-control :titles="['衣服', '鞋子', '裤子']"
		@tab-item-click="tabItemClick"/>
		<!-- 2.展示内容 -->
		<h1>{{ pageContents[currentIndex] }}</h1>


		<!-- 1.tab-control: button -->
		<tab-control :titles="['衣服', '鞋子', '裤子']"
		@tab-item-click="tabItemClick">
			// 从子组件中接收到内容放入props中
			<template v-slot:default="props">
				<button>{{ props.item }}</button>
			</template>
		</tab-control>

		<!-- 2.tab-control: a元素(重要) -->
		<tab-control :titles="['衣服', '鞋子', '裤子']"
		@tab-item-click="tabItemClick">
			// 从子组件中接收到内容放入props中
			<template #default="props">
				<a href="#">{{ props.item }}</a>
			</template>
		</tab-control>
	</div>
</template>

<script>
	import TabControl from './TabControl.vue'

	export default {
		components: {
			TabControl
		},
		data() {
			return {
				pageContents: [ "衣服列表", "鞋子列表", "裤子列表" ],
				currentIndex: 0
			}
		},
		methods: {
			tabItemClick(index) {
				this.currentIndex = index
			}
		}
	}
</script>

<style scoped>
</style>
五、非父子组件的通信
主要有两种方式:
- 全局事件总线
- Provide/Inject
1. Provide / Inject
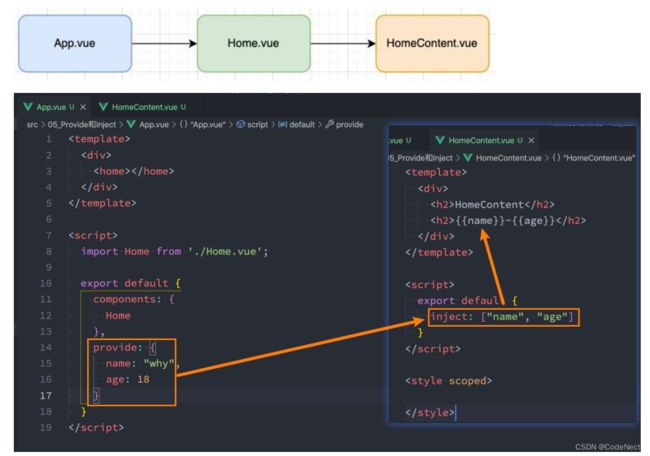
一些深度嵌套的组件,子组件想要获取父组件的部分内容,可以使用 Provide 和 Inject :
- 无论层级结构有多深,父组件都可以作为其所有子组件的依赖提供者
- 父组件有一个 provide 选项来提供数据
- 子组件有一个 inject 选项来开始使用这些数据
1.1 函数写法
如果Provide中提供的一些数据是来自data,那么我们可能会想要通过this来获取:
1.2 数据的响应式
如果修改了names之后,之前在provide中引入的 this.names.length 本身并不是响应式的:
2. 事件总线 hy-event-store
-
在Banner.vue中触发事件:
eventBus.emit("事件名",参数) -
在App.vue中监听事件:
eventBus.on("事件名",回调函数)
// HomeBanner.vue
<template>
	<div class="banner">
		<button @click="bannerBtnClick">banner按钮</button>
	</div>
</template>

<script>
import eventBus from './utils/event-bus'

export default {
methods: {
	bannerBtnClick() {
		console.log("bannerBtnClick")
		eventBus.emit("whyEvent", "why", 18, 1.88)
	}
}
}
</script>
// App.vue
<template>
	<div class="app">
		<h2>App Message: {{ message }}</h2>
		<home></home>

		<button @click="isShowCategory = false">是否显示category</button>
		<category v-if="isShowCategory"></category>
	</div>
</template>

<script>
import eventBus from './utils/event-bus'
import Home from './Home.vue'
import Category from './Category.vue'

export default {
	components: {
		Home,
		Category
	},
	data() {
		return {
			message: "Hello App",
			isShowCategory: true
		}
	},
	created() {
		// fetch()

		// 事件监听
		eventBus.on("whyEvent", (name, age, height) => {
			console.log("whyEvent事件在app中监听", name, age, height)
			this.message = `name:${name}, age:${age}, height:${height}`
		})
	}
}
</script>
2.1 取消事件
某些情况下我们希望取消掉之前注册的函数监听:
// Category.vue
<template>
	<div>
		<h2>Category</h2>
	</div>
</template>

<script>
import eventBus from './utils/event-bus'

export default {
	methods: {
		whyEventHandler() {
			console.log("whyEvent在category中监听")
		}
	},
	created() {
		eventBus.on("whyEvent", this.whyEventHandler)
	},
	unmounted() {
		console.log("category unmounted")
		<!-- 取消事件 -->
		eventBus.off("whyEvent", this.whyEventHandler)
	}
}
</script>
六、组件化-额外知识补充
1. 组件的生命周期(重要)
- 生命周期函数是一些钩子函数(回调函数),在某个时间会被Vue源码内部进行回调
- 通过对生命周期函数的回调,我们可以知道目前组件正在经历什么阶段
- 那么我们就可以在该生命周期中编写属于自己的逻辑代码了
2. refs引入元素/组件(重要)
某些情况下,我们在组件中想要直接获取到元素对象或者子组件实例:
- 在Vue开发中我们是不推荐进行DOM操作的
- 这个时候,我们可以给元素或者组件绑定一个ref的attribute属性
- 通过$parent来访问父元素
- 通过$root来访问根组件
// App.vue
<template>
	<div class="app">
		<!-- 绑定ref属性 -->
		<h2 ref="title" class="title" :style="{ color: titleColor }">
			{{ message }}
		</h2>
		<button ref="btn" @click="changeTitle">修改title</button>

		<banner ref="banner" />
	</div>
</template>

<script>
import Banner from "./Banner.vue";

export default {
	components: {
		Banner,
	},
	data() {
		return {
			message: "Hello World",
			titleColor: "red",
		};
	},
	methods: {
		changeTitle() {
			// 1.获取h2/button元素
			console.log(this.$refs.title);
			console.log(this.$refs.btn);

			// 2.获取banner组件: 组件实例
			console.log(this.$refs.banner); // Proxy(Object) {bannerClick: ƒ, …}
			// 2.1.在父组件中可以主动的调用子组件的对象方法
			this.$refs.banner.bannerClick();
			// 2.2.获取banner组件实例, 获取banner template中的所有元素(单根)
			console.log(this.$refs.banner.$el);
			// 2.3.如果banner template是多个根, 拿到的是第一个node节点
			// 注意: 开发中不推荐一个组件的template中有多个根元素
			// console.log(this.$refs.banner.$el.nextElementSibling)

			// 3.组件实例还有两个属性(了解):
			console.log(this.$parent); // 获取父组件 null
			console.log(this.$root); // 获取根组件 Proxy(Object) {changeTitle: ƒ, …}
		},
	},
};
</script>
3. 动态组件的使用
想要实现了一个功能:点击一个tab-bar,切换不同的内容显示
可以使用动态组件的方式实现
- 动态组件是使用 component 组件,通过一个特殊的attribute is 来实现:
- 动态组件的传值:将属性和监听事件放到component上来使用
// App.vue
<template>
	<div class="app">
		<div class="tabs">
			<template v-for="item in tabs" :key="item">
				<button :class="{ active: currentTab === item }"
				@click="itemClick(item)">
					{{ item }}
				</button>
			</template>
		</div>

		<div class="view">
			<!-- 做法: 动态组件 component -->
			<!-- is中的组件需要来自两个地方: 1.全局注册的组件 2.局部注册的组件 -->
			<!-- 传值 -->
			<component :is="currentTab"
			name="why"
			:age="18"
			@homeClick="homeClick">
			</component>
		</div>
	</div>
</template>

<script>
import Home from './views/Home.vue'
import About from './views/About.vue'
import Category from './views/Category.vue'

export default {
	components: {
		Home,
		About,
		Category
	},
	data() {
		return {
			tabs: ["home", "about", "category"],
			currentTab: "home"
		}
	},
	methods: {
		itemClick(tab) {
			this.currentTab = tab
		},
		homeClick(payload) {
			console.log("homeClick:", payload)
		}
	}
}
</script>

<style scoped>
	.active {
		color: red;
	}
</style>
// Home.vue
<template>
	<div>
		<h2>Home组件: {{ name }} - {{ age }}</h2>
		<button @click="homeBtnClick">homeBtn</button>
	</div>
</template>

<script>
export default {
	// 与父组件进行传值
	props: {
		name: {
			type: String,
			default: ""
		},
		age: {
			type: Number,
			default: 0
		}
	},
	emits: ["homeClick"],
	methods: {
		homeBtnClick() {
			this.$emit("homeClick", "home")
		}
	}
}
</script>
4. keep-alive
- 默认情况下,我们在切换组件后,原组件会被销毁掉,再次回来时会重新创建组件
- 在开发中某些情况我们希望继续保持组件的状态,而不是销毁掉,这个时候我们就可以使用一个内置组件:keep-alive
4.1 keep-alive 属性
keep-alive有一些属性:
- include - string | RegExp | Array。只有名称匹配的组件会被缓存
- exclude - string | RegExp | Array。任何名称匹配的组件都不会被缓存
- max - number | string。最多可以缓存多少组件实例,一旦达到这个数 字,那么缓存组件中最近没有被访问的实例会被销毁
include 和 exclude prop 允许组件有条件地缓存:
- 二者都可以用逗号分隔字符串、正则表达式或一个数组来表示
- 匹配首先检查组件自身的
name选项
4.2 缓存组件的生命周期
对于缓存的组件来说,再次进入时,我们是不会执行created或者mounted等生命周期函数的:
- 可以使用activated 监听到何时重新进入到了组件
- 可以使用 deactivated 监听到何时离开了组件
// App.vue
<template>
	<div class="app">
		<div class="tabs">
			<template v-for="item in tabs" :key="item">
				<button :class="{ active: currentTab === item }"
				@click="itemClick(item)">
					{{ item }}
				</button>
			</template>
		</div>

		<div class="view">
			<!-- include: 组件的名称来自于组件定义时 name 选项  -->
			<keep-alive include="home,about">
				<component :is="currentTab"></component>
			</keep-alive>
		</div>
	</div>
</template>

<script>
	import Home from './views/Home.vue'
	import About from './views/About.vue'
	import Category from './views/Category.vue'

	export default {
		components: {
			Home,
			About,
			Category
		},
		data() {
			return {
				tabs: ["home", "about", "category"],
				currentTab: "home"
			}
		},
		methods: {
			itemClick(tab) {
				this.currentTab = tab
			},
			homeClick(payload) {
				console.log("homeClick:", payload)
			}
		}
	}
</script>

<style scoped>
	.active {
		color: red;
	}
</style>
// Home.vue
<template>
	<div>
		<h2>Home组件</h2>
		<h2>当前计数: {{ counter }}</h2>
		<button @click="counter++">+1</button>
	</div>
	</div>
</template>

<script>
export default {
	// 需有name,与include配对
	name: "home",
	data() {
		return {
			counter: 0
		}
	},
	created() {
		console.log("home created")
	},
	unmounted() {
		console.log("home unmounted")
	},
	// 对于保持keep-alive组件, 监听有没有进行切换
	// keep-alive组件进入活跃状态
	activated() {
		console.log("home activated")
	},
	deactivated() {
		console.log("home deactivated")
	}
}
</script>
5. 异步组件的使用
5.1 webpack 分包处理
- 默认的打包过程:
- 默认情况下,在构建整个组件树的过程中,因为组件和组件之间是通过模块化直接依赖的,那么webpack在打包时就会将组件模块打包到一起(比如一个app.js文件中)
- 随着项目的不断庞大,app.js文件的内容过大,会造成首屏的渲染速度变慢
- 打包时,代码的分包:
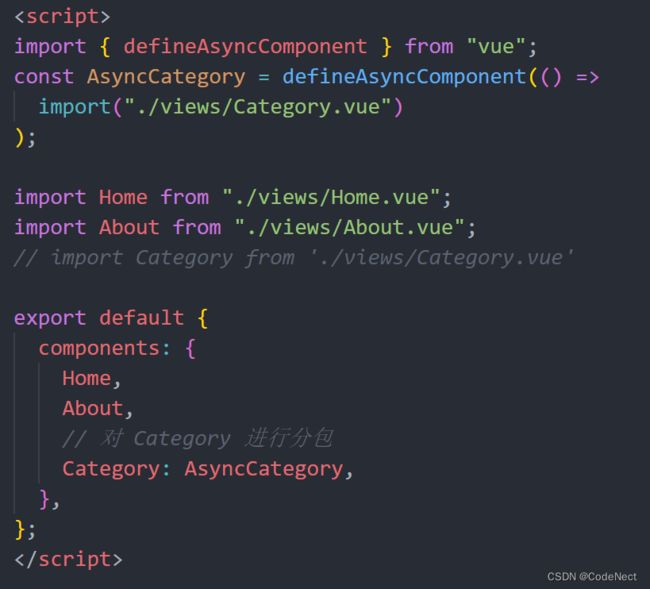
- 所以,对于一些不需要立即使用的组件,我们可以单独对它们进行拆分,拆分成一些小的代码块chunk.js
- 这些chunk.js会在需要时从服务器加载下来,并且运行代码,显示对应的内容
5.2 Vue 中实现异步组件
提供了一个函数:defineAsyncComponent
6. 组件的 v-model
vue也支持在组件上使用v-model
为了我们的MyInput组件可以正常的工作,这个组件内的必须:
- 将其 value attribute 绑定到一个名叫 modelValue 的 prop 上
- 在其 input 事件被触发时,将新的值通过自定义的 update:modelValue 事件抛出
6.1 绑定多个自定义名称属性
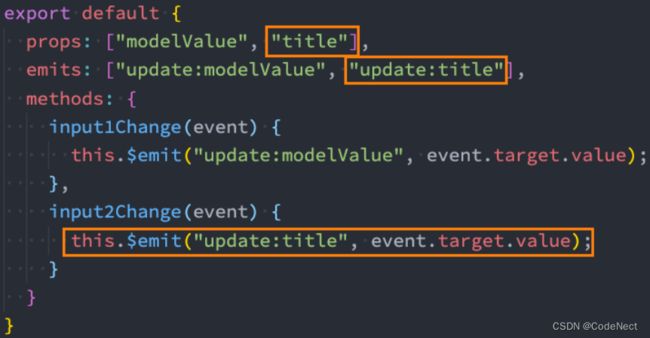
- 默认情况下的v-model其实是绑定了 modelValue 属性和 @update:modelValue的事件
- 如果我们希望绑定更多,可以给v-model传入一个参数,那么这个参数的名称就是我们绑定属性的名称;
// App.vue
![]()
7. 混入 Mixin
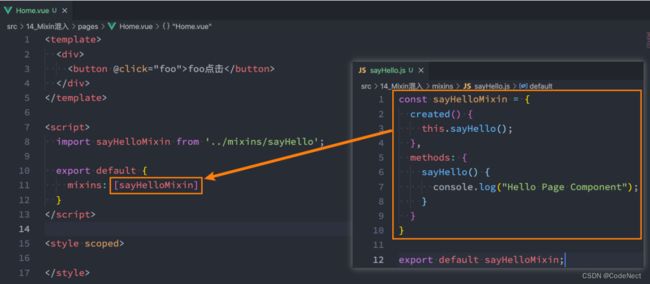
组件和组件之间有时候会存在相同的代码逻辑,我们希望对相同的代码逻辑进行抽取
7.1 Mixin 的基本使用
如果Mixin对象中的选项和组件对象中的选项发生了冲突,合并规则:(以组件对象为优先)
- 情况一:如果是data函数的返回值对象
- 返回值对象默认情况下会进行合并
- 如果data返回值对象的属性发生了冲突,那么会保留组件自身的数据
- 情况二:生命周期钩子函数
- 生命周期的钩子函数会被合并到数组中,都会被调用
- 情况三:值为对象的选项,例如 methods、components 和 directives,将被合并为同一个对象。
- 比如都有methods选项,并且都定义了方法,那么它们都会生效
- 但是如果对象的key相同,那么会取组件对象的键值对
7.2 全局混入 Mixin
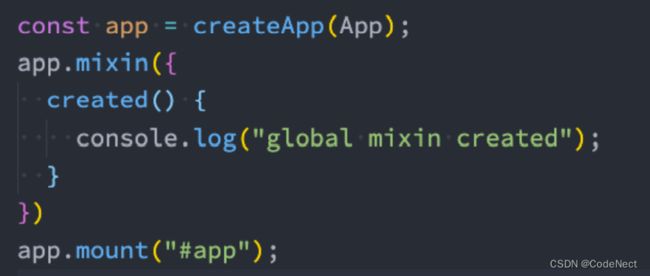
如果组件中的某些选项,是所有的组件都需要拥有的,那么这个时候我们可以使用全局的mixin:
- 全局的Mixin可以使用 应用app的方法 mixin 来完成注册
- 一旦注册,那么全局混入的选项将会影响每一个组件
