SpringCloud Stream集成rabbitMQ(延时队列)
上节咱们讲了SpringCloud Stream集成rabbitMQ,本章节咱们将实现延时队列功能。在实际开发中我们有些场景用延时队列实现非常方便。下面列举延时队列适合使用的场景:
- 用户下单30分钟后未付款自动关闭订单
- 用户下单外卖以后,距离超时时间还有 10 分钟时提醒外卖小哥即将超时
- 邮箱编辑好邮件定时发送等等
上节已经讲过SpringCloud Stream集成rabbitMQ步骤,下面就不在重复赘述了,不明白的同学可以去看上节的内容。
1.主要的变化是配置文件
spring:
  application:
    name: rabbitmq-dome
  cloud:
    function:
      definition: source;sink; #函数名称,对应服务中的注入的Bean
    stream:
      binders: #需要绑定的rabbitmq的服务信息
        default-binder: #定义的名称,用于bidding整合
          type: rabbit #消息组件类型
          environment: #配置rabbimq连接环境
            spring:
              rabbitmq:
                addresses: 10.0.1.141:5672 #服务器的地址和端口
                username: xt3dev #用户名
                password: 4V9prcFbRoYxLCMd #密码
      bindings:
        source-out-0: #自定义消息通道的名称
          destination: QUEUE_DOME #exchange名称,交换模式默认是topic,创建时同时会创建QUEUE_DOME.${spring.application.name}队列
          content-type: application/json #设置消息的类型为json
          group: ${spring.application.name} #分组
          binder: default-binder #绑定的binder名称
        sink-in-0:
          destination: QUEUE_DOME
          content-type: application/json
          group: ${spring.application.name}
          binder: default-binder
      rabbit:
        bindings:
          source-out-0:
            producer:
              ttl: 5000 #延时队列的延时时间,单位毫秒
              auto-bind-dlq: true #为true是开启死信队列
              dead-letter-exchange: QUEUE_DOME_IN #死信队列的交换机
              dead-letter-queueName: QUEUE_DOME_IN.${spring.application.name} #死信队列名称
2.启动项目测试
浏览器访问http://localhost:8080/sendMessage?message=hello rabbitMQ,从控制台我看可以看出生产者发送消息到消费者接收到消息是有5秒钟的延时,我们配置文件配置的也是5000毫秒,说明延时队列功能是可以的。
3.延时队列原理分析
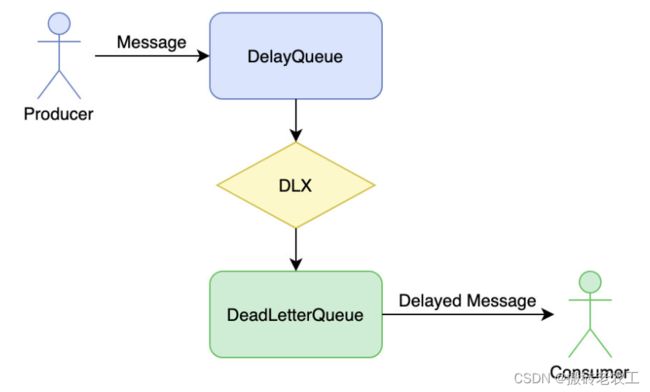
RabbitMQ本身没有直接支持延迟队列功能,两种方式可以实现延迟队列,一种是利用对的TTL特性来实现,另外一种是使用RabbitMQ延迟插件来实现。本文主要讲述的是TTL的方式来实现的
RabbitMQ可以针对Queue和Message设置 x-message-tt,来控制消息的生存时间,如果超时,则消息变为dead letter
RabbitMQ针对队列中的消息过期时间有两种方法可以设置。
- A: 通过队列属性设置,队列中所有消息都有相同的过期时间。
- B: 对消息进行单独设置,每条消息TTL可以不同。
如果同时使用,则消息的过期时间以两者之间TTL较小的那个数值为准。消息在队列的生存时间一旦超过设置的TTL值,就成为dead letter
延迟队列原理分析图
4.设置单条消息过期时间
使用spring cloud stream的方式是没办法设置单条消息过期时间的,只能利用RabbitTemplate来设置单条消息过期时间。
4.1 创建RabbitConfig类
@Configuration
@RequiredArgsConstructor
public class RabbitConfig {

  private final BinderFactory binderFactory;

  private final static String binderName = "default-binder";

  @Bean
  public RabbitTemplate rabbitTemplate(ConnectionFactory connectionFactory) throws NoSuchFieldException, IllegalAccessException {

    // 获取目标binder
    Binder binder =
            binderFactory.getBinder(binderName, BinderConfiguration.class);
    Assert.notNull(binder, binderName + " is null");

    // 获取binder的connectionFactory
    Field field = binder.getClass().getDeclaredField("connectionFactory");
    field.setAccessible(true);
    connectionFactory = (ConnectionFactory) field.get(binder);

    // new
    return new RabbitTemplate(connectionFactory);
  }
}
4.2 改造生产者实现类
@Slf4j
@Service
@RequiredArgsConstructor
public class ProducerServiceImpl implements ProducerService {

    private final RabbitTemplate rabbitTemplate;

    private final Sinks.Many> sinks =
            Sinks.many().multicast().onBackpressureBuffer();

    @Bean
    public Supplier>> source(){
        return sinks::asFlux;
    }

    @Override
    public void sendMessage(String message, String expiration) {
        log.info("发送时间:{}, 生产者发送消息:{}", new Date(), message);
        rabbitTemplate.convertAndSend("QUEUE_DOME_OUT", "#", message, msg -> {
            MessageProperties messageProperties = msg.getMessageProperties();
            // 设置过期时间,单位:毫秒
            messageProperties.setExpiration(expiration);
            return msg;
        });
    }
}
4.3 改造MessageController类
@RestController
@RequiredArgsConstructor
public class MessageController {

    private final ProducerService producerService;

    @GetMapping("/sendMessage")
    public void sendMessage(@RequestParam(value = "message", defaultValue = "hello world") String message,
                            @RequestParam(value = "expiration", defaultValue = "5000") String expiration) {
        producerService.sendMessage(message, expiration);
    }
}
4.4 启动项目测试
浏览器访问http://localhost:8080/sendMessage?message=hello%20rabbitMQ&expiration=3000,设置消息过期时间为3秒
结果:
浏览器访问http://localhost:8080/sendMessage?message=hello%20rabbitMQ&expiration=3000,设置消息过期时间为5秒
结果:


