数据库CDC中间件学习之Maxwell
文章目录
- 介绍
-
- 工作原理
- Maxwell与Canal的对比
- 安装及配置
-
- 前提条件
- 在MySQL中打开binlog
- 创建maxwell数据库
- 操作
-
- Maxwell命令行测试
-
- 插入数据
- 更新数据
- 删除数据
- Maxwell连接Kafka
-
- 普通测试
- topic分区
- 数据过滤
- 数据表的全量输出
介绍
Maxwell是Zendesk开源的用java编写的MySQL实时抓取(CDC,Change Data Capture,变更数据读取)软件,通过实时读取MySQL的二进制日志Binlog生成json信息,再作为生产者将信息发给Kafka、控制台、redis等消费者,官网地址:http://maxwells-daemon.io/
工作原理
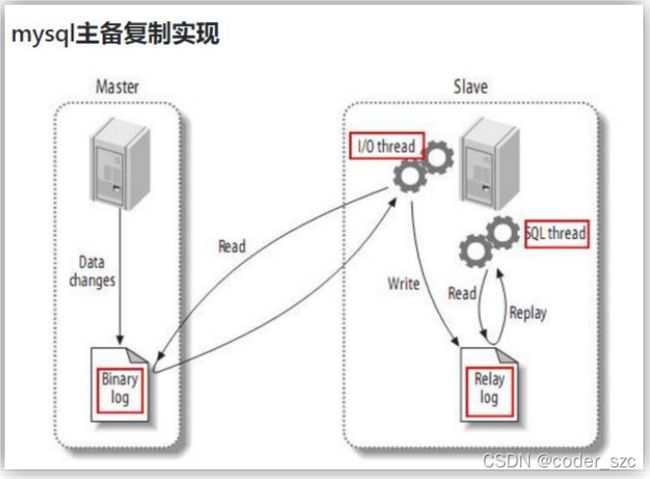
首先需要了解MySQL的主从复制过程:
- Master主库将数据变更记录写入二进制日志binlog中;
- Slave从库向主库发送dump协议,将主库的二进制日志事件复制到从库的中继日志relayLog中;
- 从库读取并重做中继日志中的事件,将改变的数据同步到自己的数据库中
整个过程如下图所示

因此,Maxwell的工作原理就是把自己伪装成一个MySQL从库,以从库的身份从主库MySQL中复制数据。
Maxwell与Canal的对比
| Canal | Maxwell | |
|---|---|---|
| 实现语言 | java | java |
| 数据格式 | 格式自由 | json |
| 采集数据方法 | 增量 | 增量/全量 |
| 数据落地 | 定制 | kafka等多种平台 |
| HA | 支持 | 支持 |
安装及配置
前提条件
安装好MySQL和Kafka,然后解压maxwell安装包:
[root@scentos szc]# tar -zxvf maxwell-1.29.2.tar.gz
[root@scentos szc]# cd maxwell-1.29.2/
在MySQL中打开binlog
打开MySQL配置文件my.ini,开启binlog,且格式为row:
server-id=1
log-bin=mysql-bin
binlog-format=Row
而后重启MySQL即可。
创建maxwell数据库
然后在MySQL中创建maxwell数据库,用以存储Maxwell元数据,并分配一个用户(没有会自动创建)可操作该数据,并且可以监控其他数据库的变更:
mysql> create database maxwell;
Query OK, 1 row affected (0.00 sec)

mysql> grant all on maxwell.* to 'maxwell'@'%' identified by 'maxwell';
Query OK, 0 rows affected, 1 warning (0.01 sec)

mysql> grant select, replication slave, replication client on *.* to 'maxwell'@'%';
Query OK, 0 rows affected (0.00 sec)

mysql> flush privileges;
Query OK, 0 rows affected (0.01 sec)
操作
Maxwell命令行测试
先启动Maxwell,让其输出到命令行:
[root@scentos maxwell-1.29.2]# bin/maxwell --user='maxwell' --password='maxwell' --host='192.168.31.60' --producer=stdout
参数很简单:user和password分别指明连接MySQL的用户名和密码,host指定MySQL所在的主机IP或主机名,producer指定向哪里发送数据。
插入数据
在MySQL中非maxwell的其他数据库中,测试插入一条数据:
mysql> insert into users(username, password, email) values('aaa', 'bbb', 'ccc');
Query OK, 1 row affected (0.01 sec)
Maxwell的输出如下:
{"database":"test","table":"users","type":"insert","ts":1639476575,"xid":113362,"commit":true,"data":{"id":4,"username":"aaa","password":"bbb","email":"ccc"}}
在MySQL中插入三条数据:
mysql> insert into users(username, password, email) values('aaa0', 'bbb0', 'ccc0'), ('aaa1', 'bbb1', 'ccc1'), ('aaa2', 'bbb2', 'ccc2');
Query OK, 3 rows affected (0.00 sec)
Records: 3  Duplicates: 0  Warnings: 0
Maxwell输出如下:
{"database":"test","table":"users","type":"insert","ts":1639476698,"xid":114256,"xoffset":0,"data":{"id":5,"username":"aaa0","password":"bbb0","email":"ccc0"}}
{"database":"test","table":"users","type":"insert","ts":1639476698,"xid":114256,"xoffset":1,"data":{"id":6,"username":"aaa1","password":"bbb1","email":"ccc1"}}
{"database":"test","table":"users","type":"insert","ts":1639476698,"xid":114256,"commit":true,"data":{"id":7,"username":"aaa2","password":"bbb2","email":"ccc2"}}
说明Maxwell是按照数据行来采集数据的。
更新数据
MySQL中更新一条数据:
mysql> update users set username='qqq' where id = 4;
Query OK, 1 row affected (0.00 sec)
Rows matched: 1  Changed: 1  Warnings: 0
Maxwell中的输出如下:
{"database":"test","table":"users","type":"update","ts":1639476806,"xid":115070,"commit":true,"data":{"id":4,"username":"qqq","password":"bbb","email":"ccc"},"old":{"username":"aaa"}}
删除数据
MySQL中删除一条数据:
mysql> delete from users where id=4;
Query OK, 1 row affected (0.01 sec)
Maxwell中的输出如下:
{"database":"test","table":"users","type":"delete","ts":1639476866,"xid":115490,"commit":true,"data":{"id":4,"username":"qqq","password":"bbb","email":"ccc"}}
Maxwell连接Kafka
普通测试
首先得启动Kafka,然后启动Maxwell,将输出定向到Kafka:
[root@scentos maxwell-1.29.2]# bin/maxwell --user='maxwell' --password='maxwell' --host='192.168.31.60' --producer=kafka --kafka.bootstrap.servers=scentos:9092 --kafka_topic=maxwell
参数很简单,kafka.bootstrap.servers指定kafka集群的URL,–kafka_topic指定生产的数据话题。而后启动kafka的命令行消费者:
[root@scentos kafka_2.11-0.11.0.0]# bin/kafka-console-consumer.sh --bootstrap-server scentos:9092 --topic maxwell
再在MySQL中插入数据进行测试:
mysql> insert into users(username, password, email) values('aaa3', 'bbb3', 'ccc3');
Query OK, 1 row affected (0.00 sec)
可以看到kafka控制台也输出了数据:

说明数据成功传入kafka。
topic分区
首先,重命名Maxwell的配置文件config.properties.example为config.properties,然后修改:
[root@scentos maxwell-1.29.2]# mv config.properties.example config.properties
[root@scentos maxwell-1.29.2]# vim config.properties
修改内容如下:
# tl;dr config
log_level=info

producer=kafka # 生产者为kafka
kafka.bootstrap.servers=scentos:9092 # kafka服务器IP或域名:端口

# mysql login info
host=192.168.31.60 # MySQL主机IP或域名
user=maxwell # MySQL用户名
password=maxwell # MySQL密码

.....

kafka_topic=maxwell_parter # 指定kafka话题

.....

#           *** partitioning ***

# What part of the data do we partition by?
producer_partition_by=database # 通过数据库名分区
# [database, table, primary_key, transaction_id, thread_id, column]
.....
再创建maxwell_part话题,其中分区数要>=MySQL中的数据库数:
[root@scentos kafka_2.11-0.11.0.0]# bin/kafka-topics.sh --zookeeper scentos:2181 --create --replication-factor 1 --partitions 15 --topic maxwell_part
WARNING: Due to limitations in metric names, topics with a period ('.') or underscore ('_') could collide. To avoid issues it is best to use either, but not both.
Created topic "maxwell_part".
而后利用配置文件启动Maxwell:
[root@scentos maxwell-1.29.2]# bin/maxwell --config ./config.properties
向MySQL的两个数据库中插入数据:
mysql> insert into users(username, password, email) values('aaa7', 'bbb8', 'ccc8');
Query OK, 1 row affected (0.00 sec)

mysql> insert into testck.t_user (id, code) values(8, 8);
Query OK, 1 row affected (0.00 sec)
通过kafka-tools工具,可以看到两次数据变更信息被写入到了不同的分区中:

数据过滤
比如只监控数据库test中的users表:
[root@scentos maxwell-1.29.2]# bin/maxwell --user='maxwell' --password='maxwell' --host='192.168.31.60' --producer=stdout --filter='exclude: *.*, include:test.users'
我们再向test.users和testck.t_user中写入数据:
mysql> insert into users(username, password, email) values('aaa7', 'bbb8', 'ccc9');
Query OK, 1 row affected (0.00 sec)

mysql> insert into testck.t_user (id, code) values(9, 9);
Query OK, 1 row affected (0.00 sec)
数据表的全量输出
Maxwell默认只能监控MySQL的binlog以实现数据变更的监控,不过我们可以通过修改maxwell数据库中的元数据来将某张数据表全量导入Maxwell,即数据表的全量同步。
只需要把数据库中某张表的数据库名和表名写入maxwell数据库中的bootstrap表中即可:
mysql> insert into maxwell.bootstrap(database_name, table_name) values('test', 'books');
Query OK, 1 row affected (0.00 sec)
而后启动Maxwell进程,就会看到test.books表数据全部输出了:
![]()
